40 C
Dubai
Friday, May 2, 2025
Home Blog Page 97

How to Complete a Pending SSL Certificate request in Exchange Server 2013

See

How to Create an SSL Certificate Request for Exchange Server 2013

Now lets see how to Complete the Pending SSL Certificate in Exchange Server 2013

Step 1:

Login to Exchange Administration Center (EAC) in Exchange 2013

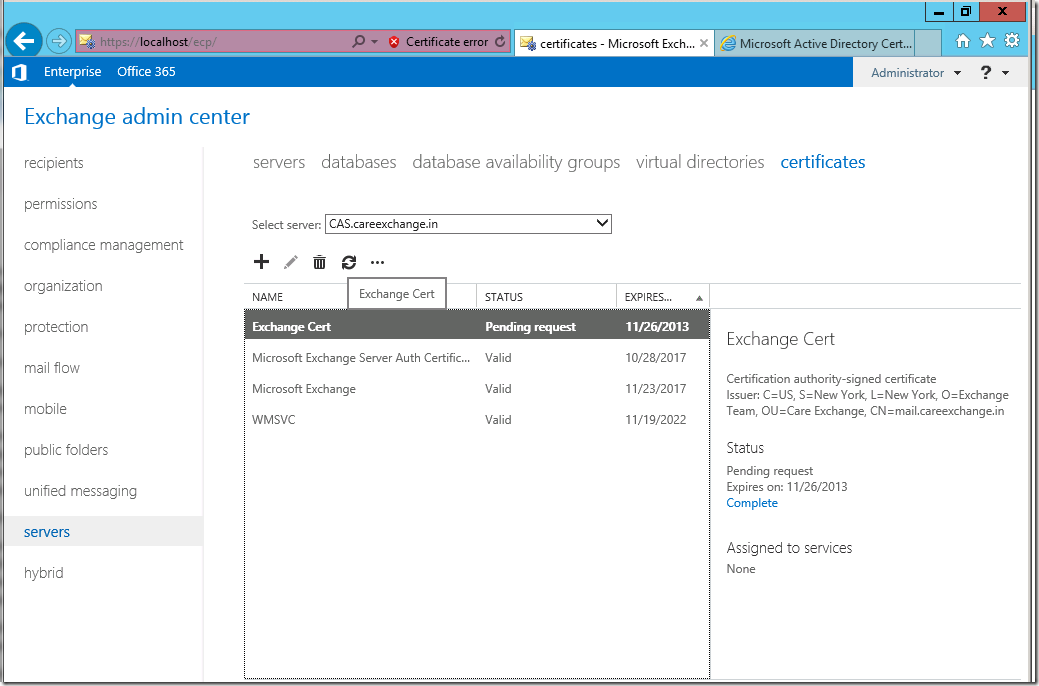
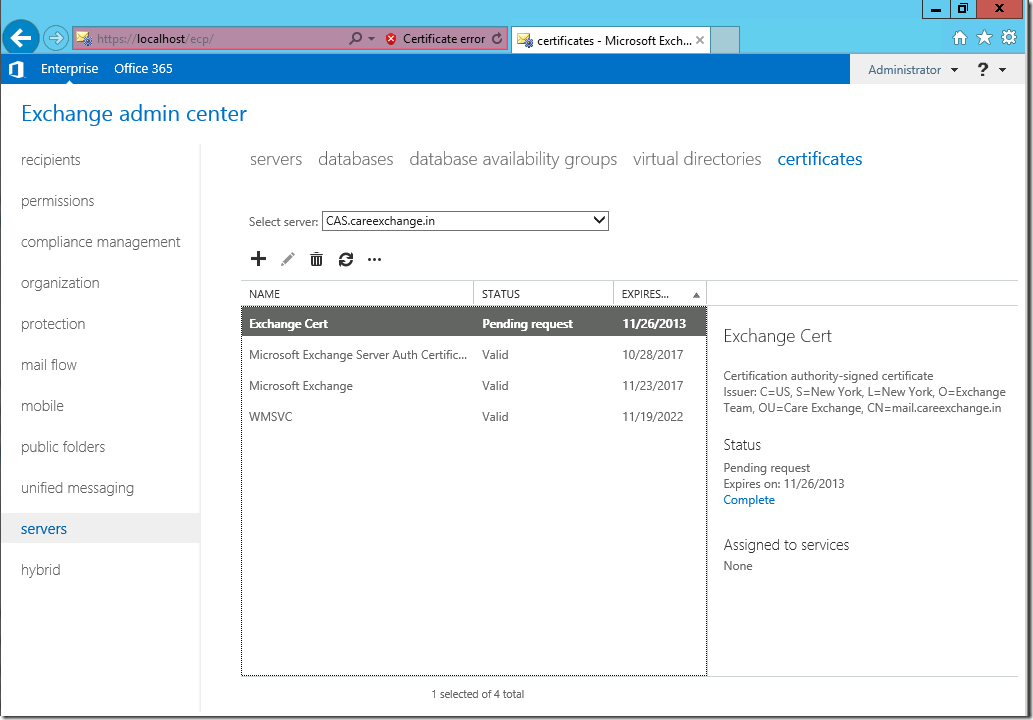
Servers – Certificates – Click on the  Cert Which has the Status “Pending Request”

Now go to your EAC – Servers – Certificates- Choose the Pending Request – Choose Complete

image

Step 2:

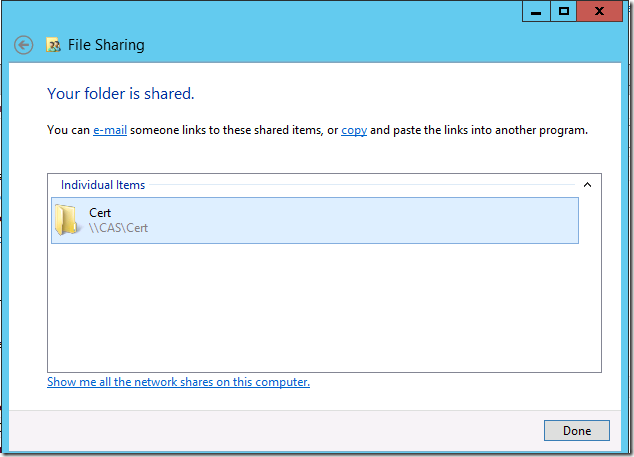
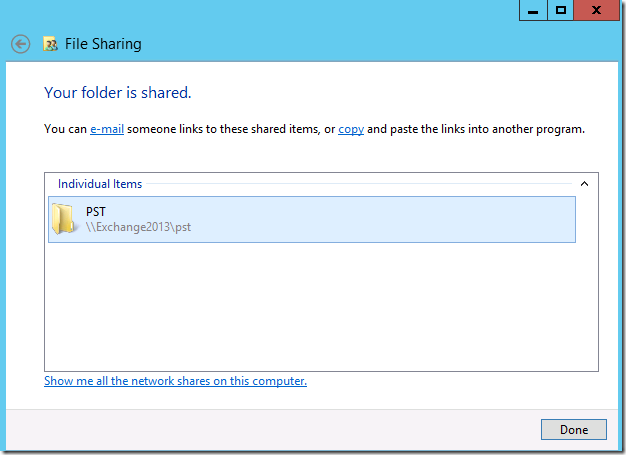
Create a Simple Share to Save the Cert

image

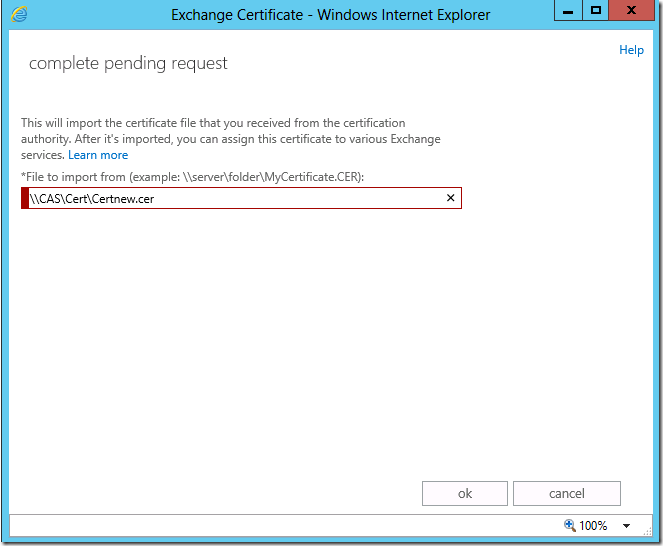
Now Enter the Share Name with Cert file name as below

image

Step 3:

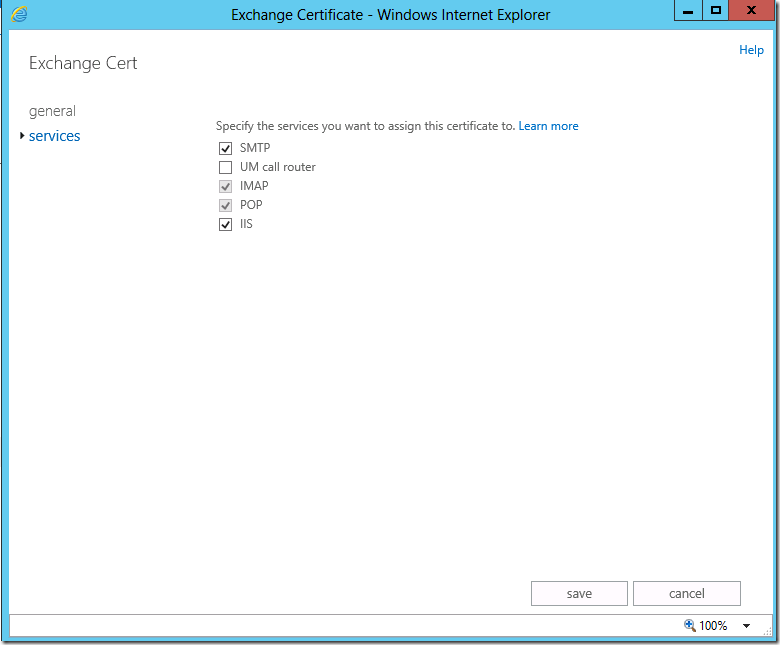
Now Assign Services to the Certificate

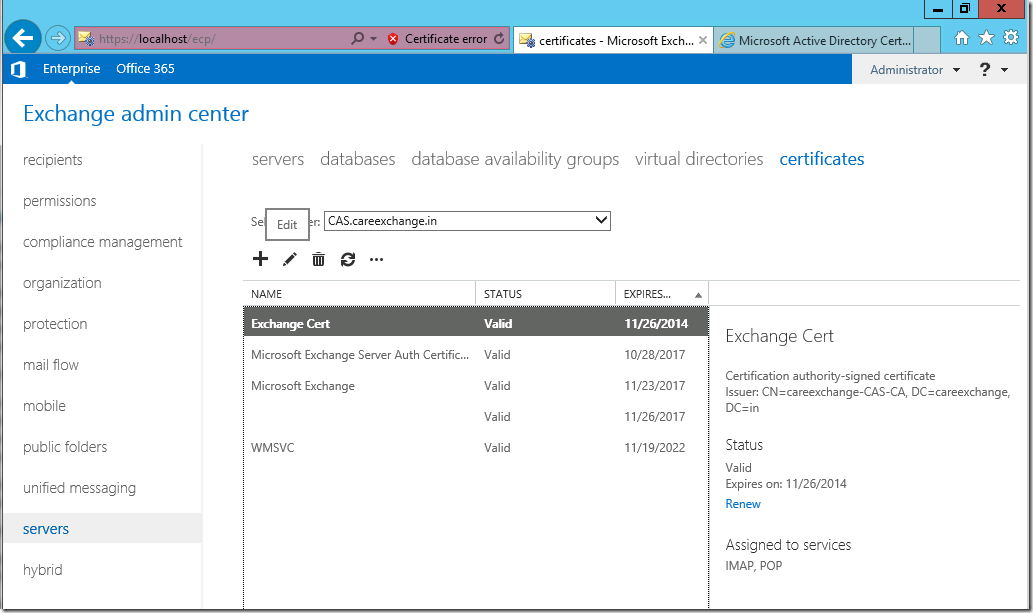
Choose Cert and Click on Edit

image

image

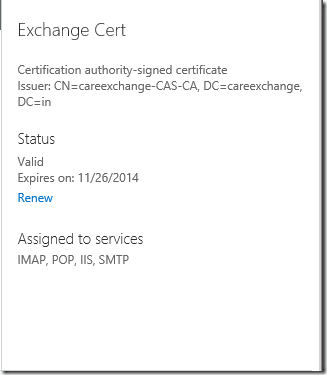
Now the Server Part is ready

image

How to Create an SSL Certificate Request for Exchange Server 2013

First we will learn how to Export a Certificate request file from Exchange 2013/Exchange 2016,

Step 1:

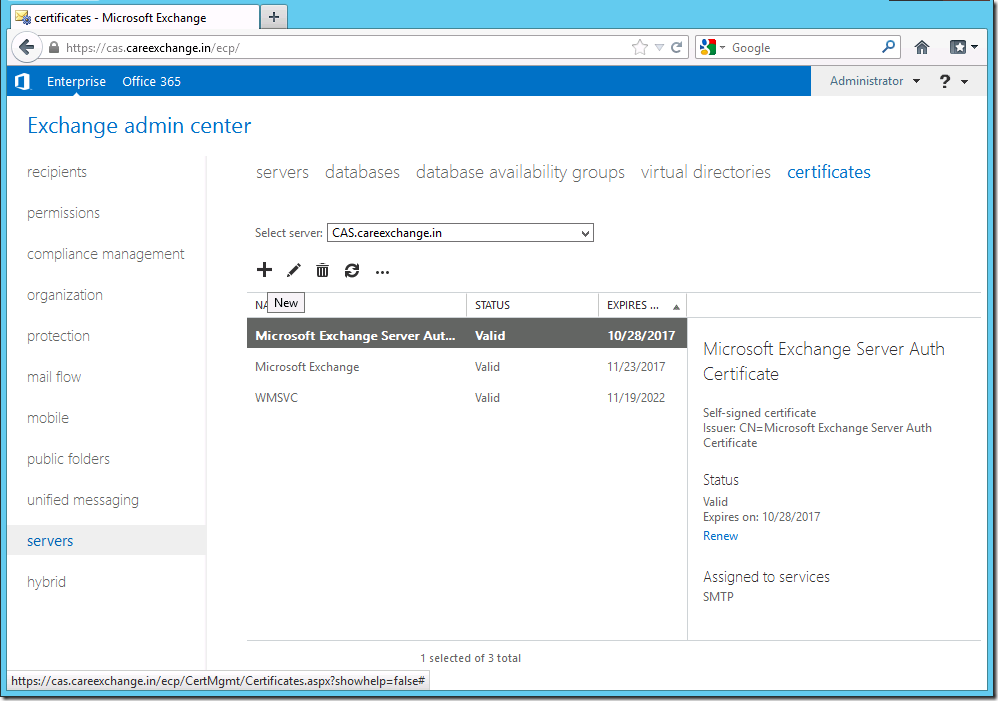
Login to Exchange Administration Center (EAC) in Exchange 2013

Servers – Certificates – Click on the “+” Sign – New

image

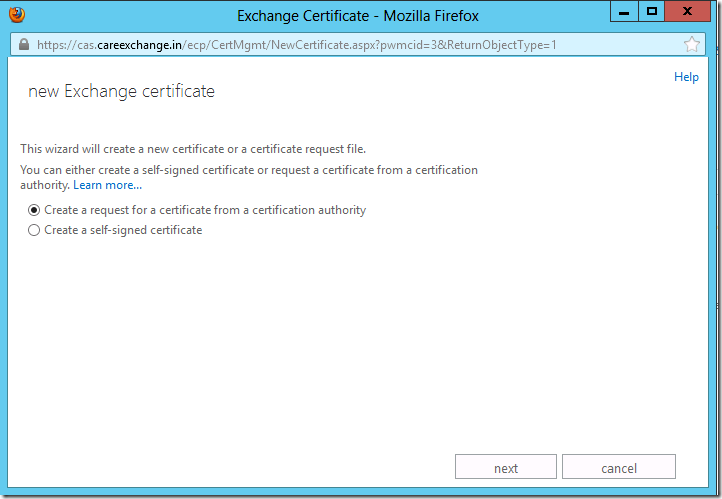
Choose

  • Create a request for a Certificate from the Certification authority

Next

image

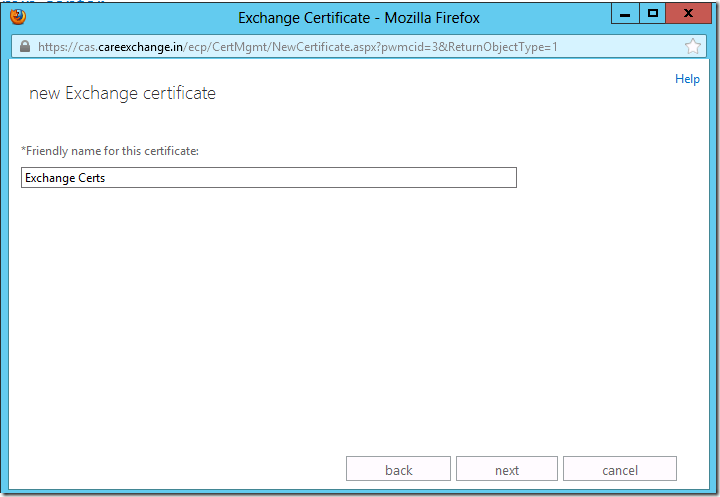
Type a Friendly Name :

image

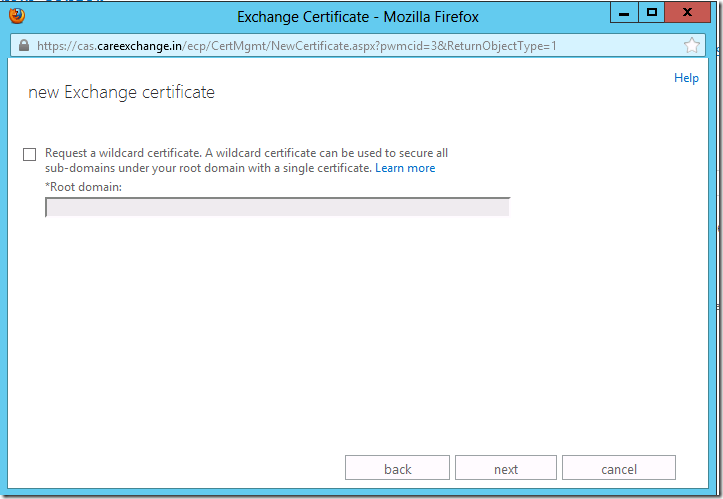
Leave it unchecked

Wild Card is used if you are going to manage more URLs .For Example : *.Domain.com

image

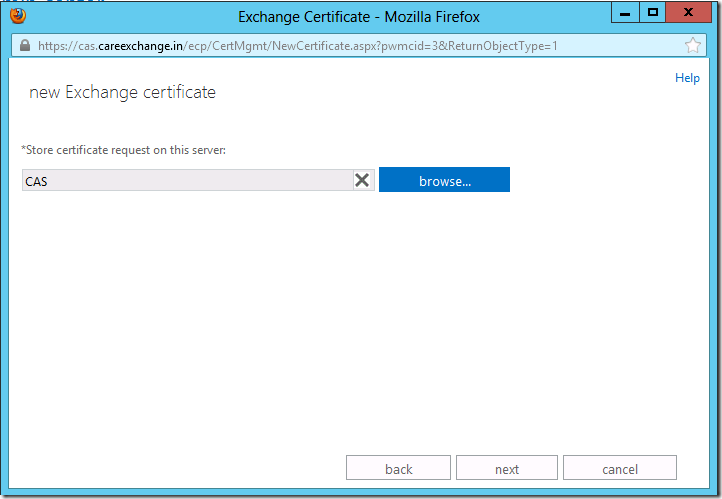
Choose the Server to have the Cert Request

image

Step 2:

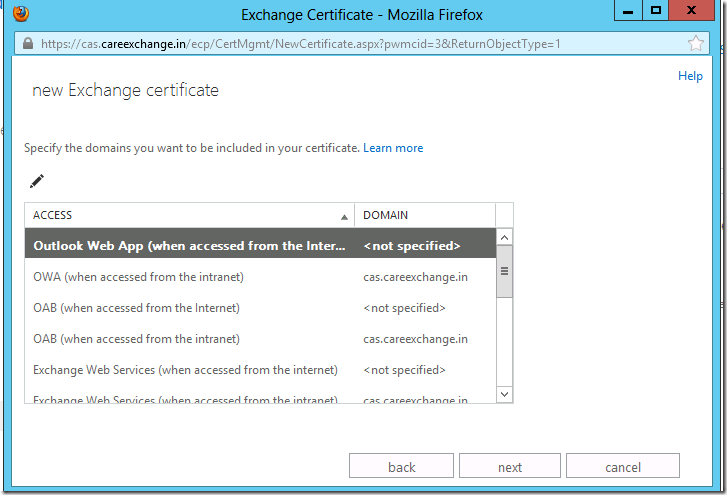
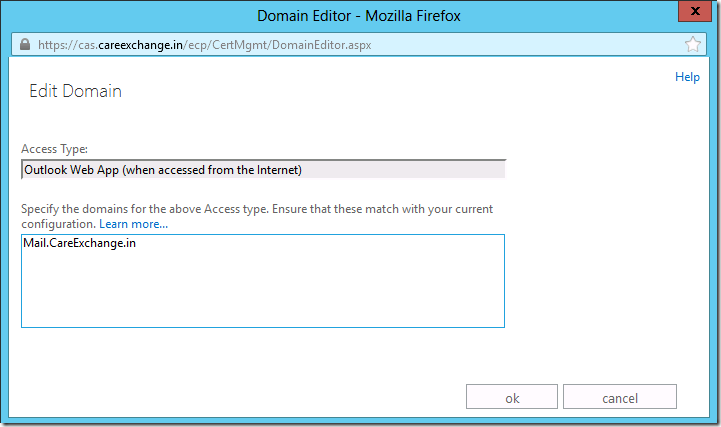
Enter the Required URL’s for your Exchange ,

image

For Example Am entering only for Outlook Web App (When accessed from the internet)

image

Step 3:

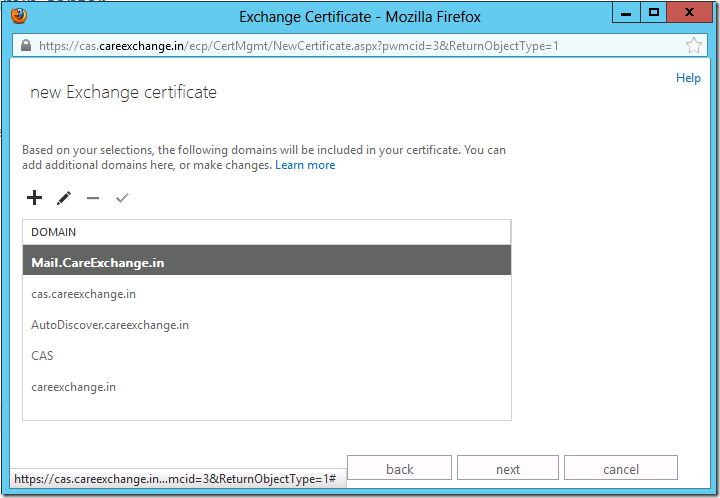
You will see the collection for URL’s

Traditionally –

Exchange requires only two Entries in the Cert, if you have other entries in the cert for some other purposes it doesn’t affect anything .

Mail.CareExchange.in

Autodiscover.CareExchange.in

Other entries can be removed. Servernames which has .local is not being allowed on a 3rd party Cert.

image

Step 4:

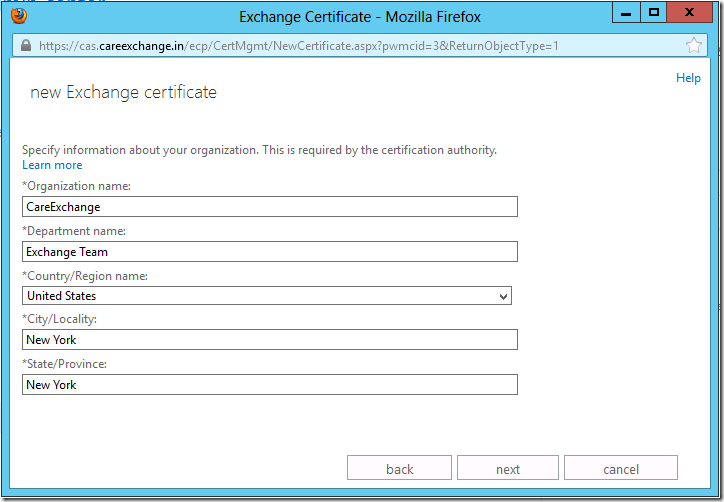
Fill out the Form

image

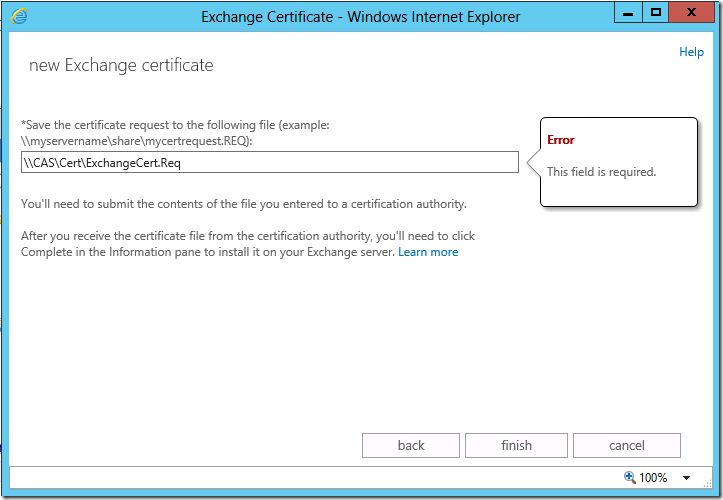
Create a Simple Share to Save the Cert Request

image

Save the Cert Request to a Shared Location as below

image

Now you could see the Pending Cert Request

image

Step 5:
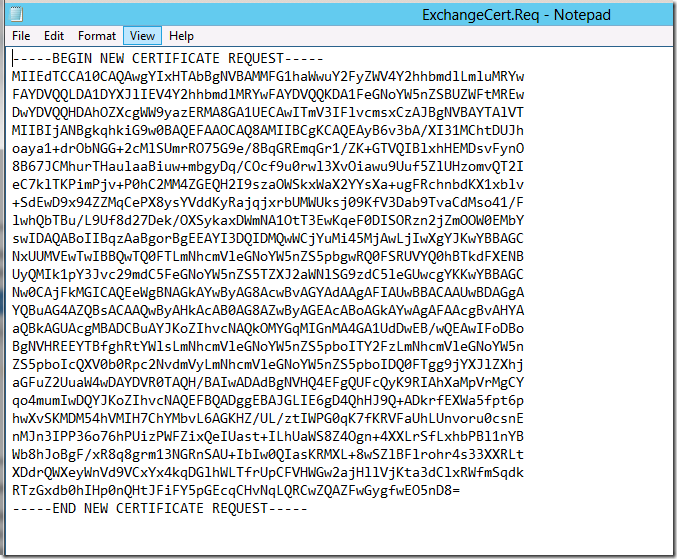
Your request file would look like this

image

Open it via Notepad , because we need this content to generate a Certificate

image

I would recommend to use a 3rd party  commercial certificate where you need to purchase it from DigiCert

or

If you are planning to use internal Windows CA which is for free but you got to install the Cert on every client as its not trusted globally

How to use a internal Windows CA (Certificate Authority) in Windows 2012 with Exchange 2013

How to use a internal Windows CA (Certificate Authority) in Windows 2012 with Exchange 2013

Using a internal windows CA certificate with Exchange 2010

Using a Self Sign Certificate can Manage Owa alone, But Issuing a Internal Windows CA Certificate can serve all type of Clients
So will learn how to do it on Windows Server 2012.

We can use a internal windows CA certificate with Exchange 2013 to avoid Cert Errors
Something which you need to know is , Using a Internal Windows CA Certificate you need to install the certificates on every machine you use and Mobile devices other wise you will end up in a certificate error.
So that’s why people prefer going for a 3rd party certificate to overcome it.
In this article We Will Learn issuing a Internal Windows CA Certificate ,

You need to have two A records , Mail.domain.com and Autodisover.domain.com

and you will place the cert which we generate into the machines your configuring outlook. or any device, So that you can over come outlook errors

First we will learn how to Export a Certificate request file from Exchange 2013,

Step 1:

Login to Exchange Administration Center (EAC) in Exchange 2013

Servers – Certificates – Click on the “+” Sign – New

image

Choose

“Create a request for a Certificate from the Certification authority”

Next

image

Type a Friendly Name :

image

Wild Card is used if you are going to manage more URLs .For Example : *.Domain.com

image

Choose the Server to have the Cert Request

image

Step 2:

Enter the Required URL’s for your Exchange ,

image

For Example Am entering only for Outlook Web App (When accessed from the internet)

image

Step 3:

You will see the collection for URL’s

image

Step 4:

Fill out the Form

image

Create a Simple Share to Save the Cert Request

image

Save the Cert Request to a Shared Location as below

image

Now you could see the Pending Cert Request

image

Step 5:
Your request file would look like this

image

ExchangeCert.req is the request file you created. Now right click on the file , Open with , Use notepad

Opening it via Notepad , It would give a set of Request content, You will use this content in the later part

image

Step 6:
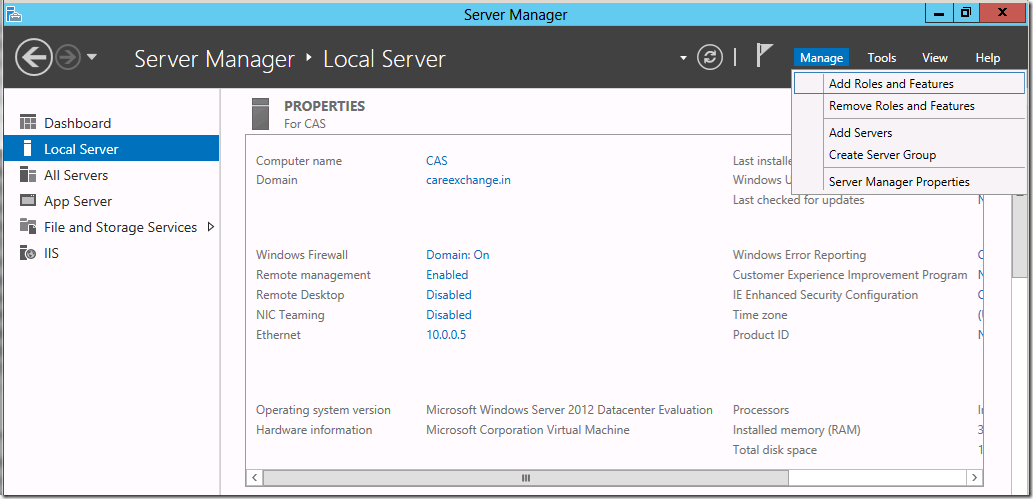
You need to have this role installed to have a  Certificate Authority , It can be DC or Exchange it self
I have done this in the Exchange itself (No Harm)

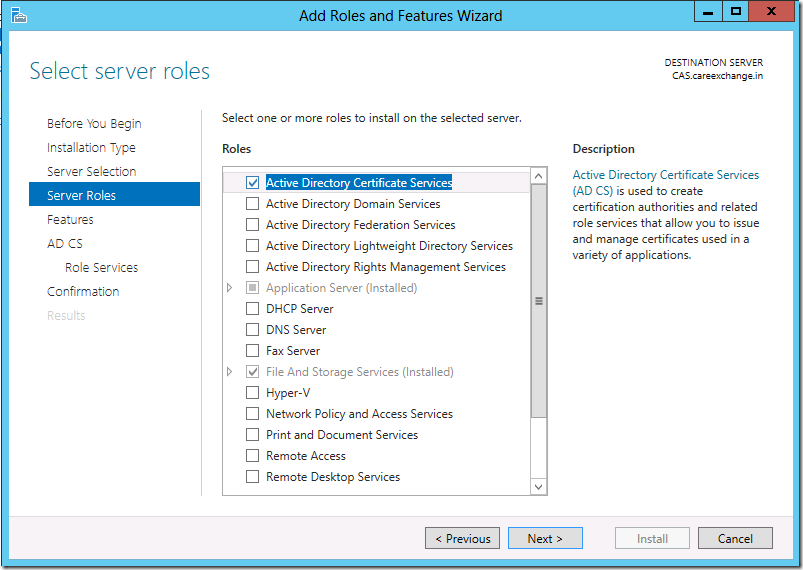
Open Server Manager – Manage – Add Roles and Features

image

Step 7:

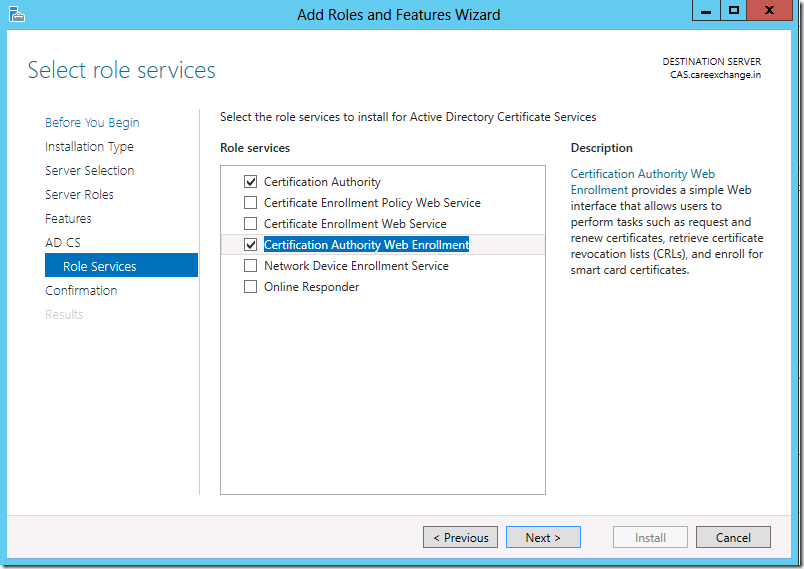
Choose : Active Directory Certificate Services

Choose Next

And Choose : Certification Authority Web Enrollment

image

Choose : Certification Authority Web Enrollment

image

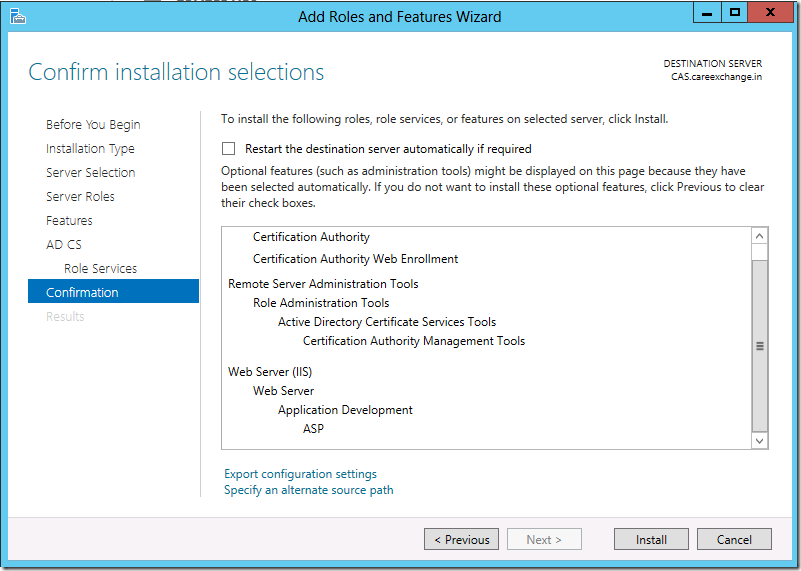
Choose Install

image

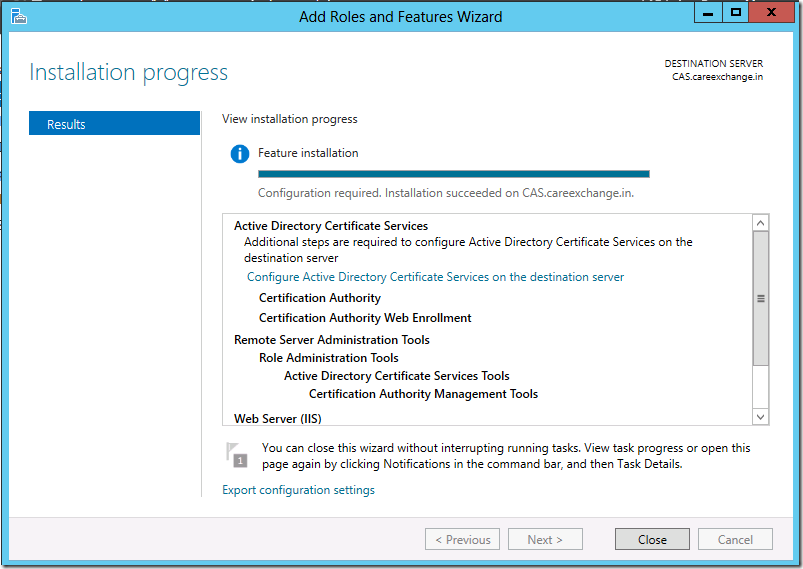
Choose Close

image

Step 8:

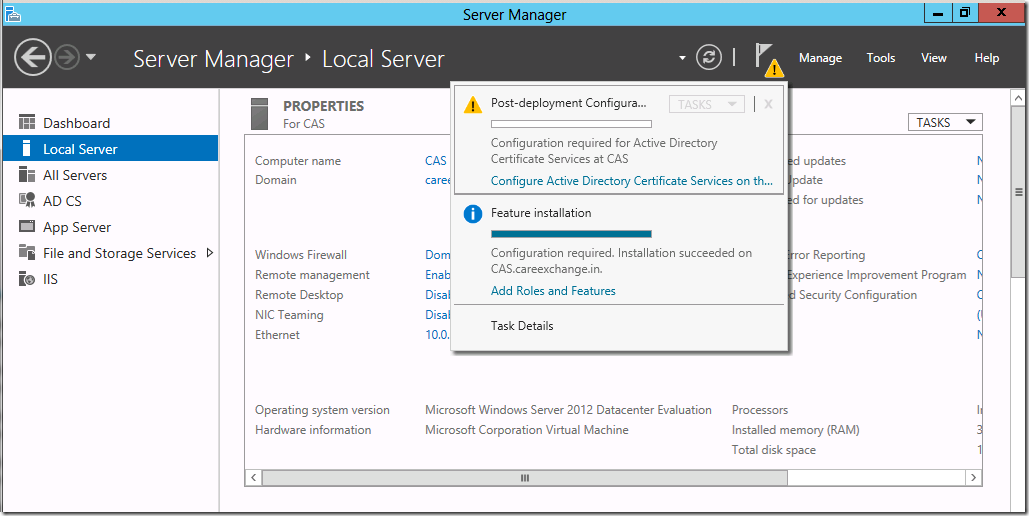
To Configure Active Directory Certificate Services

Choose the Exclamation Mark on the Flag

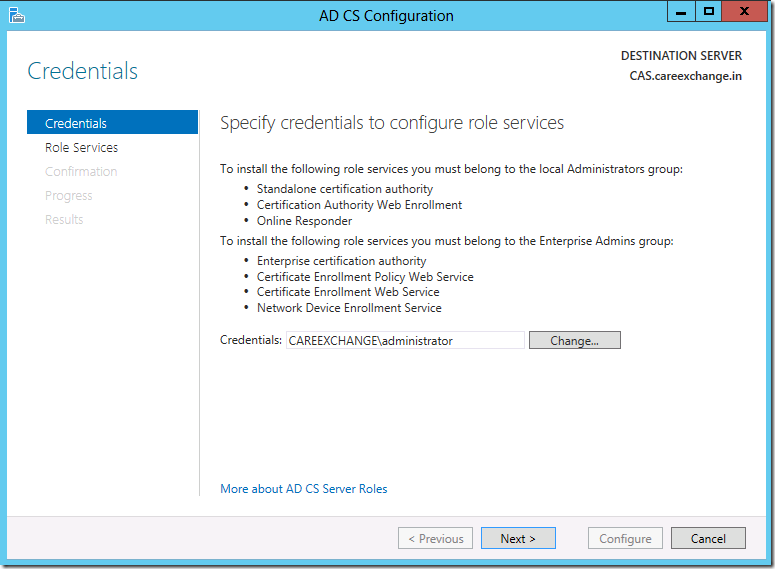
image

Choose Next

image

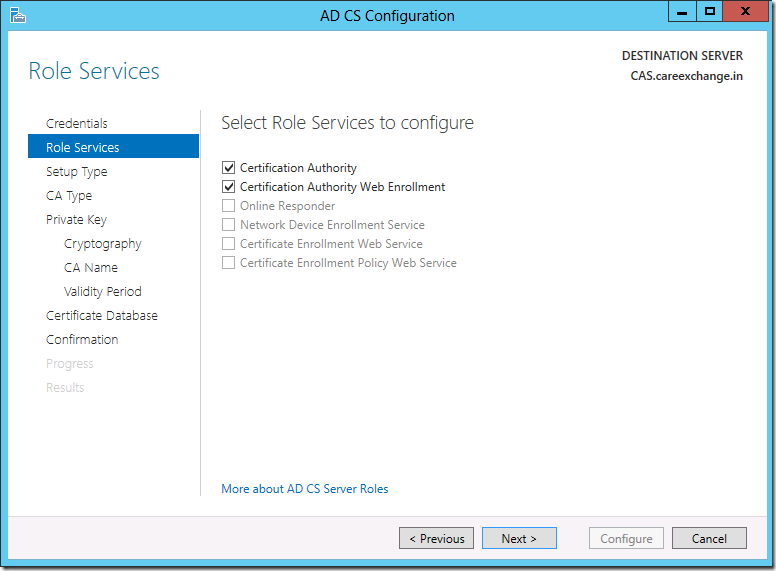
Choose

Certificate Authority

&

Certification Authority Web Enrollment

image
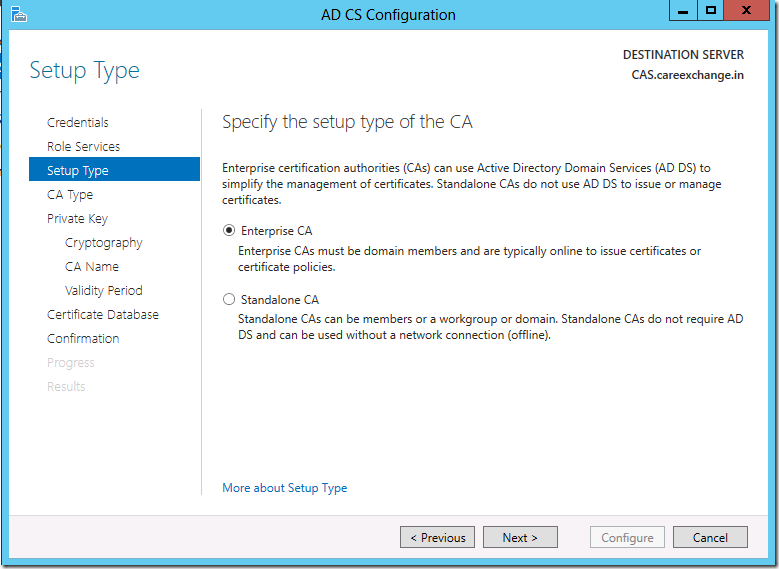
Choose Enterprise

image

Step 9:
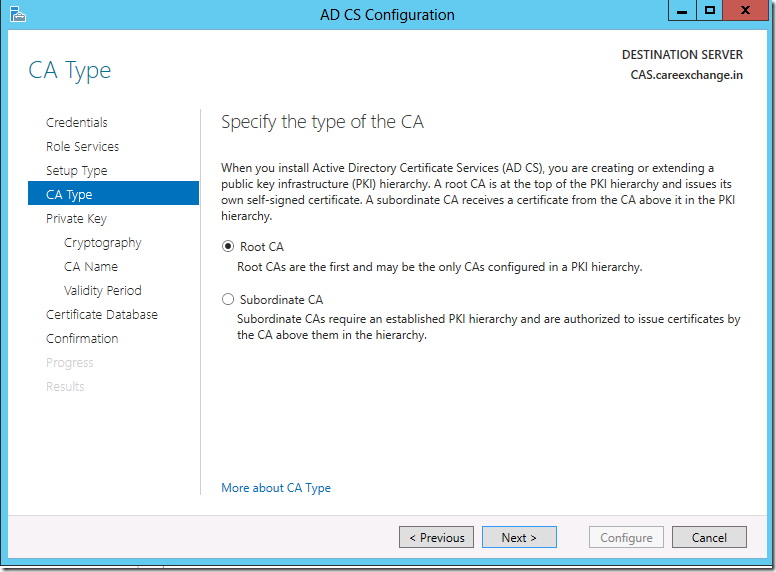
Choose Root CA

image

Step 10:
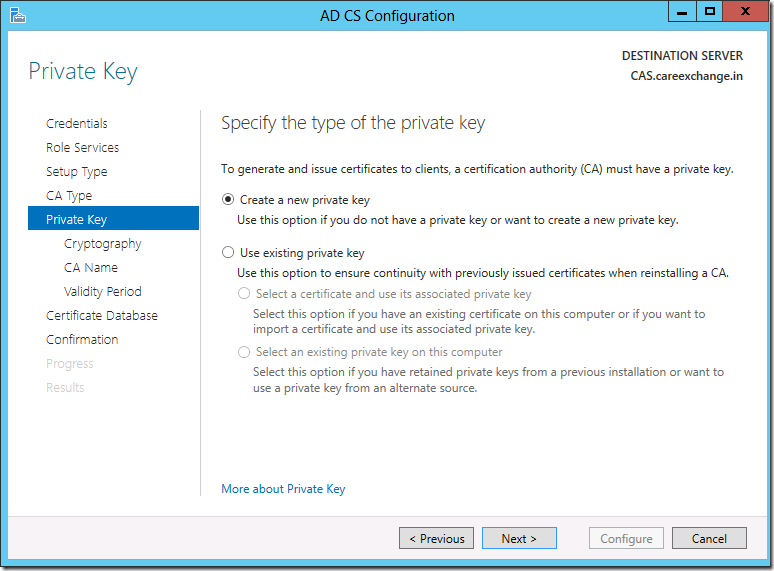
Create a new Private key

image

Step 11:
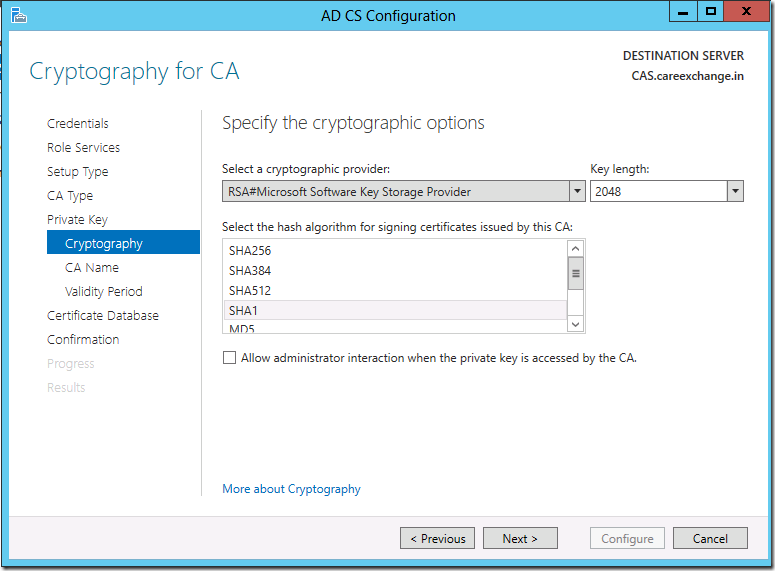
Have this Default with 2048 key Character length

image

Step 12:
Click Next

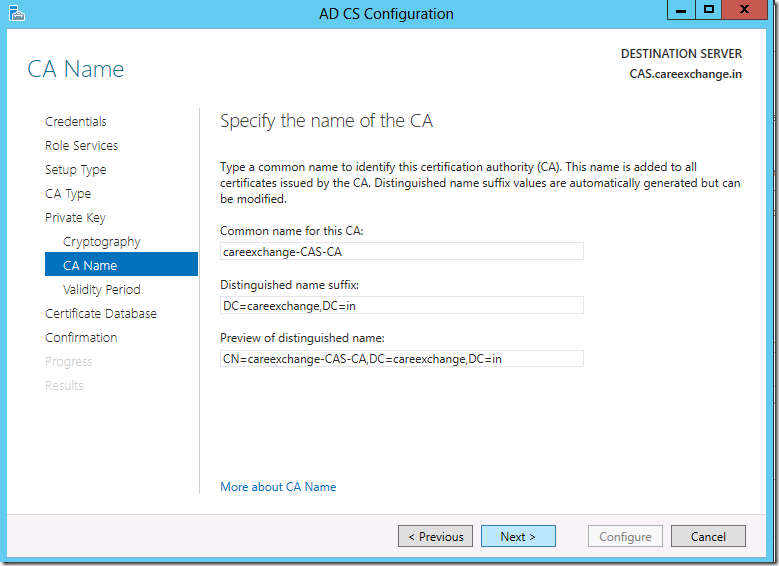
image

Step 13:
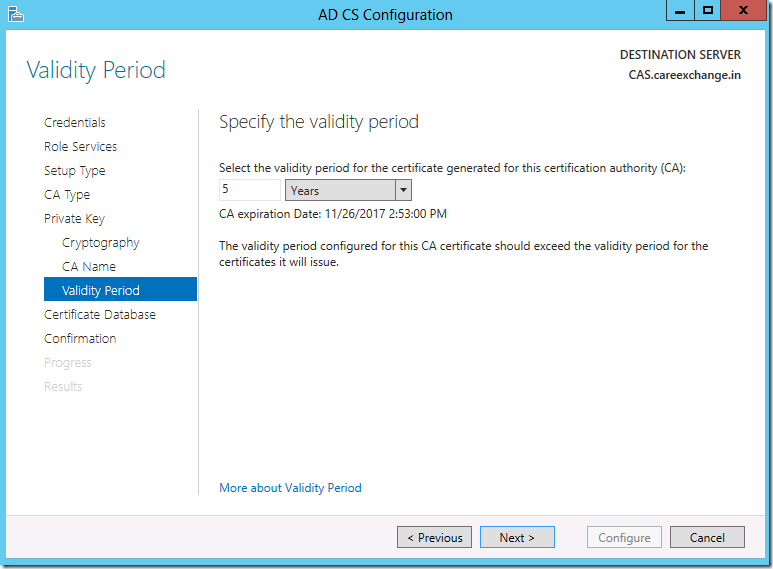
By Default Certificate is valid for 5 years , Don’t make any changes on it , Click next

image

Step 14:

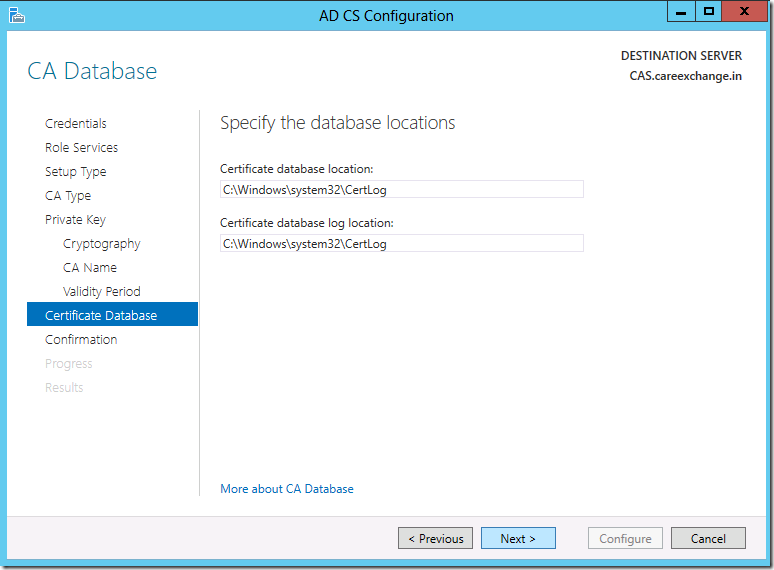
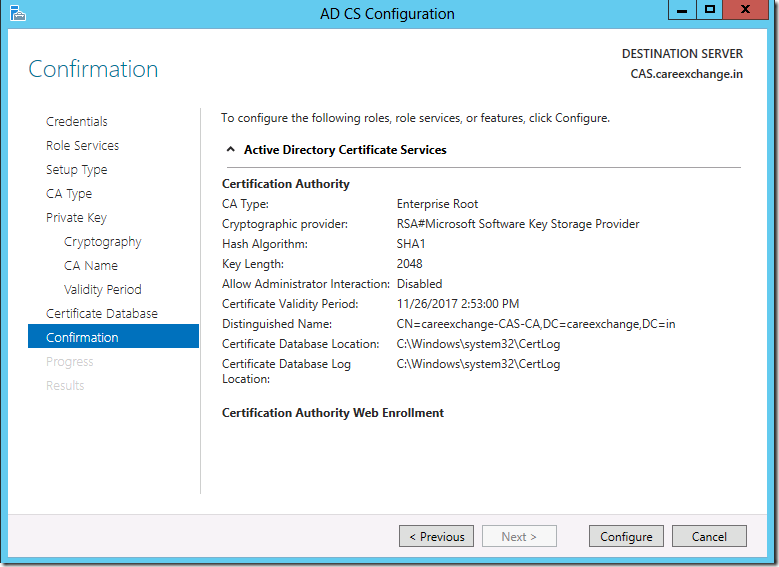
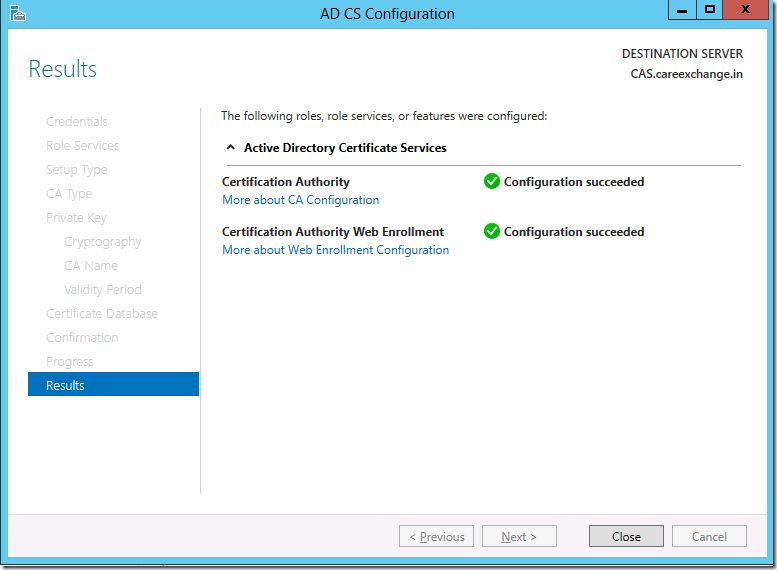
image

image

image

Step 15:
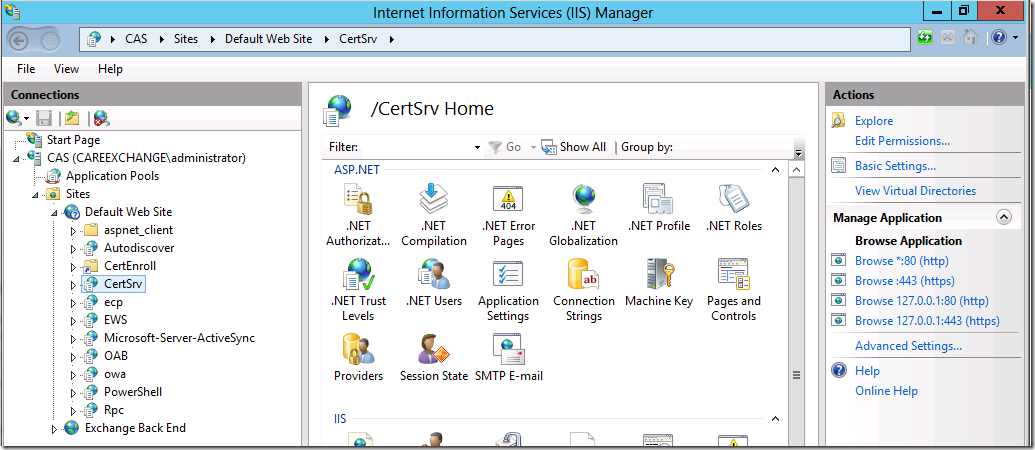
Now if you Open IIS manager , you will see “CertSrv”  a Virtual Directory Created ,

image
Use the right side column “Browse *.443(https)

Step 16:
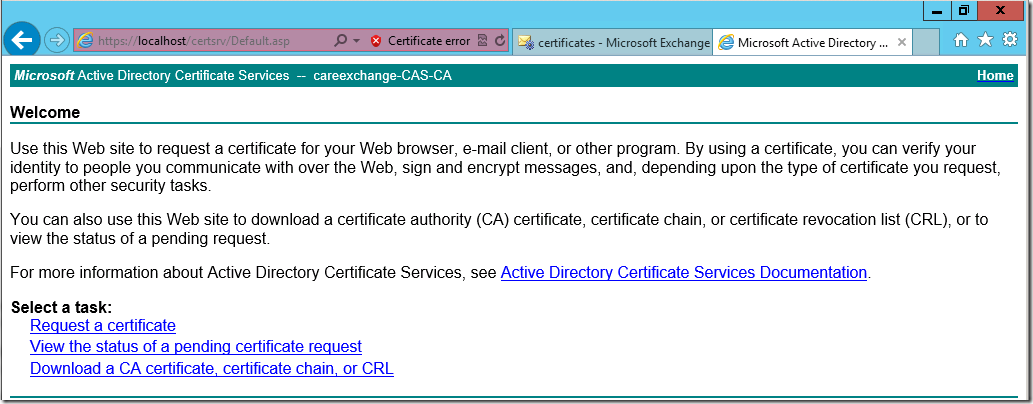
You would see a page like this , Choose Request a Certificate

image

Step 17:
Click on Advanced Certificate Request

image

Step 18:
Choose the Second one
Submit a certificate request by using a base-64-Encoded CMC

image

Step 19:
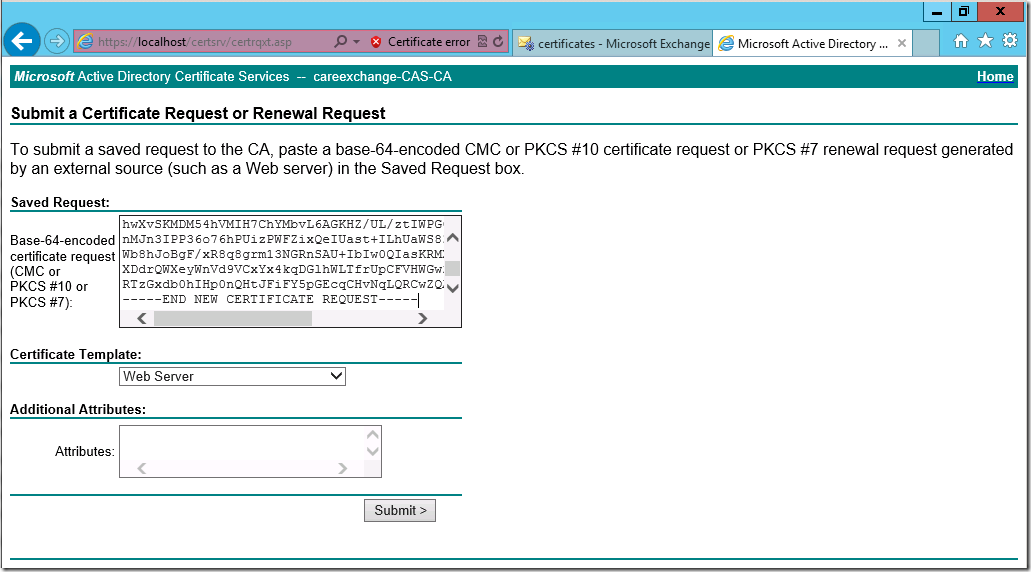
Now Copied the content from the  Note pad  – (See Step5)
Choose Template : WebServer

image

Step 20:
Choose “Base 64 encoded”

image

Step 21:
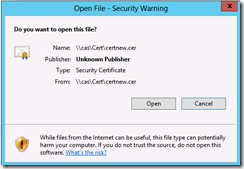
Save the Certificate

image

Copied the File to a  Common Share

image

Step 22:

Now go to your EAC – Servers – Certificates- Choose the Pending Request – Choose Complete

image

image

Step 23:
Now Assign Services to the Certificate

Choose Cert and Click on Edit

image

image

Now the Server Part is ready

image
Step 24:

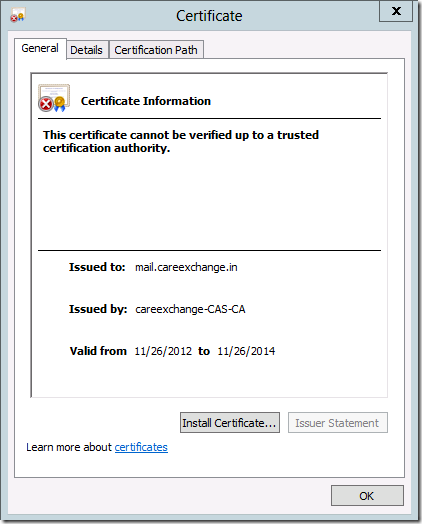
Now will learn how to install the Certificate in the Client End
Double Click on the Certificate

image

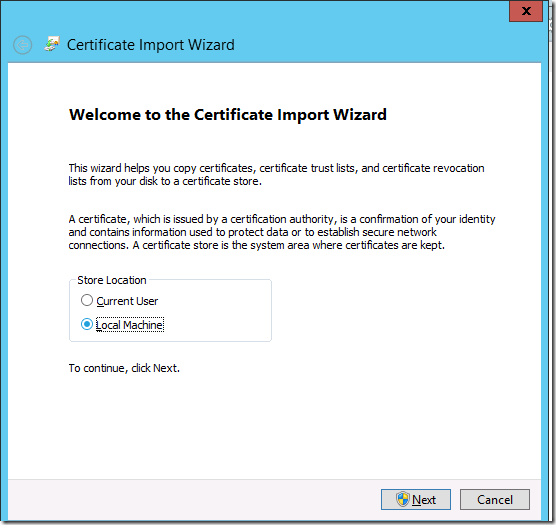
Click Install Certificate – Click Next –

image

Choose Local Machine

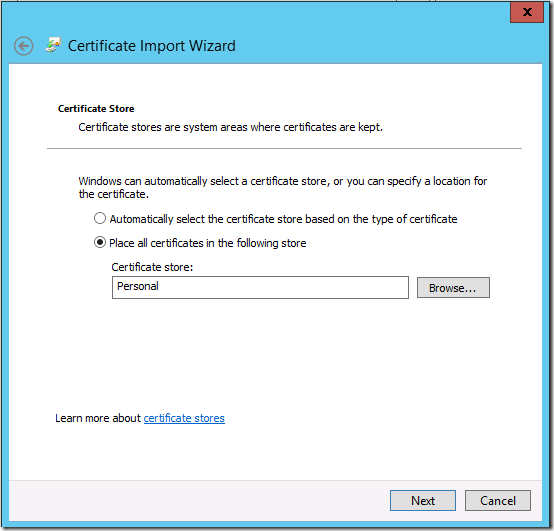
image

Choose Personal –

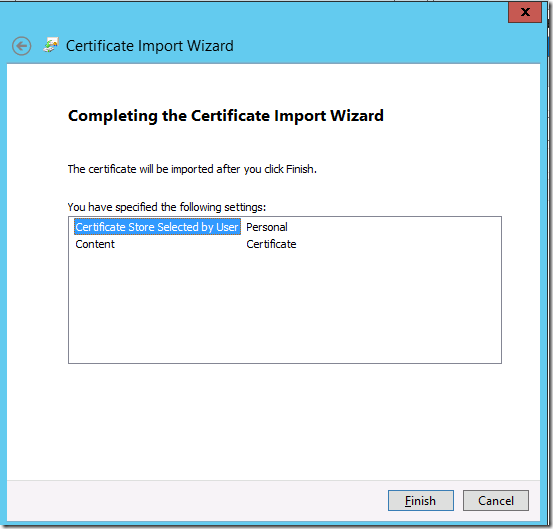
image
Click Next And Import will be Successful

image
Now Do the Same Process
Double Click on the Certificate

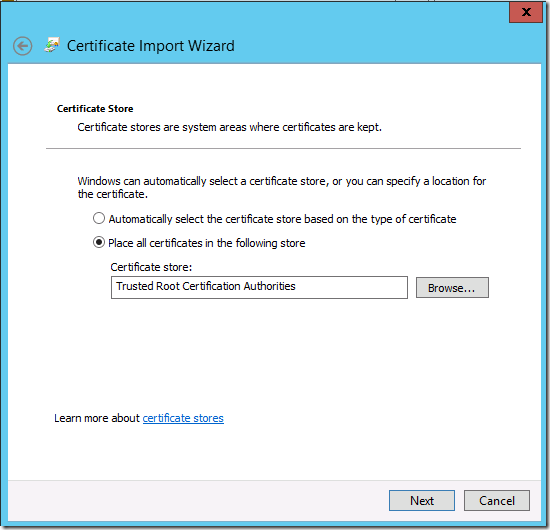
Click Install Certificate – Click Next – Choose Trusted Root Certification Authorities

image
Double Click on the Certificate

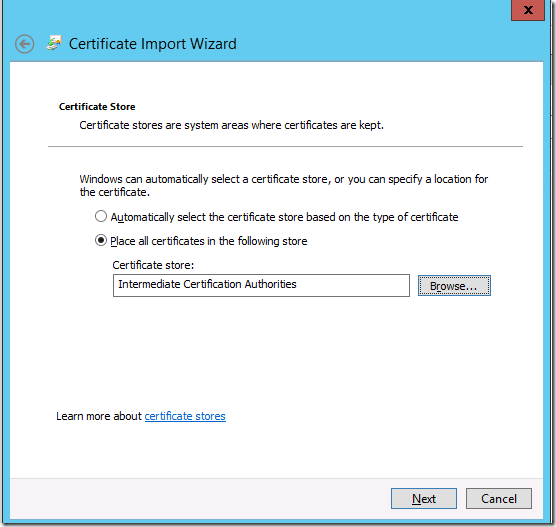
Click Install Certificate – Click Next – Choose Intermediate Certification Authorities

image

Step 25:
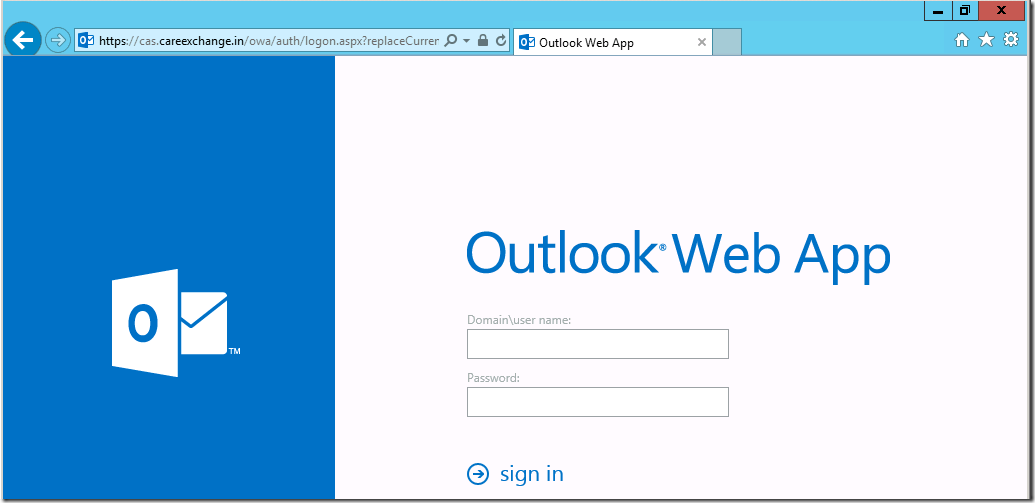
Before

image

After installing the Certificate in the Client

image

Great !!

Now you learnt how to Use a internal windows CA certificate in Windows Server 2012 with Exchange 2013

Microsoft Exchange Server 2013 – Installing , Deploying , Configuring

Minimum System Requirements and Forest Functional Level for Exchange 2013

Installations –

How to Install Exchange 2013 Sp1 on Windows Server 2012 R2

How to Install Exchange 2013 on Windows Server 2012

Installing Exchange 2013 on Windows Server 2008 R2 Sp1

Recipient Configuration –

How to Login to Exchange Administration Center (EAC) in Exchange 2013

Public Folders –

Exchange 2013 – Public Folders – Architecture -Part 1

Exchange 2013 – Public Folders – Creating and Managing -Part 2

Exchange 2013 – Public Folders – Features -Part 3

How to Recover Public Folder Items in Exchange 2013

Offline Address book –

How offline Address books works in Exchange 2013

ediscovery –

How to do a Proximity Search Using In-Place eDiscovery (NEAR) Operator in Exchange 2013

Certificates –

Configuring 3rd Party SSL Exchange Certificate in Exchange 2013

How to use a internal Windows CA (Certificate Authority) in Windows 2012 with Exchange 2013

How to import a Wildcard SSL Certificate in Exchange 2013

Configuring –

How to Configure Outlook Web App , Active Sync , Exchange Control Panel in Exchange 2013

How to Configure a Relay Connector for Exchange Server 2013

Adding Disclaimers –

How to Add a Professional Disclaimer in Exchange 2013

Office Web Apps Server Integration

Install and Configure Office Web Apps Server (OWAS) with Exchange 2013

Find More Exchange 2013 Articles here –

For Latest Exchange 2013 Articles

Also See

Rapid Migration Guide from Exchange 2010 to Exchange 2013

How to do a Proximity Search Using In-Place eDiscovery (NEAR) Operator in Exchange 2013

Discovery Search was introduced in Exchange 2010 but it doesn’t support NEAR operator

It was supporting AND,OR operators

So happy that Exchange 2013 does support NEAR operator .

Lets see how to use it efficiently

Let say I want to Search a Mail Content has below in my Whole Organization

“One day Alan was asleep in his bed dreaming”

How to Search Efficiently to acquire better results ?

If am going to search for a name “Alan” in my Whole Org its going to return a plenty of results

Lets Say , You remember just about Alan and Bed alone.

Approximately where Alan and Bed have 4 words in-between, You can Increase the numbers as per your wish and depends on your criteria.

This example is just for your better understanding – Please Customize it as per your wish

Search Criteria would be – Where Alan and Bed Could be Near 6 words

Criteria Would be – (Alan NEAR(6) Bed)

How to Do it ?

Step 1:

Login to Exchange Administration Center (EAC) in Exchange 2013

Step 2:

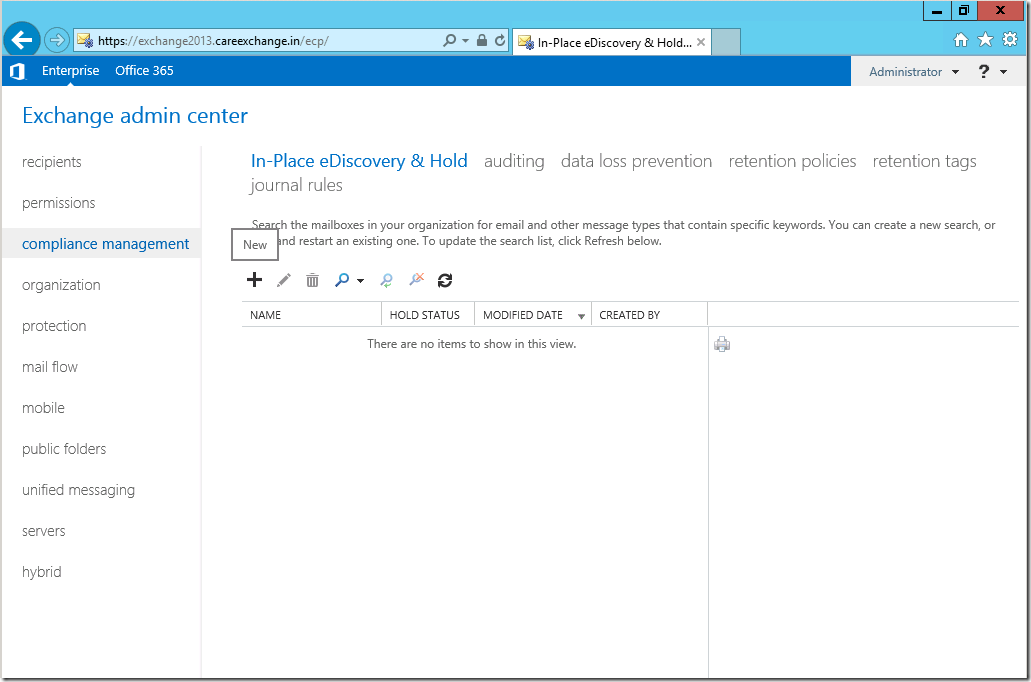
Compliance Management – Choose New

image

Step 3:

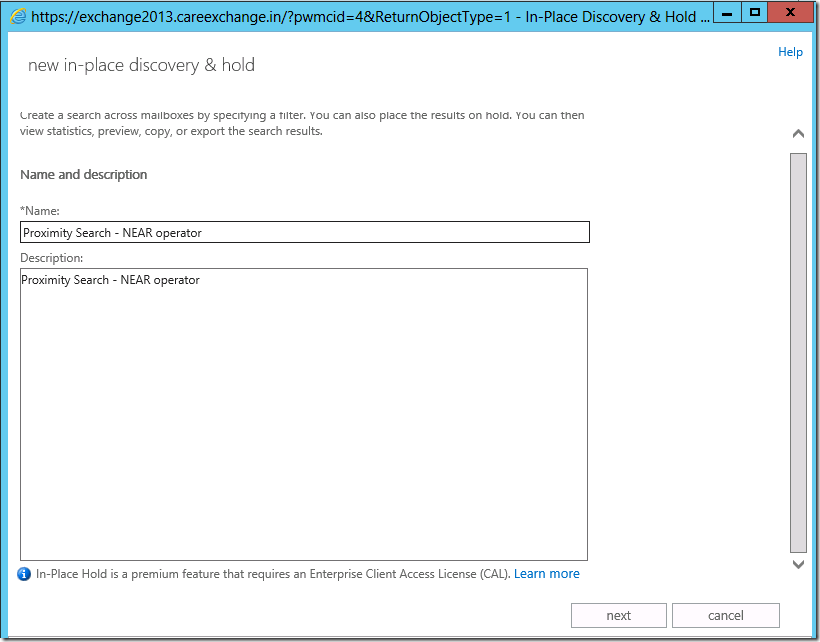
Type a Friendly name for your search – And Description if required

image

Step 4:

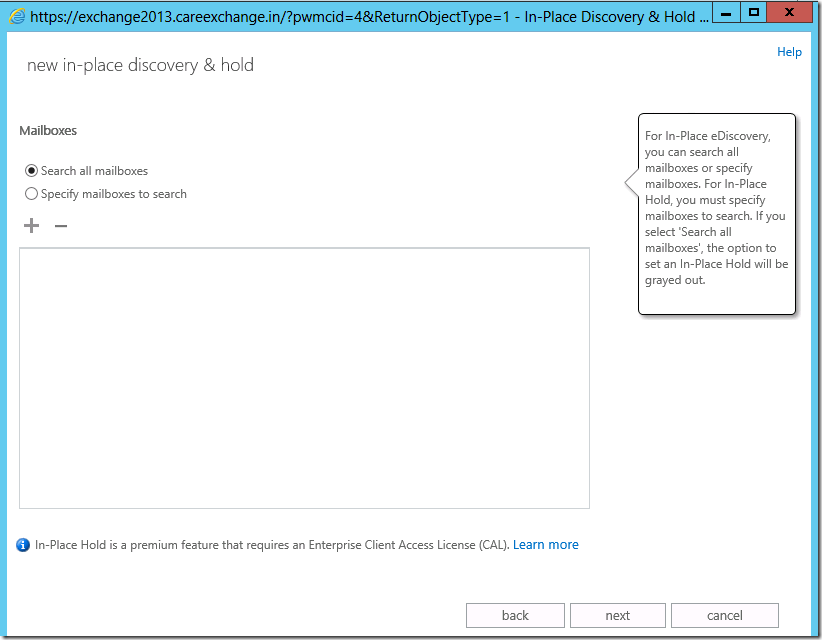
You can choose the mailboxes to search or you can search all the mailboxes

image

Step 5:

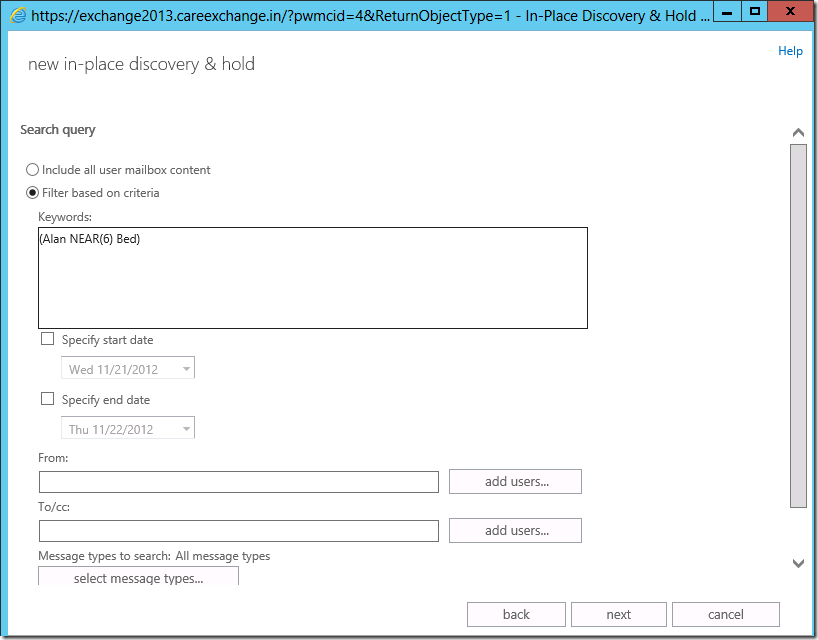
Now my Criteria is

Criteria –

(Alan NEAR(6) Bed)

Explanation – Alan and Bed – both are within 6 words

Specify a Date if you wish to narrow down your search more

image

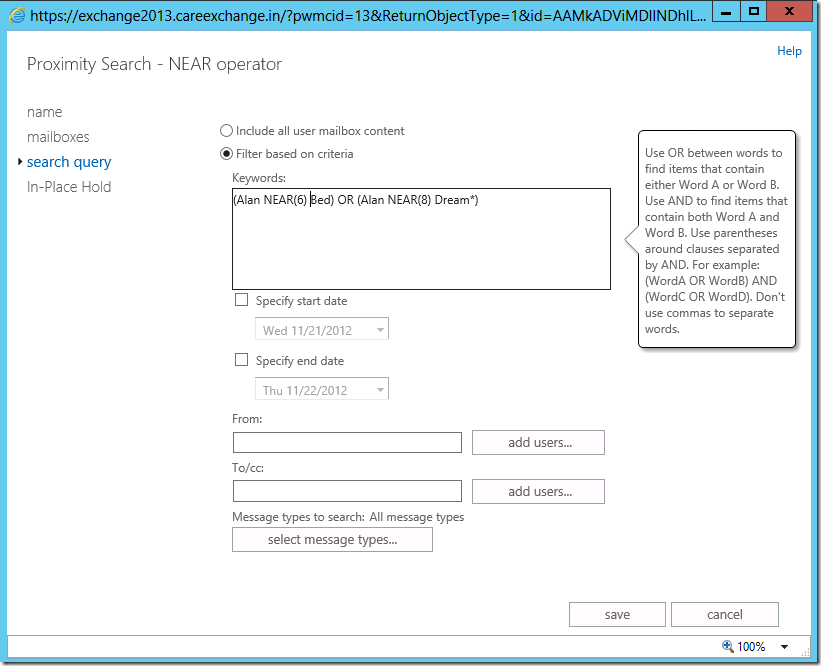
Also you can make a Search like – (Note – use can use also OR,AND operators)

Criteria – (Alan NEAR(6) Bed) OR (Alan NEAR(8) Dream*)

Explanation –

Alan and Bed – both are within 6 words

OR

Alan and Dream(Wildcard –Anything starts with Dream) – both are within 8 words

image

Step 6:

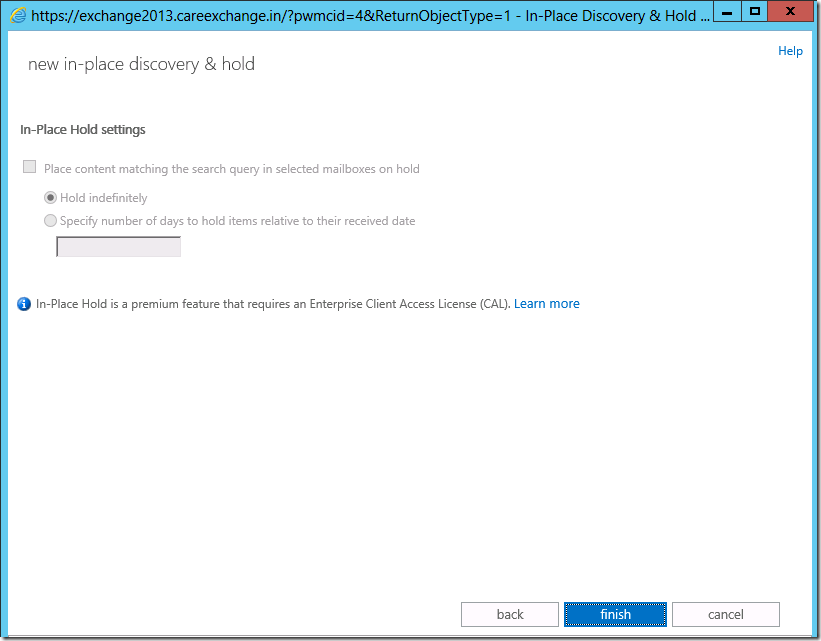
Choose Finish

image

Step 7:

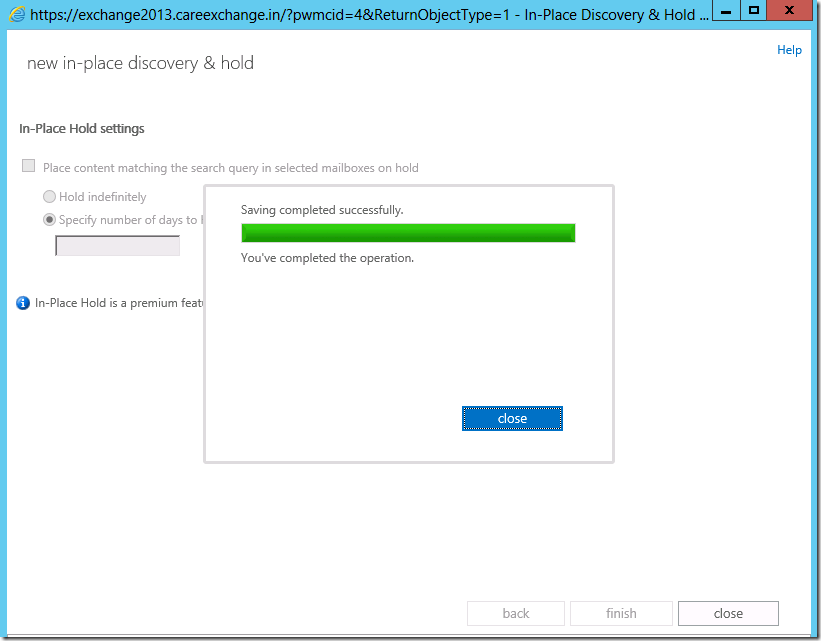
Now your Search will be saved – Choose  Close

image

Step 7:

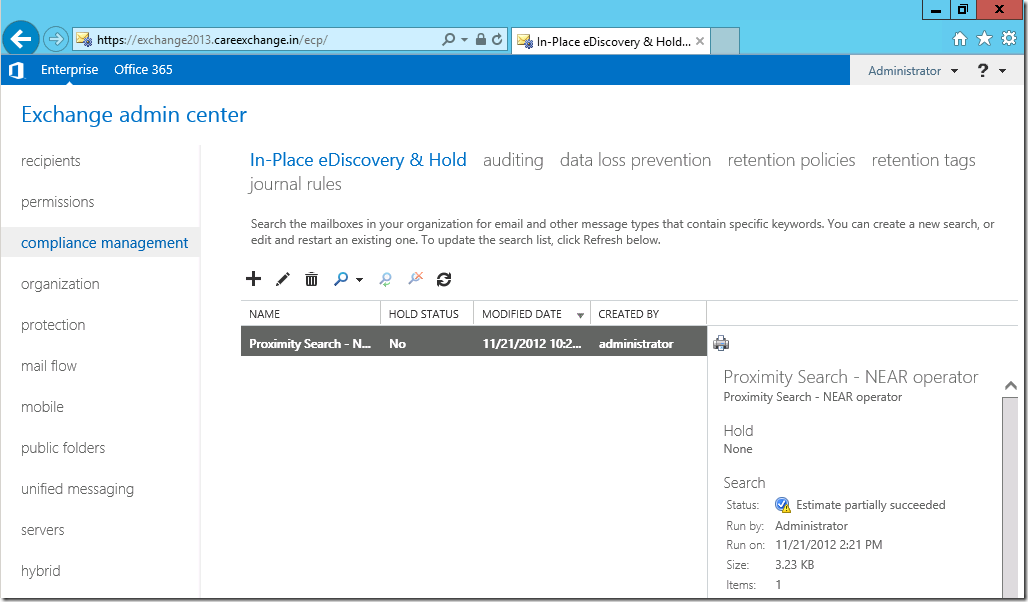
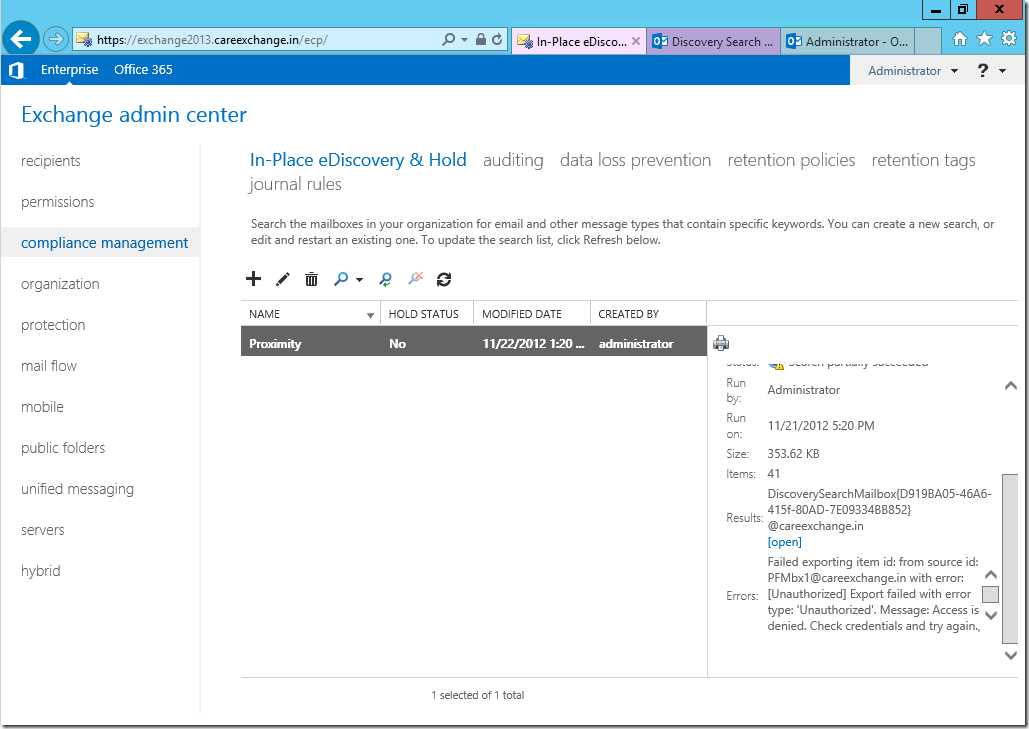
Now you can see Estimate partially Succeeded and number of items Returned

image

Step 8:

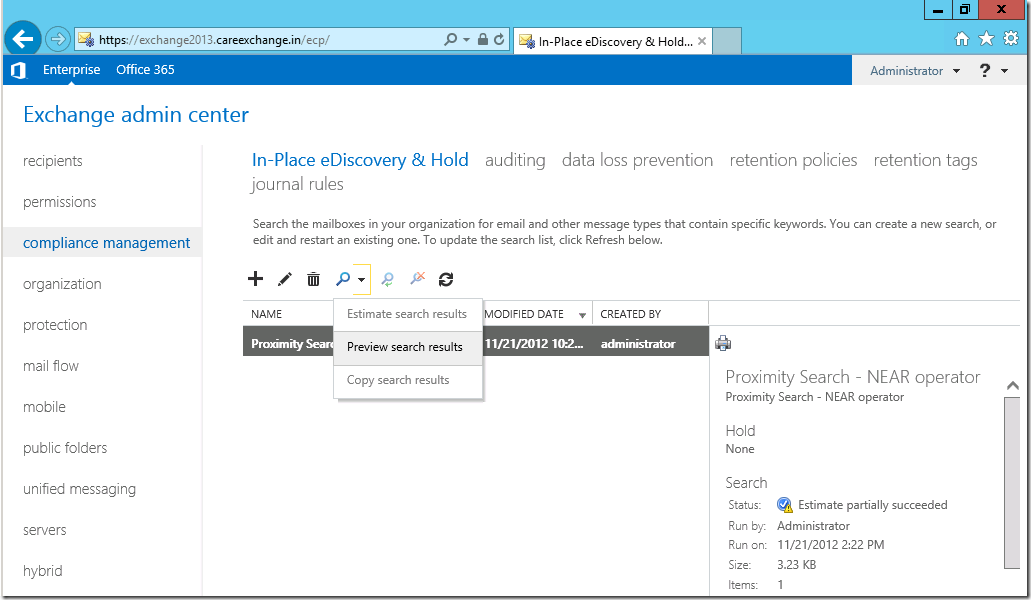
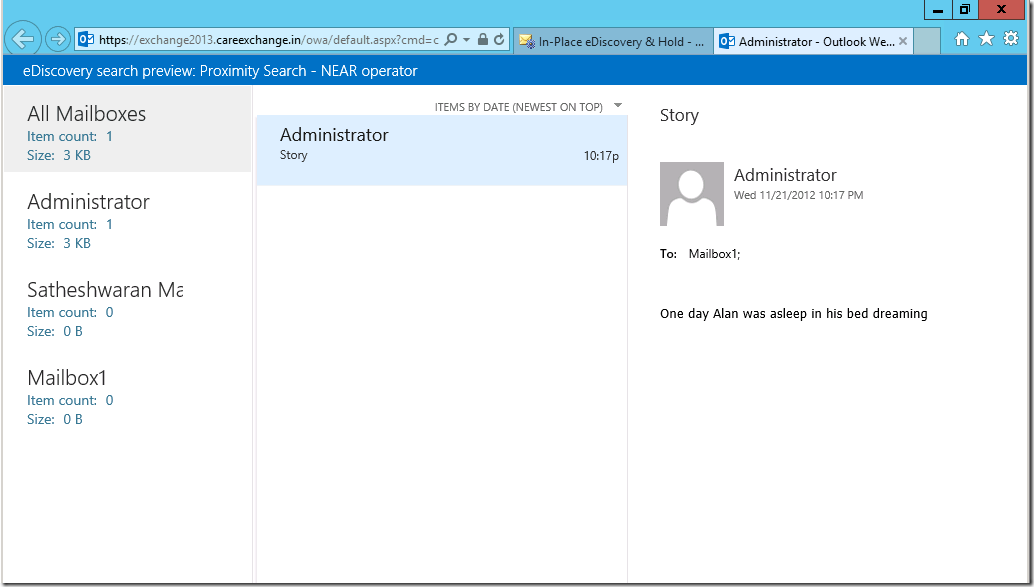
You can Preview your Search results- where viewing the results is more convenient in exchange 2013

image

Preview Results

image

Step 8:

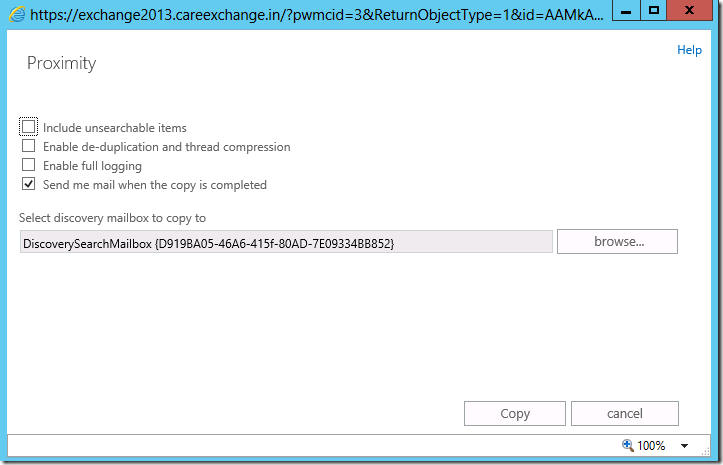
To Copy the Results

image

Choose Copy Results – You can copy Search results to a Discovery mailbox

image

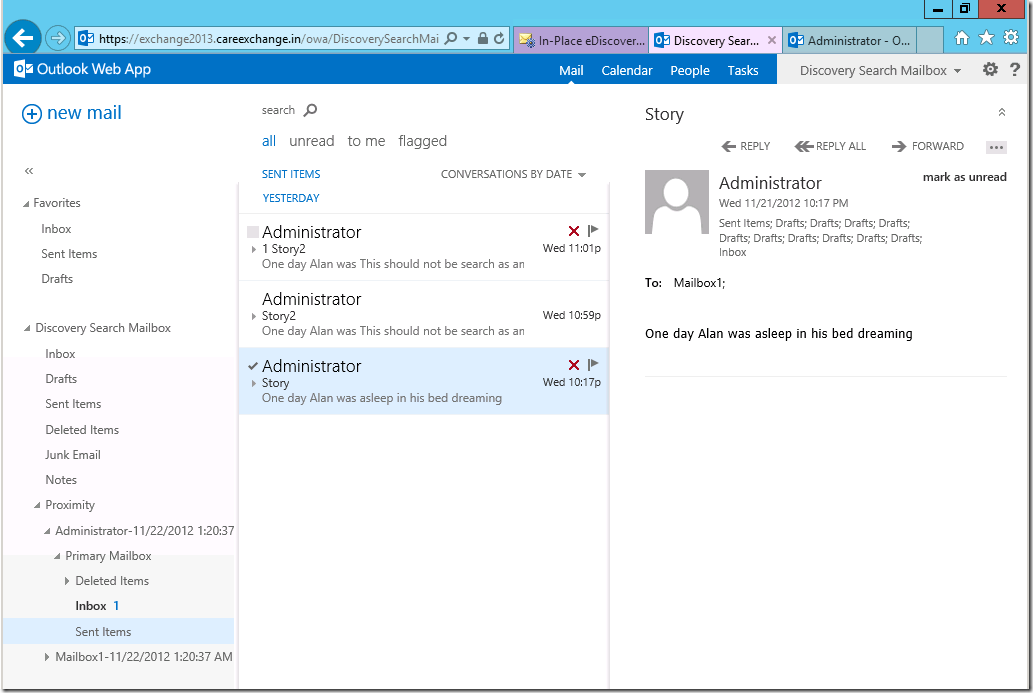
To View the Content in a mailbox – Choose Open in Right side of the Results

image

Now you can see all the Results in the Discovery Mailbox

image

Step 9:

If you want to Extract the Content to a PST

Create a Share –

image

Add Mailbox Import Export Permission –

New-ManagementRoleAssignment –Role "Mailbox Import Export" –User Administrator

image

Close and Reopen Shell-

New-MailboxExportRequest –Mailbox DiscoverySearch* –FilePath "\\ServerName\ShareName\SearchResults.pst"

image

You can add the PST File to an Outlook and use the Search Results

Hope it helped you for better understanding !!

How offline Address books works in Exchange 2013

What is a Offline Address book ?

For Users where Outlook is in Cache mode, They got to have their Outlook Address book Updated ,when they can access the latest Address book while they go offline.

If Outlook is left running constantly in Cached Exchange Mode, it updates the Offline Address Book automatically about once a day, depending on Address Book updates on the server running Exchange. To initiate these updates manually, do the following:

  1. On the Tools menu, point to Send/Receive, and then click Download Address Book.
  2. Under Information to download, click Full Details or No Details.

So that they can use their updated address book when they are offline.

Earlier Exchange 2010 Version. Outlook Connects to the Client Access Server for MAPI Connectivity.

But From Exchange 2013 Outlook Connects to the Client Access Server

And the requests are proxied to the Mailbox Server

Lets See what is happening in the Background

In my Case all Roles are installed on the Same Server

Offline Address book Generation Server will be a Mailbox Server.

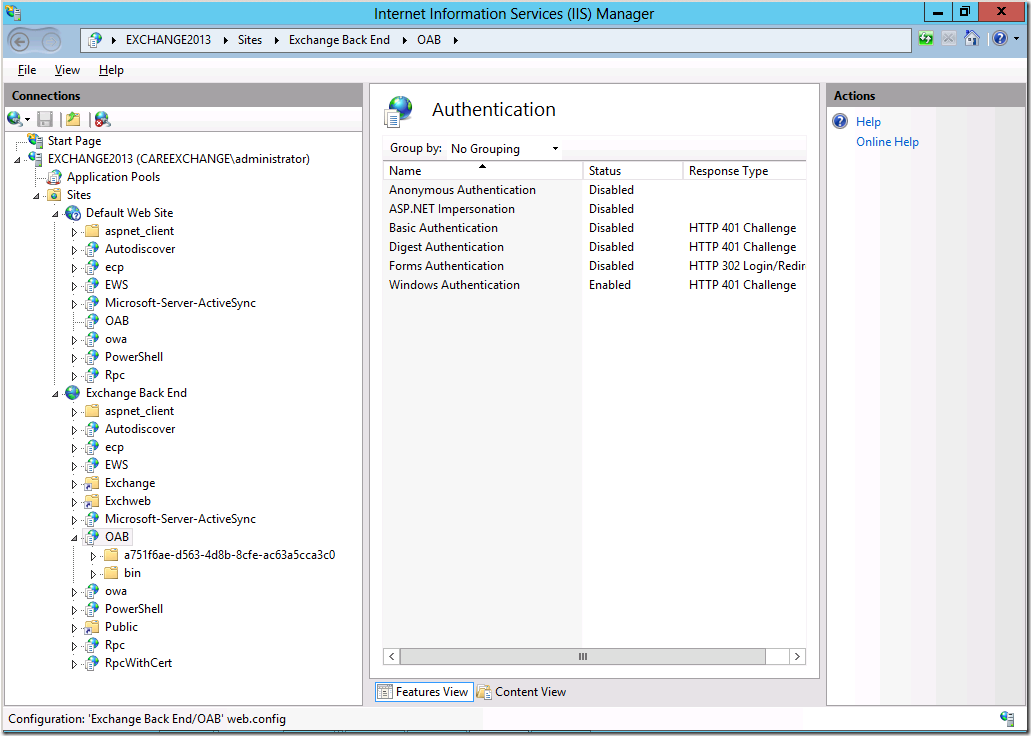
You can find a OAB Virtual Directory in IIS – in the Client Access Server

The Request to the Client Access (OAB Virtual Directory) Proxies the request to the “Exchange Back End” (OAB Virtual Directory) which is a Mailbox Server Containing OAB Files where client downloads the OAB Files
image


Offline Address Book Storage Location

Offline Address book Stores its files to a “System Mailbox” Which is called as “Organizational Mailbox” Where if the database fails the Organization Mailbox can failover using Database availability Group.

where the request from the Client doesn’t fail . It looks the database which owns the Organization Mailbox and OAB files are copied over to the Disk in the appropriate Mailbox Server and it has been to the Client.

Where OAB is no more a single point failure in Exchange 2013

To See which Organizational Mailbox is storing OAB files –

Get-Mailbox –Arbitration | where-Object {$_.PersistedCapabilities –Like "*OabGen*"} | FL Name,Persisted*

You can see – “OrganizationCapabilityOABGen”

image

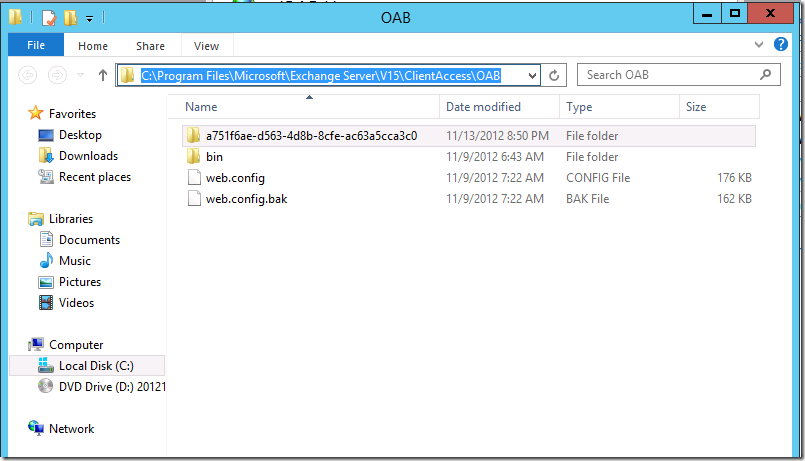
Then Its Copied over to the disk in the Form of LZX files

Default Location: (Differs if you install Exchange on a Different Drive)

C:\Program Files\Microsoft\Exchange Server\v15\ClientAccess\OAB
image

They will be copied to the disk in the Form of LZX files

image

How to find the Offline Address book url , which is used for OAB Downloads

From Outlook 2007 ,Outlook 2010 and So on , Outlook Downloads Offline Address book using the OAB Url Web-Based (IIS)

Get-OabVirtualDirectory | FL Name,*Url*

You got to Specify the External Url if you are going to use Outlook Anywhere

using Set-OabVirtualDirectory Cmdlet

image

To Find which OAB a User Downloads

Go to a Client Machine

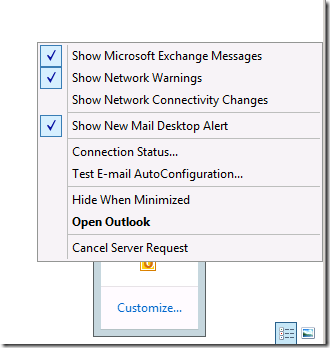
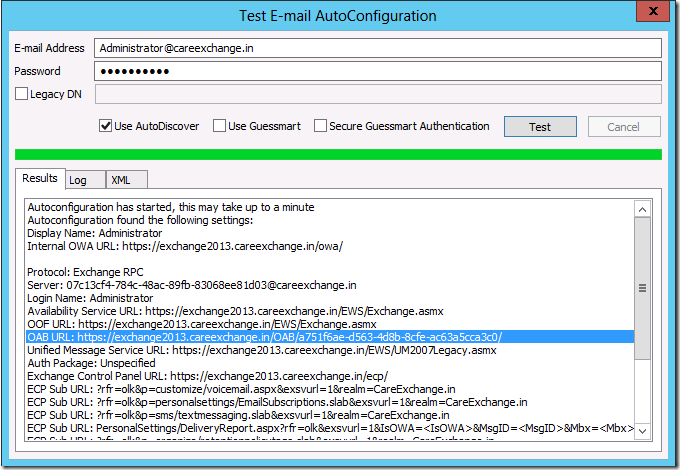
Hold your Ctrl Key and Right Click on the Outlook icon – Click on Test Email AutoConfiguraion
image

Now Using AutoDiscover , You can see the Offline Address book URL as listed below with the Correct Guid Value
image

To Find the GUID Value of the Offline address book

Get-OfflineAddressbook | FT Name,Guid

image

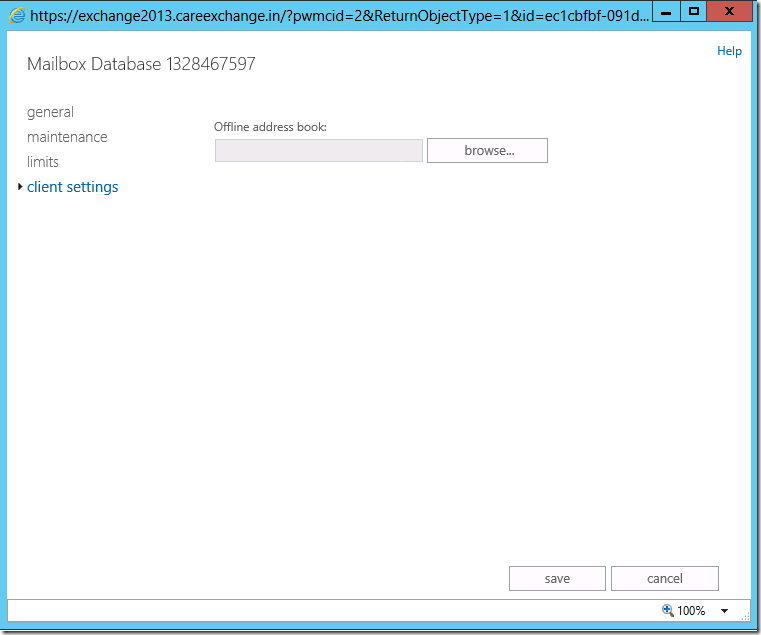
Client will Download their Own OAB depends upon their “Client Settings in Database Properties”

If its not specified – By Default they will download the “Default Offline address book”
image

Or

If they have address book policies applied They would Download their own OAB respective to the Policy

Get-Mailbox "Mailbox Name" | FL Name,AddressBook*

image

How Often Offline Address book Updates itself

** This Updates the Items only on the Mailbox Server – Stores in the “Organization Mailbox” as explained earlier

Get-Offlineaddressbook | FL Name,Schedule

image

Now Depends on the Update Time “Organization Mailbox” will get updated on the Mailbox Server.

**Offline Address book data are saved first only on the Organization Mailbox**  Then Once its got Updated it Serves the latest data to the Clients

How to Force update the Offline Address book

Get-OfflineAddressbook "Default Offline Address book" | Update-OfflineAddressBook

image

To Verify

**Property Last Touched Time Gets updated**

Get-OfflineAddressbook | FT Name,LastTouch*

image

or

You can Restart

Microsoft Exchange Mailbox Assistant Service

As that’s the service does all the job in the background

Restart-Service MsExchangeMailboxAssist*

image

Additional Info –

Type of Distribution used in Exchange 2013

Exchange 2013 Uses only One Type of Distribution –Web-Based Distribution

1 .Web-Based distribution

image

2. Public Folder distribution (Removed in Exchange 2013)

Earlier

Earlier Version Like Outlook 2003, Offline address book are Downloaded via Public Folders,

Offline Address Book Version In Exchange 2013

For Outlook 2010, Outlook 2007 clients it uses OAB version 4

Get-OfflineAddressbook

image

Great !!

You Learnt How Offline Address book works in Exchange 2013

× How can I help you?