32 C
Dubai
Friday, May 2, 2025
Home Blog Page 96

How to Recreate Public Folder Master hierarchy in Exchange 2013

At times in Exchange 2013, If you remove the Public Folder Mailbox which holds the Master hierarchy abruptly, Or deleting Using Adsiedit.msc , It doesn’t get removed properly

Where as a result of that master hierarchy goes disappeared. Even if you Create Public Folders it will create as Secondary hierarchy

So in the First place. We need to find the Hidden Master hierarchy

Running the Below Command , It will show Which mailbox is the Master hierarchy

Get-OrganizationConfig | Format-List RootPublicFolderMailbox

image

Get the ExchangeGuid Value from RootPubicFolderMailbox

Now Run

Get-Mailbox –PublicFolder | FL Name,ExchangeGuid

Now you can see which Public Folder holds the Master hierarchy

image

If you are seeing it , Its Good , Its available

But if you are not seeing the ExchangeGuid on this list . It means something went wrong.

As Changing the Master hierarchy is bit Tricky and Tweaking the architecture. We won’t know what its going to mess up

If you are in the starting phase, I would recommend to Remove all the Public Folders and Public Folder mailboxes

and Start from scratch

Removing all Public Folders

Get-PublicFolder –Recurse | Remove-PublicFolder

image

Removing all PublicFolder Mailboxes

Get-Mailbox –PublicFolder | Remove-Mailbox -PublicFolder

image

Now open Adsiedit.msc – Connect to

image

Choose Configuration

image

Expand Configuration –Services – Microsoft Exchange – “Your Exchange Org Name” (Properties)

image

Find “MsExchDefaultPublicFolderMailbox”

image

Cick on Edit and Click on Clear

Choose Ok and Ok again

image

Now the Master hierarchy goes empty

Now create a PF mailbox

New-Maibox PF1 –PublicFolder

Which becomes the master hierarchy

How to Add Database Copies in Exchange 2013

Powershell –

Add-MailboxDatabaseCopy -Identity Database-002 -MailboxServer Exch01
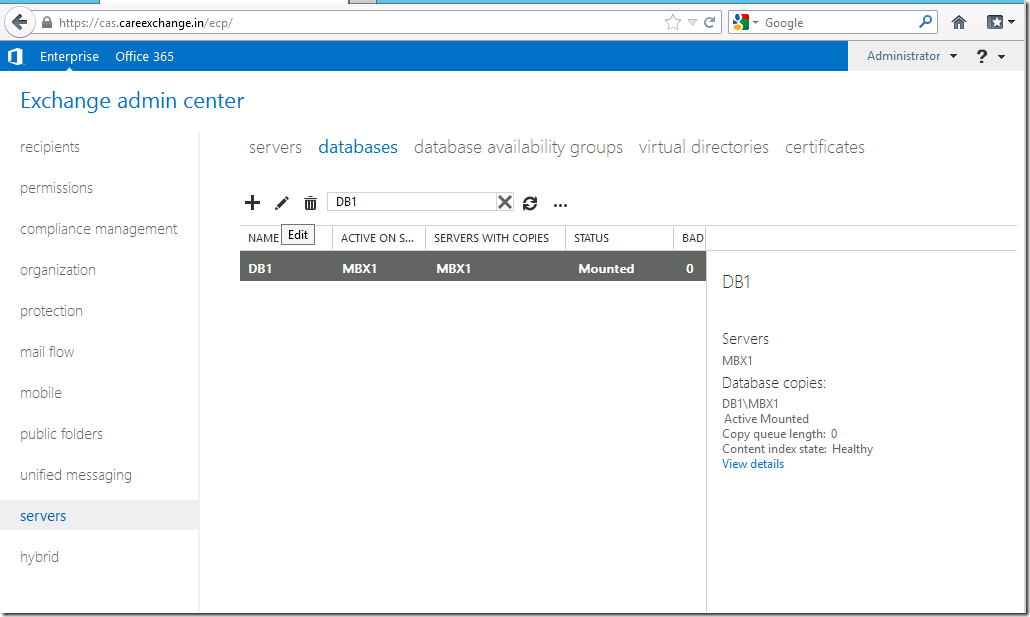
Login to EAC

Servers – Databases –  Choose the Database – Add Database Copy

image

Choose Browse – Choose the Server – Click on Save

image

image

Reference –

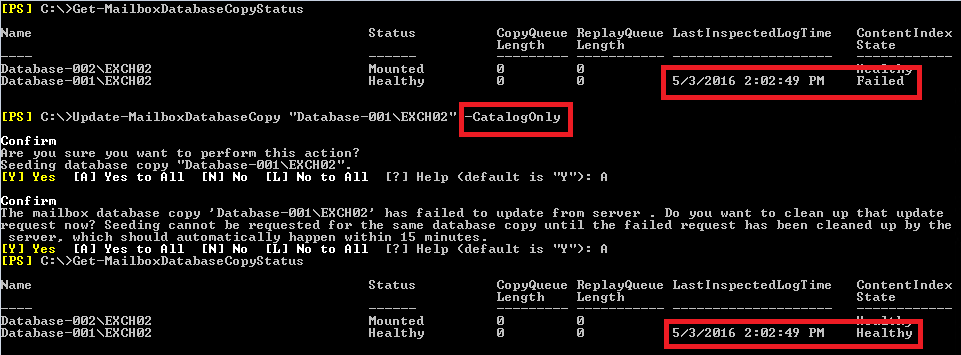
Updating Content Indexing only upon failure –

Get-MailboxDatabaseCopyStatus -Server Exch01
Update-MailboxDatabaseCopy "Database-001\EXCH02" -CatalogOnly

contentindex

To Update the Entire Database Copy –

Suspend-MailboxDatabaseCopy "Database-001\EXCH02"
Update-MailboxDatabaseCopy "Database-001\EXCH02" -DeleteExistingFiles

To Activate Databases –

Move-ActiveMailboxDatabase Database-002 -ActivateOnServer EXCH01

How to create a Database Availability Group in Exchange 2013

Refer newer version –

https://www.azure365pro.com/create-dag-database-availability-group-in-exchange-2016/


Well, Creating Database Availability Group (DAG) Became much more simpler,

But configuring it properly is the best part to have it efficiently working.
So lets see how to create a 2 node DAG ,

NOTE **Am not going to Describe about load balancing for Client Connectivity in this blog

I will describe my environment now

I have 2 AD sites

Every AD site has Exchange Servers

image

image

========================================================
First we will prepare the Environment for the DAG

NOTE : If you have 10g Interfaces also it is highly Available. Dedicated Replication Network is optional.Preferred Architecture states to have only one network.
———————————————————————————-
I will have my Primary LAN . Will add a Replication LAN ,for my DAG replication for all the nodes which am planning to add in DAG

image

Verify my NIC binding are Correct

Advanced – Advanced Settings

image

1.Primary Network

2.Replication Network

image

Make Sure they are in a Different Class of IP

Primary Network –

image

Replication Network –

*No Default Gateway

*No DNS Servers Set

*Add a persistent Route for all the nodes with the Replication NIC’s

Replication NICs should ping with other replication NIC’s – So that DAG replication will happen through these NIC’s

Port Used : 64327

image
Now there is no Single point of failure on my LAN
If my replication network fails it can failover to the production network. vice versa.

When creating a DAG with Mailbox servers running Windows Server 2012 in an Active Directory environment with Windows Server 2008 R2 directory servers, you must pre-stage the cluster network object before adding members to the DAG. For detailed steps, see Pre-Stage the Cluster Network Object for a Database Availability Group.

See

http://technet.microsoft.com/en-us/library/dd351172.aspx

Lets See How to pre stage a Cluster CNO object.

Open ADUC – New Computer Account

image

Enter the DAG Name

image

Disable the Account

image

Give Full Control for Exchange Trusted Subsystems

image

Add the First Node Computer account and Give Full Control

Note –  Choose Object types to Select Computer Accounts

image

image

Apply the Permissions

Reference link –

Pre-Stage the Cluster Network Object for a Database Availability Group

==========================================================================
Now we will  Create a DAG ,


Login to EAC –Servers – Database Availability Groups – Choose New

image


Specify

* DAG name

* Witness Server Name

* Witness Location

Add Two DAG ips’ (Static IP for the DAG )

1 for Primary Site

1 for DR site

if you have different subnet or different class of ip on either Sites.
Have Two IP address for the DAG so that DAG resource can be online while failover on either sites
If you have only one Subnet , then you can have only one Ip address for the DAG

image
Now my DAG Configuration is Ready
Add members to it.

Choose Manage DAG Membership

image

image

Adding the members

image

Now you can add the other DAG memberwhere it should get added without any issues.

image


Great !! Now your DAG is ready !!


See

How to Add Database Copies in Exchange 2013

How to move database path and log folder path in Exchange 2013

You got to use the Exchange Management Shell to move the database path and log folder path in Exchange 2013

You will be using Move-Databasepath Cmdlet

Move-Databasepath "DatabaseName" –EdbFilepath "C:\Newlocation\DBname.edb" –LogFolderpath "C:\Newlocation"

Caution ** It will dismount the stores temporarily which will cause you downtime.

image

How to Verify it has been moved Successfully

You can Run

Get-MailboxDatabase "DatabaseName" | FL Name,*Path*

image

or

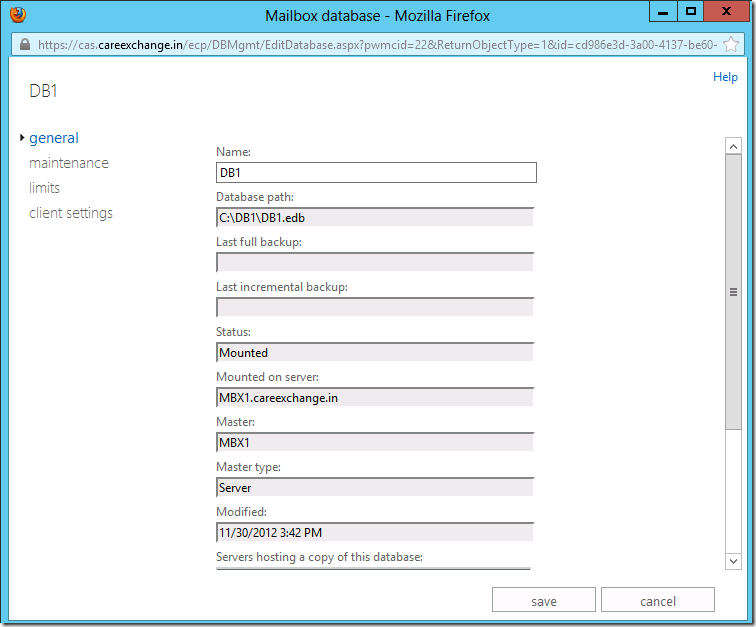
You can login to Exchange Admin Center

image

You can see the New Database Path

image

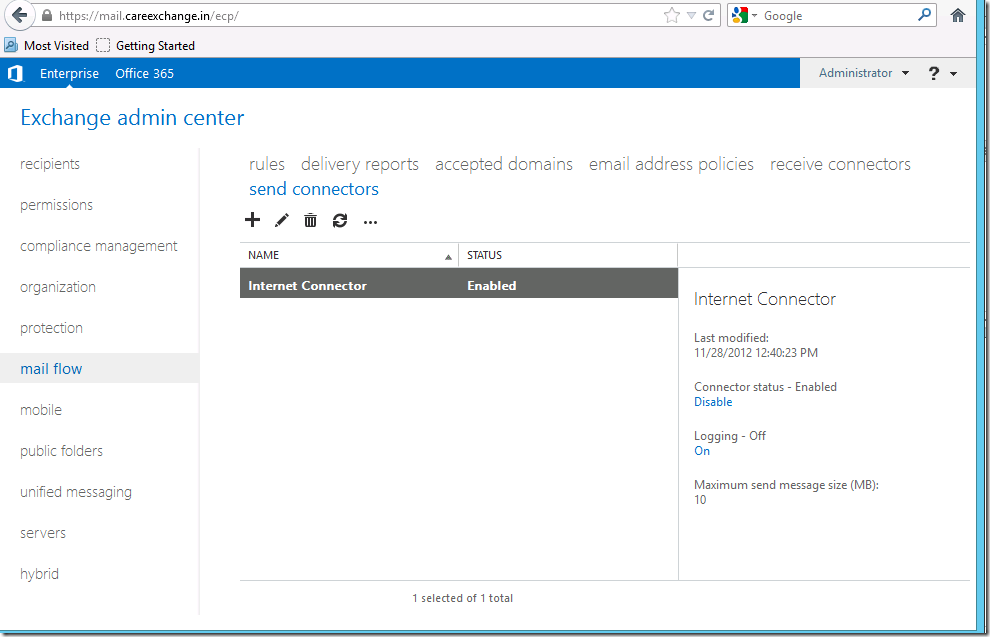
How to Create a Send Connector in Exchange 2013

Send Connector is required to Send Emails over the internet from Exchange 2013 and Exchange 2016 Servers
Step 1:

Login to Exchange Administration Center (EAC) in Exchange 2013

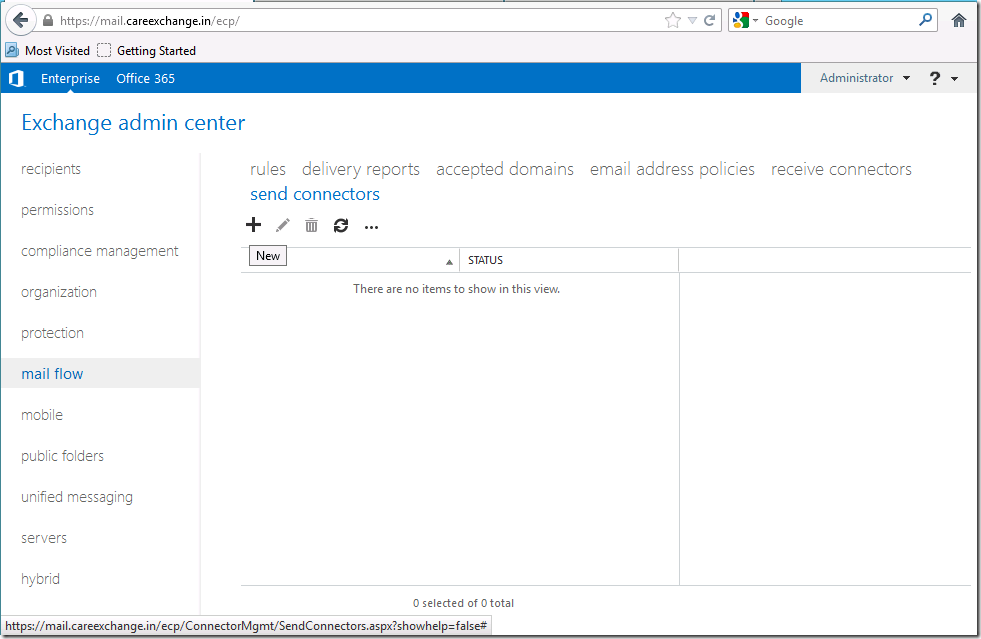
Step 2:
Click on MailFlow -> Send Connectors –> Choose “+” New

image

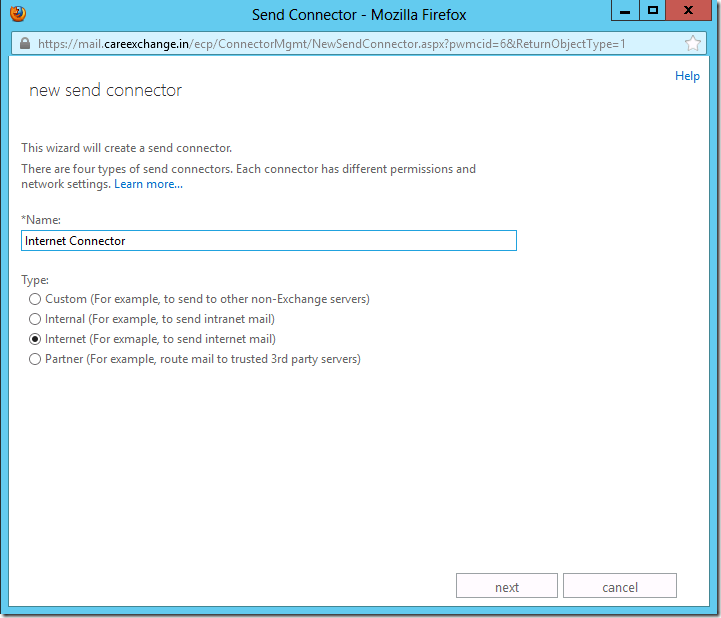
Step 3:
Type a friendly name – Choose Next

image

Step 4:

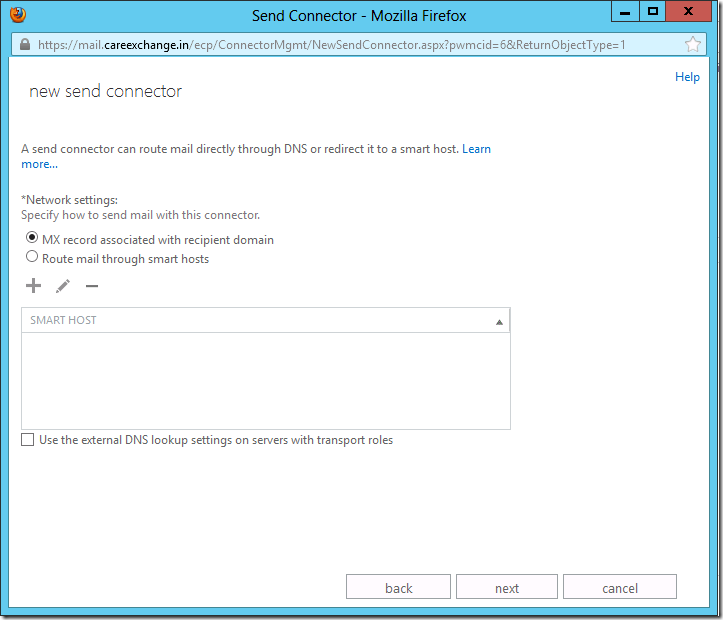
Choose Mx Record associated with Recipient Domain – Choose Next

If you are planning to Route your internet mail via a Smart Host or Spam Filters – Specify the Smart host ip

image

Step 5:

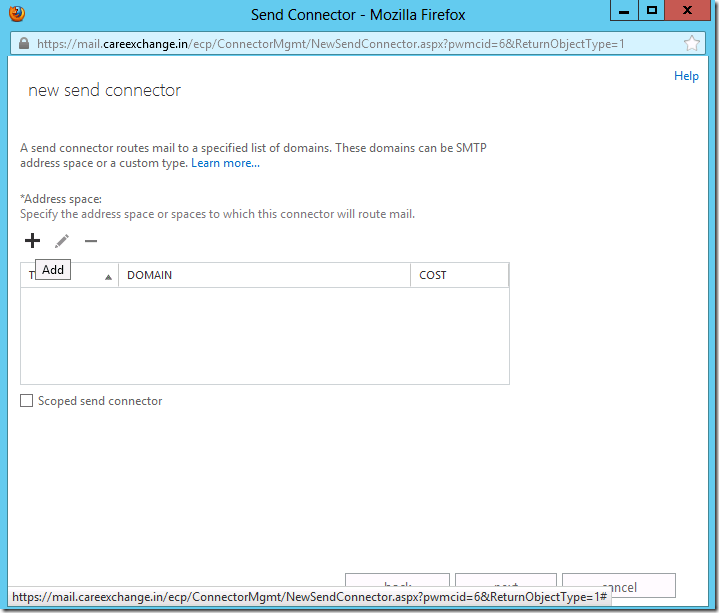
Choose “+” Add

image

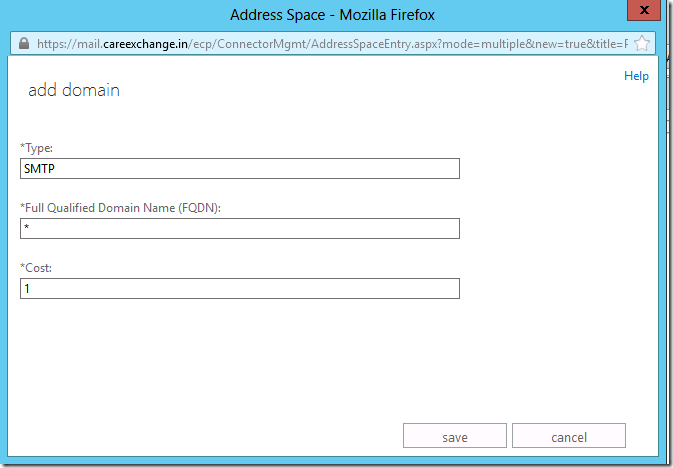
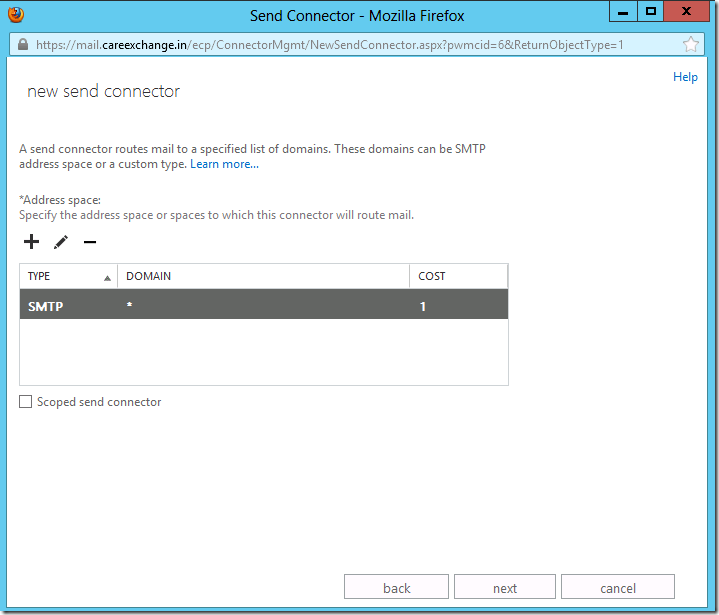
Type “*” to Specify all the domains to use this Connector

Lesser the Cost – More the priority.

image

image

Step 6:
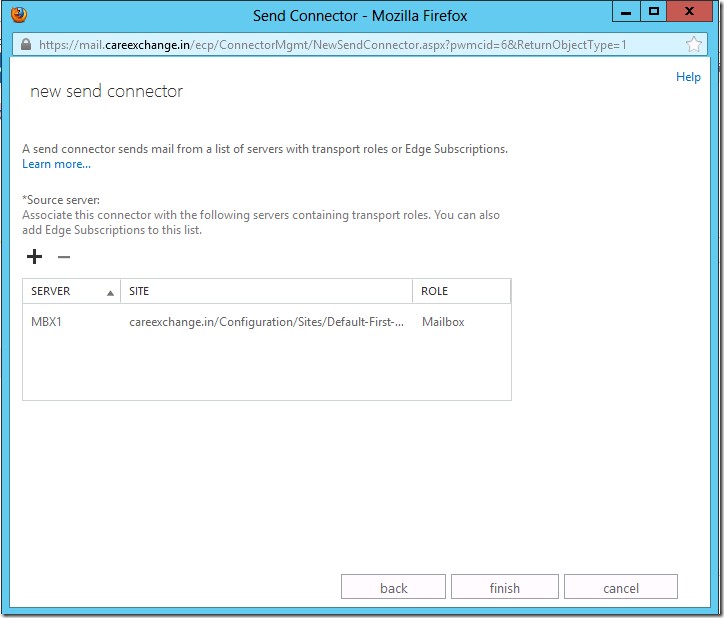
If you have multiple Exchange 2013 Mailbox Servers you can configure the source server as per your Requirement

image

image

Or Use Powershell –

New-SendConnector -Name "Internet" -Usage "Internet" -SourceTransportServers "EXCH2013A","Exch2013C" -DNSRoutingEnabled $True -AddressSpaces ("SMTP:*;10") -IsScopedConnector $False -UseExternalDNSServersEnabled $false

powershellsendconnector

Great you have configured a Internet Send Connector For your Exchange 2013 Server

Configuring 3rd Party SSL Exchange Certificate in Exchange 2013

Exchange 2013 creates a self-signed SAN certificate and assigns it to the services like IMAP, POP, IIS, and SMTP.The only drawback of this self-signed certificate is that it contains the server’s FQDN and NetBIOS names only.Where we get certificate errors on all the Clients where we need to install the Self signed Certificates manually on all the clients , which is a hassle and no one likes it in fact .

To avoid any certificate related errors and use it over the internet without any problems it is highly recommended that you request and assign a certificate from a Certification Authority that can be contacted from anywhere like DigiCert,VeriSign,Go Daddy etc.. .

To request a new certificate from a trusted CA use following format:

Step 1:

Requesting a Certificate , you can use Exchange Management shell or GUI

GUI is much user friendly

You can refer the link below to use GUI and Export the Exchange Certificate

How to Create an SSL Certificate Request for Exchange Server 2013

Step 2:

Use this request file for submission to the CA and download the certificate. Save the certificate to a convenient location.

image

Upload the CSR (.req) file to the third party Cert providers like DigiCert.

image

And once the Verification Process completes. you can download the Cert from their Portal.

Step 3:

To Import the Generated certificate

See

How to Complete a Pending SSL Certificate request in Exchange Server 2013

Great !!

You learnt how to Export and Import Exchange Certificates in Exchange 2013

× How can I help you?