34 C
Dubai
Sunday, May 4, 2025
Home Blog Page 82

Unable to verify account information – Unable to Configure IPhone with Exchange 2013

Unable to configure IPhone with Exchange 2013 ,Error :Unable to verify account information , It was with specific mailboxes , and other mailboxes were able to configure with IPhone without any issues.

image

Verified Inheritance is enabled for that account

Open ADUC(Active directory users and computers) – Properties of the account – Security – Advanced

(View – Advanced features should be checked in ADUC)

image

In my case It was enabled as well .

Checking for the IIS logs

“C:\inetpub\logs\LogFiles\W3SVC1”

Try on your IPhone once and Open the Recent log – Ctrl +f your mailbox

2014-04-24 00:00:04 192.168.1.8 POST /Autodiscover/france@careexchange.in/Autodiscover.xml &CorrelationID=<empty>;&cafeReqId=5f91da0e-c3e9-48ec-a360-83d95eccbc0c; 443 – 192.168.1.111 Microsoft+Office/12.0+(Windows+NT+6.1;+Microsoft+Office+Outlook+12.0.4518;+Pro) – 401 0 0 15

It was showing up 401 unauthorized . strange

Opened IIS

image

Enable Windows Authentication

image

Do the same process for ( Exchange Back End )  Site – Enable Windows Authentication


IPhone Configured successfully .

Roll Up Update 2 – System Center 2012 R2 Data Protection Manager


Microsoft released the RU2 for the SC 2012 R2. With this, 2 Major features are added which SQL DBA’s have been looking for long time after adapting System Center 2012 and they are :-


1. Support for:

MS SQL 2005 Instance on Windows 2003.

               – MS SQL 2008/2008 R2 Instance on Windows 2003.


2. Support for:-

              – Protection of SQL AlwaysOn with clustering.


Find more details in KB2958100.

Virtualization with System Center VMM 2012 R2 – Manage ‘FABRIC’– Part 1

Following the previous post, where we successfully set up the VMM 2012 R2 server you must know that VMM 2012R2 as a management server is also capable of managing various third party hypervisor hosts(like VMware and Citrix etc.) as well  and “FABRIC” is the management component where these Hypervisor hosts can be integrated and managed within.


image


Now, for our lab we have 2 Hyper-V hosts installed and they are:

       MYLAB-HYPERV01.TECHDEFINE.COM

       MYLAB-HYPERV02.TECHDEFINE.COM


FABRIC’ in VMM gives an option to segregate the Hypervisor hosts in separate “Host Groups” and scope of this article would be creating the Host Group and configuring it with Hyper-V servers integration.

Host Group is basically for a unified management of multiple hypervisor hosts based on physical resources allocation like Network, Storage allocation, Dynamic optimization settings etc.. Host groups can also be delegated to certain administrators based on their roles.


So, lets go ahead and integrate our Hypervisor hosts.


We will start with creating a new Host Group.

image


We named it “HYPERV HOST GROUP”

image


Now, click on “Add Resources” and select “Hyper-V Hosts and Clusters”

image


Select “Windows Server computers in a trusted Active Directory domain”. Click on Next.

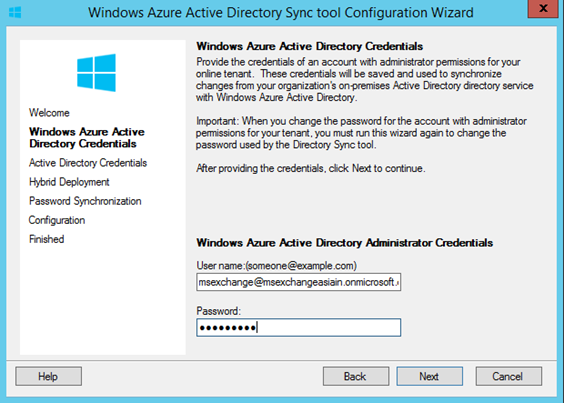
In the next page, you will get an option to select an account which will be used for discovery of the Hyper V hosts and install the VMM agent.


In our case, we created a new run as account “VMMAdmin” and selected it.

Also, make sure that this account has local ‘Administrators’ group membership in hosts which needs to be discovered in VMM. Click on Next.

image


In the Discovery Scope option, mention the host names. I would prefer not to select “Skip AD verification”. Click on Next.

image


Select both the discovered Hyper-V Hosts. And, click on Next.

image


Specify the Host group which we created for Hyper-V hosts.

No need to re-associate as these hyper-v hosts are not managed by any other VMM server.

The location for the Virtual Machine to be created in a Host can be placed here. We are not selecting it here. Click on Next.

image


Confirm the settings and click on Finish.

Confirm if the jobs are completed. For us, it completed with warning which we can ignore for the time being.

image


So, now the Hyper-V hosts are integrated with in the Host Group and ready to be managed partially(Shared storage and Networking yet to be configured).

image


Now.lets look into the properties of this Host Group.

image

The Important properties are:-

Placement Rules :

                       These settings helps to understand where(on which host) to place the Virtual Machine while migration or while manually creating. The placement algorithm based on the rule defined evaluates the performance data for the workload and the  host. The placement rule enhances the Hyper-V cluster in defining and selecting ‘Preferred Owners’, ‘Possible Owners’ and ‘Availability Sets’.

You can find further information on this here.

Host Reserves :

                      I personally liked this feature very much as this guarantees the performance of a Host. This feature technical helps the administrator to reserve the resources on a host level. The placement algorithm checks into the host reserves settings while placing the virtual machine and in case if the host requires resources from these reserved ones, it will throw an error. Hence, this feature helps to run a host with the best performance which the administrator wanted and set the resources with.!

image

Dynamic Optimization :

                      Using this property, an administrator can set the thresholds on the host level based on which Dynamic Optimization balances the VM load within a cluster. Administrators can even configure the aggressiveness level which when met, the VM’s can be configured to get migrated to another host automatically.

image

                     Power Optimization is an additional feature which can be also be used to save the power by evacuating a host of a balanced cluster. Technically, this feature is a very good one especially when you have a setup of multi node cluster.

image

Network :

              Here, The host group can be attached with the Network resources like ‘IP Pools’, ‘Network Load Balancers’ or ‘Logical Networks’.

Storage :

             Here, the Host Group can be allocated with the Storage Pools and LUN’s.

Both Network and Storage needs their own configuration before it can be associated with a Host group.

And, our upcoming articles in this series would be explaining them in detail.

During this course, if you have any doubts or need any clarification please feel free to mail to info@careexchange.in

Stay Tuned….!

A problem occurred while you were trying to use your mailbox Exchange 2010

While accessing a mailbox via Outlook Web Access – its ends up with this below error

(A problem occurred while you were trying to use your mailbox)

image

Steps to resolve –

Verify its one mailbox or many mailboxes are having this issue

If its one mailbox try moving the mailbox to a different database and check if that resolves.

Verify mailbox is accessible via Outlook .

In my case . I was having Event generated for the particular user

Log Name:      Application
Source:        MSExchangeIS
Date:          4/19/2014 11:22:30 AM
Event ID:      9646
Task Category: General
Level:         Error
Keywords:      Classic
User:          N/A
Computer:      mail.careexchange.in

Description:
Mapi session “b3cb9ed0-e667-4568-997e-b5e518f6bb70: /o=CareExchange/ou=Exchange Administrative Group (FYDIBOHF23SPDLT)/cn=Recipients/cn=Sathesh. | CareExchange70c” exceeded the maximum of 16 objects of type “session”.

Open Registry

  1. On the server that is running the Exchange Server 2010 Mailbox role, click Start, click Run, type regedit, and then click OK.
  2. Locate and then click the following key in the registry:
    HKEY_LOCAL_MACHINE\SYSTEM\CurrentControlSet\Services\MSExchangeIS\ParametersSystem
  3. On the Edit menu, point to New, and then click DWORD Value.
  4. Type Maximum Allowed Service Sessions Per User, and then press ENTER.
  5. On the Edit menu, click Modify.
  6. Type the decimal value that specifies the number of sessions to 28 (Max is 32), and then click OK.
  7. Exit Registry Editor.

Make sure you don’t put it to max . if there are many users . it can make the server to be unstable as all the users will be able to make 28 non-mapi sessions to the server .

Non Mapi sessions are IMAP, POP, Outlook Web Access, Microsoft Exchange ActiveSync (EAS), or Exchange Web Services (EWS).

image
image

Click Ok.

Now mailbox is accessible .

(you can try doing a IISreset if its still inaccessible)

Reference KB –

https://support.microsoft.com/en-us/help/980049/you-cannot-connect-to-an-exchange-server-2010-mailbox-from-outlook-web

Build Your Own LAB: Deployment & Migration to Microsoft Office 365 Cloud – Part 5

Let’s now run through the last part of this blog series in which will see the ADFS and Hybrid setup.

Hybrid Migration (Exchange 2010)

Having hybrid setup you have the option to have single sign on implemented using MS Directory Synchronization tool or Active Directory Federation Services. In our LAB scenario we made sure during configuring DirSync we didn’t select the option enable password sync and hence would be setting up ADFS server.

Let us have the LAB ready and setup in place.

  1. Virtual Machine – As we have already have created the VM for ADFS and in my case as mentioned below.


  2. Installing ADFS server role – I followed the link and input was as per my lab scenario. We would be ensuring the ADFS is installed as standalone and if you want to test HA better to create FARM using Windows Internal Database setup providing the FQDN which can be reached via internet to on premise AD in my case I have used sts.msexchangeasia.in

  3. Create a service account for ADFS service and in my case I created one called adfsservice

  4. Make sure the DNS A record is registered on internet as mentioned below.


  5. Make sure you create and configure endpoints on SSL service


    Federating the domain with Azure AD – this is the critical part where you update cloud AD about the on premise domains which are federated post which when you enter the credential at portal.microsoftonline.com the MS federation server will then redirect the request to on premise ADFS for single process with on premise to authenticate and get the mailbox access. For your convenient create a shortcut of the Windows Azure PowerShell from – C:\ProgramData\Microsoft\Windows\Start Menu\Programs\Windows Azure Active Directory.

  6. Connect to Windows Azure AD as mentioned below


  7. After successful authentication you can check for federated domain which are already federated and since I have already updated Azure AD you will see the below results.


  8. If you want to setup a new federated domain or update existing one enter the below commands

    New


Update


This will help you in case your configuration was changed or the ADFS server was crashed due to some reason.

  1. Verifying the redirection – Once you try to login via portal.microsoftonline.com with your company email address the login page would be redirect you to the company ADFS server as mentioned below.


    1. At above portal you enter your company email address and click on password area


    1. The portal will be then redirect the request to ADFS as you have already informed / updated the msexchangeasia.in domain is federated via PowerShell in above steps and as you notice below screen the url is changed to ADFS server as sts.msexchangeasia.in


Drilling down to our Hybrid setup configuration below are the prerequisites to be taken care.

  1. Make sure the Public Certificate with the required alternate names like mail.msexchangeasia.in / autodiscover.msexchangeasia.in is listed. SMTP service is assigned enabled on the Exchange Public Certificate


  1. Add Exchange online to Exchange Management Console – check below step


    Give the tenant name and select on-line, provide the Office 365 Admin Credentials


    Verify the tenant is added successfully.


  2. Create a new Federation Trust via Organization Configuration option @on premise, in my case I’ve already created and re-running using manage federation option


  3. Configure the domain proof record @Internet DNS, to get the domain proof run the below command using PowerShell


    Copy the domain proof value and create a txt record @internet DNS and in my case at godaddy dns control panel.


  4. Create and configure Organization Relationship


    Enter the external Exchange organization – which is what we subscribed to Office 365 as msexchangeasiain.onmicrosoft.co


    Upon successful completion the results would be automatically updated as mentioned below.


  5. Configure the Hybrid Wizard
    • Run the wizard to check if the prerequisites were met


    • Provide the on premise and online credentials


    • Add the domain which is federated


    • Verify the provisioning status is active


    • Add the CAS / HUB servers


    • Enter the public IP used by Exchange Server to send email out of the internet and EOP online will whitelist the IP to receive from on premise to cloud. Also make sure the FQDN mentioned here must be listed on the

      Exchange Certificate


    • Select the appropriate certificate and the mail routing option


    • Verify the settings and complete the wizard


    Post configuring Hybrid setup upon creation of new mailbox the below email address policy will be applied.


    The user which is created and moved online on cloud gets converted mail users as mentioned below with additional target remote routing address stamped with owaredirectu2@msexchangeasiain.onmicrosoft.com as the MX is still pointed to on premise Exchange 2010 and the mailbox was moved to cloud based on the remote routing address the email will be forwarded to MS EOP using the send connector which was automatically created during the hybrid configuration wizard. Similarly the receive connector will also be created with all the Online IPs whitelisted to receive email on premise from cloud.


    Do some features testing on your own since you have a running LAB setup and below are some topics on which you can work on.

    1. Free Busy
    2. Mail tips
    3. Secure Email
    4. Move Mailbox
    5. Archive Mailbox – for this you will need additional trial subscription to be added using the existing subscription under license option in the Office 365 Portal as mentioned below.


Hope now you had enjoyed setting up this lab and good to know the resources availability which is so ease to gather which & convenient to test the scenario what fits us and accordingly evaluate the benefits of migration and moving to Microsoft Office 365 Cloud.

Hope that’s been informative & Enjoy J

Build Your Own LAB: Deployment & Migration to Microsoft Office 365 Cloud – Part 4

I hope you now had completed testing this scenario IMAP and CEM migration using Part 2 & Part 3 of this Blog Series, let us now move on to next part for Hybrid migration(Exchange 2010).

Hybrid Migration (Exchange 2010)


If you have a long term goal to maintain mailboxes in your on premise (having Exchange 2010) as well as cloud or have an existing Exchange 2003 or 2007 you must have minimal Exchange 2010 on premise installed and setup to enable Hybrid Deployment.

Having this Hybrid setup configured due to the Exchange Federation and Org. relationship setup with MS Office 365 there are no two separate Exchange organization and we can take the advantage of the below features.

  • Cloud Based Email Archiving
  • Secure Mail Routing between on premise / online
  • Unified Global Address List
  • Centralized mail flow – Outbound
  • Single Outlook WebApp URL for Online / on Premise
  • Move Mailbox on Premise to Online
  • Centralized Management Console
  • Message Tracking / Mail Tips / Multi-Mailbox Search

Let us have the LAB ready and setup in place.

1. Virtual Machine – In my lab I have configured in below steps.

  1. Created a Virtual machines on Windows Azure trial subscription under Virtual Network 192.168.0.0 network address range with cloud services as follow. The VM configuration consist of 2 Core, 3.5 GB RAM
  2. Exchange 2010(Windows 2008 R2) – mitpe2k10.cloudapp.net
  3. ADFS (Server 2012 R2) – mitpadfs.cloudapp.net
  4. ADS & DirSync (Server 2012 R2) – mitpadfs.cloudapp.net


  1. Installed Domain Controller services with msexchangeasia.in having DNS AD integrated & reverse lookup zone for the subnet 192.168.0.0 and made sure the records are populated for DC.


  1. Installing and Configuring Exchange 2010 SP3
    1. Downloaded the Exchange 2010 SP3 from the Microsoft Download Center and extracted the setup in C:\Exchange 2010 folder
    2. Installed prerequisites like dot net framework 3.5 using windows features
    3. The Organization preparation will be done during the Exchange 2010(SP3) Installation setup.
    4. Run through the Exchange 2010 setup installation, provided the organization name as MSExchangeAsia, Post Exchange 2010 Installation rebooted the server.
    5. Enabled Outlook Anywhere with the FQDN – mail.msexchangeasia.in
        

  1. Configured the Exchange Virtual Directories – AutodiscoverServiceInternalURI / Web-Services / OAB / OWA / EAS Virtual Directories

                           image


  1. Configured OWA virtual directory for OWA redirection


  1. Imported SAN certificate using power shell and enabled Exchange service like IIS on to the certificate. (Certificate should have minimum 3 records mail/autodiscover/sts – for ADFS)


  1. Create an endpoint rules for SMTP (25) and SSL (443) services so that Exchange 2010 can send / receive emails and connect using autodiscover service externally on internet


  1. Create internet / intranet DNS record like webmail.msexchangeasia.in / autodiscover.msexchangeasia.in / sts.msexchangeasia.in / mx.msexchangeasia.in


  1. Test the Exchange 2010 Outlook anywhere functionality @ https://testexchangeconnectivity.com and verify the test is successful.


  1. Let us create some test mailboxes, groups and contacts at on premise Exchange organization so that we can test the successful migration.


  1. I have created an Office 365 trial subscription tenant msexchangeasiain.onmicrosoft.com and will login to the portal.microsoftonline.com


  1. Verify the domain is added and verified as mentioned below.

               image

  1. Next step to enable Active Directory Synchronization, in my case I have already activated and hence it’s showing as deactivated.


  1. Click on Manage next to DIRSync to down the setup file and install on domain controller


  1. Prior to running the setup the OS must meet the prerequisite on OS 2012 to have dot net framework 3.5 & 4.0. Post meeting the pre-requisites just install the DirSync tool. Directory Sync Configuration Icon will be available on the desktop and you can double click to further pending configuration.


  1. Enter the Office 365 tenant admin credentials and in my case msexchange@msexchangeasiain.onmicrosoft.com


  1. Enter the on premise admin credentials who is member of enterprise and domain admin groups.


  1. Select enable Hybrid Deployment to give access DirSync tool to allow certain attributes write back from cloud to on premise.


  1. Do not enable password Sync as for single sign we will be using ADFS for this LAB


  1. Click on next to complete the configuration

             image

  1. You can select the option synchronize your directories now which forces tool to start synchronizing the objects on cloud


  1. You could also run manually via PowerShell shortcut which is available in the setup installed path on DirSync server which I have created as shortcut on desktop.


  1. Now verify on Office 365 portal if the users are successful synchronized to cloud as mentioned below.


Hope this have been informative and stay tuned for our last part of LAB scenario on Hybrid (Exchange 2010) migration which will cover the prerequisites and setups to configure ADFS / Hybrid and some features testing.


× How can I help you?