31 C
Dubai
Monday, May 5, 2025
Home Blog Page 83

Virtualization with System Center VMM 2012 R2 – First Step towards the SDDC/SDN…..!!!


In my last post, I had briefed about the concept Software Defined Datacenter (SDDC) and the leading technologies available in the industry to modernize your Datacenter. Microsoft, specifically termed this concept as a Software Defined Networking (SDN).

Moving forward, our most of the articles would be an effort to showcase its adaptation process and methodologies primarily on top of the Windows Server 2012/2012 R2, System Center 2012/2012 R2 family suite and the Windows Azure Cloud.


In the previous article, I did mention that though the concept SDDC/SDN is not just the Virtualization, but Virtualization is definitely the most important and the core component for the SDDC/SDN and its adaptation should ideally start from it…..!!!!!!!


Windows Server 2012 R2 Hyper-V is the Microsoft’s latest and most robust Hypervisor platform which enhances and enables an organization to optimize and consolidate the physical server infrastructure.

Windows Server 2012 R2 Hyper-V server together with System Center Virtual Machine Manager 2012 R2 (SCVMM) delivers a unified management across on-premises, service provider and Windows Azure environments.

There are two options through which Hyper-V platform can be installed:

– Installing the Hyper-V Role on Windows Server 2012 R2 or

– Installing the Hyper-V Server 2012 R2 on a bare metal server which will install just the Hyper-V footprint into it and the VMM would be required to manage the hypervisor. The Hyper-V Server 2012 R2 is free of cost and is a downloadable one.


Now, In this article I wont be showing the Installation of Hyper-V Server as it’s very simple click and go setup. But, would definitely like to take you all through VMM 2012 R2 installation.

In order to Install the VMM 2012 R2, make sure about meeting the prerequisites, especially:

1. SQL Server 2008 R2(Standard, Enterprise and Datacenter) or SQL Server 2012(Standard and Enterprise)

Note : Express Edition of SQL is not supported.

Note : ‘Database Engine Services’ and ‘Management Tools – Complete’ features of SQL Server are required.

2. Microsoft .NET Framework 4.5 or Microsoft .NET Framework 4.5.1

3. Windows Assessment and Deployment kit (Windows ADK) for Windows 8.1


We have already Installed all the necessary prerequisites.

image

Click on Install. The Next page will give you the options to select:

VMM Management Server &

VMM Console (If you want to install just the VMM console on your client machines, you have to run this setup and select this option.)


As, we want a complete Management server to manage our Hyper-V servers we will select VMM Management Server. Click On Next.

image

On the next page, you will get the option to register the product by giving the Name, Organization Name and the product key.

For trial versions, you can skip the Product Key information and click on Next.

Agree to the license agreements and click Next.

Select the appropriate option for CEIP. I personally prefer to select it. Click Next.


image

Its recommended to select ‘ON’ to use the Microsoft Update to check for the updates. Click Next.

Select the Installation Location. Click Next.

Make sure the prerequisite review finishes successfully and Click Next.


image

In the Database Configuration Page:

Mention the SQL Server Name. Its not necessary to have a dedicated SQL server or Instance for VMM, you can use your existing SQL server or Instance to accommodate the VMM Database. In our case, we have Installed the SQL Server 2012 standard edition on the same server.

Make sure the right Instance names gets populated. We are proceeding with the default Instance ‘MSSQLSERVER’.

Select or create a New Database. We will go with a new database. Click on Next.


image

In the Service Account configuration page, select the type of service account to be used.

I would recommend to go through this article before selecting it. We are going to use a domain account which has the appropriate permission(member of Local Administrators of the Computer).

For Distributed Key Management setup, if you are planning for a highly available VMM server its wise to store the encryption keys in AD. This is mainly considering a scenario of one VMM server fails over to another VMM server in a cluster, the VMM service would require access to the keys to access the database.

As we are planning to configure our VMM server in a Cluster down the lane, we would store the keys in our AD (OU=VMMKEY,OU=Encryption,DC=TECHDEFINE,DC=COM). Click on Next.


image


In the Port Configuration page, you can configure the port numbers for various VMM features and their proper communications.

We will proceed with the default port numbers. Click on Next.

Configure the Library folder location. Click on Next.

Review the Summary and click on INSTALL..!!


image


image


image

The VMM is now installed successfully.


Open the VMM Console.

image


VMM 2012 R2 has got some very good new features which enhanced the ability of overall Datacenter Management.

image


‘FABRIC’ would be the VMM Management component which likely to be the most used option.

image

Under this management option, major Infrastructure components like the Servers, the Networking and the Storage can be defined and managed.


In our upcoming articles, we will explore the various features of VMM2012 and explain how the hypervisor servers can be integrated and managed within.


Stay Tuned…!!!!

Build Your Own LAB: Deployment & Migration to Microsoft Office 365 Cloud – Part3

I hope you had this successful LAB for the IMAP migration using Part 1 Blog Series and will move on to our next migration option called Cutover Exchange Migration.


Cutover Exchange Migration.

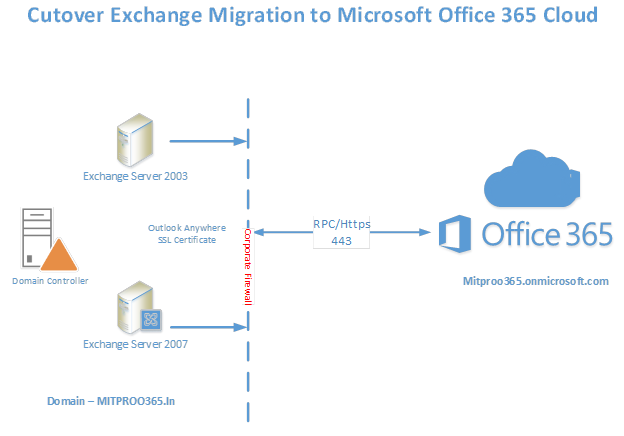
clip_image002

Cutover Exchange migration is the approach when you want to migrate from a legacy (Exchange 2003 & 2007) Exchange environment having maximum number of mailboxes to 1000. When you actually perform a CEM the migration service on cloud provisions users/contacts/groups automatically for each accounts on on premise Exchange organization. There are certain prerequisites which needs to be taken care before starting migration batch and post migration too which will be seeing soon below step by step.


Let us have the LAB ready and setup in place.

1. Virtual Machine – In my lab I have configured in below steps.

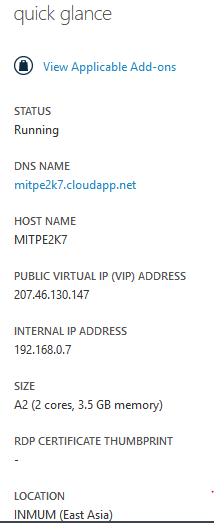
a) Created a Virtual machine on Windows Azure trial subscription under the Virtual Network 192.168.0.0 network address range with cloud service selecting as mitpe2k7.cloudapp.net. The VM config consist of 2 Core, 3.5 GB RAM with Windows 2008 R2 SP1 Operating System

clip_image003

b) Installed Domain Controller services with mitproo365.in namespace having DNS AD integrated.

clip_image005

c) A reverse lookup zone for the subnet 192.168.0.0 and made sure the records are populated for DC.

2. Installing and Configuring Exchange 2007 SP3

a) Downloaded the Exchange 2007 SP3 from the Microsoft Download Center and extracted the setup in C:\Exchange 2007 folder

b) Installed prerequisites like dot net framework 3.5 using windows features

c) The Organization preparation will be done during the Exchange 2007 Installation setup.

d) Run through the Exchange 2007 setup installation, provided the organization name as MITPROO365. Post Exchange 2007 Installation rebooted the server.

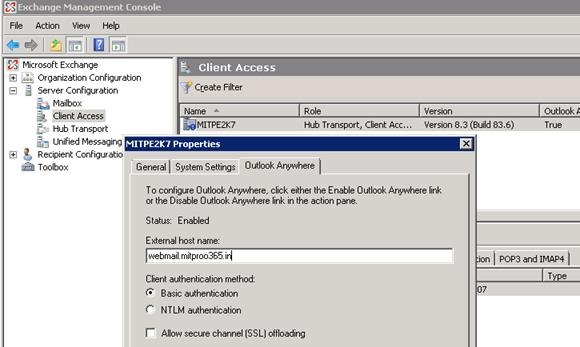
e) Enabled Outlook Anywhere with the FQDN – webmail.mitproo365.in

clip_image007

3. Configured the Exchange Virtual Directories – AutodiscoverServiceInternalURI / Web-Services / OAB / OWA / EAS Virtual Directories

clip_image008

clip_image009

4. Configured OWA virtual directory for /OWA redirection

clip_image011

5. Imported SAN certificate using power shell and enabled Exchange service like IIS on to the certificate. (Certificate should have minimum 2 records webmail/autodiscover)

clip_image013

6. Create an endpoint rules for SMTP (25) and SSL (443) services so that exchange can send / receive emails.

clip_image015

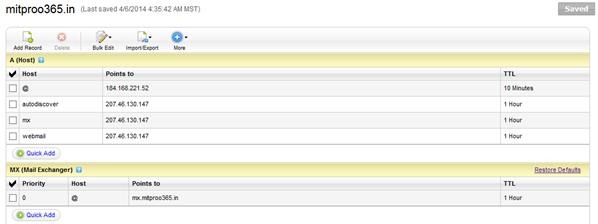
7. Create internet / intranet DNS record like webmail.mitproo365.in / autodiscover.mitproo365.in

clip_image017

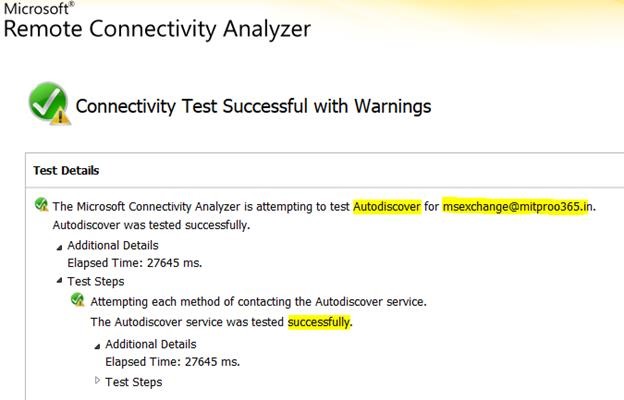
8. Test the Exchange 2007 Outlook anywhere functionality @ https://testconnectivity.microsoft.com/ and verify the test is successful.

clip_image019

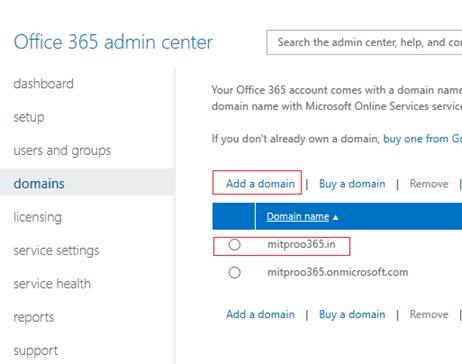
9. Office 365 Subscription and tenant verification:

We have already configured the Office 365 tenant for the domain MITPROO365.in in our previous part of the blog series.

clip_image021

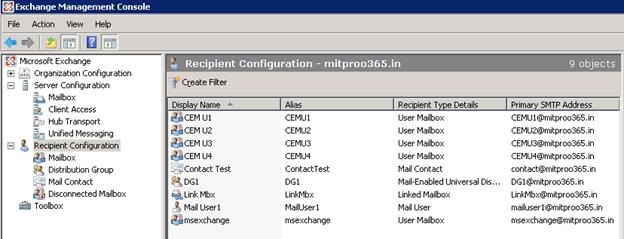
10. Let us create some test mailboxes, groups and contacts at on premise Exchange organization so that we can test the successful migration.

clip_image023

11. Migration Batch – Since we are done with the prerequisites and setup configuration we will now perform CEM using Office 365 portal

clip_image024

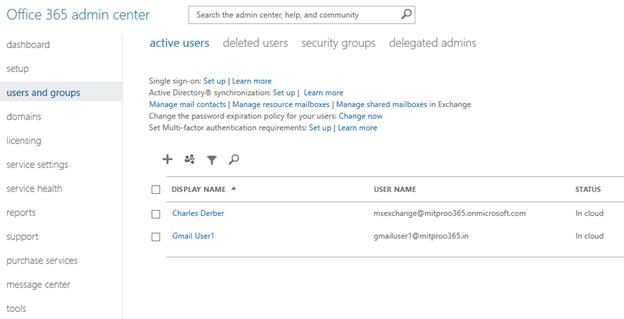
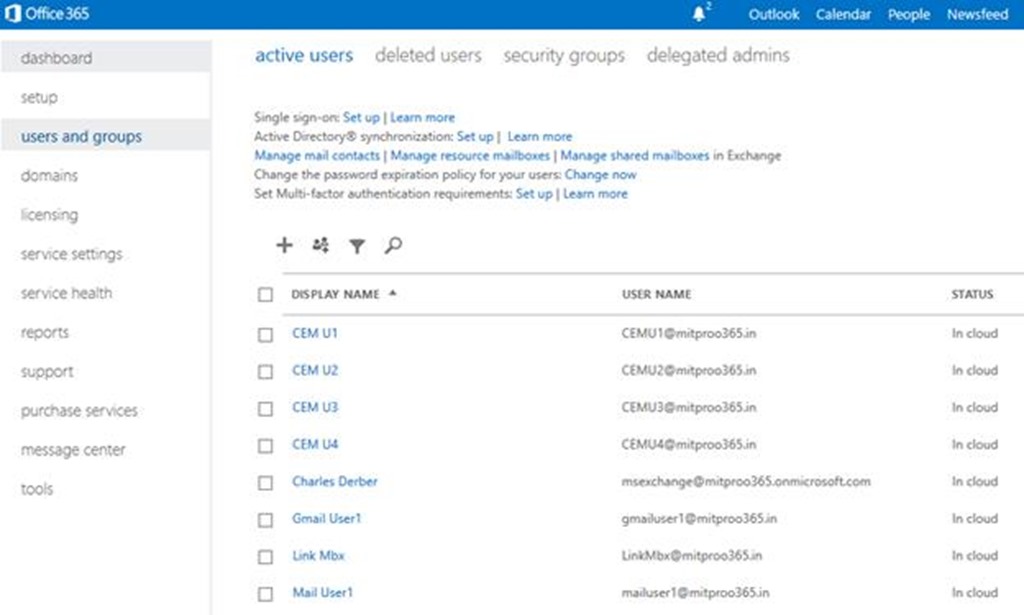
12. Let us verify we don’t have any users of on premise on Office 365 Cloud

clip_image026

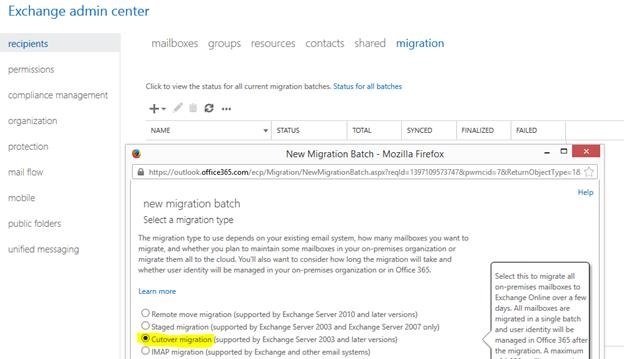
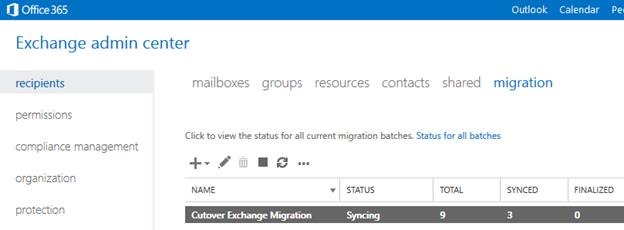
13. Using Exchange Admin Center will migrate with Cutover migration option

clip_image028

a) Provide the on premise delegated Full Access Permission credentials to migrate the mailboxes.

clip_image030

b) Since we have setup / configured the Exchange 2007 environment properly it has automatically fetched the Exchange Server information.


clip_image032

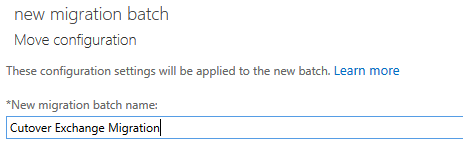
c) Provide the Batch migration name as desired

clip_image033

d) Select the admin mailbox to send migration report & you could start the migration right away or later as per your convenient.

clip_image035


clip_image036


e) We can monitor the progress of the migration happening as mentioned below

clip_image038

f) You will further see the Exchange recipient was provisioned automatically with the help of migration service.

clip_image040

All looks good J successful migration and you can check the admin inbox for the detailed report.

Post successful migration

Ø Assign licenses migrated users on Office 365 – be aware of the grace period

Ø Configure an MX / Autodiscover DNS record to point it to cloud

Ø Implement a single sign-on solution

Ø Decommission on-premises Exchange servers

Note:

§ There was good question brought up by the participants which I wasn’t aware whether linked mailbox can be migrated or not but logically I answered yes and replied would get back to him shortly as I never had that scenario. Later no sooner I had this cross forest setup on Azure lab with msexchangeasia.in domain was able to successfully migrate the Linked Mailboxes as well. In this blog series I had we had also migrated the Linked mailbox called Link Mbx whose account resides in the forest msexchangeasia.in. If you need the detailed step just buzz me and I will email you the entire steps as I have documented it.

§ Make sure you don’t enabled Directory Synchronization enabled on Office 365 portal or else the cutover migration option will be disabled via migration wizard.

Hope this have been informative and stay tuned for our next last LAB scenario on Hybrid (Exchange 2010) Migration.

Build Your Own LAB: Deployment & Migration to Microsoft Office 365 Cloud – Part2

I hope you are now done with the LAB resources and setting up prerequisites to create LAB. Let us further drill down to the architecture view & configuration of the LAB to perform some test migrations.


We will do some of the below migration approach:


IMAP Migration also called Simple Data Migration.


IMAP


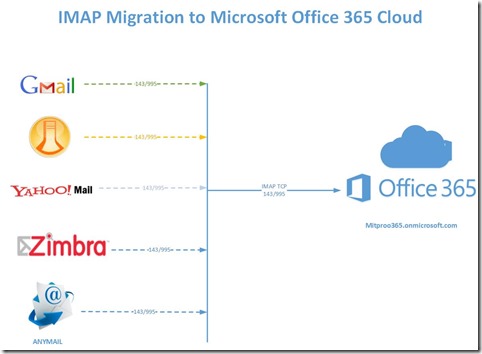
This is basically migrating from the source messaging environment mailboxes to Office 365 using IMAP client features, for this particular lab we will create test mailbox in gmail.com and then using the trial subscription from Office 365 Cloud on the migration wizard, pull the emails items providing Csv file which contains the credential details of Gmail mailbox and corresponding email address on Office 365 tenant. Prior to start migration we will take care of the account provisioning for the respective Gmail mailbox and make sure we have added the domain on to Office 365 portal.


Let us verify the prerequisites and steps to migrate.

1. Verify the access to IMAP on the source messaging environment, try to telnet the IMAP server in my case imap.gmail.com. For some org. the telnet client features itself is not installed by default on systems or the IMAP request from LAN is restricted. Hence the objective is to verify you are able to access Gmail mailbox using IMAP protocol.


clip_image003


Post entering the command you would notice the result is blinking or a banner with some description mentioning the service is ready to accept connections.

clip_image004


2. Office 365 Tenant setup with domain configured (in my case MITPROO365.in)


3. Login to your tenant portal & add domain


clip_image006


Make sure you have added your domain and verified as mentioned below


clip_image007


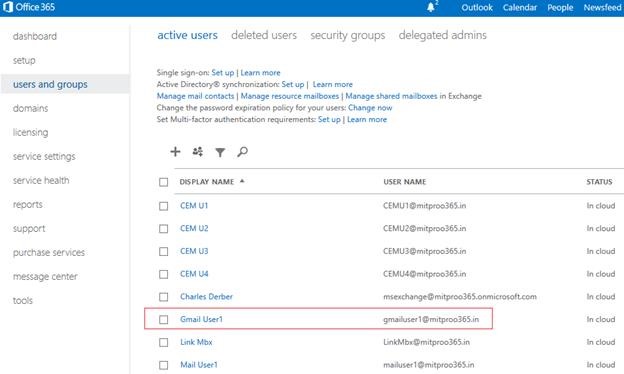
4. Provision 1 user account to migrate from Gmail mailboxes – in my case I have created a mailbox and assigned a license for the selected user.


clip_image009


5. Make sure you have the IMAP user credential (username/pwd) and create a csv file for migration as mentioned below.


clip_image010


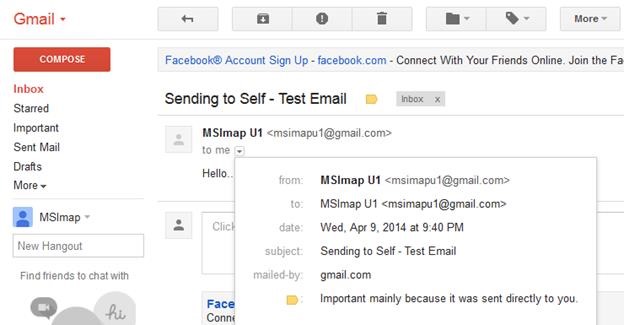
6. Let’s send and receive test email to fill up Gmail mailbox and then will verify the same is migrated in office 365 mailbox.

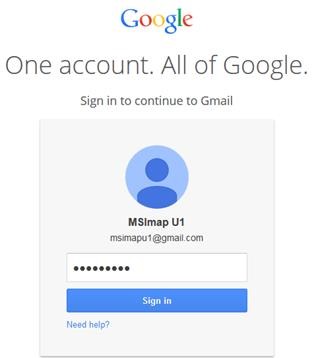
Login on to test Gmail mailbox


clip_image012


This is to fill up the mailbox and will the same is migrated to office 365 mailbox.


clip_image014


7. Let us now migrate using the csv file @Exchange Migration Wizard à Office 365 Portal


clip_image016


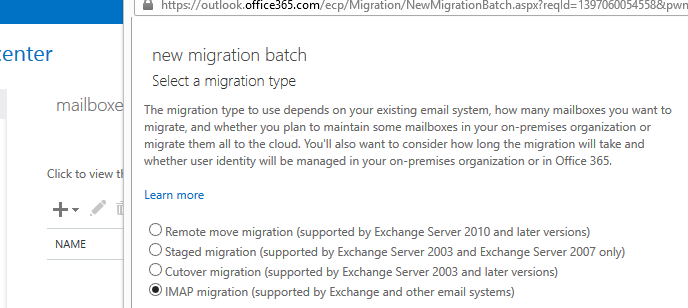
Click on + option, migrate to Exchange Online and select IMAP migration


clip_image017


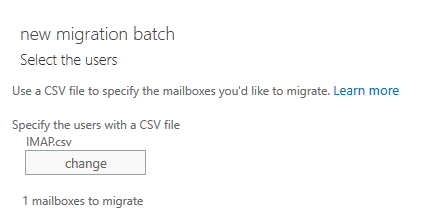
8. Browse to the csv path and you will see it has read the file content and found 1 mailbox to migrate


clip_image018


9. Provide the source messaging server details and the protocol (IMAP) used, in my case Gmail.

clip_image020


10. Give some name to migration batch

clip_image021


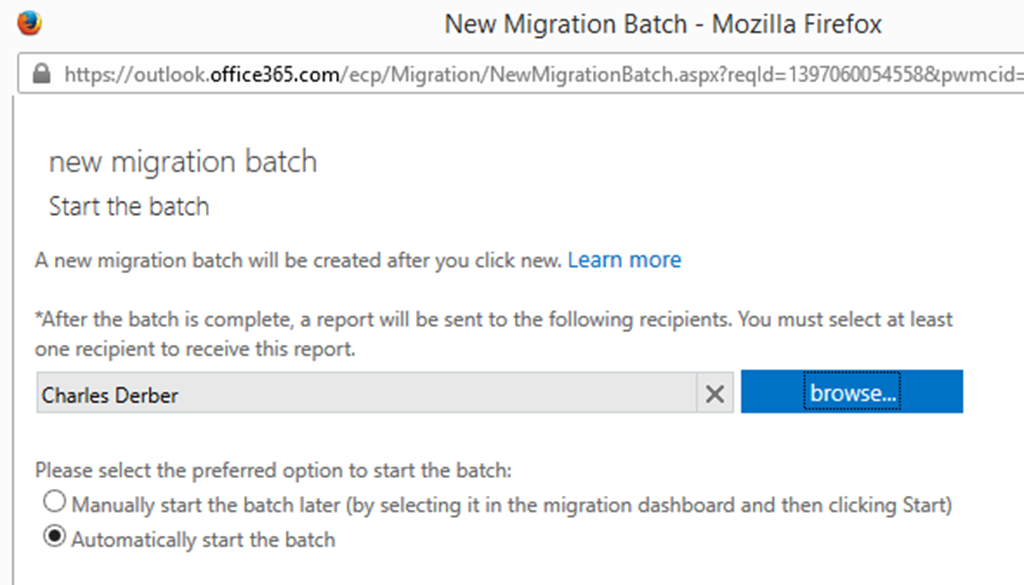
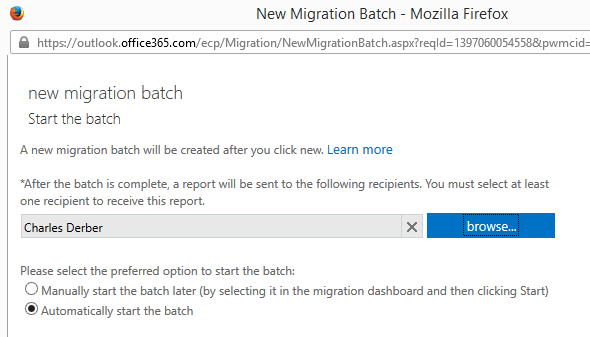
You can further configure the mailbox to whom the report must be sent and whether to start the migration now or later as per your convenient – I will select now.


clip_image022


You can further monitor the progress as mentioned below.


clip_image024


Post migration completion, Login Office 365 mailbox to which the Gmail mailbox is mapped to migrate and you will see the email item migrated successfully


clip_image026


Since we had selected Charles Derber to send report post migration below is the report.

clip_image028


Hope this have been informative and stay tuned for further LAB scenario on Cutover Exchange & Hybrid (Exchange 2010) Migration.

Build Your Own LAB: Deployment & Migration to Microsoft Office 365 Cloud – Part1

The LAB is setup basically to test IMAP / Microsoft Exchange Cutover & Hybrid (2010) Migration on your own. I will not jot down each and every steps which are involved to setup this LAB due to time constraint rather will guide you in a way that any MS Exchange Guys who wants to evaluate the migration approach can do.

During this test lab setup if you have any queries please feel to write us info@careexchange.in and will try to help you accordingly.

Below are the checklists you must know to create your own LAB and before getting your hands dirty


Internet DNS Registration

clip_image002

Go to http://www.godaddy.com and register for the 2 internet domain names, in my case I registered msexchangeasia.in and mitproo365.in. It had cost me approx. 398 Rs. which is again convenient for me and hopefully to all.

If you have already registered the domains, you don’t have to register a new one.


Office 365 Trail Subscription.

clip_image003

Subscribe for the E3 Trail plan – http://office.microsoft.com/en-001/business/office-365-enterprise-e3-business-software-FX103030346.aspx

I subscribed for two E3 Plans for my LAB as mentioned below.

1. msexchange@msexchangeasiain.onmicrosoft.com (Hybrid Scenario)

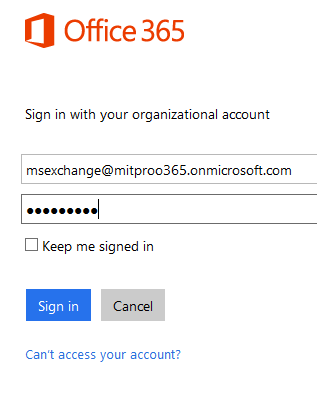
2. msexchange@mitproo365.onmicrosoft.com (IMAP / Cutover Scenario)

Microsoft Windows Azure – LAB Resources


clip_image005

http://azure.microsoft.com/en-us/pricing/free-trial/

The subscription will cost 1$ via credit card for the purpose of verification to confirm if the account is not misused. You will soon have the resource access post account creation with 200$ credited.

DigiCert – Exchange SAN Certificate

clip_image007

Chat with DigiCert support to get the one month trial SSL SAN certificate with promo code link and register yourself

https://www.digicert.com/link/chat.php

Make sure you have the domains registered and a identify proof to submit and post verification you will get the certificates and in my case I got the below

1. Msexchangeasia.in (mail.msexchangeasia.in / autodiscover.msexchangeasia.in / sts.msexchangeasia.in / legacy.msexchangeasia.in)

2. Mitproo365.in – (webmail.mitproo365.in / autodiscover.mitproo365.in)


Microsoft Windows Azure – LAB Guidance

1. Create a virtual networks with any C class address range – in my case I used 192.168.0.0 / 24

clip_image009

2. Create two DNS server for this Virtual as we are going to put two forest DNS servers called msexchangeasia.in & MITPROO365.in IP address

clip_image010

3. Create 3 Cloud services

clip_image012

4. Create Virtual Machines

clip_image014

When you create a virtual machines important thing to keep in mind. (Use Basic A2 2 Cores, 3.5GB Memory)

MITPADDIR & MITPADFS virtual machines servers should be created under one cloud services mitpadfs.cloudapp.net

MITPE2K10 virtual machine server should be created under one cloud service called mitpe2k10.cloudapp.net

MITPE2K7 virtual machine server should be created under one cloud service called mitpe2k10.cloudapp.net

Doing so you get individual public IP address to connect from internet to your ADFS / Exchange 2010 & Exchange 2007 servers.

Select the existing cloud service(for each set of servers as mentioned above) and virtual network instead of new as mentioned below and leave else default.

clip_image015


Virtual Machines Configurations & Setup

clip_image017

clip_image019

clip_image021

Important things to know.

§ Keep an eye on account.windowsazure.com to check your credit limit and make sure you don’t exceed the available amount or else will get deducted from your credit card for no refund once the usage exceeds the given credit limit(250$)

§ Complete your LAB within a month as it’s a free trial subscription

§ Evaluate the certificates within a month as it’s a free trial and will get expired accordingly.

§ Make sure you know the sequence of the created Virtual Machines and when you want to shutdown, make sure you do it in the reverse sequence or else the LAB might get crashed by simply because of the change in IP addresses of the virtual machine. Shutting down in sequence and in order there wouldn’t be any issues.

§ Do not turn of your virtual machine using remote desktop rather use Azure Portal and the status should shows as de-allocated rather than just shutdown, if the status is not de-allocated your credit will get deducted as the resources are still being used.

Soon in my next part of the blog series will help you know how to setup Domain / DNS Registration / 2 Exchange Org Setup and Migration Guide.

A new Internet Threat “Heartbleed” Bug….!!!


A very serious encryption flaw has been reportedly affected the Internet exposing sensitive information like Passwords and credit card numbers…!!

Find more information here:

http://heartbleed.com/


image


This vulnerability, its impact and corrective actions are further explained in NVD Website and here.


Also, find the updates from various IAAS providers:


Microsoft Azure

Information on Microsoft Azure and Heartbleed


Amazon Web Services

Heartbleed Bug Update


VMware

VMware Security and Compliance blog

The Concept “Software Defined Datacenter (SDDC)”

I am sure, majority of this blog readers must have heard or read about this most trending topic “Software Defined Datacenter”. This is the most recent and widely used Set of Techno-Marketing Jargons by the leading Technology giants to define the modern IT…!!!


So, What exactly is this Software Defined Datacenter?

Let me try to define it…….

Is it a Virtualization or probably an enhanced Virtualization?

Is it some sort of Software?

Is it a Cloud, a Private Cloud, a Public Cloud or probably a Hybrid cloud ?

Is it so called the IAAS, PAAS, SAAS or any xAAS ?

Well, I would say NONE OF THESE to be precise….!!!!!
 

SDDC, what I have learned and understood is a concept which enables each and every components of a Datacenter (Servers, Networking, Storage, Security, Monitoring and Managing the resources & services) to get automated and function efficiently and most importantly to become flexible for tomorrows Business and IT requirements. There is no fixed setup methodology to achieve and implement this concept. Perhaps, it’s a mixed use of all the components with Virtualization being the core component and the IT governance defined policies based on the business requirements to deliver an IT as a Service to the Business. (ITaaS). This concept apparently enables the IT to become Scalable in order to support the organizations growing business demands efficiently.


So, How to implement this SDDC?

This is where I really would like to start by appreciating the Technology Giants like Microsoft, Vmware, IBM, Cisco, Citrix etc. on the way they derived this concept by understanding and anticipating the different Industry requirements.

In order to implement SDDC, it is very important to strategize the planning, deployment and implementation the SDDC. It requires, a detailed conceptual understanding of the products provided by various players in the market. A detailed analysis is required on whether your existing Datacenter can be transformed to a SDDC, or it requires a complete redesigning and restructuring? Ultimately, this concept adaptation is not a one or two days Job, in fact it’s a complete end to end Project implementation cycle on itself.

Microsoft and VMware are currently the main providers of the SDDC concept through their set of product suites. I wont be explaining the products, their technicalities, deployments and provisioning methodologies in this article. But, I would definitely give a brief about them to conclude this article with.


image


VMware helps to adapt the concept SDDC, through their updated version 5.5:

  • VMware vCloud® Suite

This suite helps to build a policy driven Datacenter on top of the vSphere Platform.  This suite has features like vSphere ESXi, DRS, vMotion, Storage vMotion in order to deploy a High Available virtualization platform.

  • NSX Network Virtualization

A solution which sounds extremely good and could be a revolutionary concept which enables the IT to virtualize the Networking. Personally, I believe there is a lot of scope of improvement in this and I am sure the roadmap for this would be very promising.

  • Virtual SAN

Every Datacenter Architect or Manager would agree that, Storage is possibly the costliest component of a Datacenter. And, for the same reason I would say this solution as the most important in a SDDC, which enables the IT to define and manage Storage in a much efficient way. The flexibility factor is to enable the pooling, replication and on demand distribution which can help in drastic cost reductions.

  • vSphere with Operations Management

This enables the IT to manage the capacity and the performance of the various features of the cloud suite.

  • vSphere Data Protection Advanced

A solution for efficient and reliable backup/restore of Virtual machines

  • vCenter Configuration Manager

A solution which enables the IT to integrate with and configure the datacenter environment. Plays a very important role in automating the compliance management.

  • vCenter Orchestrator

This solution, is the most important in terms of automating the delivery by integrating all the components of a datacenter together.


Microsoft also has set of suites which delivers similar solutions to implement SDDC. Though, Microsoft was little late into this race of SDDC, in last few years Microsoft did develop and release some very good solutions in form of Windows 2012/2012R2 and System Center 2012/2012R2 to adapt the SDDC.

Microsoft’s Windows 2012/2012 R2 and System Center 2012/2012 R2 suite delivers through:


  • Hyper-V Server

Solution which helps to develop a very robust hypervisor platform.

  • SCVMM (System Center Virtual Machine Manager)

A management solution, which enables the IT to manage multi hypervisor platforms together like VMware, Citrix XenServer. Other features include, Migration of VM’s from other hypervisor platforms to Hyper V, Network and Storage virtualization.

  • SCOM (System Center Operations Manager)

A Solution which can enable the IT to monitor and manage every components of a Datacenter in much more efficient way.

  • SCCM (System Center Configuration Manager)

Like, the vCenter configuration Manager this solution also also enables the IT to and configure the datacenter management along with compliance management. SCCM has certain added IT management capabilities like ‘Change Management”, “Inventory & Asset Management” along with added Performance Management capabilities.

  • SCDPM (System Center Data Protection Manager)

A Backup ad restore solution to backup the Virtual Machines and the applications. Personally, I like the concept of “Synchronization” and “Data Consistency checks” very much which actually provides benefits of Full Backup and reduces the amount needed to be backed up.

  • System Center Orchestrator

Like vCenter Orchestrator, this one is also a workflow automation solution which enables the IT to automate the monitoring and delivery of data center resources.

  • SCSM (System Center Service Manage)

It’s an Enterprise Management platform for automating the IT service management practices.

  • App Controller

A Self service tool which enables the stakeholders to easily configure, deploy and manage the VM’s.


In addition to these, Windows server 2012 R2 has few added components which enables the IT to integrate with Microsoft’s Public cloud service(Azure)….!!!!!!
 

In my upcoming blogs, I would love to share my experience of SDDC concept adaptation, focusing on the technicalities and the methodologies to adapt and implement the SDDC.


Stay tuned !!
× How can I help you?