42 C
Dubai
Sunday, May 4, 2025
Home Blog Page 80

How to Install Exchange 2013 Sp1 on Windows Server 2012 R2

Updated Version

Let us see How to Install Exchange 2013 Sp1 on Windows Server 2012 R2

You can Download the Exchange Setup Sp1 from the Below Link

Microsoft Exchange Server 2013 Service Pack 1 (SP1)

http://www.microsoft.com/en-in/download/details.aspx?id=41994

——-

Note in Exchange 2013 you can use the Latest CU Setup for New installations.

Cumulative Update 8 for Exchange Server 2013 (KB3030080)

https://www.microsoft.com/en-us/download/details.aspx?id=46373

——

Step 1:

To Prepare Active Directory

Install the Below Feature

Open Windows PowerShell.

Install-WindowsFeature RSAT-ADDS

image

Step 2:

Am Going to Install all roles in the Scenario

Open Windows PowerShell

Install-WindowsFeature AS-HTTP-Activation, Desktop-Experience, NET-Framework-45-Features, RPC-over-HTTP-proxy, RSAT-Clustering, RSAT-Clustering-CmdInterface, RSAT-Clustering-Mgmt, RSAT-Clustering-PowerShell, Web-Mgmt-Console, WAS-Process-Model, Web-Asp-Net45, Web-Basic-Auth, Web-Client-Auth, Web-Digest-Auth, Web-Dir-Browsing, Web-Dyn-Compression, Web-Http-Errors, Web-Http-Logging, Web-Http-Redirect, Web-Http-Tracing, Web-ISAPI-Ext, Web-ISAPI-Filter, Web-Lgcy-Mgmt-Console, Web-Metabase, Web-Mgmt-Console, Web-Mgmt-Service, Web-Net-Ext45, Web-Request-Monitor, Web-Server, Web-Stat-Compression, Web-Static-Content, Web-Windows-Auth, Web-WMI, Windows-Identity-Foundation

image

# Run Restart-Computer to Reboot the Server

Step 3:

Download and Install

Unified Communications Managed API 4.0 Runtime

http://www.microsoft.com/en-us/download/details.aspx?id=34992

image

Step 4:

Preparing Active Directory

Open Windows PowerShell

Browse to Setup Location

Run .

.\setup /Preparead /IAcceptExchangeServerLicenseTerms /OrganizationName:"Enter Exchange Org Name"

Note : If you are already in a Exchange Organization – Remove /OrganizationName Parameter

image

Step 5:

Preparing Schema

Open Windows PowerShell

Browse to Setup Location

Run .

.\setup /PrepareSchema /IAcceptExchangeServerLicenseTerms

image

Step 6:

Preparing Domain

Open Windows PowerShell

Browse to Setup Location

Run .

.\setup /Preparedomain /IAcceptExchangeServerLicenseTerms

image

Note :

If you are in a Child domain Scenario

Run

.\setup /Preparealldomains /IAcceptExchangeServerLicenseTerms

Step 7:

Choose Next

image

Step 7:

Choose Next

image

Step 8:

Choose the Roles

Choose Next

Note : You can see “Edge Transport Role is added” Which can be installed on a separate Server.

image

Step 9:

Choose Next

image

Step 10:

Choose Next

If you already Did “Step 4” you won’t see this Page. As Already Exchange Org is created

image

Step 11:

Choose No

&

Choose Next

image

Step 10:

Choose Install

image

Step 11:

image

Exchange 2013 SP1 Cu8 Installed Successfully !!

How to Configure Outlook Web App , Active Sync , Exchange Control Panel in Exchange 2013

Configuring Virtual Directories Simplified.

You need to make sure three things.

  1. External URLs are configured correctly.
  2. Right Ports are opened in the firewall.
  3. Certificates been Assigned properly


Then Outlook WebApp , Active Sync and ECP should work without any issues.

1. External URLs are configured correctly.

Open EAC (Exchange Admin Center) –> Servers –> Virtual Directories

Choose the Server you want to Configure which will be a internet facing client access server.

Click on the Spanner sign


image

Enter the External Client access domain .

image

To Configure it manually . – Powershell commands are for all available virtual directories. If you multiple servers please specify them

$urlpath = “https://mail.careexchange.in”
get-webservicesvirtualdirectory | Set-webservicesvirtualdirectory -ExternalUrl “$urlpath/ews/exchange.asmx”
get-oabvirtualdirectory | Set-oabvirtualdirectory –ExternalUrl “$urlpath/oab”
get-owavirtualdirectory |Set-owavirtualdirectory –ExternalUrl “$urlpath/owa”
get-ecpvirtualdirectory | Set-ecpvirtualdirectory –ExternalUrl “$urlpath/ecp” 
get-ActiveSyncVirtualDirectory | Set-ActiveSyncVirtualDirectory -ExternalUrl "$urlpath/Microsoft-Server-ActiveSync"

To Check the Existing Internal/External Urls

get-ClientAccessServer | fl *url*
get-webservicesvirtualdirectory | fl *url*
get-oabvirtualdirectory | fl *url*
get-owavirtualdirectory | fl *url*
get-ecpvirtualdirectory | fl *url*
get-ActiveSyncVirtualDirectory | fl *url*

2. Right Ports are opened in the firewall.

Ports need to be opened in the firewall —

25 – SMTP

443 – HTTPS

80 – HTTP

110 – POP TCP (TLS)

995 – POP TCP (SSL)

143 – IMAP TCP (TLS)

993 – IMAP TCP (SSL)

3.Certificates been Assigned properly

Configuring 3rd Party SSL Exchange Certificate in Exchange 2013

https://www.azure365pro.com/configuring-3rd-party-ssl-exchange-certificate-in-exchange-2013/

How to import a Wildcard SSL Certificate in Exchange 2013

https://www.azure365pro.com/how-to-import-a-wildcard-ssl-certificate-in-exchange-2013/

How to use a internal Windows CA (Certificate Authority) in Windows 2012 with Exchange 2013

https://www.azure365pro.com/how-to-use-a-internal-windows-ca-certificate-authority-in-windows-2012-with-exchange-2013/

Also See –

How to Configure/Troubleshoot Exchange 2013 Outlook Anywhere with Outlook 2013

https://www.azure365pro.com/how-to-configuretroubleshoot-exchange-2013-outlook-anywhere-with-outlook-2013/

10 Microsoft Cloud Products and Terms you many need to know

image

1.SCVMM – System Center Virtual Machine Manager

This is the primary VM lifecycle management tool for the solution.

2.SCOM – System Center Operations Manager

The purpose of SCOM in this solution is to provide performance and resource optimization (PRO) for the Hype-V server virtualization

infrastructure.

3.SCorch – The System Center Orchestrator

The purpose of SCORCH in is to provide the automation.

4.WAP – Windows Azure Pack

WAP is to provide the self-service portal for administration & tenant to access their dedicated infrastructure hosted on IaaS.

5.IaaS – Infrastructure as a Service

Offer computers – physical or (more often) virtual machines.

6.NVGRE – Network Virtualization using Generic Routing Encapsulation.

In short – In NVGRE, the virtual machine’s packet is encapsulated inside another packet. The header of this new packet has the appropriate source and destination IP addresses

7.SPF – Service Provider Foundation

This enables service providers and hosters to design and implement multi-tenant self-service portals that integrate IaaS capabilities available on System Center 2012 R2.

8.SOFS – Scale Out File Server

SOFS adds highly available, active-active, file data access for application data workloads to Windows Server clusters through SMB, Continuous Availability (CA), and Cluster Shared Volumes (CSV).

9.GUFS – General Use File Server

It supports NTFS and Resilient File System (ReFS),Branch  Cache,Data Deduplication where SOFS doesnt support these.

Good blog explains in detail about the differences of these file servers.

http://blogs.technet.com/b/filecab/archive/2013/12/05/to-scale-out-or-not-to-scale-out-that-is-the-question.aspx

10.DbaS – Database as a Service

Windows Azure Pack gives out a feature to use SQL Server giving out Database as a service.

Does Exchange server 2013 Need a Backup ?

Does Exchange 2013 Need a Backup ?

The answer is “No” in a typical business model . It can be Yes in some cases.

image

Lets discuss it in detail .

if Exchange Server is a member of DAG(Database Availability Groups) and databases having healthy copies. Eventually its going to failover with no data loss in the event of failure . where there is no need of real backup .

Exchange Databases are eventually huge as there is a fashion of large mailboxes . Exchange 2013 managed store reduces the IOPS and it makes the Exchange server much efficient   . So that Exchange 2013 can just use JBOD disks to manage the storage. You will need to compare the amount of money you spend on the Backup solutions and dedicating a storage and licensing it , also the amount of man hours spent over managing these backups.

If the features available in Exchange 2013 are correctly configured . You can have the Exchange servers Highly Available with no backups .

Exchange 2013 gives out so many new features like Automatic Reseed as it allows you to configure a spare disk in the event of disk failure where the primary database copy resides(It can be configured for the database copies as well ) .

When we need a backup ?

1. To restore some old data .

2. In the time of disaster recovery.

3. Mail items have been deleted by mistake.

4. Purging Exchange Transaction logs .

Lets see how we can handle these tasks efficiently without a backup.

1. To restore some old data .

if we think that if a mailbox data may need in the future for legal purposes or retain the data for various reasons.We can place the mailbox on Legal hold(Litigation Hold) . So that Mailbox data gets retained forever until the Litigation hold is removed.

This feature allows to restore the data anytime from that mailbox .

To Enable this feature on the mailbox – LitigationHoldEnabled is set to $True.

– LitigationHoldDuration will determine the duration of the Litigation hold.

2. In the time of disaster recovery.

Exchange 2013 gives a option to have a DR (Disaster Recovery) site . Unlike previous versions even Datacenter failover happens automatic . Having the Witness in the third site . or having the witness in any available site in the time of disaster . Even Name space planning have been much simplified in Exchange 2013 where users connect to the other site with ease in the time of disaster .

Disaster like flooding and power Outage is a rare scenario.

if we plan to have exchange servers on a particular site.Datacenters gives almost 99.98 % availability nowadays  .

Tier3 and Tier4 datacenters are much recommended for Cloud Providers and Medium and large Enterprises

Datacenter Tier Level and its differences.
(1)

  • Single non-redundant distribution path serving the IT equipment
  • Non-redundant capacity components
  • Basic site infrastructure with expected availability of 99.671%

(2)

  • Meets or exceeds all Tier 1 requirements
  • Redundant site infrastructure capacity components with expected availability of 99.741%

(3)

  • Meets or exceeds all Tier 2 requirements
  • Multiple independent distribution paths serving the IT equipment
  • All IT equipment must be dual-powered and fully compatible with the topology of a site’s architecture
  • Concurrently maintainable site infrastructure with expected availability of 99.982%

(4)

  • Meets or exceeds all Tier 3 requirements
  • All cooling equipment is independently dual-powered, including chillers and heating, ventilating and air-conditioning (HVAC) systems
  • Fault-tolerant site infrastructure with electrical power storage and distribution facilities with expected availability of 99.995%


3. Mail items have been deleted by mistake.

Exchange 2013 by default retains the deleted items for 14 Days. (Value can be customized)

When a user soft deletes the mail item it goes to deleted items.

When the user hard deletes the mail item , It retains the items for another 14 days for recovery purposes by default.

You can also add an extra layer of protection by enabling Single Item Recovery. Where even if the user purges the mail item from Recoverable Items folder . Still mailbox retains the item for 14 days by default.


For Single Item Recovery – This parameter SingleItemRecoveryEnabled is set to $True.


4. Purging Exchange Transaction logs .

Every exchange server has a load of Transaction logs . which will be purged only when the full backup runs over these databases.

To overcome this situation you can enable circular logging in the Exchange databases which has database copies . When you combine circular logging with continuous replication, you have a new type of circular logging called continuous replication circular logging (CRCL).

CRCL is performed and managed by the Microsoft Exchange Replication service.

Where it overwrites the Logs where it doesn’t allow generation of too much of transaction logs.


Hope this article is helpful .

How to Configure a Relay Connector for Exchange Server 2013

Lets see how to create a relay connector (Anonymous relay) in Exchange 2013.

What is relay in simple terms –

Email relaying is using an email server to send email that did not originate on the
email server.

Most Commonly used for fax servers, CRM , Email Routing from different forests etc..

Step 1 –

Login to Exchange Control Panel . https://servername/ecp

image

Step 2 –

Its highly recommended not to touch the default connectors . Or Create any connector on the Hub Transport role

Choose the + Sign

image

Step 3 –

Enter a Friendly Name , Choose the role “Front End Transport”

Choose Type Custom


image

Frequent Exchange Admin Mistakes –

https://www.azure365pro.com/exchange-2013-transport-service-is-not-starting1067-error/

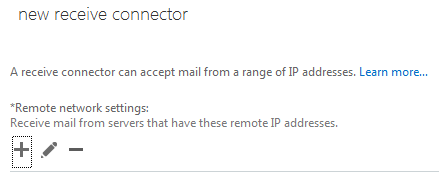
Step 4 –

Leave this part Unchanged ,

image

Step 5 –

Take off the full range , Assign the application IP which needs access to relay through this mail server.

image

Click Finish and get the connector Created

Step 6 –

Now open the properties of connector – (Just double click on it )

image


Or Use Powershell –

New-ReceiveConnector -Name "Relay" -RemoteIPRanges ("10.128.57.2","10.128.57.3") -TransportRole "FrontendTransport"  -Bindings ("0.0.0.0:25") -Usage "Custom" -Server "Exch2013A.azure365pro.com"
Set-ReceiveConnector -Identity "Servername\Relay" -PermissionGroups "AnonymousUsers"

Step 7

To Complete this task . you got to allow to accept anonymous connections in the connector.

One Exchange Management Shell – Run

Get-ReceiveConnector "Relay Connector Name" | Add-ADPermission -User "NT AUTHORITY\ANONYMOUS LOGON" -ExtendedRights "Ms-Exch-SMTP-Accept-Any-Recipient"

For Example –

Get-ReceiveConnector "ServerName\RelayConnectorname" | Add-ADPermission -User "NT AUTHORITY\ANONYMOUS LOGON" -ExtendedRights "Ms-Exch-SMTP-Accept-Any-Recipient"

Now that Application will be able to relay through Exchange 2013 with ease.

Quick Tip – Find number of Mailboxes in Each database using single PowerShell Command–Exchange 2010/2013

image_thumb1


Every time we got to do a audit on number of mailboxes on each databases and it has to be maintained with a threshold .

Without going for PowerShell Script . or not checking the mailboxes count in each database .

if you run this  below PowerShell command  it will list the number of mailboxes available in each database in the Exchange server.

PS —

Get-MailboxDatabase | foreach{($_.name) + '='+ (Get-Mailbox -Resultsize unlimited -Database $_.Identity ).count + ' Mailboxes'}

image

× How can I help you?