33 C
Dubai
Sunday, May 4, 2025
Home Blog Page 78

How to Copy all NDRs/DSN to a mailbox in Exchange 2013

Exchange Server 2013 uses delivery status notifications (DSN) to provide non-delivery reports (NDRs) and other status messages to message senders


All NDRs Generated from the server can be forwarded to a mailbox so that you can watch over internal NDR’s and External NDR’s to be proactive from getting blacklisted.

Also it helps to be proactive to get in touch with internal users when they struggle with NDR’s

Note : It can be forwarded only to a Mailbox – Not to a Distribution Group – It cannot be forwarded to a Distribution Group from Postmaster mailbox as well.


Step 1 :

First Login to ECP – Create a Mailbox with your primary address – Postmaster@testcareexchange.biz

Make your Display Name only PostMaster

Note – Make sure you have a good amount of mailbox size. otherwise once its full . It will stop receiving NDR emails

image


Step 2 :

By Default External PostMaster Address will be Empty

To Catch all External NDR’s (Common Scenario – When a mail is sent to a User from external world which doesn’t exist in our Server)

Set-TransportConfig -ExternalPostmasterAddress postmaster@testcareexchange.biz

image


Step 3 :

To Catch All internal NDR’s (Common Scenario – When a mail is sent to a Internal User to a internal User which doesn’t exist in our Server)

Set-OrganizationConfig -MicrosoftExchangeRecipientReplyRecipient Postmaster@testcareexchange.biz

image


Step 4 :

To Set What all the NDR’s you want to catch from the server. –

-5.1.1 – am specifically adding as we are doing a GAL sync in my scenario and deleting/recreating users often so i want to catch all NDR’s which says (User Doesn’t exist)

Run (These are list of Common NDR’s)

Set-TransportConfig -GenerateCopyOfDSNFor 5.4.8,5.4.6,5.4.4,5.2.4,5.2.0,5.1.4,5.1.1

To See Common Enhanced Codes (DSN Codes)


For Example

To Remove or ADD DSN Codes later

Set-TransportConfig -GenerateCopyOfDSNFor @{Add=”5.7.5″; Remove=”5.7.1″}

Only to Add

Set-TransportConfig -GenerateCopyOfDSNFor @{Add=”5.7.1″}

image

(DSN- Delivery Status Notifications)

(NDR-Non-Delivery Report)


Step 5:

Now I added the postmaster account in my outlook . It started collecting my NDR’s

image

How to Split First Name and Last Name (Splitting the first space) in Excel 2013

Always when there is a CSV import. People won’t give you the right data you need.

and you got to use some excel expertise which will save some time.

I got a list of Contacts with only DisplayName and Email.

But I got to split them with First Name and Last Name

Text to Columns will help, Still some people has two last names. Let me explain both so that you can be clear.

So I got Split the First Column into Firstname and LastName

image

Choose the Column A (Starters – Click on “A” which will choose the whole Column)

Data –>Text to Columns –>

image

Choose Space

image

Now they are separated.

image

Now what if they have two Last Names and if you use text to columns it will give two Columns for last names.

here is a simple formula to achieve it.

image

Now

Click on B2 Enter the Formula

=LEFT(A2,FIND(” “,A2)-1)

Click on C2 Enter the Formula

=RIGHT(A2,LEN(A2)-FIND(” “,A2))

image

Now Click on the Cell and Drag it down.

image

Now if we have two Last names you can split it with the first space.

Setting up Outlook Redirection from On-Prem to Private/Hosted Cloud in Exchange 2013

Scenario –

Customers have source Exchange 2010/2013 and they want to migrate to a Private Cloud which runs Exchange 2013.

So in the initial phase of migration some users are going to be in On-Prem (On Premises Server) and Private/Hosted Cloud.

We will be sharing the same domain namespace for some period of time.

In Simple Words Testcareexchange.biz is the Customer who is going to migrate to a Private/Hosted Cloud to use Testcareexchange.biz

This article will cover only the concept how outlook (On-Prem) going to recognize cloud users and redirect them to the private cloud. (where it requires AD sync to sync the passwords which will be covered in future articles)

Lets assume TestcareExchange.biz has 5000 mailboxes .

They have DNS records Mail.TestcareExchange.biz and autodiscover.TestcareExchange.biz

which points to their On-Prem Server. I cannot change the autodiscover records as they will create issues for my On-Prem users where it runs Exchange.


Now Lets say I Migrate Sathesh@testcareexchange.biz from OnPrem Server to Cloud.

Once Data Migration is done.

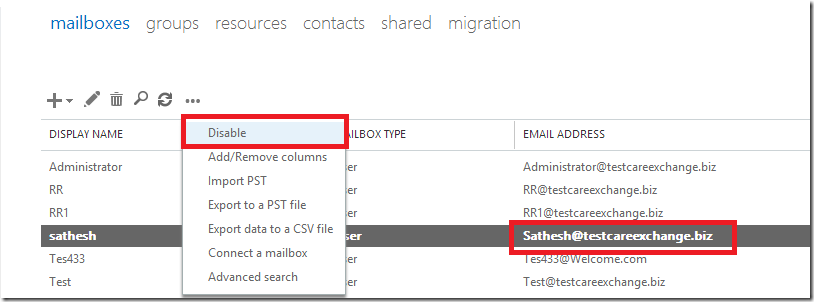
I will login in the On-Prem Server and disable the mailbox of the migrated user so that my Active Directory Account is retained.

image

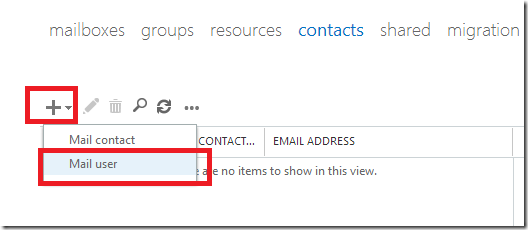
Now Click on Contacts –> + –> Mail User .

image

Choose Existing User and Connect to the same Active Directory account which you disabled . where you don’t disturb the Users desktop profile

Am Entering External Email address as sathesh@testcareexchange.mail.cloud.com

Where In my Private/Hosted Cloud

My Mailbox has two Email Addresses

Primary – Sathesh@testcareexchange.biz

Secondary – sathesh@testcareexchange.mail.cloud.com

Autodiscover (Subdomain testcareexchange.mail.cloud.com) is pointing to –

autodiscover.testcareexchange.mail.cloud.com CNAME to autodiscoverredirect.cloud.com


image

Click Save.

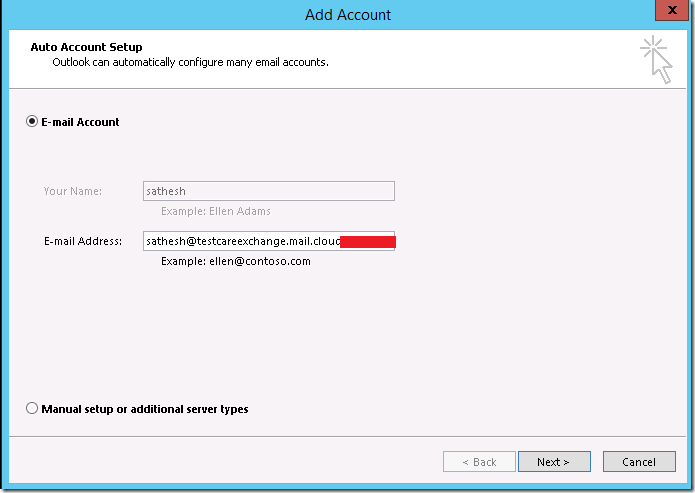
Now user logs in where the mailbox is migrate to the Cloud (This is Domain Joined Machine behaviour)

And the On-Prem Active Directory doesn’t have a mailbox just a mail user with a target address specified

image

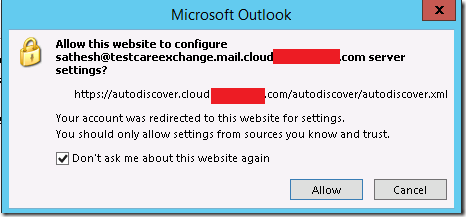
Autodiscover determines the mailbox is in the cloud.

Check “Don’t ask me about this website again”

Click on Allow

image

image

Now Outlook profile is connected.

Outlook Connected to the Cloud mailbox and shows only the  primary Smtp Sathesh@testcareexchange.biz by design.

image

Now to see what really happening on the background

Run the Outlook Auto discover test

https://testconnectivity.microsoft.com

image

1. It determines the information of target address using autodiscover

2. Autodiscover acquires the server information of the target address

image

Hope this article is useful.

Will look forward to concentrate on ADsync/Mailflow in future articles.


Good to know – How Hoster will configure Autodiscover redirection.

How to Create Autodiscoverredirect record for Multi Tenant Scenario in Exchange 2013

The name on the security certificate is invalid – Exchange 2013

Domain joined machines and outlook pop up shows up with this error

“The name on the security certificate is invalid or does not match the name of the site”

image

Coz the internal server name is not listed in my cert as recommended

image

Now Outlook get this pop up while retrieving the Autodiscover information

you got to change this entry to avoid this . so that it will start looking at mail.testcareexchange.biz

Run

Get-ClientAccessServer | fl Identity,*uri*

image

Now run to set to the entry which is on the cert.

Set-ClientAccessServer -Identity EXCH2013 -AutoDiscoverServiceInternalUri https://mail.testcareexchange.biz/Autodiscover/Autodiscover.xml

image


Do an IISreset – if changes doesnt take effect.

Install and Configure Office Web Apps Server (OWAS) with Exchange 2013

Install and Configure Office Web Apps Server (OWAS) with Exchange 2013

and in my setup OWAS runs in Windows Server 2012 R2.

Main purpose of Office Web Apps Server with exchange 2013 is to open Email Attachment in the web browser itself. (OWAS also integrates with Sharepoint / Lync as well )

Step 1 :

Getting the Setup Files

Download the OWAS setup

Step 2 :

Installing Windows features

Install the Windows features using the below command on the server which is planned to run Office Web Apps Server (OWAS)

Add-WindowsFeature Web-Server,Web-Mgmt-Tools,Web-Mgmt-Console,Web-WebServer,Web-Common-Http,Web-Default-Doc,Web-Static-Content,Web-Performance,Web-Stat-Compression,Web-Dyn-Compression,Web-Security,Web-Filtering,Web-Windows-Auth,Web-App-Dev,Web-Net-Ext45,Web-Asp-Net45,Web-ISAPI-Ext,Web-ISAPI-Filter,Web-Includes,InkandHandwritingServices,NET-Framework-Features,NET-Framework-Core

Step 3 :

Installing Office Web Apps Server (OWAS)

image

Step 4 :

Checking how default Document Viewing looks

First we will open a Word Doc  and PPT normally

Old feature called as WebReady Document Viewing

image

image

Step 5 :

Exporting the Cert with Private key.

Login to Exchange 2013 – Servers – Certificates – Choose the Certificate – Export Certificate.

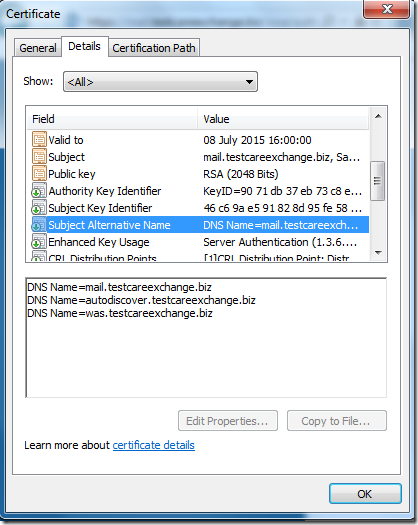
Am using the Same UC cert which has the entry was.testcareexchange.biz

image

Exporting the Cert with the private key.

image

Step 6 :

Importing the Cert with Private key.

Now Open MMC in OWAS server

File – Add/Remove Snap-in

image

Choose Certificates – Add – Choose Computer account – click ok

image

Now Import the Cert To Trusted Container

image

Choose the PFX file which you exported earlier with the private key

image

Enter the password

image


Now you can see the Cert in the Trusted container.

2 Things

1 . Copy the Cert you imported – Paste in Personal and intermediate container.

2 . Note down the friendly name of the Cert which is the right side last column.

image

Now Cert has been placed properly.


Step 7 :

Configuring OfficeWebAppsFarm

Am placing Internal and External url as same . Cause my Cert doesn’t have the Internal Name in the SAN entry.

New-OfficeWebAppsFarm –InternalUrl https://was.testcareexchange.biz -ExternalUrl “https://was.testcareexchange.biz” -CertificateName “e2k13” -EditingEnabled

Note —

*When to use –EditingEnabled  ?

–EditingEnabled is optional and enables editing in Office Web Apps when used with SharePoint 2013. This parameter isn’t used by Lync Server 2013 or Exchange Server 2013 because those hosts don’t support editing.

*Was.testcareexchange.biz will have a public IP and points to OWAS server. If this feature has to work externally.

image

Now browse  – Make sure there is no Cert Errors

https://was.testcareexchange.biz/hosting/discovery

image

Step 7 :

Integrating Exchange Server 2013 with Office Web Apps Server (OWAS)

Now Login to Exchange 2013

Configuring Office Web Apps Server URL –

Set-OrganizationConfig -WACDiscoveryEndPoint https://was.testcareexchange.biz/hosting/discovery

image

Enabling Office Web Apps Rendering –

Set-OwaVirtualDirectory “Exch2013\owa (Default Web Site)” -ForceWacViewingFirstOnPublicComputers $true -ForceWacViewingFirstOnPrivateComputers $true

image

Do an IIS reset if required.

Now Open the Attachment in OWA . It has much features.

image

image

Quick Tip – New-MailboxFolder – Exchange 2013

image_thumb1


New-MailboxFolder doesn’t have the capability of creating folders in users mailboxes.

When administrator is logged in . It has the capability of creating a folder only in Administrator mailbox

So an administrator cannot create Custom root folders in users mailboxes using this command. (RBAC has Implicit read scope set to Self – Which cannot be overridden)

EWS Managed API is the only alternative available to accomplish these tasks

PS —

To Create Folder in Administrator Mailbox

New-MailboxFolder -Parent administrator -Name Folder1

To Create Folder in Administrator Mailbox Below Inbox Folder

New-MailboxFolder -Parent :\Inbox -Name Folder1

image

Trying to Create a mailbox folder in user mailbox called “RR”

You will endup with an Error –saying it Doesn’t exist as it doesn’t have read permissions over the other objects

image

New-MailboxFolder -Parent RR -Name Folder1
The specified mailbox “RR” doesn’t exist.
+ CategoryInfo          : NotSpecified: (:) [New-MailboxFolder], ManagementObjectNotFoundException
+ FullyQualifiedErrorId : [Server=EXCH2013,RequestId=4ccd32aa-dd39-489d-918b-5b37c8ac8ee8,TimeStamp=7/21/2014 5:15
:21 AM] [FailureCategory=Cmdlet-ManagementObjectNotFoundException] DC37182,Microsoft.Exchange.Management.StoreTask
s.NewMailboxFolder
+ PSComputerName        : exch2013.testcareexchange.biz

× How can I help you?