User has Exchange 2013 Hybrid Configuration, With Azure Active Directory Password Sync.
User has Successfully Synced the OU’s and Provisioned Licenses to the Mailboxes. One Weird thing happened, It has provisioned empty Mailboxes on the Cloud and User has Mailboxes in the On-Prem as well,Causing Duplicate Mailboxes.
Ideally this shouldn’t happen.
By Design – Assigning License for an On-premises mailbox in the Cloud.
It should prompt in Mail Setting “This User’s On Premises Mailbox hasn’t been migrated to Exchange Online. The Exchange Online Mailbox will be available after migration is completed.

Weird – Assigning License for an On-premises mailbox in the Cloud. (Provisioning Empty Mailboxes in the Cloud Causing Duplicate mailboxes)
As the Mailboxes kept Provisioned for a day or so. The empty mailboxes received emails sent from Same domain Office 365 Users .
Took a Backup of emails using E-discovery search –
Easy Way – Before July1 2017 you have to use in-place eDiscovery & hold to search and download as PSTs
![image_thumb[10]](https://www.azure365pro.com/wp-content/uploads/2017/01/image_thumb10_thumb.png "image_thumb[10]")
Choose the mailboxes to be exported.
![clip_image001_thumb[1]](https://www.azure365pro.com/wp-content/uploads/2017/01/clip_image001_thumb1_thumb.png "clip_image001_thumb[1]")
Choose All Criteria
Note – Use Internet Explorer for the Export PST application to work.
![clip_image001[7]_thumb[1]](https://www.azure365pro.com/wp-content/uploads/2017/01/clip_image0017_thumb1_thumb.png "clip_image001[7]_thumb[1]")
![clip_image001[9]_thumb[1]](https://www.azure365pro.com/wp-content/uploads/2017/01/clip_image0019_thumb1_thumb.png "clip_image001[9]_thumb[1]")
As Specified After July you have to use the Security and compliance center to do the same process.
https://protection.office.com
![image_thumb[8]](https://www.azure365pro.com/wp-content/uploads/2017/01/image_thumb8_thumb.png "image_thumb[8]")
In the left pane of the Security & Compliance Center, click Search & investigation > Content search.
- On the Content search page, select a search.
- In the details pane, under Export results to a computer, click Start export.
- On the Export the search results page, under Include these items from the search, choose one of the following options:
- Under Export Exchange content as, choose one of the following options:
- One PST file for each mailbox Exports one PST file for each user mailbox that contains search results. Any results from the user’s archive mailbox are included in the same PST file.
Lets see the Traditional Way to Copy Mails to Another Mailbox –
Added Office 365 Administrator to Discovery Management
Add-RoleGroupMember "Discovery Management" –Member admin@domain.onmicrosoft.com
New-Managementroleassignment –Role "Mailbox Import Export" –User admin@domain.onmicrosoft.com
![image_thumb[2]](https://www.azure365pro.com/wp-content/uploads/2017/01/image_thumb2_thumb.png "image_thumb[2]")
Close Powershell and Re-Opened Powershell
You can use –EstimateResultsonly switch to check the stats before run.
![image_thumb[14]](https://www.azure365pro.com/wp-content/uploads/2017/01/image_thumb14_thumb.png "image_thumb[14]")
Get-mailbox Test20 | Search-mailbox –searchquery {received:02/01/2013..01/17/2017} –TargetFolder Backup –TargetMailbox Backup@careexchange.in
For Example in my case.
![image_thumb[4]](https://www.azure365pro.com/wp-content/uploads/2017/01/image_thumb4_thumb.png "image_thumb[4]")
Exported to the Backup Mailbox
![image_thumb[12]](https://www.azure365pro.com/wp-content/uploads/2017/01/image_thumb12_thumb.png "image_thumb[12]")
To check precise items in the folders you can also use –
Get-mailboxfolderstatistics mailboxname | select Name,FolderSize,ItemsinFolder
![image_thumb[16]](https://www.azure365pro.com/wp-content/uploads/2017/01/image_thumb16_thumb.png "image_thumb[16]")
Now mailboxes are Backed up using PST or Copied to different mailbox.
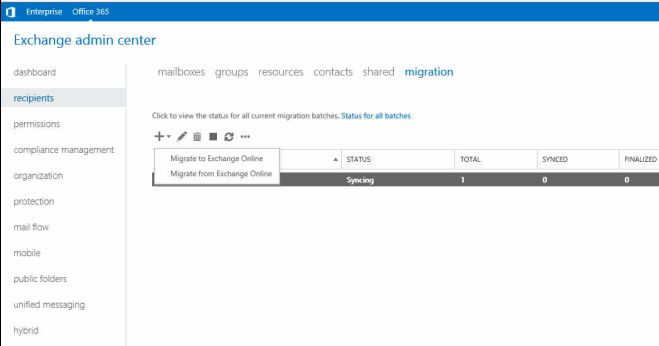
Re Ran the Hybrid Configuration wizard from Exchange 2013 Server to make sure things are fine.
Good to know – Now If you have customized the co-existence connectors .It puts back to default hybrid configurations. In my case I couldn’t use TLS in a specific site and manually specified public ips in mail flow connectors.
re running the hybrid configuration put me back to TLS.
![image_thumb[18]](https://www.azure365pro.com/wp-content/uploads/2017/01/image_thumb18_thumb.png "image_thumb[18]")
Now Remove the License from the Mailboxes using GUI or Connect to MSOL for Bulk modifications.
Connect-MsolService
Set-MsolUserLicense –UserPrincipalName test@careexchange.in -RemoveLicenses "orgname:ENTERPRISEPACK"
To list licensed users
Get-Mailuser | Where-object{$_.Islicensed –like “True”} | FT UserPrincipalName,Licenses
To Check and Remove the right licenses .
![image_thumb[19]](https://www.azure365pro.com/wp-content/uploads/2017/01/image_thumb19_thumb.png "image_thumb[19]")
Now All duplicate mailboxes should have been converted to mail users. Before migrating them back make sure you permanently delete them from the deleted mailbox list.
if they exist in SoftDeletedMaibox List . Permanently remove them before you try Migrating them back again.
Using Office 365 PowerShell –
To List Softdeleted mailboxes –
Get-Mailbox –SoftDeletedMailbox
To Permanently Delete All SoftDeletedMailboxes – (Be Careful on this)
Get-Mailbox –SoftDeletedMailbox | Remove-Mailbox –PermanentlyDelete
![image_thumb[21]](https://www.azure365pro.com/wp-content/uploads/2017/01/image_thumb21_thumb.png "image_thumb[21]")
Using Msol service
Connect-MsolService
Make sure it doesn’t return any deleted users as well. which has been duplicated
Get-MsolUser –ReturnDeletedUsers
To Remove Deleted Users –
Remove-MsolUser -UserPrincipalName test@careexchange.in –RemoveFromRecycleBin
To Remove All Deleted Users – (Be Careful on this)
Get-MsolUser -ReturnDeletedUsers | Remove-MsolUser -RemoveFromRecycleBin –Force
![image_thumb[24]](https://www.azure365pro.com/wp-content/uploads/2017/01/image_thumb24_thumb.png "image_thumb[24]")
Now We are good to go to migrate them back again.
Still having issues ?
Remove MSOL user from Cloud. To sync back the Object again.
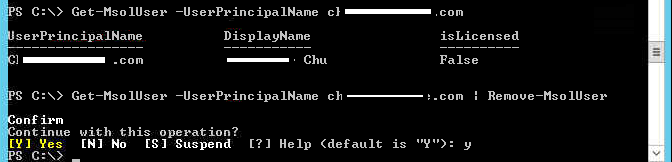
Get-MsolUser -UserPrincipalName user@careexchange.in
Removing MsolUser (Be Careful on this)
Get-MsolUser -UserPrincipalName user@careexchange.in | Remove-MsolUser
Removing MsolUser from RecycleBin (Be Careful on this)
Get-MsolUser -UserPrincipalName user@careexchange.in -ReturnDeletedUsers |
Remove-MsolUser -RemoveFromRecycleBin
Once you remove. Force Sync or Wait for the Normal Sync Interval to happen.
Import-Module ADSync
Start-ADSyncSyncCycle -PolicyType Delta

Workaround Which worked out in Some Environments –
Use Exchange On-Premises in
Remove the license for the user, wait for few minutes , then log into the Exchange Control Panel (Office 365 TAB) on your on-premises exchange server and initiate remote move from there.
Choose Remote Move Migration
Good to know –
Compared Immutable IDs – Looks Same.
$immuOnPremID – is OnPrem Immutable ID.
$immuCloudID is Cloud Immutable ID
Import-Module ActiveDirectory
Import-Module ADSync
$cred = Get-Credential

Connect-MsolService -Credential $cred
$GUIDbyte = (Get-ADUser TestUser).objectGUID.ToByteArray()

$immuOnPremID = [System.Convert]::ToBase64String($GUIDbyte)
$immuCloudID = Get-MsolUser -UserPrincipalName Testuser@careexchange.in | Fl ImmutableId
To Change Immutable ID for Specific User –
Set-MsolUser -UserPrincipalName Testuser@careexchange.in -ImmutableId $immuID
See also –


![image_thumb[10]](https://www.azure365pro.com/wp-content/uploads/2017/01/image_thumb10.png "image_thumb[10]")
![clip_image001_thumb[1]](https://www.azure365pro.com/wp-content/uploads/2017/01/clip_image001_thumb1.png "clip_image001_thumb[1]")
![clip_image001[7]_thumb[1]](https://www.azure365pro.com/wp-content/uploads/2017/01/clip_image0017_thumb1.png "clip_image001[7]_thumb[1]")
![clip_image001[9]_thumb[1]](https://www.azure365pro.com/wp-content/uploads/2017/01/clip_image0019_thumb1.png "clip_image001[9]_thumb[1]")
![image_thumb[8]](https://www.azure365pro.com/wp-content/uploads/2017/01/image_thumb8.png "image_thumb[8]")
![image_thumb[2]](https://www.azure365pro.com/wp-content/uploads/2017/01/image_thumb2.png "image_thumb[2]")
![image_thumb[14]](https://www.azure365pro.com/wp-content/uploads/2017/01/image_thumb14.png "image_thumb[14]")
![image_thumb[4]](https://www.azure365pro.com/wp-content/uploads/2017/01/image_thumb4.png "image_thumb[4]")
![image_thumb[12]](https://www.azure365pro.com/wp-content/uploads/2017/01/image_thumb12.png "image_thumb[12]")
![image_thumb[16]](https://www.azure365pro.com/wp-content/uploads/2017/01/image_thumb16.png "image_thumb[16]")
![image_thumb[18]](https://www.azure365pro.com/wp-content/uploads/2017/01/image_thumb18.png "image_thumb[18]")
![image_thumb[19]](https://www.azure365pro.com/wp-content/uploads/2017/01/image_thumb19.png "image_thumb[19]")
![image_thumb[21]](https://www.azure365pro.com/wp-content/uploads/2017/01/image_thumb21.png "image_thumb[21]")


