31.8 C
Dubai
Friday, May 16, 2025
Home Blog Page 56

Mark the Entire Mailbox as Read using Outlook

As a System Administrator I have several folders with 1000’s of Unread Emails.  Alerts and reports which I cannot just delete.

But I love to keep my mailbox organized mark them as Read. lets see how to collect these unread emails and mark as read regularly using Dedicated Search Folders Feature in Outlook.

I usually use these Search Folders to Collect my Follow up my emails. But mark all emails as read it saving some minutes for me.

lets see how to do this.

My Typical Mailbox is like this – Right Clicking on Each Folder as Marking As Read . Not a Great Idea Every time.

image

Scroll Down to the Last – You can See Search Folders – Right Click on it – Click on New Search Folder.

image

Choose on Custom – Create a a Custom Search folder

image

Enter a friendly name as per your choice – Choose criteria

Choose More Choices tab and Click on Only Items that are Unread.

and choose ok .

image

Now Search folders accumulate all my 2000 Unread Emails to a Single Tab.

Easy to Review them and mark all as read .

image

Understanding AWS Simple Storage Services S3

Amazon S3 (stands for Simple Storage Services) is a simple web service interface that allows you to store object based data & retrieve it from anywhere and at any time. It is highly scalable, secure, durable (99.99999999999%), reliable, fast and inexpensive data storage.

image

Know the fundamentals:

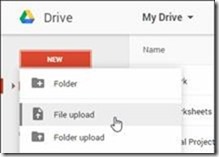
  • AWS S3 is object based storage which allows you to upload files, think of a drop-box (it actually uses AWS S3 service to store files), Facebook, Microsoft One Drive, Google Drive.

clip_image004 clip_image006

clip_image008

clip_image010

  • You can upload unlimited data using your individual AWS account and at the backend AWS monitors for the provisioning and scalability as and when required around all the regions in the world.

clip_image011

Files are stored in buckets which are nothing but a folder, you can put your files in the bucket or create as many buckets you want.

clip_image013

  • Buckets names in S3 are universal and must be unique. You cannot create the same name if it is already used earlier. For example if I created a bucket called awsmum it creates a namespace as https://s3.ap-south-1.amazonaws.com/awsmum
  • S3.ap-South-1 is the region
  • awsmum is the bucket, you must use small character alphabet for the bucket name.
  • The files would be uploaded & accessed using http secure service
  • It is not used to install Operating systems or application databases.

S3 Data Consistency:

AWS S3 provides read-after-write consistency for PUTS of new object (e.g. a file 10MB file) in your bucket (which is a folder). When you upload word document you will be able to view the content immediately however if you try to modify and update the same word file then there will slightly delay in accessing the updated modified due to changes which are replicated across the storage facilities across AWS region. During this updating process the end users will be able to view the file which was originally uploaded or the updated modified file but what user will not see is the corrupted or partial data. For the detailed theory how it works you can refer to http://docs.aws.amazon.com/AmazonS3/latest/dev/Introduction.html .

AWS S3 Storage Classes – Standard / Infrequent Access / Reduced Redundancy / Glacier

S3 Standard:

  • S3 Standard provides availability and durability which helps store data across multiple facilities and can sustain the loss of 2 facilities parallel.

S3 Infrequent Access (IA):

  • S3 Standard also provides similar availability and durability like standard which helps store data across multiple facilities and can sustain the loss of 1 facilities only. It is much cheaper than S3 as the data is not frequently accessed and is only charged at the retrieval

Key features of Standard and Infrequent Access:

  • Frequent accessing of data with highly available (99.99%) and redundant (99. 999999999%)
  • Very low latency and high performance
  • Backed with AWS S3 SLA for availability
  • Supports encryption of data in transit and at rest
  • Life cycle management for automatic migration of objects.

S3 Reduced Redundancy:

  • Cheaper than standard and IA
  • It provides availability (99.99%) & durability (99.99%)
  • It is also backed with SLA and can sustain loss of data in a single facility

S3 Glacier:

  • Very cheaper than Standard, IA & RR – 1 cent per GB per month
  • Used for non-frequent data access & main purpose is for data archival
  • Provides durability(99.999999999%) only
  • Supports encryption of data in transit and at rest
  • Vault lock feature enforces compliance via lockable policy

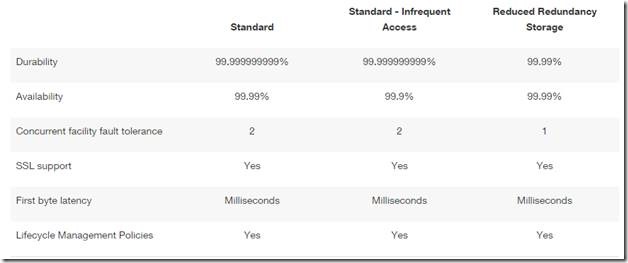
Below Table Summarize The above Storage Class Features.

clip_image015

clip_image017

AWS S3 Charges

S3 pricing is based on location of the AWS region and are charged for below:

  • Storage – Data stored in AWS storage
  • Request – Number of request made to S3 bucket
  • Storage Management – you can tag and classify the object based on the tagging.
  • Data Transfer – Data uploaded in S3 is free but data transfer in different region is charged.
  • Transfer Acceleration – It enables fast, secure transfer of your files over long distance between end-user and S3 bucket with the help of cloud front service which is globally distributed.

Configuring AWS Identity and Access Management (IAM)

What we learned so far:

  • AWS IAM is global and not limited to any specific region
  • Root account is the account through which we signed up for AWS account and by default it has full access to all the services and resources. It is also required to configure MFA for security purpose.

Now that we have understood IAM being a centralized control of your AWS account. Configuring MFA (multi-factor authentication) is one of the mandatory steps for the root account else we notice it shows as a pending task out of the 5 security step. We have successfully configured in previous article

IAM consist of Users, Group, Roles & policy documents and further we will understand more how to configure those & use it. After setting up the multi-factor authentication (MFA) on AWS root account we will further create User and Group so that we can delegate AWS service & resources access to dedicated authorized users.

clip_image002

Let us use “SAM” as a new user and below you will find two access type option.

1. Programmatic Access – User needs access key ID and secret access key to access the AWS service using API, CLI, SDK and other development tools.

2. AWS Management Access Console – User needs password to login using web AWS management console

While creating user you could also create more than one users and assign option to change password at first sign in. If you notice there are two access type

clip_image004

clip_image006

Instead of assigning the AWS services directly to the users let’s create custom group and add users to it which is a best practice. You might want to create groups based on the organization requirement and delegation purpose like HR, System Admin, Finance etc. As a group the policies are applied to users

clip_image008

We will create a group called “SystemAdmin” and assign policy “AdministratorAccess” to manage AWS services. Policy document is set of permissions which are assigned to group & any users who are member of the group inherits the permission. Policy document “AdministratorAccess” as mentioned below provides full access to AWS services and resources.

clip_image010

You can drill down to see the code (Jason format) which details attributes and its value. If you are developer you will love to read this and look for other policy documents too.

  • Attributes – versions, statement, effect, action & resource
  • Values – date, Allow, *(wildcard)

clip_image012

User is added to the Group – “SystemAdmin”

clip_image014

Review the summary

clip_image016

After clicking on create you will see the below details. Since we have selected both the access type; user is assigned not only with Access Key ID, Secret Access Key but also with password to access AWS services and resources using programmatic as well as via management console

clip_image018

Let’s understand roles, it is just a set of permission that grants access to actions and resources in AWS. It allows one service to interact with another AWS service and in further article we will understand more about roles.

clip_image020

Let us create a role called “AmazonEC2”

clip_image022

Select AmazonEC2 service under role type under AWS service roles and click on select

clip_image024

Select the policy AmazonEC2FullAccess & click on next step.

clip_image026

Review the role summary

clip_image028

Now the role is created and available as mentioned below. Working with role is again a vast topic we will see in further articles.

clip_image030

Now that we have created role lets finish the last part of the security status i.e. configure and apply IAM password policy.

clip_image032

Click on manage password policy

clip_image034

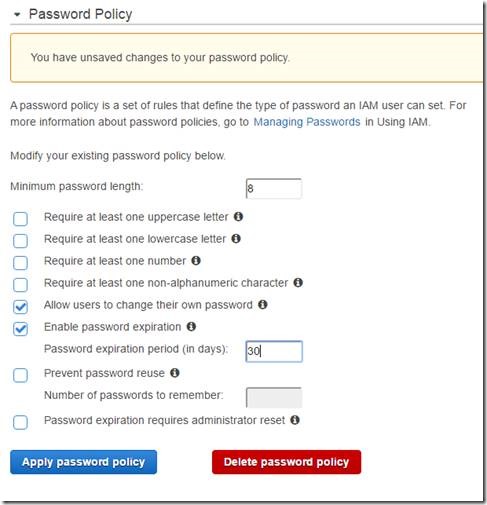
Below is the default option and let’s modify as your requirement, in my case I had updated password length with 8 and enabled password expiration to 30days.
clip_image036

clip_image038

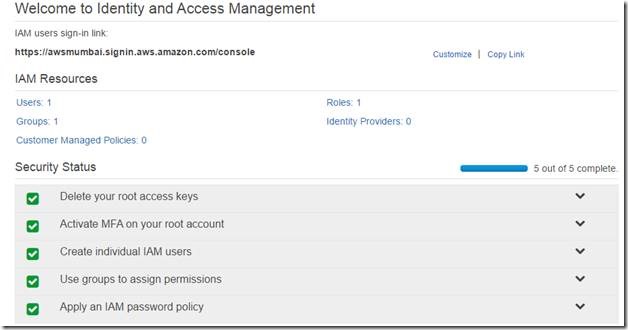
Below is the security status which shows that we completed the 5 out of 5 steps complete.
clip_image040

Let’s summarize:

  • New users have no permission by when created and hence Administrator must assign permission to access AWS services and resources.
  • Access Key ID and Secret Key are different from Password and used for different purpose for example access type called Programmatic and Management Console. You cannot use password to do programmatic Access type & key ID/Secret Key to do Management console access.
  • Configure MFA at least on your AWS root account for security purpose.
  • You can create your own password policies under AWS IAM as per your requirement.

This is not the end of AWS IAM, there is lot to learn and deep dive on this topic but we have gone through the overview and a quick hands-on. We will explore more in the coming articles so stay tuned.

Understanding AWS Identity and Access Management (IAM)

The article series will help you go through and understand Identity and Access Management under AWS Services. It is a web service which helps you to securely access and control AWS resources for your users, you can also define what resources users can use to which they are authorized.

In year 2016 AWS had more than 1000 services to successive year progress beginning since year 2004, for announcements of past & upcoming new services stay tuned at https://aws.amazon.com/new/ .

The objective of this article series to make you understand high level on the IAM features, it is free to use and no charge is applicable except for the use of other AWS services.

(Check what services are charged at https://aws.amazon.com/pricing/).

There are two ways how you access the AWS services either through AWS Management Console Access or Programmatic access which we will see further in this article. To start with we will use browser-based interface to manage IAM and AWS resources.

Once you log into your AWS portal either paid or free tier you will be able to view all the features which you can use under the selected region (some services may or may not be available based on the region).

Once you login into your AWS account through web below is the view which will be displayed. Select your region where you want to deploy your AWS services. You might not be able to view the service what you are looking for and hence take time to run through the link to know what AWS services are available under specific region https://aws.amazon.com/about-aws/global-infrastructure/regional-product-services/

image


Now when you have selected the desired region it will list the available services and for now we will be focusing on the IAM Identity & Access Management. IAM is not region specific but Global that’s why when you see the next slide the region is replaced by Global. Let us now go through the IAM option and see the available features.

image

image

By default it will create an access link for the management console using some number, we can change it with our desired alias as long it is available. If you see next slide in our case I have changed it to https://awsmumbai.signin.aws.amazon.com/console by clicking on customize option

image

As you see the link is updated with the desired alias “awsmumbai” which was available at that time.

image

The next step activate MFA on your root account, it is the same account through which you signed up the AWS, for security reason lets activate and configure it. Click on manage MFA.

image

There are two type of MFA device (Virtual and Hardware) and in our case we will configure virtual MFA device.

image

We must have AWS MFA-compatible application on our smart phone, PC or any device which is supported and you can find a list of AWS MFA-compatible applications https://aws.amazon.com/iam/details/mfa/

image

In our case I have selected Google Authenticator on my Android OS phone. Google authenticator is freely available on Google play store, download and install as per the next slide.

image

Download the Google Authenticator from Google Play Store

image

Select begin to start & select the option Scan a barcode to generate a code as shown in the next slide.

image

image

We have to scan the barcode so that Google Authenticator can recognize the AWS service for MFA and once you scan you will get the code as shown in the next slide which needs to be entered below.

image


You must enter the code one by one, you notice the code changes once is blue circle resets

image


Post that confirm the MFA device was successfully associated.

image


Quickly to see how it looks like now when you quickly log off and try to login again you will see the login screen with below option, it will ask for authentication code all you need to do is get the code under Google Authenticator app and enter here. It will allow you to login successfully.


image

Remove Orphaned Virtual machines from Vcenter

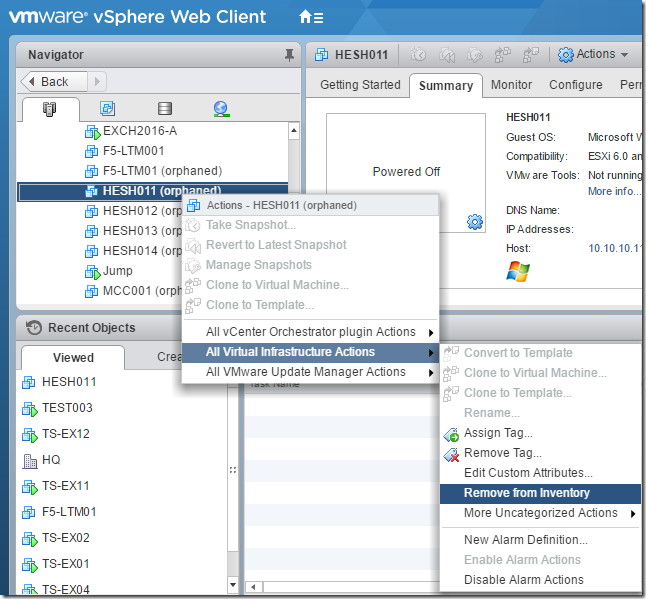
In my case host Crashed with VMs and Virtual Machines removed from the Backend.

image

Right Click on the Orphaned Virtual Machine – All Infrastructure Actions – Remove from Inventory.

clip_image001

Move Fail : Mailbox Changes Failed to Replicate

Error: Mailbox Changes Failed to replicate . Database doesn’t satisfy the constraint second copy because commit time isn’t guaranteed by replication time.

  • Verified NTP is fine,
  • Time zones are fine.
  • Verified all DAG members showing same time.
  • They are in Same VLAN in same site. (In my Case its a three node DAG , 2 on primary , 1 on Second Site.)
  • Database Replication seems to be healthy.
  • Replication link seems to be healthy.

Even Smaller Mailboxes tend to fail with same error.

image

To workaround this error : We temporarily set DataMoveReplicationContraint to None

image

Set-mailboxdatabase DatabaseName -DataMoveReplicationConstraint None

Mailboxes moved to new databases without any errors instantly.

× How can I help you?