28.9 C
Dubai
Friday, May 16, 2025
Home Blog Page 54

Configure System State Backup for Active Directory

System state backups are important for any enterprise environment. Most of the common restores can be achieved by the Active Directory Recycle bin. System state backups comes into place for a complete roll back or used only for disaster recovery.

Am Choosing the Full Virtual Machine to Backup as its important incase of any worst case scenarios like ransomware or virus issues . Full server + System State is going to be very useful.

Open Server Manager , Add Roles ad Features , Choose Windows Server Backup and install it.

image

Added a Additional Disk . Note : Disk is Online but not initialized.

Adding on the same machine as its a virtual environment.

image

Choose Backup Schedule , To Run a Automatic Backup Everyday.

image

Choose Full Server (Recommended)

image

Choose Appropriate timings.

image

Choose : Backup to a hard disk that is dedicated for backups

Note : It is the safest way to store backups and the hard disk that you use will be formatted and then dedicated to only store backups

image

Choose show all Available disks and you can see the added disk which is online.

image

Choose Yes

image

Choose Finish.

image

you can Run a Test Backup

by —  Choose Backup Once – option on the right side of the windows server backup console.

Choose Scheduled backup options

image

Choose Backup

image

Test Backup was successful.

image

You can see the number of copies maintained by Windows Server Backup.

image


Use PowerShell to manage Versions of Windows Server backup using PowerShell

Remove Windows Server Backup Versions using PowerShell

Demote Windows Server 2016 Domain Controllers

Had to Demote/Rename and Promote them back as Windows Server 2016 Domain Controllers. Lets see how to do it.

To list FSMO Roles –

netdom query fsmo

If they Hold It , you can move them easily using PowerShell.

Move-ADDirectoryServerOperationMasterRole -Identity DS001 -OperationMasterRole 0,1,2,3,4

image

Uninstall Using PowerShell –

Import-Module ADDSDeployment
Uninstall-ADDSDomainController -DemoteOperationMasterRole:$true -Force:$true

image

Or use GUI below ,

Open Server manager , Remove roles and features.

image

Uncheck / Remove Active Directory Domain Services.

image

Click on Demote this Domain Controller

image

Choose Next

image

Check Proceed with Removal

Choose next.

image

Enter the Administrator password

image

Start – Run –dssite.msc (Active Directory Sites and Services) – Delete the Stale Object Servers Object. once the replication completes

image

Waiting for the Replication to finish across sites rename and promote them back again.  By default replication interval across sites is 180 Minutes.

Optional –

Force Replication across sites  – (Do Not run below on large Environments – As it lists All ADobjects and tries to sync them)

Get-ADObject -Filter * | Sync-ADObject –Destination DS0003

Force Topology Creation –

repadmin /kcc DS003

For Replication between domain controllers with existing replication links –

repadmin /syncall /AePdq

Active Directory as an LDAP Server in Vcenter Appliance

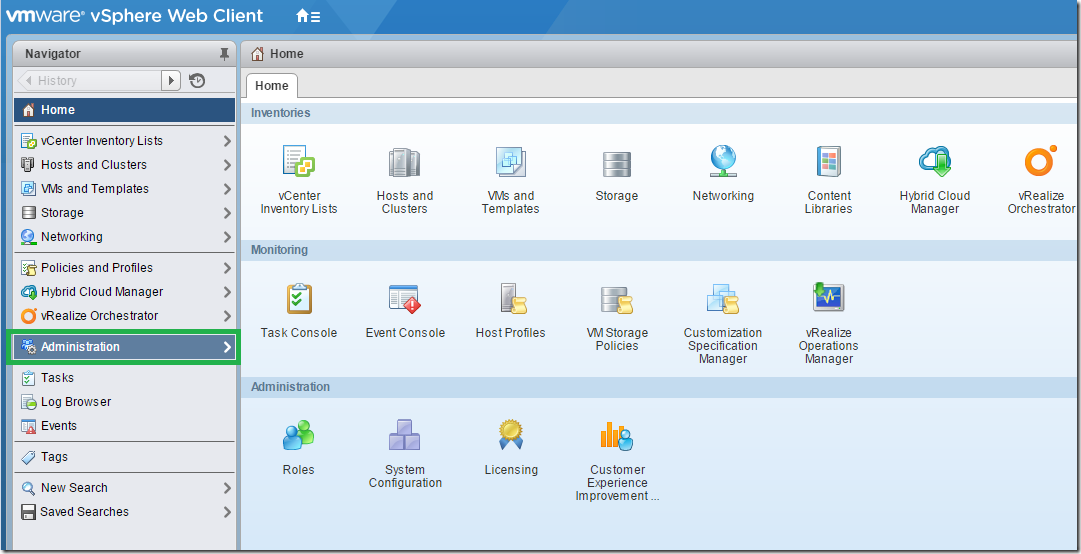
Login to Vcenter as Administrator@vsphere.local

image

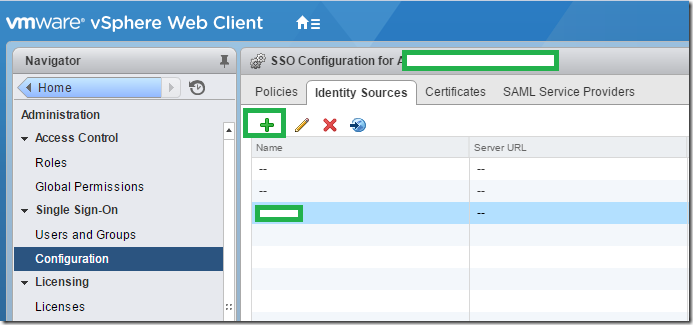
Configuration – Identity Sources – Choose the + Sign

image

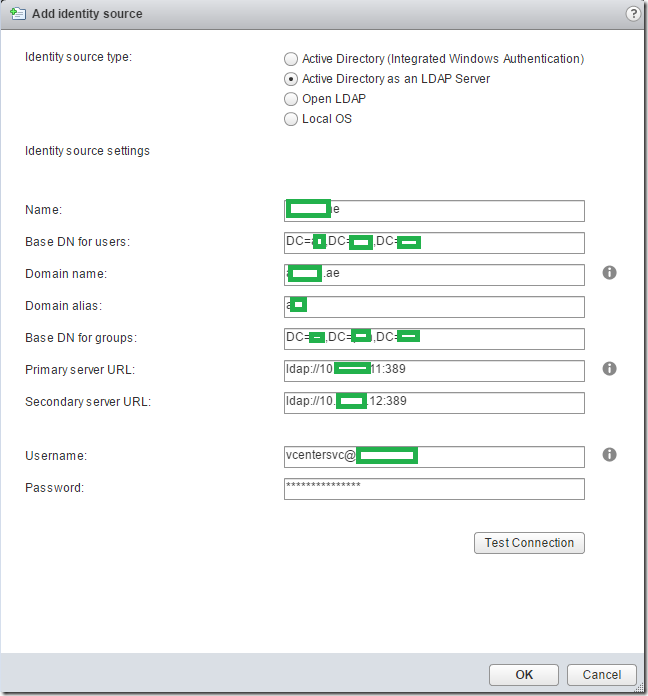
Choose Active Directory as an LDAP Server

Name –

FriendlyName – Cloudid.biz

BaseDNfor Users (Recommended  to use Specific Organization Unit Distinguish name ) – DC=CloudID,DC=Biz

DomainName – Cloudid.biz

DomainAlias (NETBIOS Name of the Domain) – Cloudid

BaseDNforGroups (Recommended  to use Specific Organization Unit Distinguish name )– DC=CloudID,DC=Biz

PrimaryServer URL – Active Directory Integrated  DNS Server #1 – ldap://10.10.10.11:389

SecondaryServer URL – Active Directory Integrated  DNS Server #2  – ldap://10.10.10.11:389

Create a Service Account in Active Directory . Just Domain Users

vcenterldap@cloudid.biz

Password

Test Connection.

If it works.  Add it .

image

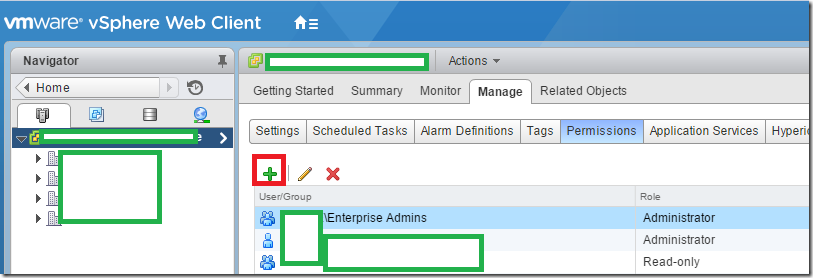
Then Assign Permission on Vcenter object (+) or whichever is required to gain access to, You have to use the domain on the drop down and choose user from Active Directory.

Then login to vcenter as Domain\username

It should allow you to login.

image

Target Mailbox doesn’t have a proxy matching – Bulk add Proxy Address

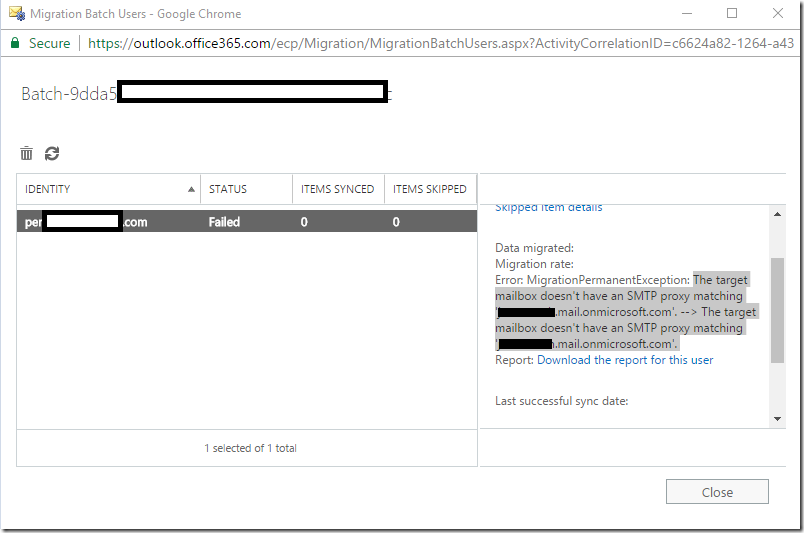
Moving to Office 365 – Mailbox Migration Error

Error: MigrationPermanentException  “Target mailbox doesn’t have an SMTP proxy matching ‘<domain>.mail.onmicrosoft.com'” error when you try to move mailboxes to Exchange Online

Lets see how to add proxy addresses in bulk using powershell.

image

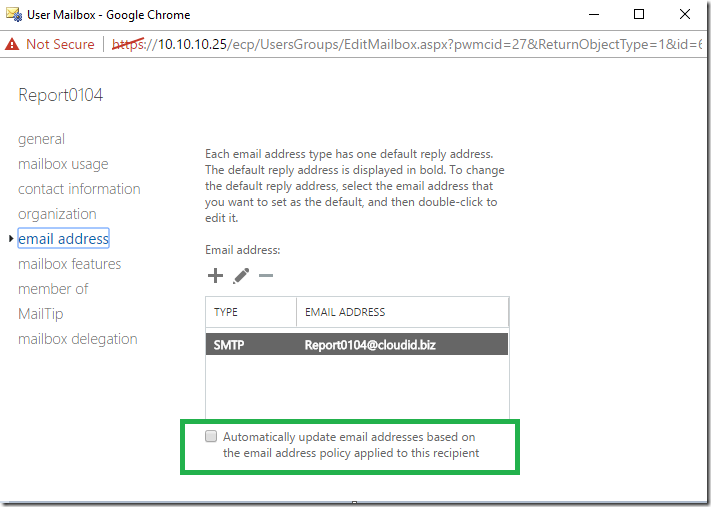
Issue happens only to users where email address policy is not enabled

image

Checking this Automatically Update Email Address on bulk for multiple mailboxes can give serious implications if the number of mailboxes are more .As in some environments people rename email address out of the email address policy for various reasons (Update/Customize,More friendly).

When you check Automatically Update Email Address . It will apply as specified in the policy like firstname.lastname@localhost or Alias@localhost which you can see in the email address policy settings.

Now lets see how to add the proxy address in bulk , Without updating the email address policy.

List Mailboxes where EmailAddressPolicyEnabled  is  False

Get-Mailbox -ResultSize Unlimited | Where-Object {$_.EmailAddressPolicyEnabled -like &quot;False&quot;}

image

Export to CSV –

Get-Mailbox -ResultSize Unlimited | Where-Object {$_.EmailAddressPolicyEnabled -like &quot;False&quot;} | Select-object Alias,PrimarySmtpAddress | Export-Csv UsersneedProxyaddress.csv

image

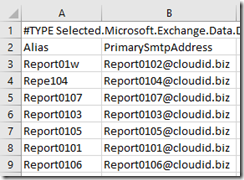
CSV looks like below –

image

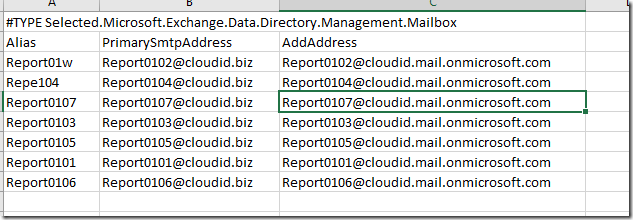
Now Create a CSV like below Having the Custom Proxy address needs to be added to user mailboxes.

image

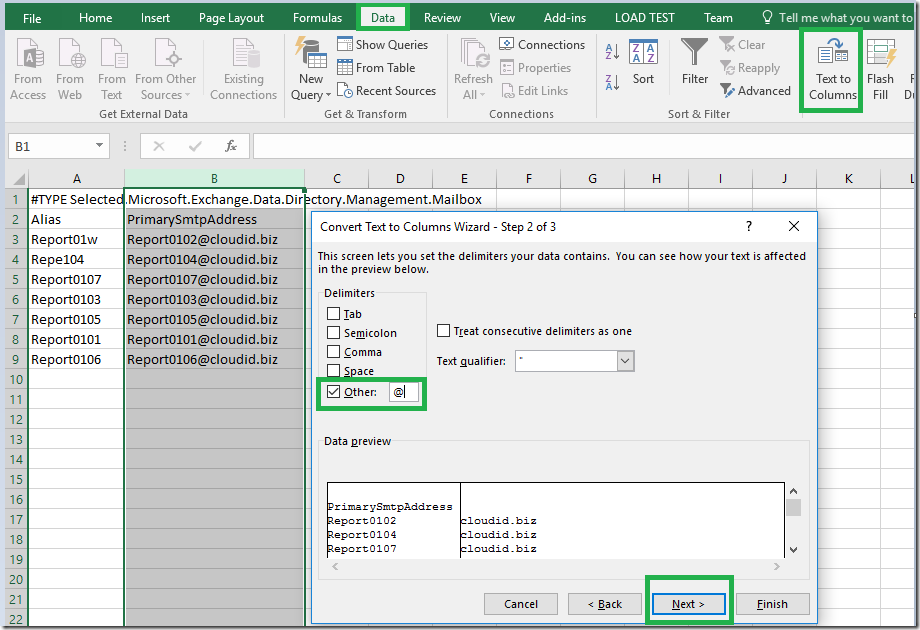
For Dummies – Using Excel Features.

image

image

To Add these Additional Proxy Addresses to these mailboxes –

Import-Csv AddProxyaddress.csv | ForEach-Object{Set-Mailbox $_.PrimarySmtpAddress -EmailAddresses @{add=$_.AddAddress}}

image

Verifying –

Import-Csv AddProxyaddress.csv | ForEach-Object{Get-Mailbox $_.PrimarySmtpAddress} | FT Emailaddresses

image

To Revert Back –

Import-Csv AddProxyaddress.csv | ForEach-Object{Set-Mailbox $_.PrimarySmtpAddress -EmailAddresses @{remove=$_.AddAddress}}

image

Removing Large File structures using PowerShell

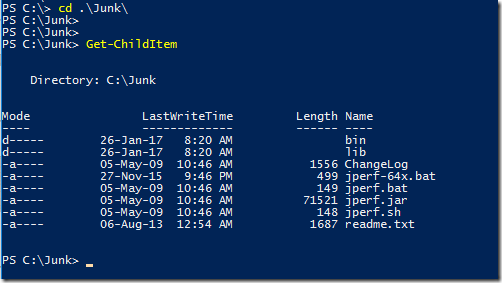
Open Powershell Run as Administrator. Browse to the Location to be Safe.
image

Get-ChildItem -Recurse | Remove-Item -recurse -Confirm:$false -Force –verbose

image

Now File Structure under Junk folder and its subfolders is Removed without any confirmation.

If you get into this below error –

The Specified Path , File Name or Both are too long. The Fully qualified file name must be less than 260 Characters, and the directory name must be less than 248 Characters

image

Now in this case use Robocopy nothing need to be installed on Latest windows Machines.

Create a Empty Folder

image

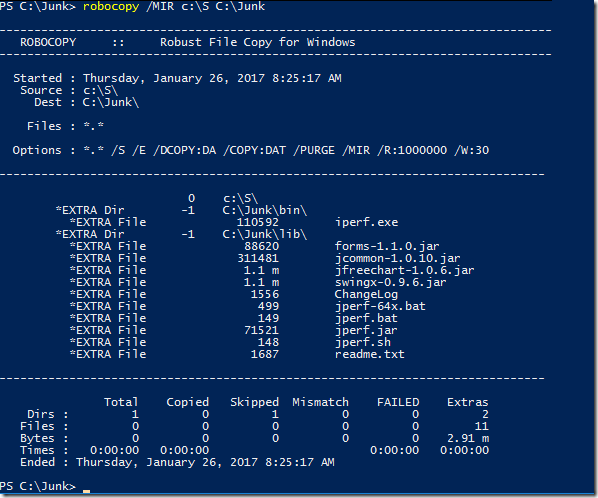
Now ask robocopy to Mirror this empty folder to the destination folder.

robocopy /MIR c:\S C:\Junk

Now File Structure under Junk folder and its subfolders is Removed without any confirmation.

image

Build Your Own LAB – AWS Object Lifecycle Management

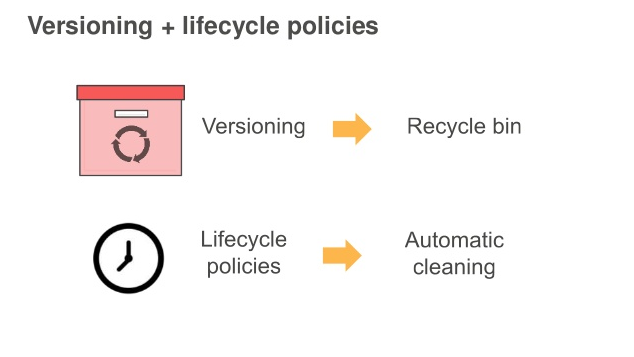
Amazon Lifecycle rules helps you to manage the storage cost by controlling the lifecycle of the object using S3 storage classes. You can apply the lifecycle rules to both current and previous of an objects. You need to ensure the versioning is enable on desired bucket to benefit from full feature of lifecycle. 

Lifecycle rules automatically transition your object to:

Standard Storage à Infrequent Access Storage à Archive Glacier à Permanently Delete 

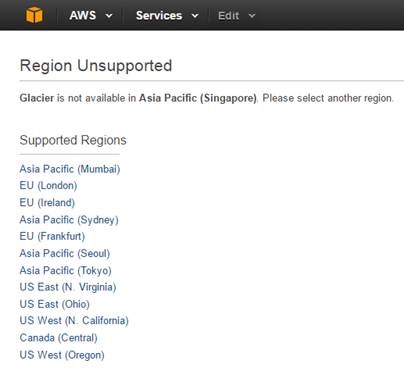
Quickly go to the Glacier option to see any region does not have this feature or not if you plan to archive.

clip_image002

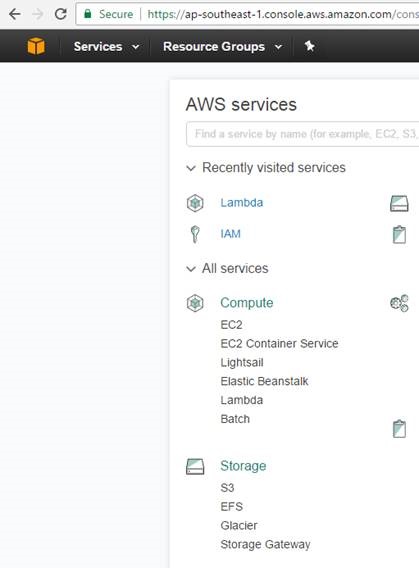
Go to the AWS S3 Storage console

clip_image004 

I have created a bucket called lifecyclemumbai and enabled versioning on it.

clip_image006


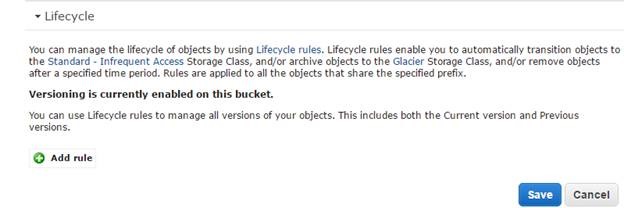
By default there is no lifecycle rule which is created, we will go ahead and create one. Click on add rule

clip_image008


Here you can select the whole bucket or subset of the bucket to apply lifecycle rule

clip_image010


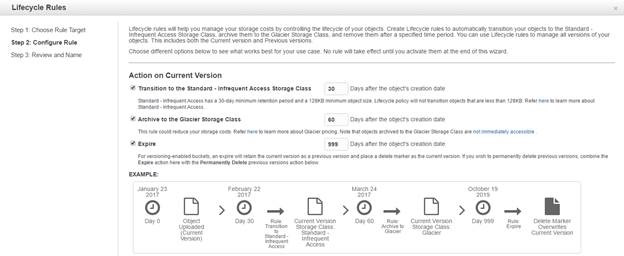
One of the best thing here is the explanation which is done diagrammatically to understand easily. Let me elaborate for you.

·        Whenever an object is created under this bucket after 30days it will get moved to infrequent access storage class

·        Post 30 days after an object which is moved from standard to IA Storage class i.e. 60 days after an object is created will be moved to Glacier Storage class. The cost is quite cheap compared to standard and IA storage & end users will be facing a slight delay in accessing archived data

·        You can also set an expiration (after 999 days after the object’s creation date) which retains the current version as previous version and place a delete marker as the current version. It will be still available under hide tab in the old portal. If you want to permanently delete the object enable this option with the combination of the option – action on previous version on the next slide 

clip_image012

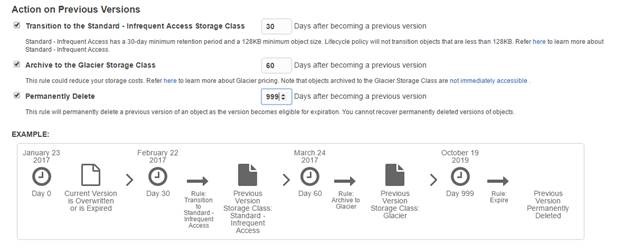
The only difference about the below process from previous screenshot is an object which is targeted (previous version). Unless you enable versioning feature on the bucket this option “action on previous versions” will not be available. Secondly to delete an object permanently when you select the combine expire option both on current as well as previous version. 

clip_image014

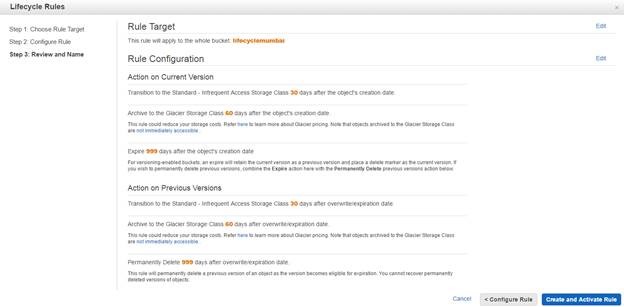
Give the rule name and review the settings. Click on create and activate rule

clip_image016 

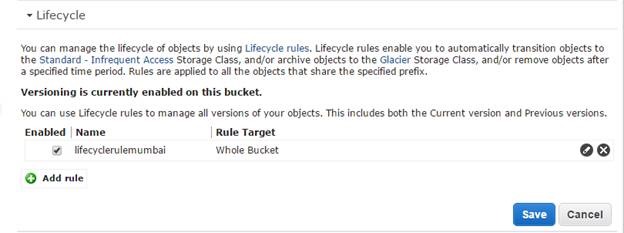
We have successfully created the lifecycle and it is enabled.

clip_image018

× How can I help you?