29.2 C
Dubai
Thursday, May 15, 2025
Home Blog Page 53

Install and Configure Certificate Authority in Windows Server 2016

We will see below topics in this article

  • Install Certificate Authority on Windows Server 2016
  • Configuring Certificate Authority on Windows Server 2016
  • Assigning Certificate on Exchange Server 2016
  • Assigning on Test Machine to see Certificate authority is working for Outlook Web Access

Step 1:

You need to have this role installed to have a  Certificate Authority

Preferred to be on Dedicated Server or on a Domain Controller.

Open Server Manager – Manage – Add Roles and Features

image

Step 2:

Choose : Active Directory Certificate Services

Choose Next

And Choose : Certification Authority Web Enrollment

image

Choose :

  • Certification Authority
  • Certification Authority Web Enrollment

image

Choose Install and Close

image

Step 3:

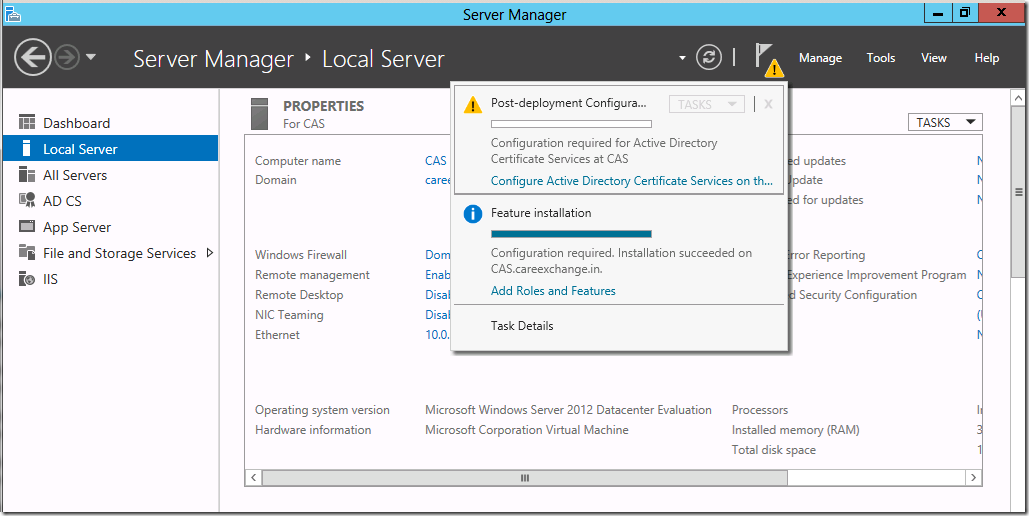
To Configure Active Directory Certificate Services – Choose the Exclamation Mark on the Flag

Configure Active Directory Certificate Services on the Destination Server

image

Choose Next

image

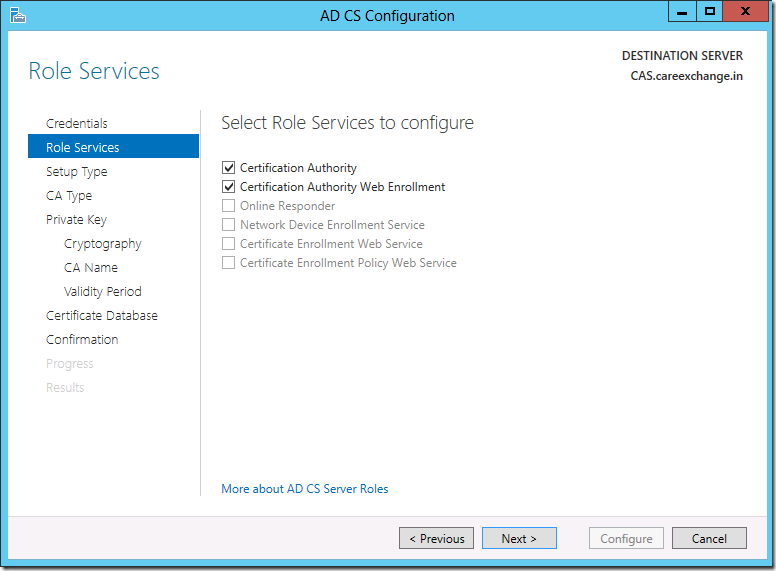
Choose

  • Certificate Authority
  • Certification Authority Web Enrollment

image
Choose Enterprise CA

  • Enterprise CAs Must be domain members and are typically online to issue certificates or certificate policies.

image

Step 4:
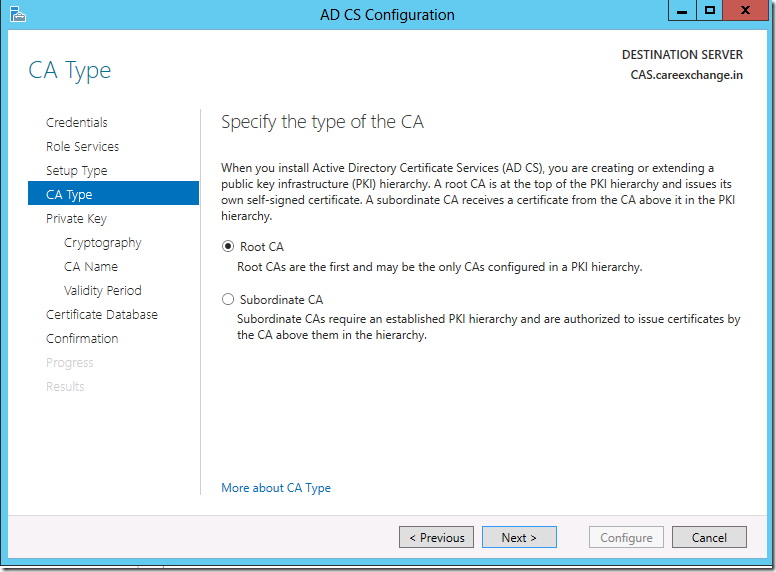
Choose Root CA

Root CAs are the first and may be the only CAs Configured in a PKI Hierarchy.

image

Step 5:
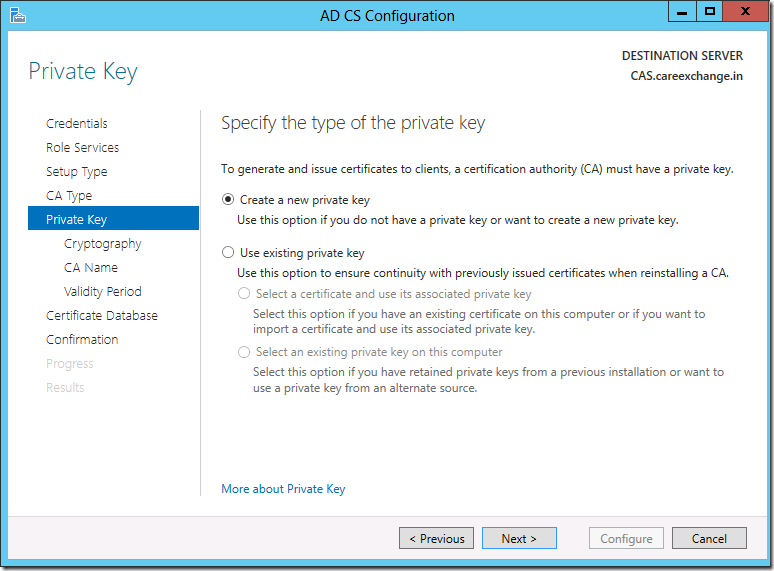
Create a new Private key

image

Step 6:

  • Use SHA256
  • RSA#Microsoft Software Key Storage Provider
  • Key Length – 2048

image

Step 7:

Click Next

image

Step 8:
By Default Certificate is valid for 5 years , Don’t make any changes on it , Click next

image

Step 9:

Specify Certificate Authority Default Database Locations

image

Click Configure

image

Choose Configure

image

We have successfully Installed and Configured – Certificate Authority on Windows Server 2016

Let us see how to Request a Create a Simple Cert from Internal Certificate Authority

Step 10:

Browse http://localhost/certsrv/

You would see a page below like this , Choose “Request a Certificate”

image

Step 11 –
Click on Advanced Certificate Request

image

Step 12:
Choose the Second one
Submit a certificate request by using a base-64-Encoded CMCimage

Step 13:

Now Copy the  Note pad Certificate Request Data – You have to generate a Certificate Request from the application. For example how we are doing in exchange server

https://www.azure365pro.com/how-to-create-an-ssl-certificate-request-for-exchange-server-2013/

Or you can use https://www.digicert.com/util/

Example – Data Should be like below –

—–BEGIN NEW CERTIFICATE REQUEST—–
MIIEXDCCA0QCAQAwgYAxHTAbBgNVBAMMFGV4Y2gyMDE2LmNsb3VkaWQuYml6MRYw
FAYDVQQLDA1FeGNoYW5nZSBUZWFtMRUwEwYDVQQKDAxDYXJlRXhjaGFuZ2UxETAP
BgNVBAcMCE5ldyBZb3JrMRAwDgYDVQQIDAdOZXcgWW9yMQswCQYDVQQGEwJVUzCC
ASIwDQYJKoZIhvcNAQEBBQADggEPADCCAQoCggEBAKXVbwTkx4zhUobUvODoSwf1
8b0ti+dQ/WAoJPHlcSTW4weE5vVwQZbjtTqRhHOAOFEDYDnwZhuU1fOjjro+B2B3
zMTlvq0x7JJPsA9Zc611p+slYeTs/pI8hT9Ud2FgbwE3veF5u2uVw6/lbZdA20yU
ZizIsCJkq9Qo2hLpMji3MB4eFRtyvd1eQpCJPnqseUdRVzfdSwN2zf0U7UQCzzG+
q7bL1Pb2jfjFlhr5xb9/RfpaR/U3TmVHjf3/u49mK1JOBuJwJQVCK/HBYHfMPOp6
VEjt8IVApclOE7tZcR3DjjyF73tHYfxUJp2HuVWml/UVemKIcSfVYOcGofNrF88C
AwEAAaCCAZQwGgYKKwYBBAGCNw0CAzEMFgo2LjIuOTIwMC4yMF8GCSsGAQQBgjcV
FDFSMFACAQUMFEVYQ0gyMDE2LkNsb3VkaWQuYml6DBFDTE9VRElEXEVYQ0gyMDE2
JAwiTWljcm9zb2Z0LkV4Y2hhbmdlLlNlcnZpY2VIb3N0LmV4ZTByBgorBgEEAYI3
DQICMWQwYgIBAR5aAE0AaQBjAHIAbwBzAG8AZgB0ACAAUgBTAEEAIABTAEMAaABh
AG4AbgBlAGwAIABDAHIAeQBwAHQAbwBnAHIAYQBwAGgAaQBjACAAUAByAG8AdgBp
AGQAZQByAwEAMIGgBgkqhkiG9w0BCQ4xgZIwgY8wDgYDVR0PAQH/BAQDAgWgMFAG
A1UdEQRJMEeCFGV4Y2gyMDE2LmNsb3VkaWQuYml6ghhBdXRvRGlzY292ZXIuQ2xv
dWRpZC5iaXqCCEVYQ0gyMDE2ggtDbG91ZGlkLmJpejAMBgNVHRMBAf8EAjAAMB0G
A1UdDgQWBBQWEHXi+M7zoQZ3FlnOeRqsRscG0jANBgkqhkiG9w0BAQUFAAOCAQEA
FlYjkXO1rxadJmNB9g9KEqWU7NlxC3UdX2zyqWwK06cDB3/k+ThKBiYE7uoiaais
YqlE6yoT3T09Nf+rihH8DfS+of14oMYQTKo9By9VdisD6R/iztY05StbVoSambRk
jnOohs1z4v3itufuEzQaqf8Q0Qu8w2xsVVRZx2t0SKfktPASqOzJZEIRS6egqELH
h9dkQBjsdOaTSsqapJXiHpMN53wxXNoztO6mWSVtPzgbfML0+NLT41ZBiIAMjyIj
ztp61S/7O5dfoR9St0cwzaxWSZ5XPriJzKfYQ3dRvl+j/e1gi/rJmw9IUyWGQ2qz
27HqRbsEa/LqFharKDjeBw==
—–END NEW CERTIFICATE REQUEST—–

SavedReqest – (NEW CERTIFICATE REQUEST Data like above)
Choose Template : WebServer

Choose Submit

image

Step 14:
Choose “Base 64 encoded”

Download Certificate

image

Step 15:
Save the Certificate – should be .cer extension

image

Lets how we are applying on Exchange 2016 for Example

image

Copied my Request .CER File generated from CA to the Exchange and using it.

image

Shows Certificate Invalid.

image

Lets see why.

1 – Start – MMC –FILE – Add/Remove Snap-In

2 – choose certificates – Add

3 – Computer Account

4 – Local Computer

5 – Expand Personal – Certificates / Expand Trusted Root Authorities Certificates

image

Now Login to Root CA Server and Export the Root CA.

image

Now login to Exchange Server Import the export cert.

image

Now Certificates looking ok

Make sure you Assign the Certificate for IIS in Exchange Control Panel.

image

Now you can see things are fine locally on Exchange 2016 server –

image

– Lets see how we can use on Desktop

First Login to Exchange Server MMC and Export the Certificate with all the certificate path into a PFX file.

Note : The desktop doesn’t need the private keys from any certificate in the chain.

Having the private key gives the ability to decrypt all the traffic between the client and the server even if that traffic is coming from someone else. It also makes a man in the middle attack on this SSL connection possible.

On 2 : For End user desktops – Choose do no export private key and use that certificate for import.


image


image

Now we have the PFX File Exported.

Open MMC and Import or Install PFX Desktop.

image

image

Now browsing the URL –

image

HTTP 500 Error in OWA and ECP Something Went wrong

image
image

🙁
something went wrong
We’re having trouble getting to your mailbox right now. Please refresh the page or try again later. If the problem continues, please contact your helpdesk.
X-ClientId: MOAG – DKFF – BDUB – 333

X-OWA-Error: Microsoft.Exchange.Data.Storage.MailboxOfflineException
X-OWA-Version: 15.0.1076.9
X-FEServer: EXCH01
X-BEServer: EXCH02
Date: 14/12/2016 05:57:00

Events Generated –

Log Name:      Application
Source:        MSExchange Control Panel
Date:          12/14/2016 12:02:46 PM
Event ID:      4
Task Category: General
Level:         Error
Keywords:      Classic
User:          N/A
Computer:      EXCH02.careexchange.in
Description:
Current user: ‘careexchange.in/Microsoft Exchange System Objects/Monitoring Mailboxes /HealthMailbox0eba0829c21c4694b00335082686d519′
Request for URL

'https://exch.azure365pro.com:444/ecp/default.aspx(https://exch/ecp/)' 

failed with the following error:
System.NullReferenceException: Object reference not set to an instance of an object.
at Microsoft.Exchange.Clients.Common.Canary15.Init(Byte[] userContextIdBinary, Byte[] timeStampBinary, String logonUniqueKey, Byte[] hashBinary, String logData)
at Microsoft.Exchange.Clients.Common.Canary15..ctor(String logonUniqueKey)
at Microsoft.Exchange.Clients.Common.Canary15Cookie. TryCreateFromHttpCookie(HttpCookie cookie, String logonUniqueKey, Canary15Profile profile)
at Microsoft.Exchange.Clients.Common.Canary15Cookie. TryCreateFromHttpContext(HttpContext httpContext, String logOnUniqueKey, Canary15Profile profile)
at Microsoft.Exchange.Management.ControlPanel. CanaryExtensions. CheckCanary15(HttpContext context, Boolean shouldRenew, String canaryName)
at Microsoft.Exchange.Management.ControlPanel. CanaryExtensions. CheckCanary(HttpContext context)
at Microsoft.Exchange.Management.ControlPanel. RbacModule.Application _PostAuthenticateRequest(Object sender, EventArgs e)
at System.Web.HttpApplication.SyncEventExecutionStep.System. Web.HttpApplication.IExecutionStep.Execute()
at System.Web.HttpApplication.ExecuteStep(IExecutionStep step, Boolean& completedSynchronously)
at Microsoft.Exchange.Clients.Common.Canary15.Init(Byte[] userContextIdBinary, Byte[] timeStampBinary, String logonUniqueKey, Byte[] hashBinary, String logData)
at Microsoft.Exchange.Clients.Common.Canary15..ctor(String logonUniqueKey)
at Microsoft.Exchange.Clients.Common.Canary15Cookie. TryCreateFromHttpCookie(HttpCookie cookie, String logonUniqueKey, Canary15Profile profile)
at Microsoft.Exchange.Clients.Common.Canary15Cookie. TryCreateFromHttpContext(HttpContext httpContext, String logOnUniqueKey, Canary15Profile profile)
at Microsoft.Exchange.Management.ControlPanel. CanaryExtensions.CheckCanary15(HttpContext context, Boolean shouldRenew, String canaryName)
at Microsoft.Exchange.Management.ControlPanel. CanaryExtensions.CheckCanary(HttpContext context)
at Microsoft.Exchange.Management.ControlPanel. RbacModule.Application_PostAuthenticateRequest(Object sender, EventArgs e)
at System.Web.HttpApplication.SyncEventExecutionStep. System.Web.HttpApplication.IExecutionStep.Execute()
at System.Web.HttpApplication.ExecuteStep(IExecutionStep step, Boolean& completedSynchronously) Boolean& completedSynchronously)

Flight info: Features:[[Global.DistributedKeyManagement, False],[Global.GlobalCriminalCompliance, False],[Global.MultiTenancy, False],[Global.WindowsLiveID, False],[Eac.AllowMailboxArchiveOnlyMigration, True],[Eac.AllowRemoteOnboardingMovesOnly, False],[Eac.BulkPermissionAddRemove, True],[Eac.CmdletLogging, True],[Eac.CrossPremiseMigration, False],[Eac.DevicePolicyMgmtUI, False],[Eac.DiscoveryDocIdHint, False],[Eac.DiscoveryPFSearch, False],[Eac.DiscoverySearchStats, False],[Eac.DlpFingerprint, False],[Eac.EACClientAccessRulesEnabled, False],[Eac.GeminiShell, False],[Eac.ManageMailboxAuditing, False],[Eac.ModernGroups, False],[Eac.Office365DIcon, False],[Eac.OrgIdADSeverSettings, False],[Eac.RemoteDomain, False],[Eac.UCCAuditReports, False],[Eac.UCCPermissions, False],[Eac.UnifiedAuditPolicy, False],[Eac.UnifiedComplianceCenter, False],[Eac.UnifiedPolicy, False],[Eac.UnlistedServices, False],],  Flights:[],  Constraints:[[LOC, EN-US],[MACHINE, EXCH02],[MODE, ENTERPRISE],[PROCESS, W3WP],[USER, HEALTHMAILBOX0EBA0829C21C4694B001F5082686D519@],[USERTYPE, BUSINESS],], IsGlobalSnapshot: False

Log Name:      Application
Source:        Windows Error Reporting
Date:          12/14/2016 12:09:15 PM
Event ID:      1001
Task Category: None
Level:         Information
Keywords:      Classic
User:          N/A
Computer:      EXCH01.careexchange.in
Description:
Fault bucket , type 0
Event Name: E12IIS
Response: Not available
Cab Id: 0

Problem signature:
P1: c-RTL-AMD64
P2: 15.00.1076.009
P3: w3wp#MSExchangeOWAAppPool
P4: M.E.Clients.Common
P5: M.E.C.C.Canary15.Init
P6: System.NullReferenceException
P7: 4058
P8: 15.00.1076.000
P9:
P10:

Attached files:
C:\Windows\Temp\981892be-0fdc-445f-9fc5-43a087f8408a\report.txt
C:\Windows\Temp\981892be-0fdc-445f-9fc5-43a087f8408a\report.xml

These files may be available here:
Analysis symbol:
Rechecking for solution: 0
Report Id: 98c251d8-c1d4-11e6-80e6-005056a13698
Report Status: 262144
Hashed bucket:

Log Name:      Application
Source:        MSExchange Common
Date:          12/14/2016 12:09:13 PM
Event ID:      4999
Task Category: General
Level:         Error
Keywords:      Classic
User:          N/A
Computer:      EXCH01.careexchange.in
Description:
Watson report about to be sent for process id: 3436, with parameters: E12IIS, c-RTL-AMD64, 15.00.1076.009, w3wp#MSExchangeOWAAppPool, M.E.Clients.Common, M.E.C.C.Canary15.Init, System.NullReferenceException, 4058, 15.00.1076.000.
ErrorReportingEnabled: True

Solution –

Start – Run – Adsiedit.msc clear these values

CN=Client Access,CN=“Organization name”,CN=Microsoft Exchange,CN=Services,CN=Configuration,DC=“domain”

image

Took backup of those values.

Cleared below Attributes from Active Directory .

msExchCanaryData0

msExchCanaryData1

msExchCanaryData2

Recycled – OWA and ECP pool

image

It logged in Successfully.

Outlook Cannot Logon System resources are critically Low

Microsoft Outlook 2016.

  • Outlook Cannot Log on. Verify you are connected to the network and are using the proper server and mailbox name . The Microsoft Exchange information service in your profile is missing required information.Modify your profile to ensure that you are using the correct Microsoft Exchange Information Service.

image

System Resources are Critically Low. Close Some Windows.

image


Why its happening all of a Sudden ?

While doing a Auto discover Test. Just Confirm its going to the Right Place .

Ideally most of the cases it should going to autodiscover.careexchange.in

But autodiscover tests the the root domain first .As Root domain listens on HTTPS by mistake and responds to autodiscover abnormally. It downloads the wrong XML file by mistake.

Its going to  https://www.azure365pro.com:443/Autodiscover/Autodiscover.xml

and downloading the wrong XML file

https://testconnectivity.microsoft.com/

image

Location –

C:\Users\sathesh\appdata\local\Microsoft\outlook\16

image

Now . Stop the domain from listening to HTTPS 443.

or delete the A record of domain.com and keep www.careexchange.in only.

Wrong / Abnormal XML File example –

<Autodiscover xmlns="http://schemas.microsoft.com/exchange/autodiscover/responseschema/2006">
 <Response xmlns="http://schemas.microsoft.com/exchange/autodiscover/outlook/responseschema/2006a">
 <User>
 <DisplayName>sath@careexchange.in</DisplayName>
 </User>
 <Account>
 <AccountType>email</AccountType>
 <Action>settings</Action>
 <Protocol>
 <Type>IMAP</Type>
 <Server>careexchange.in</Server>
 <Port>993</Port>
 <DomainRequired>off</DomainRequired>
 <SPA>off</SPA>
 <SSL>on</SSL>
 <AuthRequired>on</AuthRequired>
 <LoginName>sath@careexchange.in</LoginName>
 </Protocol>
 <Protocol>
 <Type>SMTP</Type>
 <Server>careexchange.in</Server>
 <Port>465</Port>
 <DomainRequired>off</DomainRequired>
 <SPA>off</SPA>
 <SSL>on</SSL>
 <AuthRequired>on</AuthRequired>
 <LoginName>sath@careexchange.in</LoginName>
 </Protocol>
 </Account>
 </Response>
</Autodiscover>

Working XML File of Office 365 –

<?xml version="1.0" encoding="utf-8"?>
<Autodiscover xmlns="http://schemas.microsoft.com/exchange/autodiscover/responseschema/2006">
 <Response xmlns="http://schemas.microsoft.com/exchange/autodiscover/outlook/responseschema/2006a">
 <User>
 <DisplayName>Sath | CareExchange</DisplayName>
 <LegacyDN>/o=ExchangeLabs/ou=Exchange Administrative Group (FYDIBOHF23SPDLT)/cn=Recipients/cn=a454655555980555598a83a-sathesh_758</LegacyDN>
 <AutoDiscoverSMTPAddress>sath@Careexchange.in</AutoDiscoverSMTPAddress>
 <DeploymentId>b787ddaf-ec3e-4ccf-965750e3849b</DeploymentId>
 </User>
 <Account>
 <AccountType>email</AccountType>
 <Action>settings</Action>
 <MicrosoftOnline>True</MicrosoftOnline>
 <ConsumerMailbox>False</ConsumerMailbox>
 <Protocol Type="mapiHttp" Version="1">
 <MailStore>
 <ExternalUrl>https://outlook.office365.com/mapi/emsmdb/?MailboxId=f26e24bc-5555-4544-0047-af993fbcbd43@careexchange.in</ExternalUrl>
 </MailStore>
 <AddressBook>
 <ExternalUrl>https://outlook.office365.com/mapi/nspi/?MailboxId=f26e24bc-5555-4544-0047-af993fbcbd43@careexchange.in</ExternalUrl>
 </AddressBook>
 </Protocol>
 <Protocol>
 <Type>WEB</Type>
 <Internal>
 <OWAUrl AuthenticationMethod="LiveIdFba, OAuth">https://outlook.office365.com/owa/</OWAUrl>
 <Protocol>
 <Type>EXCH</Type>
 <ASUrl>https://outlook.office365.com/EWS/Exchange.asmx</ASUrl>
 </Protocol>
 </Internal>
 <External>
 <OWAUrl AuthenticationMethod="Fba">https://outlook.office365.com/owa/Careexchange.in/</OWAUrl>
 <Protocol>
 <Type>EXPR</Type>
 <ASUrl>https://outlook.office365.com/EWS/Exchange.asmx</ASUrl>
 </Protocol>
 </External>
 </Protocol>
 <Protocol>
 <Type>EXHTTP</Type>
 <Server>outlook.office365.com</Server>
 <SSL>On</SSL>
 <AuthPackage>Basic</AuthPackage>
 <ASUrl>https://outlook.office365.com/EWS/Exchange.asmx</ASUrl>
 <EwsUrl>https://outlook.office365.com/EWS/Exchange.asmx</EwsUrl>
 <EmwsUrl>https://outlook.office365.com/EWS/Exchange.asmx</EmwsUrl>
 <SharingUrl>https://outlook.office365.com/EWS/Exchange.asmx</SharingUrl>
 <EcpUrl>https://outlook.office365.com/owa/</EcpUrl>
 <EcpUrl-um>?path=/options/callanswering</EcpUrl-um>
 <EcpUrl-aggr>?path=/options/connectedaccounts</EcpUrl-aggr>
 <EcpUrl-mt>options/ecp/PersonalSettings/DeliveryReport.aspx?rfr=olk&amp;exsvurl=1&amp;IsOWA=&lt;IsOWA&gt;&amp;MsgID=&lt;MsgID&gt;&amp;Mbx=&lt;Mbx&gt;&amp;realm=Careexchange.in</EcpUrl-mt>
 <EcpUrl-ret>?path=/options/retentionpolicies</EcpUrl-ret>
 <EcpUrl-sms>?path=/options/textmessaging</EcpUrl-sms>
 <EcpUrl-publish>?path=/options/calendarpublishing/id/&lt;FldID&gt;</EcpUrl-publish>
 <EcpUrl-photo>?path=/options/myaccount/action/photo</EcpUrl-photo>
 <EcpUrl-connect>?path=/options/socialnetworks&amp;ignore1=&lt;Action&gt;&amp;ignore2=&lt;Provider&gt;</EcpUrl-connect>
 <EcpUrl-tm>options/ecp/?rfr=olk&amp;ftr=TeamMailbox&amp;exsvurl=1&amp;realm=Careexchange.in</EcpUrl-tm>
 <EcpUrl-tmCreating>options/ecp/?rfr=olk&amp;ftr=TeamMailboxCreating&amp;SPUrl=&lt;SPUrl&gt;&amp;Title=&lt;Title&gt;&amp;SPTMAppUrl=&lt;SPTMAppUrl&gt;&amp;exsvurl=1&amp;realm=Careexchange.in</EcpUrl-tmCreating>
 <EcpUrl-tmEditing>options/ecp/?rfr=olk&amp;ftr=TeamMailboxEditing&amp;Id=&lt;Id&gt;&amp;exsvurl=1&amp;realm=Careexchange.in</EcpUrl-tmEditing>
 <EcpUrl-extinstall>?path=/options/manageapps</EcpUrl-extinstall>
 <OOFUrl>https://outlook.office365.com/EWS/Exchange.asmx</OOFUrl>
 <UMUrl>https://outlook.office365.com/EWS/UM2007Legacy.asmx</UMUrl>
 <OABUrl>https://outlook.office365.com/OAB/e238e51d-463a-4dab-8387-85555395925/</OABUrl>
 <ServerExclusiveConnect>On</ServerExclusiveConnect>
 </Protocol>
 </Account>
 </Response>
</Autodiscover>

Quick Fix Available _

  1. Point Domain.com to a dummy ip or Point to Exchange Server itself.
  2. Point domain.com to loadbalancer or webserver and redirect to www.domain.com . So that it won’t respond with dummy autodiscover files  with wrong settings.
  3. Change MX records from local to remote (Doesn’t solve all the time.)

Make sure it doesn’t respond like below.

535 Authentication Credentials invalid on Outgoing mails

Suddenly Outgoing mails stopped. with below error

Error : Exchange Toolbox – queue Viewer

4.4.0 Primary Target IP Address Responded with: “535 Authentication Credentials invalid.” Attempted to failover to alternate host, but that did not succeed. Either There are no Alternate hosts, or delivery failed to all alternative hosts.

image

Solution –  Smart Host Authentication  – Credentials were invalid

In Send Connector Properties . Smart host authentication password was changed. Had to Update the new password.

Without any service restart mail flow started flowing.

Optional – Restart Transport service to refresh.

image

Planning your Network on AWS Infrastructure (Virtual Private Cloud) – Part 1

I cannot stress how important is to plan you’re networking which is one of the most critical part of the infrastructure piece.

Amazon Virtual Private Cloud provides an isolated network environment where you can launch AWS services. You can manage and have complete control over the networking environment including the configuration of IP address range, subnets, route tables and network gateway. Access to EC2 instances can be secured using network access control list & security groups.

In this article series we will take a scenario of setting up a web and application server given an AWS platform. The objective of this article series is to understand and plan the network infrastructure so that you can access your website which is hosted on application server (public network) and connect to database server (private network)) back-end.

clip_image002

Let’s run through the important areas to understand what is and how the AWS VPC components are created and configured.

AWS Region – Mumbai

One of the important part is to select on which location you are going to create a VPC and usually you select the region where you got most of your end users located to connect fast and easily the website hosted on AWS. In my case I will be using Asia Pacific – Mumbai as most of the users who accesses the website belongs to this region.

clip_image004

Virtual Private Cloud

clip_image006

Think of a logical datacenter, you will be creating an isolated network by specifying an IP address range as a Classless Inter-Domain Routing (CIDR) block. You cannot use CIDR block larger than /16. i.e. 10.0.0.0/8 and even if you enter it won’t allow you to create. AWS recommends you to use below IPv4 address ranges as specified in RFC 1918.

· 10.0.0.0 – 10.255.255.255 (10/8 prefix)

· 172.16.0.0 – 172.31.255.255 (172.16/12 prefix)

· 192.168.0.0 – 192.168.255.255 (192.168/16 prefix)

clip_image007

Amazon also lets you provide IPv6 CIDR block using VPC. We will be using IPv4 as per our scenario having maximum 10.0.0.0/16 range. You need to plan in advance the address range e.g. if you create one range not having maximum and later thinking to add more you cannot do it rather you have to delete the existing VPC and recreate the whole thing again.

clip_image009

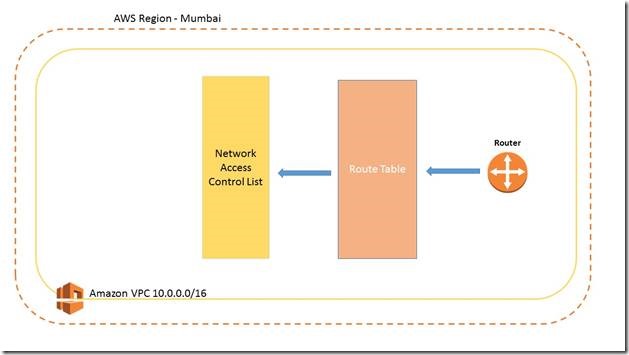
MumVPC is the name of my VPC and the address range 10.0.0.0/16 with no IPv6 having tenancy option default. You need to select dedicated option If you do not want your VPC hardware to be shared with other tenant, selecting this option will spike the cost you will be billed so in our case lets select default option and continue. You notice when you create VPC it also creates route table, network ACLs and security group.

clip_image011

A new route table has been created for MumVPC which is required for instances to connect to internet and using route table we can define custom routing between the subnets too.

clip_image013

New Security group has been created for MumVPC

clip_image015

New Network ACL has been created for MumVPC

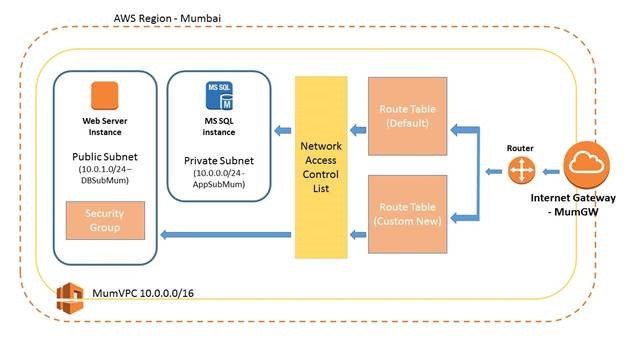
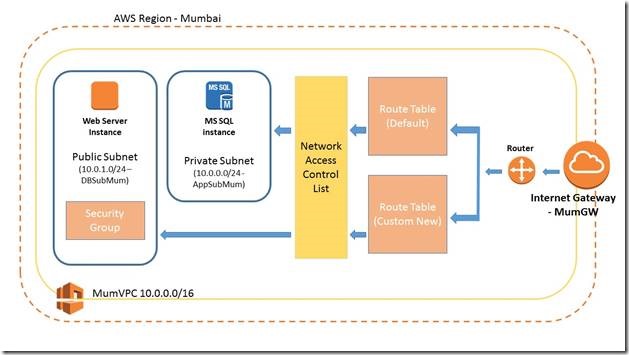
At high level below is what it looks like when you create a VPV.
clip_image017


Subnet

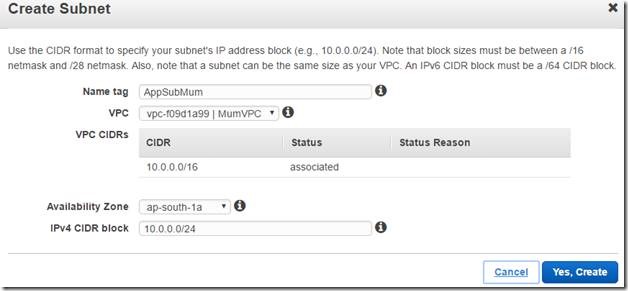
Without subnet we cannot create an instance and assign IP, so let’s create a subnet and in our scenario we will be creating two subnets for each instances. One of database and another for application network.

clip_image019

Creating a subnet called AppSubMum to create app web server instance and all the instances under this subnet will get an IP range under 10.0.0.0 network which is linked to VPC MumVPC

clip_image021

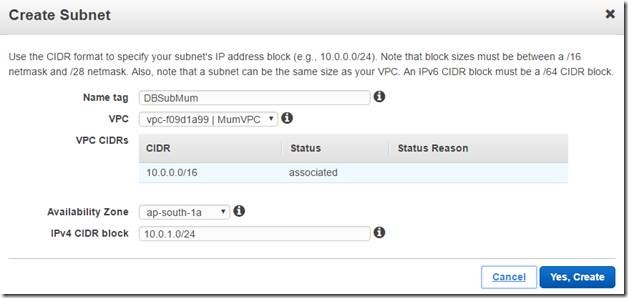
Creating another subnet called DBSubMum to create DB server instance and all the instances under this subnet will get an IP range under 10.0.1.0 network which is linked to VPC MumVPC. You can now see how many IPs are available are in each subnet and how many are reserved by default.

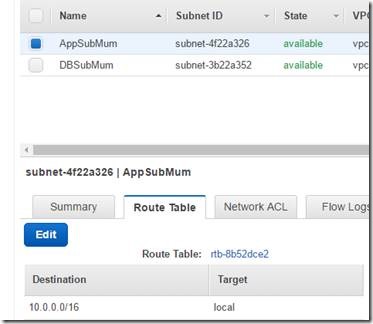
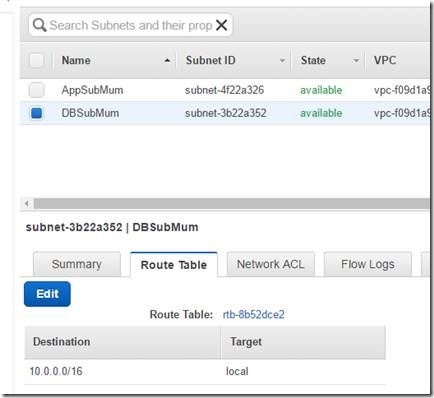
Both the subnets are now created and status is available

clip_image023

AppSubMum belongs to route table 10.0.0.0/16

clip_image025

AppSubMum belongs to route table 10.0.0.0/16

clip_image027

If you notice both the subnets are under the same route table 10.0.0.0/16 means instance created on either subnets can talk or connect to each other but since the target is local, instances on this both subnet will not be able to connect to the internet. We will see later in the article series how to configure subnet so that instances can connect to internet.

Internet Gateway

clip_image029

Internet gateway is required for instances to connect to internet on a specified subnet and it is associated single Virtual Private Cloud, you cannot attach two Internet gateway to the same VPC. Internet gateway are highly resilience and there is no single point of failure.

By default internet gateways are not created for security reason and it has to be created manually and associate with VPC.

clip_image031

Let’s create an Internet Gateway called MumGW

clip_image033

We must attach to a VPC as by default it is not attached

clip_image034

Select the MumVPC and click on Yes, Attach

clip_image036

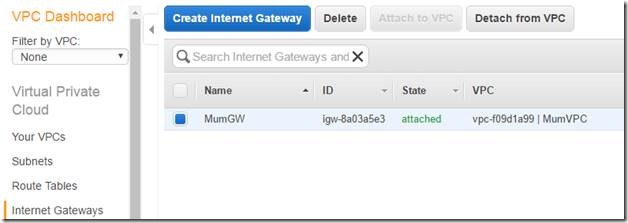
Now the internet gateway is attached to MumVPC

clip_image038

Stay tuned as we will further create instances on respective subnets and configure application subnet in such a way that the instance which are created on it can connect to internet (on app server subnet) and we can access the website which is hosted on it.

Control Removable Storage Devices via Group Policy

  • Scenario 1 – Deny all type of Storage devices.
  • Scenario 2 – Deny all type of Storage devices but allow specific devices with Administrator.
  • Scenario 3 – Deny all type of Storage devices but allow specific device IDs
  • Scenario 4 – Deny all type of Storage devices but allow iPhone only
  • Scenario 5 – Deny write Access to IPhone only or any other phone type

Scenario 1 – Deny all type of Storage devices

Within the Group Policy Editor, navigate to

\Computer Configuration\Policies\Administrative Templates\System\Removable Storage Access.

  • All Removable Storage Classes : Deny All Access

Choose Enabled

clip_image002

This policy setting takes precedence over any individual removable storage policy settings. To manage individual classes, use the policy settings available for each class.

If you enable this policy setting, no access is allowed to any removable storage class.

If you disable or do not configure this policy setting, write and read accesses are allowed to all removable storage classes. Its Recommended for Workstations which doesn’t have internet Access and to lock down completely.

· Blocks/Deny all type of Storage Devices (Tested with Thumb Drives and Phones)

Scenario 2 – Deny all type of Storage devices but allow specific devices with Administrator

Policy Type

\Computer Configuration\Policies\Administrative Templates\System\Device Installation\Device Installation Restrictions

  • Allow Administrators to Override Device Installation restriction Policies
  • Prevent Installation of devices not described by other policy settings

Choose Enabled.

clip_image004

clip_image006

If you enable this policy setting, members of the Administrators group can use the Add Hardware wizard or the Update Driver wizard to install and update the drivers for any device and start using it.

· Blocks all type of Storage Devices (Tested with Thumb Drives and Phones)

· Doesn’t Allow Charging of Phones

Scenario 3 – Deny all type of Storage devices but allow specific device IDs

Policy Type

\Computer Configuration\Policies\Administrative Templates\System\Device Installation\Device Installation Restrictions

  • Allow Installation of Devices that match any of the Device IDs
  • Prevent Installation of devices not described by other policy settings

Choose Enabled . For Matching Device IDs Policy , See how you can add device ID for a Thumb Drive as below.

clip_image008

Open Device Manager , Check Properties of Device Drives , Details tab. in the drop down choose Hardware IDs

In my Case Take the Top value like – Example – USBSTOR\DiskImation_Ridge___________PMAP

image

Enter the Hardware ID in the Policy

clip_image012

Allows Imation Pen Drive but not the iPhone as expected.

image

Even administrator Rights cannot override.

clip_image014

· Blocks all type of Storage Devices except IMATION Brand (Tested with Thumb Drives and Phones)

· Doesn’t Allow Charging of Phones

Scenario 4 – Deny all type of Storage devices but allow iPhone only

Policy Type

\Computer Configuration\Policies\Administrative Templates\System\Device Installation\Device Installation Restrictions

  • Allow Installation of Devices that match any of the Device IDs
  • Prevent Installation of devices not described by other policy settings

Choose Enabled . For Matching Device IDs Policy , See how you can add device ID for a Thumb Drive as below.

clip_image008

Open Device Manager , Check Properties of the device, Details tab. in the drop down choose Hardware IDs

In my Case Take the Top value like – Example – USB\VID

Note  that for every Iphone version Hardware ID differs like 6,6s

image

Enter the Hardware ID in the Policy

image

image

· Blocks all type of Storage Devices (Tested with Thumb Drives and Phones)

· Allows only IPhone for Charging and data Transfer


Good to know –

iPhone version Hardware ID differs 6,6S

iPhone 6S – USB\VID_05AC&PID_12A8&REV_0801

iPhone 6 – USB\VID_05AC&PID_12A8&REV_0702

Scenario 5 – Deny write Access to IPhone only or any other phone type

– Deny write access to iPhone only or any other phone type

Ideally Phone is considered as a storage Class so we can’t differentiate phone or USB drive when it comes to denying write access

Option Available – Deny all write access on Removable storage Access (Cannot override with specific Devices in this Case)

clip_image021

× How can I help you?