31.7 C
Dubai
Thursday, May 15, 2025
Home Blog Page 52

Microsoft Exchange Topology Service Crashing on restart

Symptoms –

  • Microsoft Exchange Topology Service Crashing on restart
  • PDC cannot replicate to any Server with RPC server is unavailable Error

image

Events on Exchange Server –  Couldn’t Retrieve Topology information properly by Exchange server it should be “1 7 7 1 0 1 1 7 1 “

Log Name:      Application
Source:        MSExchangeADTopology
Date:          3/27/2017 7:10:43 AM
Event ID:      2142
Task Category: Topology
Level:         Error
Keywords:      Classic
Computer:      MAIL.domain.local
Description:
Process Microsoft.Exchange.Directory.TopologyService.exe (PID=104388) Forest domain.local . Topology discovery failed, error details
No Minimal Required Number of Suitable Directory Servers Found in Forest ad.local Site Orange and connected Sites..

Log Name:      Application
Source:        MSExchange ADAccess
Date:          3/27/2017 6:58:55 AM
Event ID:      2080
Task Category: Topology
Level:         Information
Keywords:      Classic
Computer:     MAIL.domain.local

Description:
Process Microsoft.Exchange.Directory.TopologyService.exe (PID=104388). Exchange Active Directory Provider has discovered the following servers with the following characteristics:
(Server name | Roles | Enabled | Reachability | Synchronized | GC capable | PDC | SACL right | Critical Data | Netlogon | OS Version)
In-site

PDC.domain.local    CDG 1 6 0 0 0 0 0 0 0
DC1.domain.local    CDG 1 7 7 1 0 1 1 7 1

Events on Domain Controller –   The DNS server could not initialize the remote procedure call (RPC) service.

Log Name:      System
Source:        NETLOGON
Date:          3/27/2017 10:23:51 AM
Event ID:      5774
Task Category: None
Level:         Error
Keywords:      Classic
Computer:      PDC.domain.local
Description:
The dynamic registration of the DNS record ‘_ldap._tcp.A-Default-First-Site-Name._sites.ForestDnsZones.domain.local. 600 IN SRV 0 100 389 PDC.domain.local.’ failed on the following DNS server:

DNS server IP address: 192.168.111.2
Returned Response Code (RCODE): 5
Returned Status Code: 10055

For computers and users to locate this domain controller, this record must be registered in DNS.

USER ACTION
Determine what might have caused this failure, resolve the problem, and initiate registration of the DNS records by the domain controller. To determine what might have caused this failure, run DCDiag.exe. To learn more about DCDiag.exe, see Help and Support Center. To initiate registration of the DNS records by this domain  controller, run ‘nltest.exe /dsregdns’ from the command prompt on the domain controller or restart Net Logon service.
Or, you can manually add this record to DNS, but it is not recommended.

Event Type:    Error
Event Source:    DNS
Event Category:    None
Event ID:    140
Date:        3/27/2017
Time:        10:29:26 AM
User:        N/A
Computer:    PDC.domain.local
Description:
The DNS server could not initialize the remote procedure call (RPC) service. If it is not running, start the RPC service or reboot the computer. The event data is the error code.


Solution –

  • Restarted Primary Domain Controller – DNS server got initialized

Waited for Sometime like 10 minutes for Active Directory Replication to work

repadmin /syncall /AePdq

image

  • Ran Preparead

Downloaded Existing version of Exchange setup –

Preparing Active Directory

.\setup /Preparead /IAcceptExchangeServerLicenseTerms

image

Active Directory Permissions came back – Environment back to normal

Events on Exchange Topology –

Log Name:      Application
Source:        MSExchange ADAccess
Date:          3/27/2017 6:59:04 AM
Event ID:      2080
Task Category: Topology
Level:         Information
Keywords:      Classic
Computer:      PDC.domain.local
Description:
Process Microsoft.Exchange.Directory.TopologyService.exe (PID=104388). Exchange Active Directory Provider has discovered the following servers with the following characteristics:
(Server name | Roles | Enabled | Reachability | Synchronized | GC capable | PDC | SACL right | Critical Data | Netlogon | OS Version)
In-site:
PDC.domain.local    CDG 1 7 7 1 0 1 1 7 1
DC1.domain.local    CDG 1 7 7 1 0 1 1 7 1

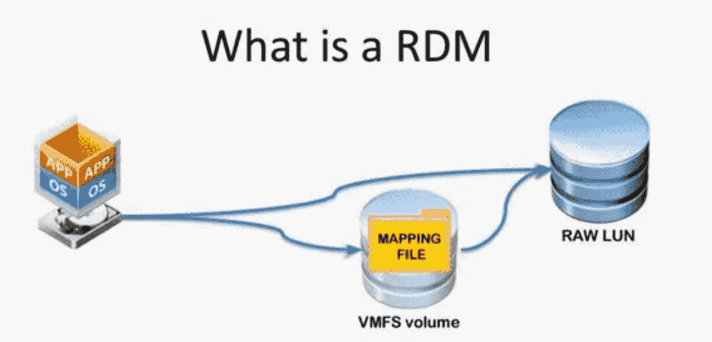
Perennially Reservation with PowerCLI for RDMs

ESXi/ESX hosts with visibility to RDM LUNs being used by MSCS nodes with RDMs may take a long time to start/reboot or during LUN rescan

Lets see how to set for specific hosts and to all hosts in a cluster.

To see ScsiCanonicalName of a Specific Virtual Machine –

(Get-VM VMNAME | Get-HardDisk -DiskType RawPhysical).ScsiCanonicalName

image

To See current status of “IsPerenniallyReserved”  for a Specific Host –

$myesxcli = get-esxcli -VMHost 10.10.10.10
$myesxcli.storage.core.device.list("naa.6000044444523030303836").IsPerenniallyReserved

image

To Set this for a Specific Host –

$myesxcli = get-esxcli -VMHost 10.10.10.10
$myesxcli.storage.core.device.setconfig($false, "naa.600009444423252523030303836", $true)

To Apply  on a Cluster  –

Enter VMNAME

Enter CLUSTERNAME

First – Remove  Line 10 to See Current Status of all hosts in the Cluster – $myesxcli.storage.core.device.setconfig($false, “$device”, $true)

If you are ok .Then insert line 10 and run the script


$devices = (Get-VM VMNAME | Get-HardDisk -DiskType RawPhysical).ScsiCanonicalName
$Cluster = Get-Cluster CLUSTERNAME
$vmhosts = $Cluster | Get-VMHost
Foreach ($Vmhost in $Vmhosts)
{
$myesxcli = get-esxcli -VMHost $Vmhost.Name
Foreach ($device in $devices)
{
$myesxcli.storage.core.device.setconfig($false, "$device", $true)
$Device
$ReservedStatus = $myesxcli.storage.core.device.list("$device").IsPerenniallyReserved
$ReservedStatus
}
}

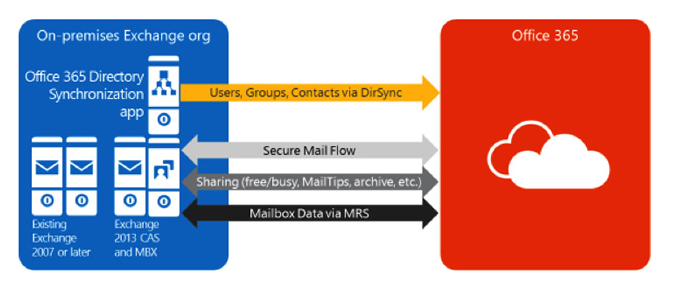
Adding Domain in Existing Hybrid Configuration

Scenario 1 –

  • Domain never Existed in the Forest.
  • All Mailboxes will be in the Cloud.
  • Hybrid Exchange Server will be used only for Recipient management.


  • Add the Additional Domain in Office Admin Center
  • Add required DNS records – Point MX,Autodiscover,SPF to the Cloud

image

Open On Premises Active Directory –

Active Directory Domains And Trust.

Properties

image

Add the Additional Suffix –

image

Now you can set –

To Change Email Addresses ,used Accepted Domain and Email Address Policies In Exchange Control Panel.

image

Try Creating test users and check user sync to the cloud with the new domain.

Scenario 2 –

  • Domain Already Exist in the Forest.
  • All Mailboxes with this domain exist in the Forest.
  • Mailboxes are yet to move to the cloud but hybrid configuration was completed with the new domain.


  • Add the Additional Domain in Office Admin Center
  • Add only verification DNS
  • Don’t Change MX or Auto discover Records.

image

Open On Premises Active Directory –

Active Directory Domains And Trust.

Properties

image

Add the Additional Suffix –

image

Now you can set –

To Change Email Addresses ,use Accepted Domain and Email Address Policies In Exchange Control Panel.

image

Add the Domain in Organization Sharing –

image

Add the Domain in Existing Hybrid Mail flow Connectors –

  • From Office 365 To Your Organization’s Email Server

Edit the Connector – Add Domain – Validate the Connector before Applying.

image

In my Case the domain was from a different site al together

So Added a new migration End Point

image

Followed the normal Process to Migrate Mailboxes use the new migration end point.

image

See –

Office 365 Hybrid Configuration Wizard Step by Step

Office 365 Hybrid Duplicate Mailboxes

Create Shared Disks for Oracle RAC Clusters in VMware

C# Client doesn’t have specific features like choose multi writer flag . So better do to do it using Web Client.

The multi-writer option allows VMFS-backed disks to be shared by multiple virtual machines. Used by Third-party cluster-aware applications like RedHat 6 or later with GFS File systems and Oracle RAC Clusters.

If the SCSI Controller is not added, Machine needs to be offline in order to do it.

Lets see how to do it.

Edit Settings of the First Node in the Cluster.

Add SCSI Controller Add

In SCSI Bus Sharing : None

Change Type : Vmware ParaVirtual

image

Now Add the Hard Disk in the First node in the Cluster

image

Now Choose

  • Thick Provision Eager Zeroed
  • Sharing Multi Writer
  • Choose Virtual Device Node you just created.
  • In my Case SCSI Controller 1 – SCSI 1:0
  • Disk mode – Independent Persistent

image

Now All done with the First Node. if you need more Shared Disks on the Same Virtual Machine. You can use the Same Physical Controller you Created

Additional Disk2 will be SCSI 1:1

Additional Disk3 will be SCSI 1:2

Now Edit Settings Copy the Disk File Name you just Created. For Example – [DataStore1]Vmname/Vmname_1.vmdk

Note : From Third Disks onwards You have to Choose Manage other disks in order to change its settings.

Now go to Second Node in the Cluster –

Add SCSI Controller Add

In SCSI Bus Sharing : None

Change Type : Vmware ParaVirtual

image

Now Add Existing Disk –

Now Choose

  • Thick Provision Eager Zeroed
  • Sharing Multi Writer
  • Choose Virtual Device Node you just created.
  • In my Case SCSI Controller 1 – SCSI 1:0 Matching the First Node to be precise.
  • Disk mode – Independent Persistent

image

Disadvantage of doing this Now Storage Vmotion is not Possible.

Good to know –

Actions or Features Supported Unsupported Notes
Power on, off, restart virtual machine
Suspend VM
Hot add virtual disks Only to existing adapters
Hot remove devices
Hot extend virtual disk
Connect and disconnect devices
Snapshots Virtual backup solutions leverage snapshots through the vStorage APIs; for example, VMware Data Recovery, vSphere Data Protection. These are also not supported.
Snapshots of VMs with independent-persistent disks Supported in vSphere 5.1 update2 and later versions
Cloning
Storage vMotion Neither shared nor non-shared disks can be migrated using Storage vMotion due to the virtual machine stun required to initiate the storage migration.
Changed Block Tracking (CBT)
vSphere Flash Read Cache (vFRC) Stale writes can lead to data loss and/or corruption
vMotion Supported for ORAC only and limited to 8 ESX/ESXi hosts


If its a Red HAT VM . Below ensures that the disks falling out of order will not cause issues in ASM

  1. shut down your virtual machine
  2. right-click on the VM’s entry in the left-hand panel and select Edit Settings
  3. click on the Options tab
  4. select the Advanced -> General item on the left and click on the Configuration Parameters
  5. Click on the Add Row button
  6. Click Add Row.
  7. In the Name column, enter disk.EnableUUID
  8. In the Value column, enter TRUE
  9. Click OK and click Save.
  10. Power on the virtual machine.

Reference –

https://kb.vmware.com/selfservice/microsites/search.do?language=en_US&cmd=displayKC&externalId=1034165

https://access.redhat.com/solutions/94583

https://access.redhat.com/solutions/158873

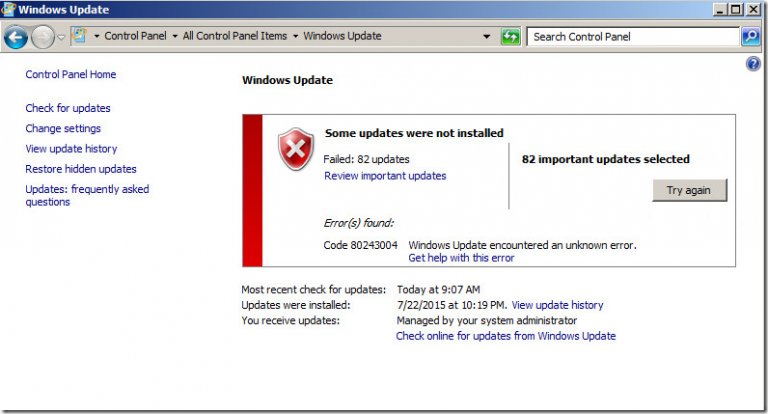
Windows Updates Error – Code 80243004

Windows is always Crazy. Craziest fix i have ever seen

Windows Updates Error on Windows Server 2008 R2 – Code 80243004

image

Solution –

Right click on the Taskbar – Choose Customize

image

Unchecked – Always Show all icons and notifications on the taskbar.

image

Click on Try Again for Updates – Started Installing Updates

image

Configuring Public DNS and MX records for exchange 2013

Lets see what are the Public DNS records we need to Configure for Exchange 2013/Exchange 2016  (Client Access / mail flow / Autodiscover)

Create A record – Mail.CareExchange.in

and point to the Exchange 2013 Server or Exchange 2016 Server .

If the server is load balanced – You will have to point to the VIP (Virtual IP of the load balancer)

Which will be the internet facing server  for your Webmail and all other URLs

Create a A Record – autodiscover.careexchange.in

and point to the Exchange 2013 Server or Exchange 2016 Server .

If the server is load balanced – You will have to point to the VIP (Virtual IP of the load balancer)

Which will be the internet facing server  for your Webmail and all other URLs

Which will serve your outlook and Active Sync phones to send configuration settings automatically.

Create a MX record – and point to the A record you created above for small businesses

Which will serve your mail flow

if you are going to use any Cloud based anti – spam or Anti-Spam Appliances . you will have to point it to their DNS Records or your Anti-spam Appliances.

Required Public IPs – 1

Required Public IPs with One Anti-Spam Server – 2

image

Ports need to be Opened on the firewall

Ports for HTTPS – 443

Port for Mail flow – 25

POP3 – port 110

IMAP – port 143

SMTP – port 25

HTTP – port 80

Secure IMAP (IMAP4-SSL) – port 585

IMAP4 over SSL (IMAPS) – port 993

Secure POP3 (SSL-POP) – port 995

Secure SMTP (SSMTP) – port 465 | Exchange specifically does not support SMTPS (implicit TLS)

Updated – Download as Excel Sheet

image

Note :

If you want to Split Mail flow and Outlook Web App URL. you can also do that .

You can have outlook web app and other URL’s has mail.careexchange.in

and for mail flow you can have mx.careexchange.in

by doing this – the advantage you can re route your mail flow anytime without disturbing anything .

For Reference :

Lets see a practical scenario on create DNS records with one of the public DNS providers

HOST A records – mail.testcareexchange.biz

HOST A records – autodiscover.careexchange.biz

image

MX Records – Testcareexchange.biz

Note : Mail is delivered to the mail exchange server with the lowest preference number (highest priority)

image

Thank you .

Hope the article was informative Smile

× How can I help you?