33.2 C
Dubai
Thursday, May 15, 2025
Home Blog Page 51

Feature you are trying to use is on a network resource that is unavailable

Trying to remove any installation in Windows gives below error

  • The Feature you are trying to use is on a network resource that is unavailable.
  • Click ok to Try Again, or enter an alternate path to a folder containing the installation package .msi in the box below

image

Download Windows Fix

https://support.microsoft.com/en-us/help/17588/fix-problems-that-block-programs-from-being-installed-or-removed

Choose Uninstalling . Choose the app you are trying to remove.

image

Configuring NTP with Master Clock in Isolated Network

Typically in Active Directory Based Environment – Primary Domain Controller (PDC) will be the master for Time and all other domain joined machines will receive time from the master.

Login to Primary Domain Controller (PDC) which holds PDC Emulator Role – In my Case its an Windows Server 2012 R2 or above.

To Find who is holding the PDC Role – Login to Active Directory –

netdom query fsmo

image

To Set NTP on a Isolated network –  (Same Process Applies on a network with Internet Connectivity just the NTP IP differs)

Setting 10.10.10.10 as my NTP Source for my primary Domain Controller

Open PowerShell Run as Administrator

w32tm /config /manualpeerlist:"10.10.10.10",0x8 /syncfromflags:manual /reliable:yes /update
Get-Service W32time | Restart-Service

Note : UDP Port 123 Should be open

Verify Time Source Applied Properly –

w32tm /query /source

image

To Resync Time with the NTP –

w32tm /resync

image

To Check Clock Type –

w32tm /query /peers

image

Verify NTP is ok and we can receive time from NTP

w32tm /stripchart /computer:10.10.10.10 /dataonly

image

For Debugging NTP w32tm

w32tm /debug /enable /file:Deb.log /entries:300 /size:100

W32tm Registry Location –

HKLM\System\CurrentControlSet\Services\w32time\Parameters

image

Had to use a Custom NTP Appliance from Master Clock  which acts as an NTP in a isolated Environment.

Download Win discovery from Master Clock Site.

Enter Global Password – Default public

Exit Win discovery Open it again.

Discover – Enter Network Configuration for Static IP

image

Administrative Actions – Set Password

image

Save it.

Enter Global Password – Save it . Close – Re open

Discover

image

exit – reopen – discover again.

Enable – NTP Server

Uncheck – Set NTP Alarm flag when not locked to a reference on Free running clocks like NTP 100

image

For Cisco Routers MD5 has to be enabled

Trusted Allowed – Enter keyword all lower case to be easier.

Enable MD5 authentication for Client Request

— Ignore Request if not Authenticated – Leave it checked as PDC is using the same master clock

image

Set Time Zone / Time offset

In my case UTC +4

image

image

Now Set the Time on UTC
Note you have to set the time always in UTC (Google Current UTC Time with Seconds)

image

SSH Enabled by Default – Add user name password. Easy to Change time / Reboot Appliance

ssh

username – public

password – publicpass

? – list all commands

Options – ssh ?

image

Known Issues –

  • VMware Machine keeps saying Local CMOS Clock

As a Recommended Practice – Apply  https://kb.vmware.com/selfservice/microsites/search.do?language=en_US&cmd=displayKC&externalId=1189

tools.syncTime = "FALSE"
time.synchronize.continue = "FALSE"
time.synchronize.restore = "FALSE"
time.synchronize.resume.disk = "FALSE"
time.synchronize.shrink = "FALSE"
time.synchronize.tools.startup = "FALSE"
time.synchronize.tools.enable = "FALSE"
time.synchronize.resume.host = "FALSE"

Check 1 – Synchronize Guest time with Host is unchecked

image

Check 2 – Verify UDP 123 Port is Open on Windows Firewall and you can query the time using strip chart command

w32tm /stripchart /computer:10.10.10.10 /dataonly

Check 3 –  Configuring another NTP and Check Status Changes , It Could be NTP not giving the time in a proper way So that Windows Server puts back to default Local CMOS Clock

Check Event Viewer

Log Name:      System
Source:        Microsoft-Windows-Time-Service
Date:          4/17/2017 5:11:22 PM
Event ID:      47
Task Category: None
Level:         Warning
Keywords:
User:          LOCAL SERVICE
Computer:      DS002
Description:
Time Provider NtpClient: No valid response has been received from manually configured peer 10.10.10.10,8 after 8 attempts to contact it. This peer will be discarded as a time source and NtpClient will attempt to discover a new peer with this DNS name. The error was: The peer is unreachable.

Vmware Windows 2012 R2 template configuration–Recommended

image

  • Floppy Drive Removed
  • Memory 4GB
  • Hard Disk 40 GB – Keeping it low is good as you cannot reduce thin provisioned disk size.

Make sure Hot Add is enabled

  • Enable Memory Hot Add for this Virtual Machine
  • Enable CPU Hot Add only for this Virtual Machine

image

  • Check and Upgrade Tools during Power Cycling

image

  • Check Enable Logging

image

Get to Boot Screen to do some configurations –

image

  • Boot-Time Diagnostic Screen to Enabled

image

Change Boot Order to  –

  • Hard Drive
  • Removable Devices
  • CD-ROM Drive
  • Network boot

Use + to Toggle or Shift ` +

image

Advanced –> I/O Device Configuration Serial Ports/Parallel Ports/Floppy Disabled.

image

  • Install VMware Tools

image

Disabled IPv6

image

Allow Remote Desktop –

image

  • Set Time to Display List of Operating Systems to 5 Seconds
  • Set Time to Display recovery Options when Needed to 5 Seconds

image

Change Machine Name –

image

Make sure Windows is up to date –

  • As .NET 4.6.1 is not supported for Some Applications like Exchange. Not Installing it at this point of time (Optional).

image

Open PowerShell Run as Administrator and Cleanup C:\Windows\WinSxS folder which contains all the Updates which is almost 8GB

Dism.exe /online /Cleanup-Image /StartComponentCleanup /ResetBase

This is a great command added with Windows 8.1 and Windows Server 2012 R2.  Essentially, it’s the mother of all commands. It cleanups and removes all the old superseded stuff from every component in the component store.

image

Change DVD ROM Drive Letter to Z: in Disk Management –

image

Control Panel – Notification Area Icons – Check Always Show All Icons and Notifications on the Taskbar

image

Power Options Set to High Performance

image

  • Proper Time Zone Updated in Server Manager
  • IE Enhance Security Configuration is set of OFF for Administrators only.

image

Start Run – Lusrmgr.msc – Local Administrator Account – Password Never Expires

image

Check – File Name Extensions

Windows Explorer – View –

image

Change Appropriate Date Format –

image


Optional – If you have Mcafee Agent Installed

cd “C:\Program Files\McAfee\Agent”

maconfig.exe –enforce –noguid

image

Optional – if you have Windows Update Services in the Environment – WSUS Client registration will fail if you don’t do below

HKLM\SOFTWARE\Microsoft\Windows\CurrentVersion\WindowsUpdate

Delete SusClientId

Delete SusClientIdValidation

image

Download sdelete https://technet.microsoft.com/en-us/sysinternals/bb897443.aspx

sdelete64.exe –z C:

image

Uncheck below on Taskbar and navigation properties –

  • Store Recently Opened Programs
  • Store and display recently

image

image

  • Delete Temporary Profile if created (C:\users\
  • IE Full Reset (inetcpl.cpl)

image

Clear All Event Logs

Get-EventLog -List | foreach{Clear-EventLog -LogName $_.log}

image

Microsoft Recommendation –

  • Do not Disable User Access Control (UAC)
  • Do not Disable Windows Firewall (Enable ICMPv4In alone – It will be easy while provisioning)


  • Clear the IP from the NIC (Network Card)
  • Shutdown Windows 2012 R2 Template server


Now Shrink the VMDK File –

putty to the host – Browse to the VMDK file of the VM. ( This doesn’t work on a VSAN Environment)

vmkfstools –K Template.vmk

image


    • Convert to Template

image

Deploy Virtual Machine From this Template –

image

Customization Specifications Manager to Join Domain Automatically –

image

image

Enter Local Administrator Password –

image

Network Settings

image

image

Enter Domain Information –

image

  • Check Generate New Security ID (SID)

image

  • Customize using an Existing customization Specification

image

Deploy Virtual Machine using Template –

image

image

Machine Joined Automatically –

image

Using PowerCLI – Import Multiple Virtual Machines using CSV

IIS Installation failed–Reserved for use by another transaction

Installation of Web Server IIS Fails on Windows Server.

The Request to add or Remove features on the specified server failed.

Installation of one or more roles,roles services,or features failed.

The function attempted to use a name that is reserved for use by another transaction . Error : 0x800071a90

image

Solution –

Disable Anti-virus.

Mcafee doesn’t show any access protection logs.

But still disabling anti-virus allowed web server installation to succeed.

Removing DHCP Server on Windows Server

Force Removal of DHCP Server will leave entries in Active Directory. Lets see how to remove it in a proper way.

Open DHCP server. Right Click Unauthorize

image

As soon as you Unauthorize

Open ADSIEdit

Connect to the Configuration Container

Drill down to CN=Configuration | CN=Services | CN=NetServices

you can see DHCP Server entries get removed. You can remove the old ones forcefully from Adsiedit.msc

image

Now Open Server Manager – remove Roles and Features –

Uncheck DHCP Server. Remove it.

Now DHCP server has been decommissioned successfully.

image

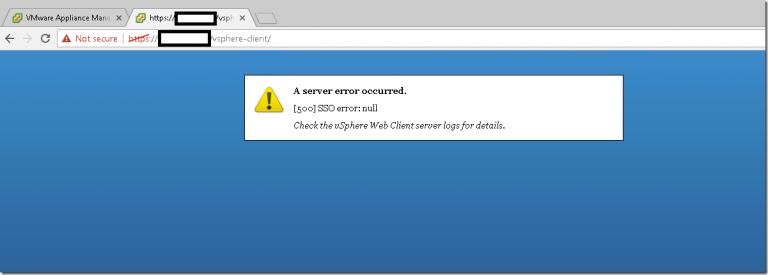
vSphere Client 500 SSO Error:null

vSphere web Client says 500 SSO Error Null after reboot of vCenter Virtual Appliance.

image

Solution –

Once you are connected to your vCenter Server Appliance

check your log file hostname# cat   /var/log/vmware/vsphere-client/logs/vsphere-client-virgo.log

Reading the logs – The PSC and the VCSA  time was off by 20 minutes.

I configured the NTP and rebooted the vcsa and the psc and the web client came back to normal.

× How can I help you?