24 C
Dubai
Thursday, May 8, 2025
Home Blog Page 48

Hybrid Configuration Failure setting the email address policy

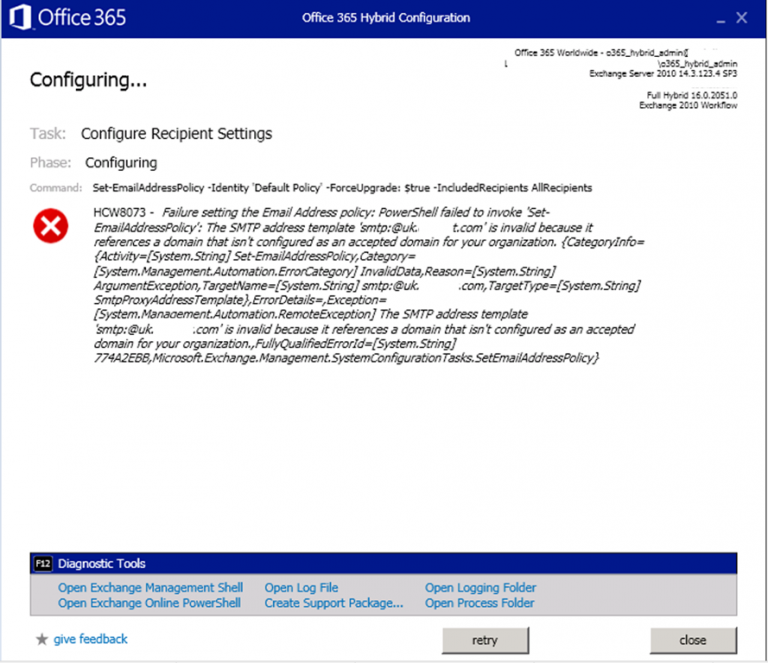
While running Hybrid Configuration on an Exchange server you may encounter below error .

Configuring Recipient Settings

HCW073 – Failure setting the email address policy.Powershell failed to invoke ‘set-emailaddresspolicy’ The SMTP address template is invalid because it references a domain that isn’t configured as as an accepted domain in your Organizations.

Command

Set-EmailAddressPolicy –identity ‘Default Policy’ –ForceUpgrade: $true –IncludeRecipients AllRecipients

image


Solution –

In my case the server is an Exchange Server 2010 where some of the domains assigned on the proxy address not added in the accepted domain and Email address policies weren’t upgraded to Exchange 2010 from legacy versions.

  • Added all missing Domains in Accepted domains of Exchange Server 2010

Ran below to Confirm its legacy.

Get-EmailAddressPolicy | FL Name,*RecipientFilter*,ExchangeVersion

image

Ran below to Check Address lists are legacy.

Get-GlobalAddressList | FL Name,*RecipientFilter*,ExchangeVersion

image

Follow below Article – Upgraded Email Address Policies and address lists to Exchange Server 2010

https://www.azure365pro.com/upgrading-email-address-policies-and-address-lists-from-exchange-2003-to-exchange-2010/


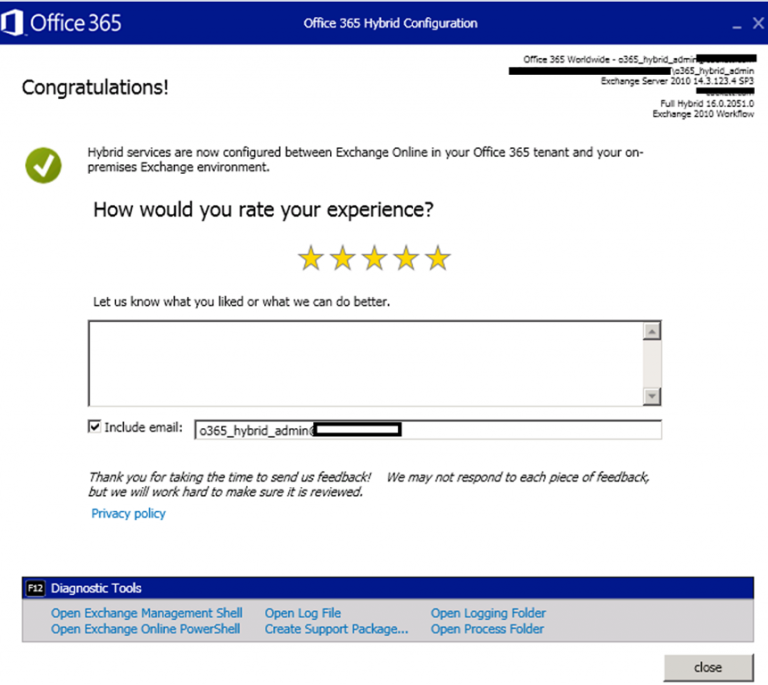
Once done. Hybrid Wizard Ran Successfully.

image

Hybrid Configuration Wizard on Exchange Server

We are planning to Migrate mailboxes from Exchange 2010. Where azure Ad connect is already in place and users are synced to Office 365. lets see how to migrate mailboxes to Exchange Online with minimal impact to end users.

Check lists –

  • Verify Exchange Servers is on Latest Rollup
  • Make sure you Export Send As/Full Access Permissions in a CSV so that you migrate the delegates in the same batch.
  • Make sure all users have the hybrid domain added in the proxy address for mail flow co-existence to work properly. You can export all proxy address to review
  • Make sure all existing smtp domains added to office 365 and verified using txt record.
  • Check mail enabled public folders are synced properly and shows up in the Global address list.
  • Verify Auto discover is configured properly from the external world with proper SAN Certificate.
  • Make sure transport rules are exported and imported to the cloud using Export-TransportRuleCollection | Import-TransportRuleCollection
  • Make sure dynamic distribution groups recreated.

Login to Office 365 Admin Portal . Exchange Admin Center.

Hybrid – Configure.

image

It detected my Optimal Internet facing Exchange server where auto discover is pointing to.

Choose Office 365 Worldwide

image

Created a Service Account for Hybrid to have Admin Access on Exchange Server and Office 365.

image

Exchange PowerShell and Exchange Online PowerShell test succeeded.

image

Choose Full hybrid Configuration. So that free/busy can be shared upon co-existence and more features.

image

Select the domains which has proper autodiscover working from external world.which will be part of hybrid and make autodiscover set to true.

Good to know

Autodiscover Domain feature which we don’t need to have Autodiscover services published for all the existing SMTP domains

With the Autodiscover domain feature, you have the option of setting one of your SMTP domains as the Autodiscover domain.

· There is no need to create an Autodiscover record for all SMTP domains in DNS, except for the domain you set as the Autodiscover domain

· There is no need to include the Autodiscover FQDN for all SMTP domains in the SAN certificate

image

Make sure you have TXT Records added for Domain verification and run verify domain ownership.

image

Choose – Configure my Client Access and mailbox server for secure mail transport.

Note : Do not choose Enable Centralized mail transport. Unless there is a specific requirement of routing all the mail flow via the on-premises Exchange Server.

image

Choose the Hub Transport server which will be configured for secure mail transport. Its mostly the same internet facing server client access server with hub role installed.

image

Enter the public IP address of the Mail transport servers.

image

In my Case , Wildcard certificate was used for the primary domain. have chosen the certificate for securing hybrid mail transport.

image

Enter the fully qualified domain name ,so that it will be used on the connector while sending out emails from Exchange online to On-premises

Make sure port 25 is allowed on the Fully qualified domain name. Refer link for Opening port 25 in a secure manner and not for all public Ips

https://technet.microsoft.com/library/dn163583(v=exchg.150).aspx

image

Choose Update –

image

Hybrid Configuration Wizard Completed Successfully.

image

Login to Office 365 Admin Center.  Setup –> Data Migration

Make sure you are member of global administrator

image

Make sure user has license and click on start migration.

image

Need to add an Migration Endpoint for the first time.So that specific endpoint will be used for migrating mailboxes to the cloud.

image

Add Migration Endpoint details , a mailbox primary smtp name to detect the endpoint automatically using autodiscover.

Enter the credentials which as access to the on-premises exchange server

image

Migration Endpoint added successfully.

image

Allows 20 Concurrent Moves by default . which can be changed on the Exchange online control panel.

image

now if you choose start migration.

Mailbox should migrate to the cloud in few hours depends on the size.

Exchange Control Panel , Migration tab will be showing the exact items details.

Happy Exchange Online Migration. All the best.

WSUS Console Error Unable to connect via the remote API

Windows Update Services Console Keeps Crashing | Error Unable to connect via the remote API

image

Reference Event –

Log Name:      Application
Source:        Windows Server Update Services
Date:          12/4/2017 9:17:51 PM
Event ID:      7032
Task Category: None
Level:         Warning
Keywords:      Classic
User:          N/A

Description:
The WSUS administration console was unable to connect to the WSUS Server via the remote API.

Verify that the Update Services service, IIS and SQL are running on the server. If the problem persists, try restarting IIS, SQL, and the Update Services Service.

The WSUS administration console has encountered an unexpected error. This may be a transient error; try restarting the administration console. If this error persists,

Try removing the persisted preferences for the console by deleting the wsus file under %appdata%\Microsoft\MMC\.
System.IO.IOException — The handshake failed due to an unexpected packet format.

Source
System

Stack Trace:
at System.Net.Security.SslState.StartReadFrame(Byte[] buffer, Int32 readBytes, AsyncProtocolRequest asyncRequest)
at System.Net.Security.SslState.StartReceiveBlob(Byte[] buffer, AsyncProtocolRequest asyncRequest)
at System.Net.Security.SslState.CheckCompletionBeforeNextReceive(ProtocolToken message, AsyncProtocolRequest asyncRequest)
at System.Net.Security.SslState.ForceAuthentication(Boolean receiveFirst, Byte[] buffer, AsyncProtocolRequest asyncRequest)
at System.Net.Security.SslState.ProcessAuthentication(LazyAsyncResult lazyResult)
at System.Threading.ExecutionContext.RunInternal(ExecutionContext executionContext, ContextCallback callback, Object state, Boolean preserveSyncCtx)
at System.Threading.ExecutionContext.Run(ExecutionContext executionContext, ContextCallback callback, Object state, Boolean preserveSyncCtx)
at System.Threading.ExecutionContext.Run(ExecutionContext executionContext, ContextCallback callback, Object state)
at System.Net.TlsStream.ProcessAuthentication(LazyAsyncResult result)
at System.Net.TlsStream.Write(Byte[] buffer, Int32 offset, Int32 size)
at System.Net.ConnectStream.WriteHeaders(Boolean async)
** this exception was nested inside of the following exception **
System.Net.WebException — The underlying connection was closed: An unexpected error occurred on a send.

Source
Microsoft.UpdateServices.Administration

Stack Trace:
at Microsoft.UpdateServices.Administration.AdminProxy.CreateUpdateServer(Object[] args)
at Microsoft.UpdateServices.UI.SnapIn.Scope.ServerSummaryScopeNode.GetUpdateServer

(PersistedServerSettings settings)
at Microsoft.UpdateServices.UI.SnapIn.Scope.ServerSummaryScopeNode.ConnectToServer()
at Microsoft.UpdateServices.UI.SnapIn.Scope.ServerSummaryScopeNode.get_ServerTools()

On Windows 10 | It was failing with 0x80244022 | Server Busy

image

Solution –

  • Verified Sufficient CPU / RAM
  • Verified Anti virus was skipped to Scan Contentdir and Targetdir

Computer\HKEY_LOCAL_MACHINE\Software\Microsoft\Update Services\Server\Setup

image
  • Increased Private Memory limit for WsusPool to 10 GB in my case. for 3000 endpoints.
image
image

Unable to find the answer CAFVARDIR in the installer Database–VMtools

Installing VMware Tools on Red Hat Servers will fail with Error


Unable to Execute /USR/bin/VMware-uninstall-tools.pl

Uninstall Failed Please correct the failure and re run the install.

Execution aborted.

image

Locating to bin and run VMware-uninstall-tools.pl will fail with Error

Unable to find the answer CAFVARDIR in the installer database. (etc/vmware-caf/pme/install/preuninstall.sh)

You may want to re-install VMWare Tools

image


Solution –

Locate below folder and remove vmware-tools folder and run vmware ./vmware-install.pl.

rm -r /etc/vmware-tools

image

Automate Run Summarization via PowerShell in SCCM

Without Delegating System Center Configuration Manager Deployment Rights. We can Update the Summarization Automatically via a Simple PowerShell Script.


image

Created a Script and Saved as PS1 file

image

Import-Module "C:\Program Files (x86)\Microsoft Configuration Manager\AdminConsole\bin\ConfigurationManager.psd1"
cd SITENAME:
Invoke-CMDeploymentSummarization -CollectionName "DeploymentApp1"
Exit

Created a Basic Task in Task Scheduler.

image

Now it updates the SCCM Summarization for a  Specific Collection Everyday.

The Maximum Size of an object has been exceeded

Active Directory Servers – Error Issuing Replication : 8304 (0x2070):

The Maximum Size of an object has been exceeded . Active Directory Replication Fails with below Error

image

image

Solution –

To See which Object Causing the issue.

Event Viewer – Directory Service – Event ID 1093 Replication

image

Below Event Clearly Shows the Object Name and the attribute Causing the issue.

Reference Event –

Log Name:      Directory Service
Source:        Microsoft-Windows-ActiveDirectory_DomainService
Date:          8/25/2017 2:34:53 PM
Event ID:      1093
Task Category: Replication
Level:         Warning
Keywords:      Classic
User:          ANONYMOUS LOGON
Computer:      AD.CareExchange.in
Description:
Active Directory Domain Services could not update the following object with attribute changes because the incoming change caused the object to exceed the maximum object record size. The incoming change to the following attribute will be reversed in an attempt to complete the update.

Object:

CN=Computer1,OU=Computers,DC=Careexchange,DC=in

Object GUID:
333333-f6b6-33e2-9333-333362ceed0
Attribute:

8cc6b307 (ms-Mcs-AdmPwdHistory)

The current value (without changes) of the attribute on the local directory partition will replicate to all other directory services. This will counteract the change to the rest of the directory services. The reversal values may be recognized as follows:
Version:
1433
Time of change:
2017-08-25 14:34:53
Update sequence number:
13333392


In my Case its the Local Account Password Solution keeps the unlimited password history. Causing to exceed the maximum object size.

Once i clear the attribute, Solve the replication issue.

× How can I help you?