38 C
Dubai
Monday, May 5, 2025
Home Blog Page 4

Step-by-Step Azure SQL Backup & Restore Guide

In the digital age, where data is the lifeblood of businesses, safeguarding databases against loss or corruption is paramount. Azure SQL Server, Microsoft’s cloud-based relational database service, offers a suite of powerful tools to ensure the integrity and availability of critical data. At the heart of this arsenal lies Azure SQL Backup, a feature-rich solution designed to protect databases from unforeseen disasters, system failures, or human errors. In this guide, we delve into the world of Azure SQL Backup, exploring its capabilities, benefits, and best practices. From data protection and disaster recovery to cost-efficiency and ease of management, Azure SQL Backup empowers organizations to fortify their data infrastructure and navigate the complexities of modern data management with confidence.

Advantages of Backup Configuration in Azure SQL Server:

  1. Data Protection and Integrity: Backup configuration in Azure SQL Server enables organizations to create regular backups of their databases, ensuring that critical data is safeguarded against accidental deletion, corruption, or other data loss events. By establishing automated backup schedules, businesses can maintain data integrity and meet regulatory compliance requirements.
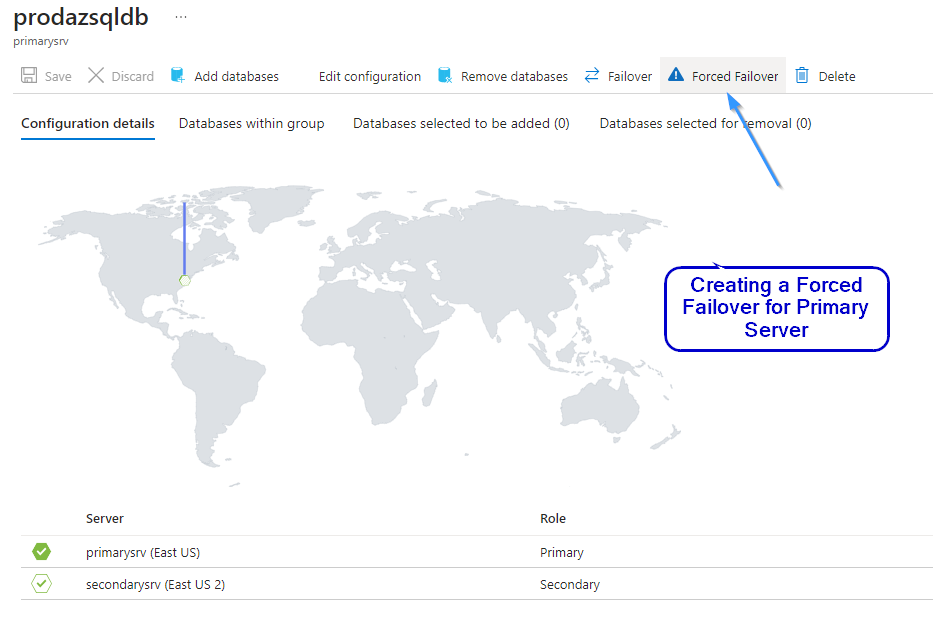
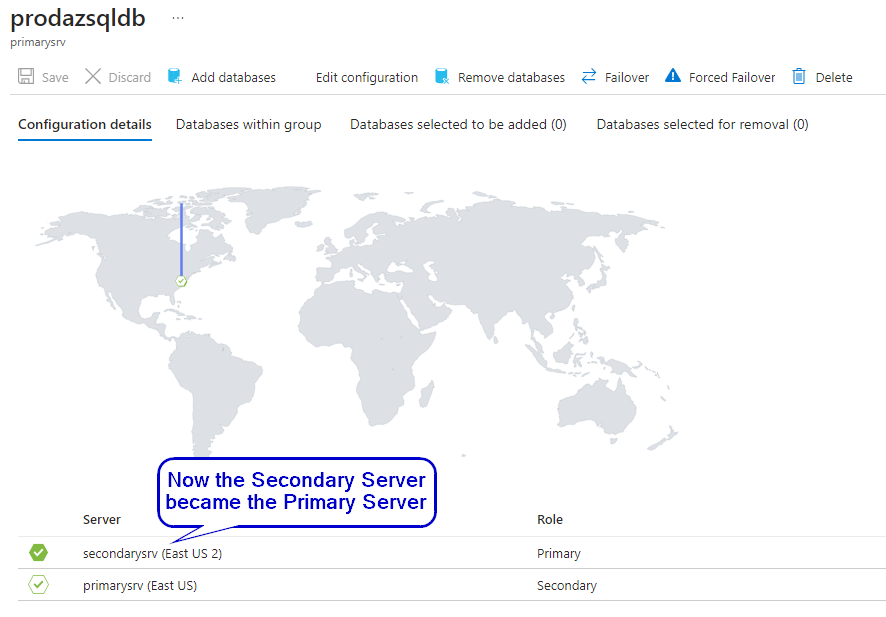
  2. Business Continuity and Disaster Recovery: With backup configuration, organizations can effectively prepare for and mitigate the impact of unexpected disasters or system failures. By regularly backing up databases to Azure Blob Storage, businesses can quickly restore data to a point-in-time state, minimizing downtime and ensuring seamless continuity of operations.
  3. Flexibility and Scalability: Azure SQL Server offers flexible backup options, allowing organizations to tailor backup configurations to their specific requirements. Whether it’s full backups, differential backups, or transaction log backups, businesses can choose the appropriate backup strategy based on their data volume, retention policies, and recovery objectives. Additionally, Azure’s scalable infrastructure ensures that backup operations can effortlessly accommodate growing data workloads.

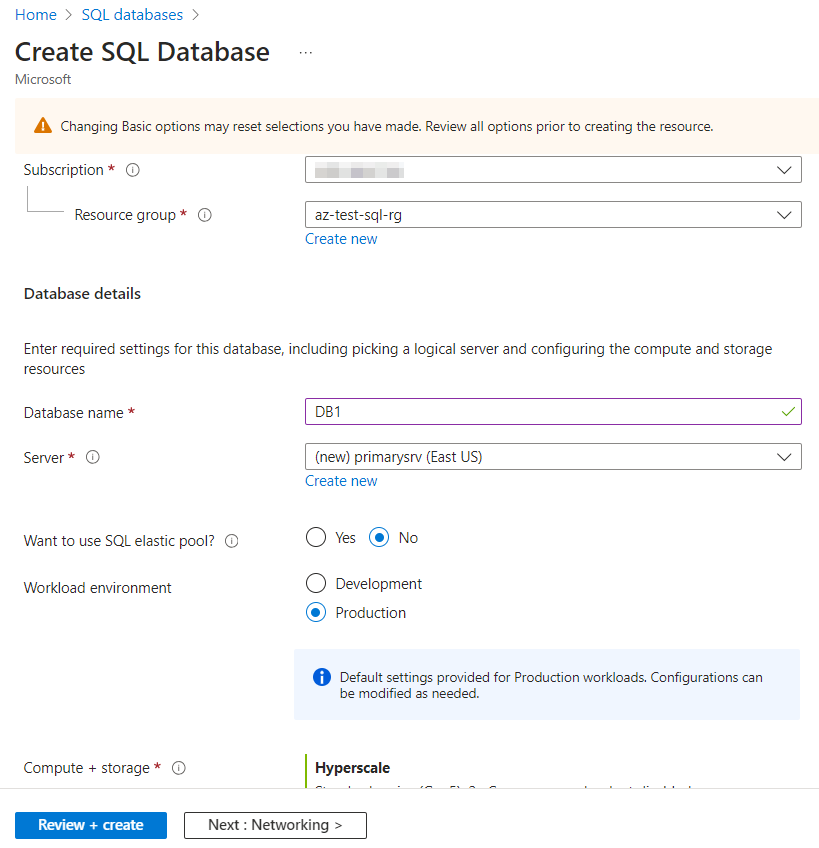
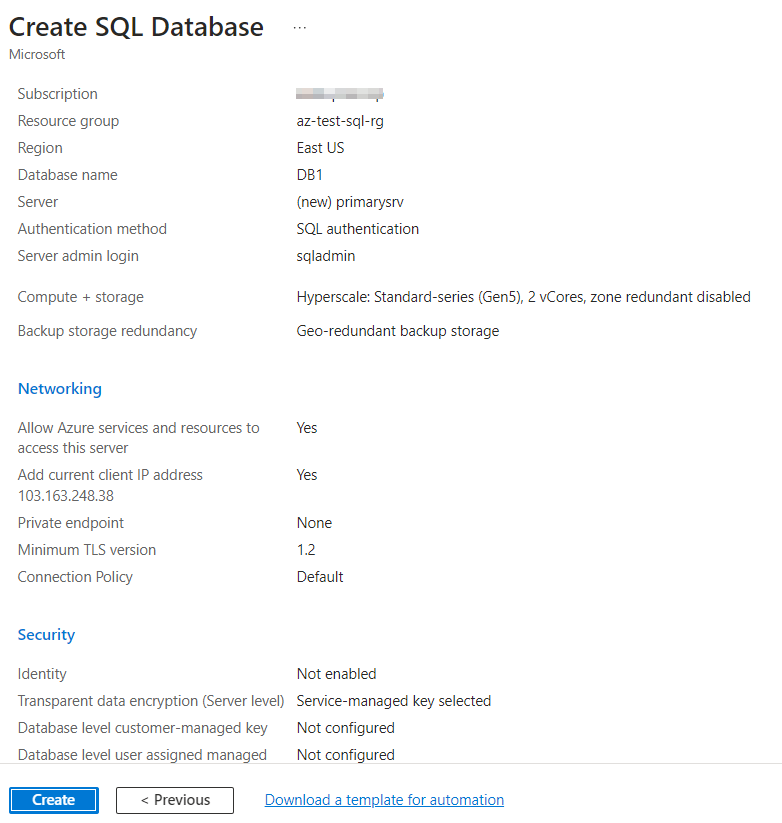
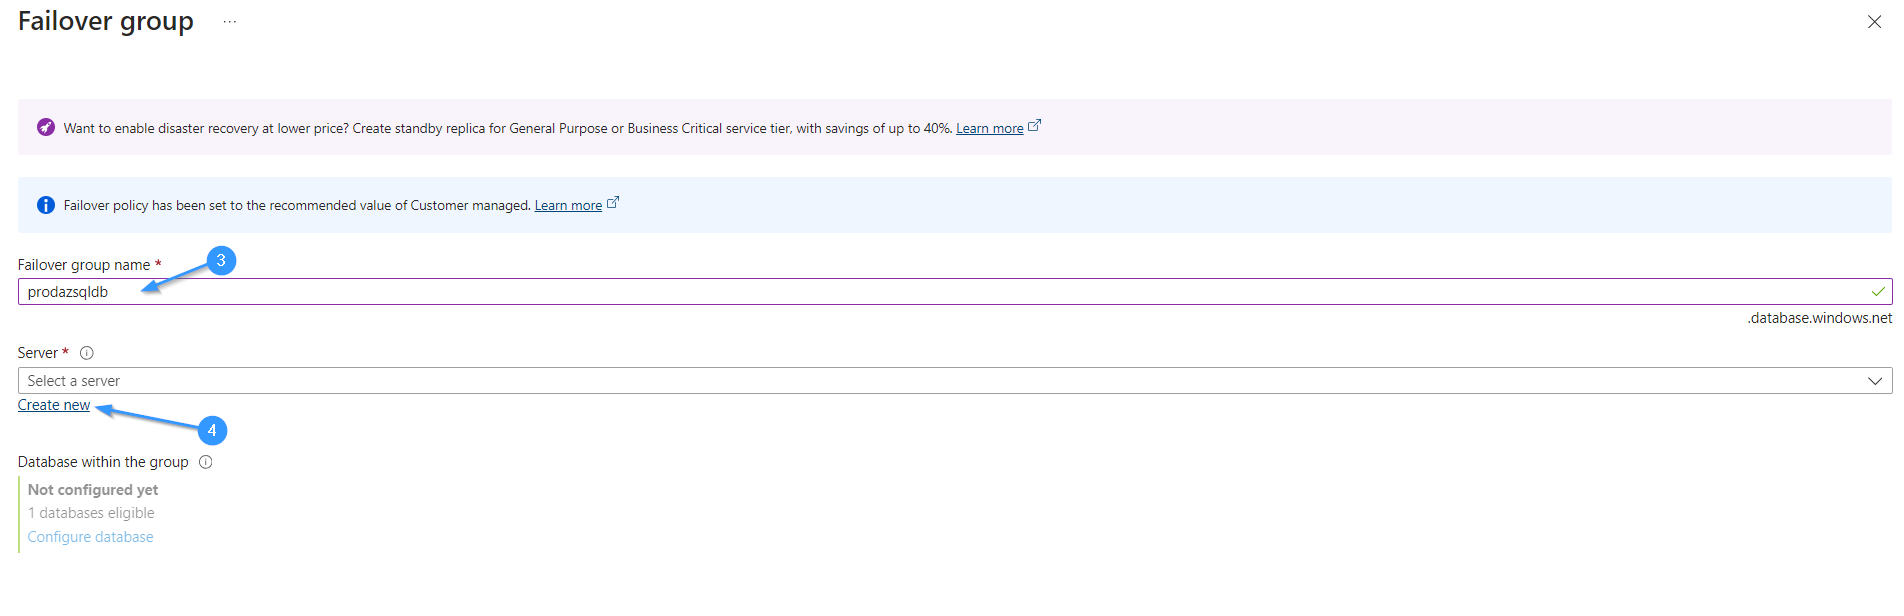
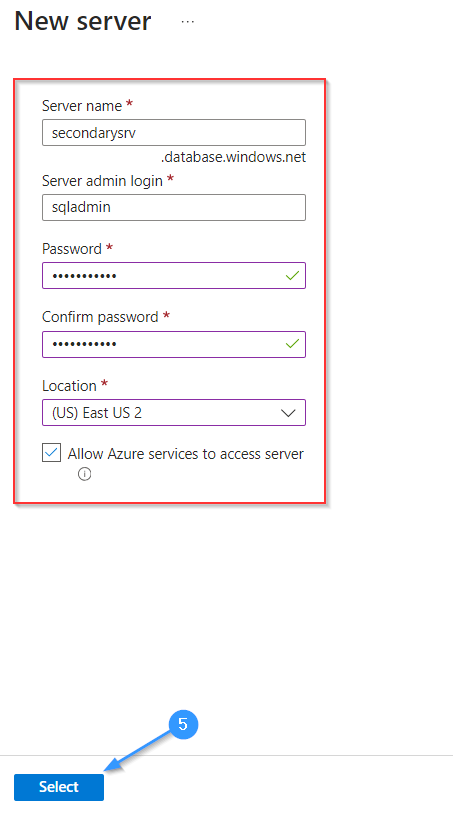
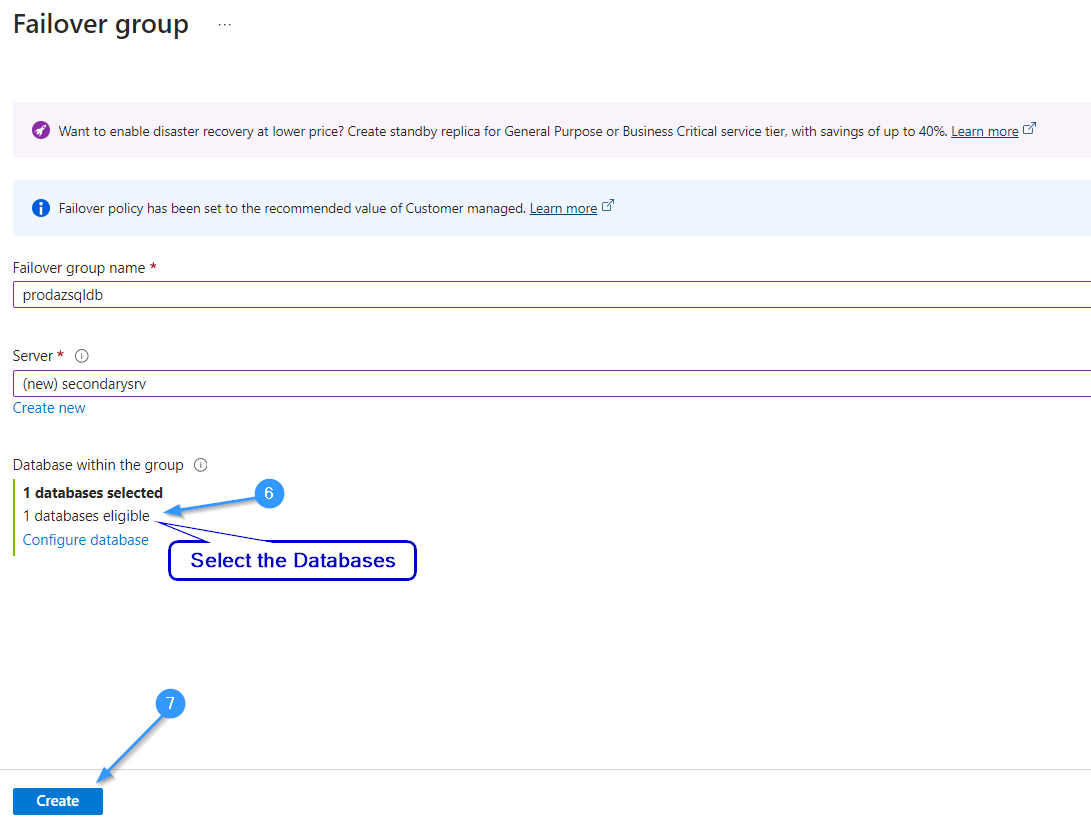
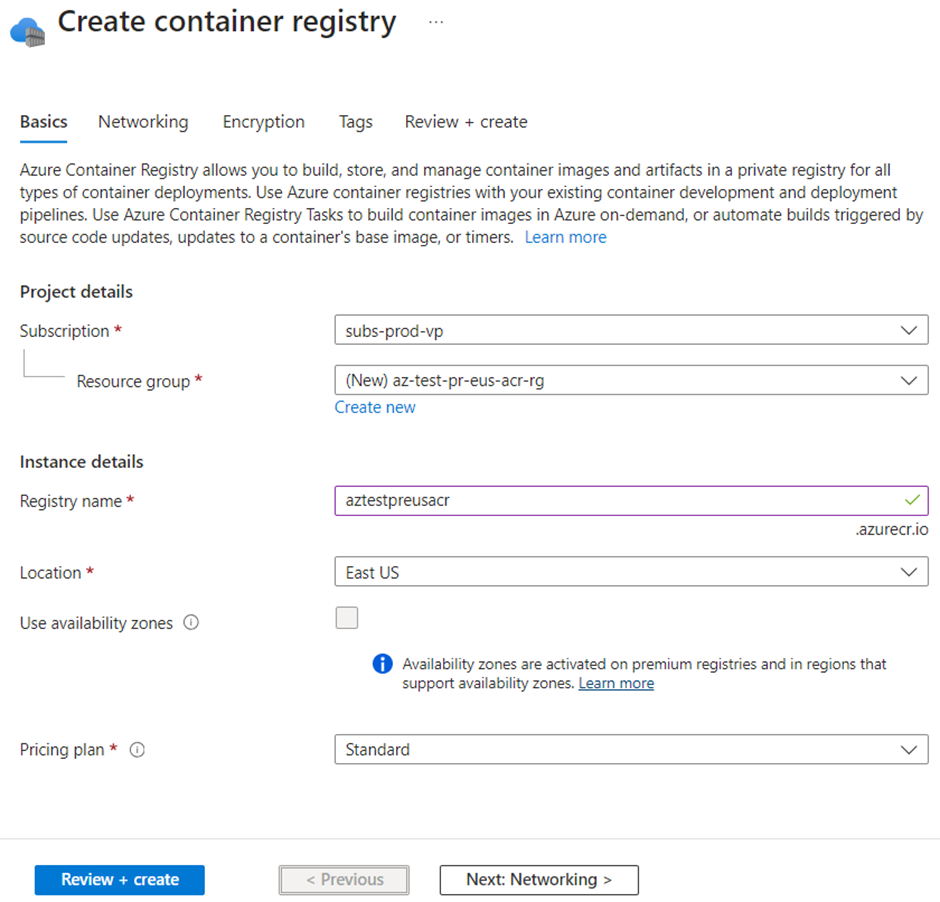
Step 1: Initiate your journey into Azure SQL Backup by creating an Azure SQL database and server. This foundational step lays the groundwork for testing various backup configurations and strategies within the Azure ecosystem.

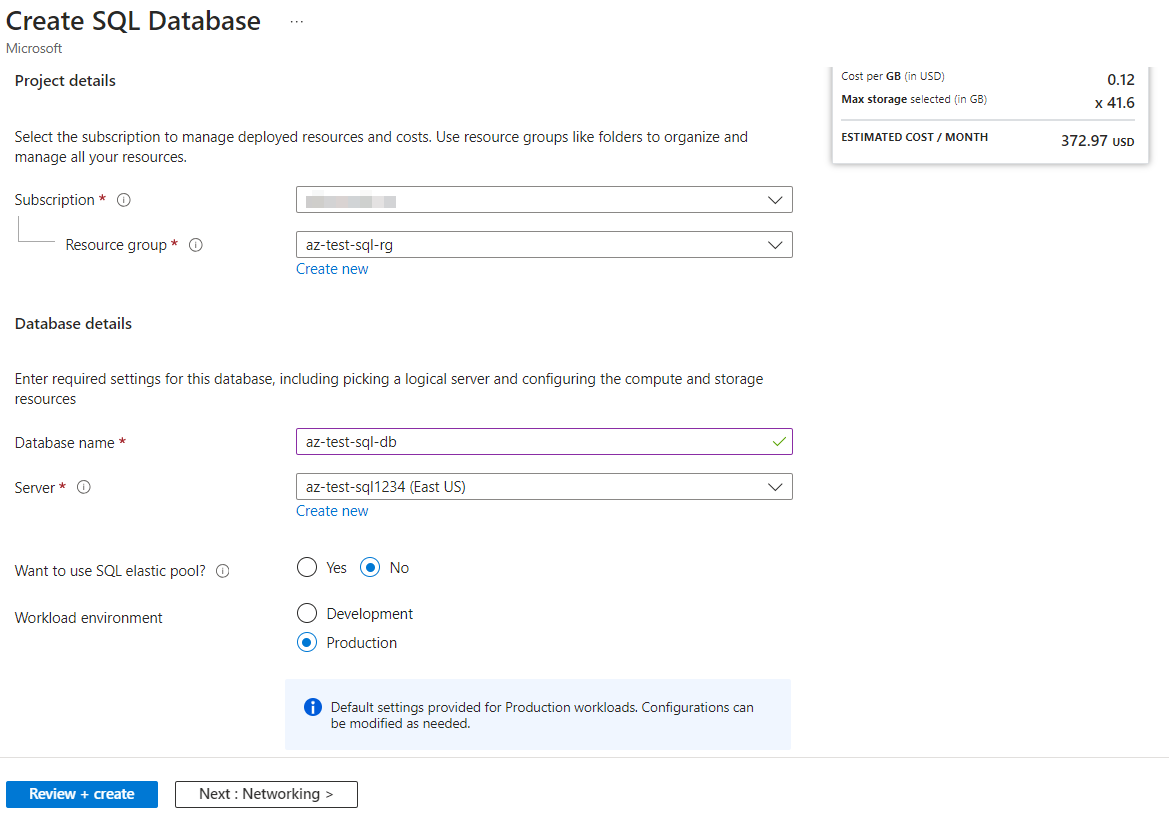
Check the created configurations and click on create.

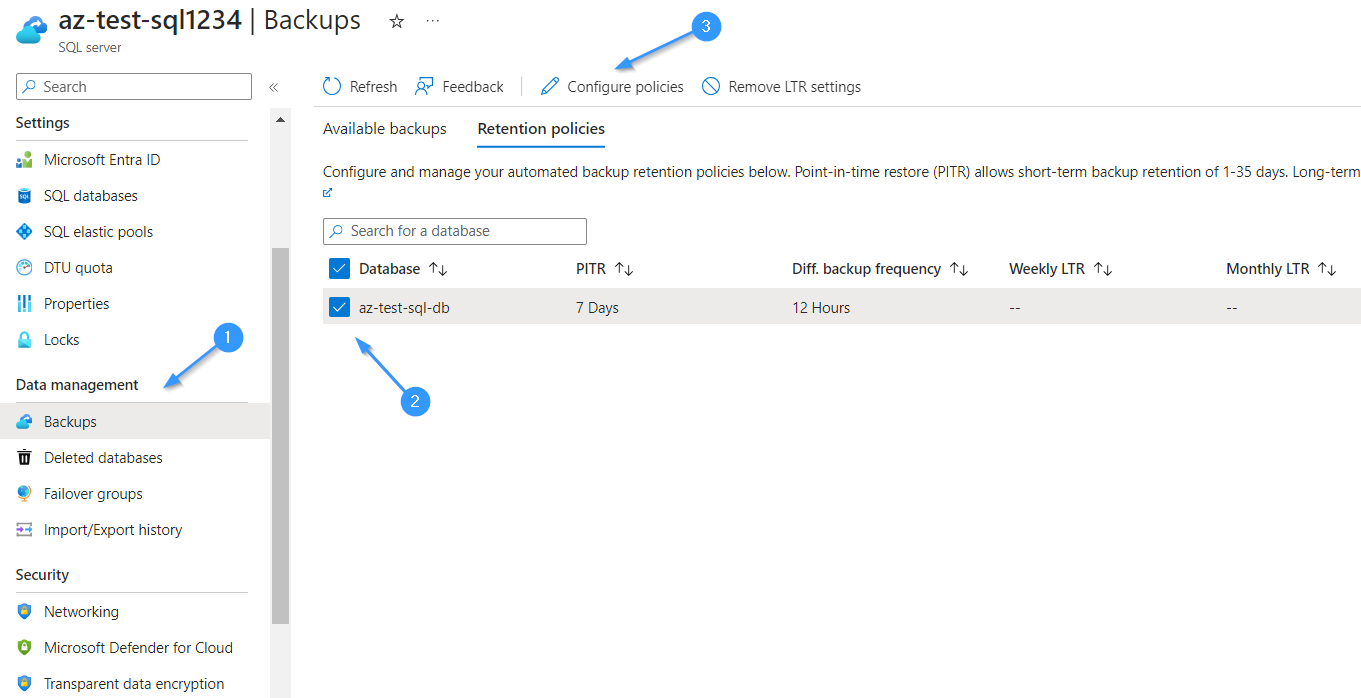
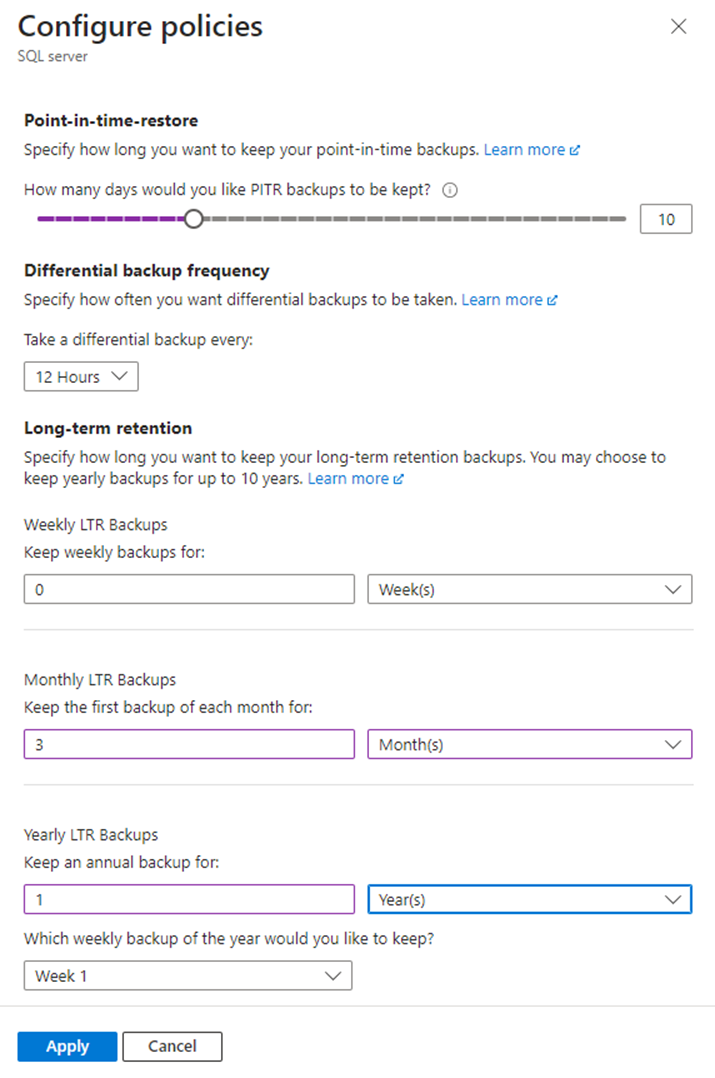
Step 2: Within your Azure SQL Server, navigate to the Data Management section and locate the Backup option. Here, you’ll be prompted to select the specific database you wish to back up. Once selected, proceed to configure the backup policy by clicking on “Configure policy.” This step allows you to define the backup frequency, retention period, and other settings tailored to your data protection needs.

Point-in-time-restore

Point-in-time restore is a feature in Azure SQL Database that allows you to recover your database to a specific moment in time, typically just before an issue occurred. This feature is invaluable in scenarios where you need to roll back your database to a previous state due to data corruption, accidental deletions, or erroneous updates.

With point-in-time restore, you can select a precise timestamp within the backup retention period to restore your database. Azure SQL Database automatically identifies the available restore points based on your backup configuration, enabling you to choose the most appropriate point for recovery.

Once initiated, the point-in-time restore process creates a new database copy based on the selected restore point, preserving data integrity up to the chosen timestamp. This allows you to effectively revert your database to a consistent state, mitigating the impact of data loss or corruption events.

Point-in-time restore empowers you to recover from unexpected incidents with minimal downtime and data loss, providing a crucial layer of resilience and flexibility in your database management strategy.

Long Term Retention
Long-term retention (LTR) in Azure SQL enables you to store database backups beyond the standard 1-35 day period, meeting regulatory or business requirements. LTR utilizes full database backups automatically created by Azure SQL, storing them in redundant Azure Blob storage with retention up to 10 years.

You can define LTR policies based on weekly, monthly, or yearly retention, specifying which backups are copied to long-term storage. For example, you might keep one backup per week for 10 years or the first backup of each month for three months.

Changes to LTR policies only affect future backups; existing backups retain their original retention settings. If you wish to delete old LTR backups prematurely, manual deletion is required.

Examples of the LTR policy:

  • W=0, M=0, Y=5, WeekOfYear=3The third full backup of each year is kept for five years.
  • W=0, M=3, Y=0The first full backup of each month is kept for three months.
  • W=12, M=0, Y=0Each weekly full backup is kept for 12 weeks.
  • W=6, M=12, Y=10, WeekOfYear=20Each weekly full backup is kept for six weeks. Except the first full backup of each month, which is kept for 12 months. Except the full backup taken on the 20th week of the year, which is kept for 10 years.

The following table illustrates the cadence and expiration of the long-term backups for the following policy:

W=12 weeks (84 days), M=12 months (365 days), Y=10 years (3650 days), WeekOfYear=20 (the week after May 13)

The following dates are in ISO 8601 (YYYY-MM-DD).

Step 3: Navigate to the Azure SQL Database configuration settings and locate the options for Point-in-Time Restore and Long-Term Retention. Configure the Point-in-Time Restore settings to define the maximum retention period for backups, allowing you to restore your database to a specific moment in time within this window. Additionally, set up Long-Term Retention settings to specify the duration and frequency of backups stored in Azure Blob storage for extended retention periods, ensuring compliance with regulatory requirements and providing additional data protection against long-term data loss events.

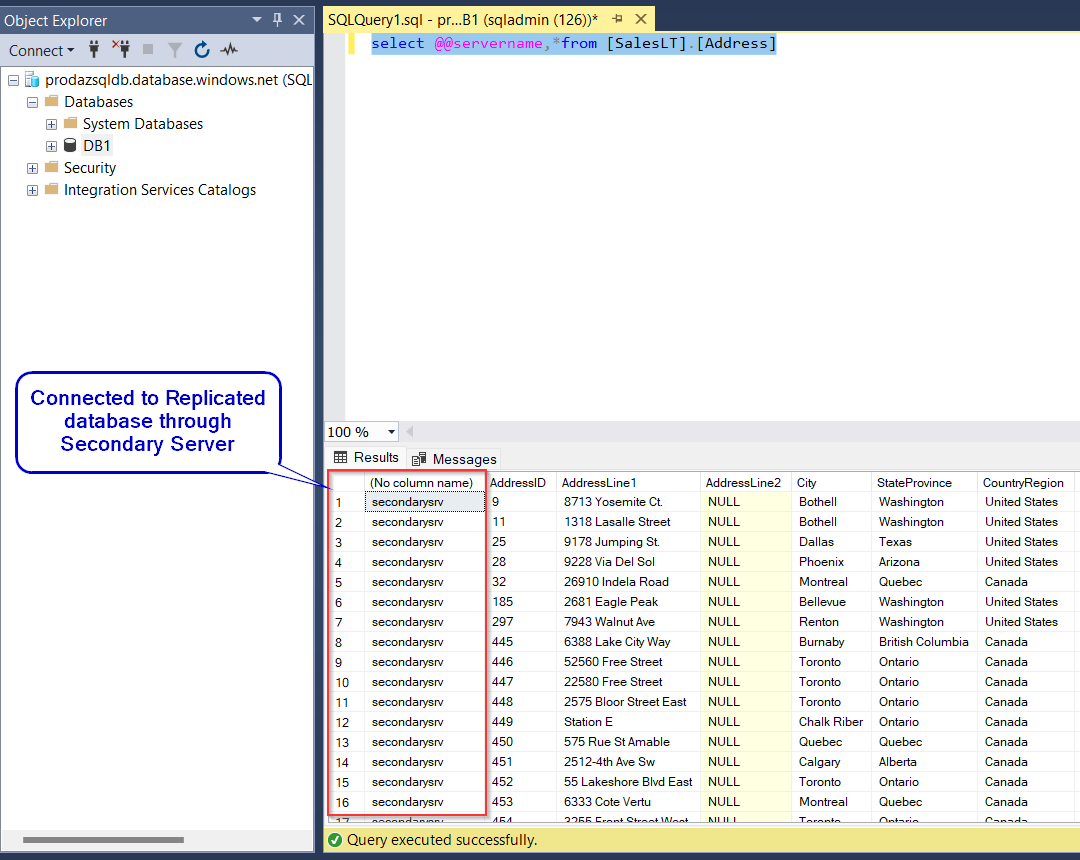
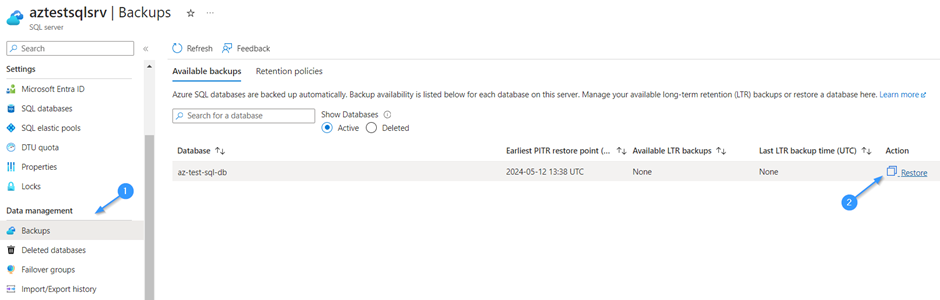
Step 4: Access the “Available backups” section within the Azure SQL Database Backups menu. Here, you’ll find a list of available backups corresponding to your configured backup policies, including both regular and long-term retention backups. Select the backup you wish to restore from, and then choose the destination database to which you want to restore the data. This step initiates the restoration process, enabling you to recover your database to a specific point in time or from a long-term retention backup with ease.

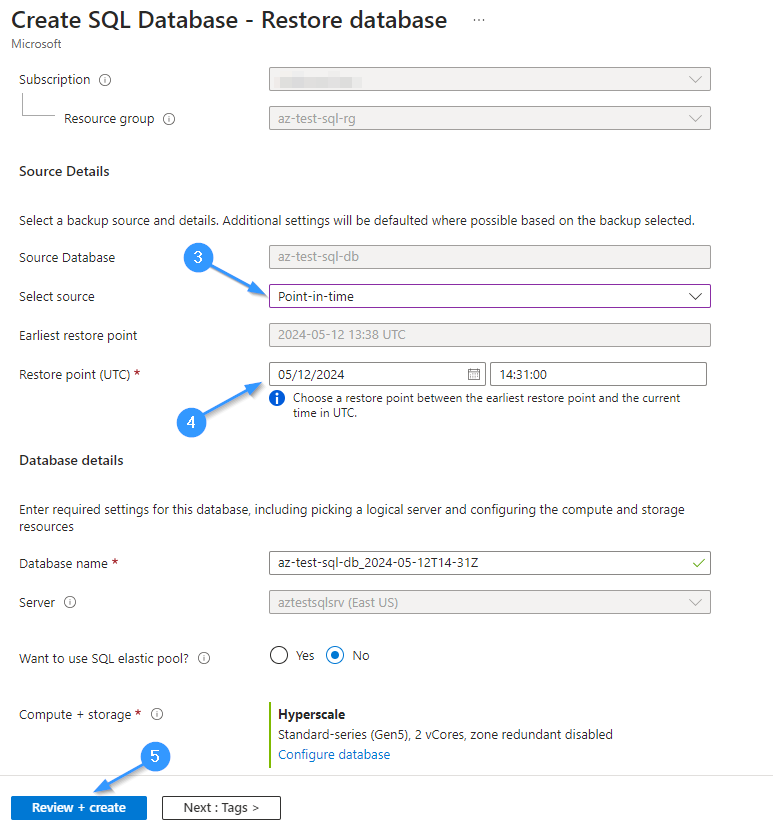
Step 5: When creating a Restore Database, first, choose the desired restore type—either Point-in-Time or Long-Term Retention—based on your recovery needs. If selecting Point-in-Time, specify the date and time to which you want to restore your database. For Long-Term Retention, ensure you’ve configured the appropriate retention policies beforehand. Once the settings are defined, initiate the restoration process by clicking on “create.” This action triggers the database restoration, effectively rolling back your database to the specified point in time or restoring it from a long-term retention backup.

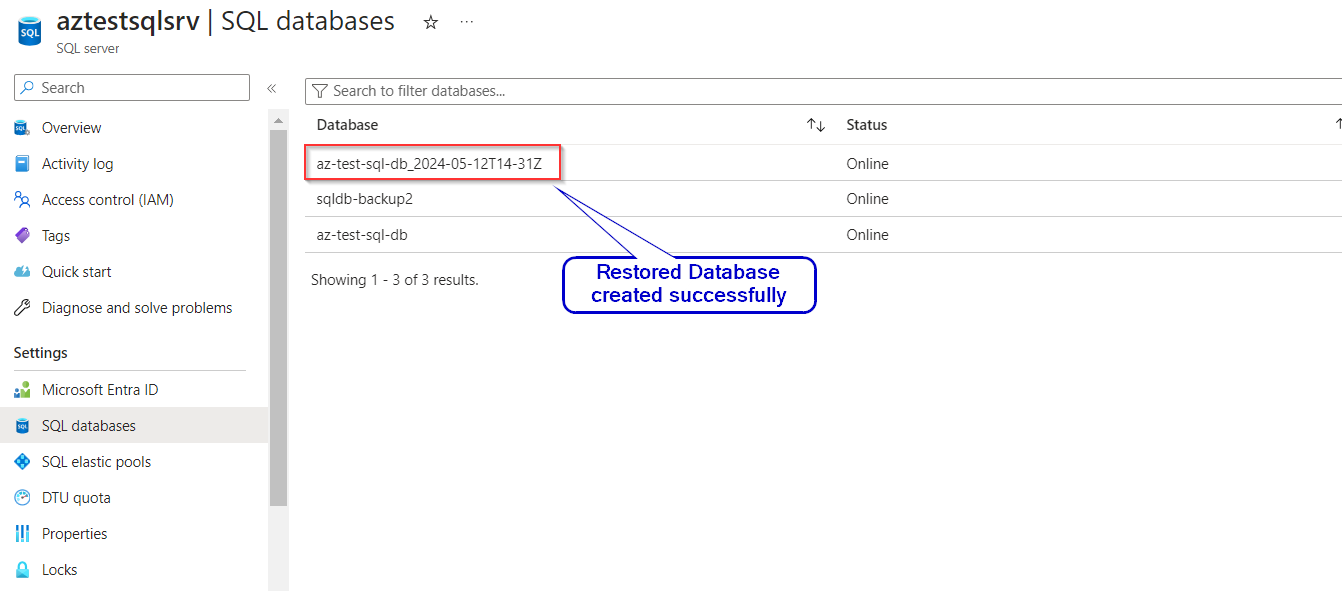
Step 6: Upon completion of the restoration process, you’ll receive a confirmation message indicating the successful creation of the restored database from the backup section. This acknowledgment verifies that your database has been successfully restored to the specified point in time or from a long-term retention backup, ensuring data integrity and enabling you to resume operations with confidence.

Exploring Azure SQL Database Auto-Failover Group for Seamless Disaster Recovery

Azure SQL Database Auto-Failover Group is a feature designed to enhance the availability and resilience of databases in Azure SQL Database. It enables automatic failover of a group of databases from a primary server to a secondary server in the event of a planned or unplanned outage, ensuring minimal downtime and data loss. This feature provides high availability and disaster recovery capabilities by synchronously replicating databases between primary and secondary servers within the same region or across different regions.

Advantages:

  1. Continuous data synchronization: Ensures that data changes are replicated in real-time between primary and secondary servers, minimizing the risk of data loss.
  2. Automatic failover with minimal downtime: Enables automatic failover to the secondary server in the event of a primary server failure, ensuring business continuity with minimal disruption to operations.
  3. Support for manual failover: Allows administrators to initiate manual failover for planned maintenance or testing purposes, providing flexibility and control over the failover process.
  4. Simplified management: Offers an intuitive interface through the Azure portal or PowerShell commands for easy configuration, monitoring, and management of failover groups.
  5. Regional and cross-regional replication: Supports replication between primary and secondary servers within the same region or across different regions, enabling robust disaster recovery strategies for geographically distributed applications.

Step 1: Begin by setting up an Azure SQL database and server. This is the foundation for testing the Auto-Failover Group for Disaster Recovery. In Azure, you can easily create these resources through the Azure Portal or by using Azure CLI commands. Ensure that you choose appropriate configurations and settings to match your testing requirements.

Check the configurations and click on create.

Step 2: Navigate to the networking section of your Azure SQL Primary server configuration. Here, you’ll want to add your public IP address to allow access to the server. By doing this, you ensure that your IP is authorized to interact with the SQL server.

Step 3: Within the primary server’s Data Management settings, locate and click on “Failover Groups.” Then, proceed to click on “Add Group.” This action initiates the setup process for creating a Failover Group.

Step 4: Assign a descriptive name to your Failover Group. This identifier will serve as a common server ID for accessing all servers associated with this Failover Group. Choosing a clear and intuitive name will streamline management and facilitate navigation within your Azure environment

Step 5: Proceed to create a Secondary server, ensuring it’s located in a distinct geographical location from the primary server. This geographical diversity is crucial for robust disaster recovery planning. By syncing the Secondary server with the primary, you establish a failover mechanism, ensuring data accessibility even in the event of Primary server failure.

Select the required databases that need to be synced with the Secondary Server.

Step 6: Utilize Azure SQL Management Studio to establish a local connection to the database. When prompted for connection details, input the Failover Group ID to seamlessly access the database resources.

Provide the Login Credentials and connect to the SQL Server.

Step 7: Enhance your database management by adding queries to ascertain from which server the database is being accessed. This step aids in monitoring and troubleshooting, providing valuable insights into the source of database requests. Currently its connected to the Primary Server.

Step 8: Within the Failover Groups section, locate and select “Forced Failover” to simulate a server-level failure for the primary server. This action triggers the failover process, directing database operations to the secondary server as per the configured failover settings.

Following the forced failover, the secondary server assumes the role of the primary server, while the original primary server transitions to become the secondary server. This exchange ensures continuity of database operations, with the former secondary server now serving as the primary point of access for data retrieval and management.

Step 9: In the networking settings of the newly promoted primary server (formerly the secondary server), add your public IP address. This action mirrors the configuration performed earlier on the original primary server, ensuring that your IP remains authorized to interact with the server.

Step 10: Deploy queries within your database environment to ascertain the source of data retrieval requests. Specifically, craft queries to confirm that data access originates from the newly promoted primary server, which was formerly the secondary server. This verification step confirms the successful failover process, demonstrating that database operations are now being conducted from the secondary server, which has assumed the role of the primary server following the failover event.

.

Disable Changing Picture in Teams

Install Exchange Online Management Module

If you set SetPhotoEnabled to False in OWA Mailbox Policy. Microsoft teams will honor it.
if you have a hybrid server, make sure you run on Exchange On-Premises and Office 365 PowerShell (Connect-ExchangeOnline)
For changing this setting for a specific set of users you need to create a dedicated OWA Mailbox policy.

Get-OwaMailboxPolicy | FL identity,Setphotoenabled 
Set-OwaMailboxPolicy -Identity OwaMailboxPolicy-Default -SetPhotoEnabled $false

Now when you try to change the picture in Teams
Picture Options are disabled by policy.

Disk Encryption BitLocker Policy in Intune Endpoint Security

Note: BitLocker Policy configurations are not applicable for the devices that enrolls through Autopilot Enrollment. As the new devices gets encrypted automatically.

BitLocker automatically encrypts internal drives during the out of box experience (OOBE) for devices that support Modern Standby or meet the Hardware Security Testability Specification (HSTI). By default, BitLocker uses XTS-AES 128-bit used space only for automatic encryption.

  • Autopilot Enrollment method for enrolling devices to Microsoft Intune has its own automatic encryption without a BitLocker Policy
  • By default, XTS-AES 128-bit (default) BitLocker configuration is applied to Autopilot Enrolled device.
  • BitLocker policy can be used for Hybrid Joined Devices. (Devices which are applied via SCCM should not have any impact on this)

M365 Disk Encryption Profile to deploy BitLocker using Intune for your laptops and desktops, Microsoft Made it seamless to deploy them.

Note: We recommend going on with 128 bits as Autopilot is encrypting 128 bits by default.

If you go with 128 bits. if you have Auto Pilot Devices it’s going to be automatically encrypted and if you have a 128-bit BitLocker policy applied on top of 128 bit. it’s going to apply seamlessly, and no changes will be made., So that you can keep 128 bits across the environment.

If you go with 256 bits. if you have Auto Pilot Devices it’s going to be automatically encrypted and if you have a 256-bit BitLocker policy applied on top of 128 bit. it’s not going to apply seamlessly, and the device needs to be decrypted to encrypt again, Either Manual or You need to apply a custom registry to disable default encryption so that you can keep 256 bits across the environment.

Hence, we recommend 128 bits, so that everything goes smooth on an Auto Pilot Environment even without a bit locker Policy.

.
.

We are recommending 128 bit – Not 256 bit.

BitLocker Silent Deploy

Encrypt Windows devices with BitLocker in Intune – Microsoft Intune | Microsoft Docs

Known Errors –
Start – Eventvwr – Application and Service Logs – Microsoft – Windows – Bitlocker-API – Management

It Failed to enable Silent Encryption.

Error: Group policy prevents you from backing up your recovery password to Active Directory for this drive type. For more info, contact your system administrator.

Solution – Policy Misconfigured – Require device to backup recovery information to Azure AD is not Configured – It should be configured to resolve it.


Error: BitLocker cannot use Secure Boot for integrity because it is disabled.

manage-bde -protectors -get c:

This shows that PCR 7 is NOT in use / Even though the secure boot is enabled.


Solution –

manage-bde -protectors c: -delete -t tpm
manage-bde -protectors c: -add -tpm

Error 1: BitLocker could not be enabled

The Bitlocker encryption key cannot be obtained. Verify that the Trusted Platform Module (TPM) is enabled and ownership has been taken.if this computer does not have TPM, verify that the USB drive is inserted and available.

C: was not encrypted

Error 2: BitLocker cannot use Secure Boot for integrity because the UEFI variable ‘SecureBoot’ could not be read.

Solution for #1 and #2: Clear the TPM using TPM.msc

Deploying Docker Image to Azure Container Registry and Hosting it with Azure Web App Service.

Step 1: Establish an Azure Container Registry (ACR) as a central repository to store and manage your Dockerized application images efficiently and securely.

Check the Configurations and click on create.

.

In Azure Container Registry fill the checkbox Admin Users and save it.

Step 2: Begin by creating an App Service in Azure, specifying a name for the Web App, choosing Docker Container as the hosting option, and selecting your preferred location for deployment. This sets up the infrastructure required to host your Dockerized application on Azure Web App Service.

Check the configurations and Click on create.

Step 3: Use the ‘az login’ command to authenticate and log in to your Azure subscription, granting access to manage Azure resources such as Azure Container Registry (ACR) and Azure Web App.


Step 4: Authenticate with your Azure Container Registry (ACR) using the ‘az acr login’ command followed by the name of your ACR instance, ensuring access to push and pull Docker images to and from the registry.

az acr login --name acrname

Step 5: Build your image using the Docker Build command.

docker build -t docker-image-name .

Step 6: Add a tag to the Docker image.

docker tag image_name acr-name.azurecr.io/image_name:latest

Step 7: Execute the ‘docker push’ command, specifying the tag of your local Docker image and the fully qualified name of your Azure Container Registry (ACR), to upload the image from your local repository to the ACR, making it available for deployment to Azure services like Azure Web App.

docker push acr-name.azurecr.io/image-name:latest

Step 8: Access the Web App and proceed to the Deployment Center. Choose Docker Compose as the deployment option, then select Azure Container Registry. Pick the appropriate Azure Container Registry and configure the port as 80. Enable Continuous Deployment to automate the deployment process.

  • Select Docker Compose
  • Select Azure Container Registry
  • Select the Required Azure Container Registry
  • In Config Provide Port 80
  • Set Continuous Deployment – On

Step 9: Verify the hosting of your Docker image by accessing your Azure Web App URL in a web browser to view the app’s details, confirming successful deployment and hosting of the image on Azure Web App.

Use Winget to deploy apps on Intune.

The fast and best way to package & deploy applications in Intune,

No need to update the application often for new versions, Limit your application size & save time in application upload.

Winget documentation reference https://learn.microsoft.com/en-us/windows/package-manager/winget/

The winget command line tool enables users to discover, install, upgrade, remove and configure applications on Windows 10 and Windows 11 computers. This tool is the client interface to the Windows Package Manager service.

Note: The winget command line tool is only supported on Windows 10 1709 (build 16299) or later. The scrips on this document are reusable by changing the application ID.

Finding Application ID

Use winget search followed by the application name to find the application ID. In this example, Finding the Application ID for Pycharm.

Open powershell as an administrator

winget search pycharm

Create installation script.

Create a PowerShell file and add this command.

Note: Not all installers support installing in “user” scope and “machine” scope consistently.  “–scope=user” refers to the application installation directory, path C:\Users\JohnS\AppData\Roaming\JetBrains\PyCharm2023.3.  

winget install -e --id JetBrains.PyCharm.Community --silent --accept-package-agreements --accept-source-agreements

Create uninstallation script.

Create a PowerShell file and add this command.

winget.exe uninstall -e --id JetBrains.PyCharm.Community --silent --accept-source-agreements

Detection script.

Create a PowerShell script and add the below script.

##What is the latest version Pycharm
$JBNSearch = winget.exe search -e --id JetBrains.PyCharm.Community --accept-source-agreements
$JBNOnlineVersion = (-split $JBNSearch[-1])[-2]

##What is the version installed
$JBNLocalSearch = winget.exe list -e --id JetBrains.PyCharm.Community
$JBNCheckIfAvailavbleExist = (-split $JBNLocalSearch[-3])[-2]
if($JBNCheckIfAvailavbleExist -eq "Available")
{
    $JBNLocalVersion = (-split $JBNLocalSearch[-1])[-3]
}
else
{
    $JBNLocalVersion = (-split $JBNLocalSearch[-1])[-2]
}
if($JBNLocalVersion -eq "input")
{
    exit 1
 #Detection failed
}
if($JBNLocalVersion -ge $JBNOnlineVersion)
{
    Write-Output "The Device got the latest version of Postman installed"
 exit 0
 #Detection success
}
else
{
 exit 1
 #Detection failed
}

Download Microsoft Win32 Content.

Web url: https://learn.microsoft.com/en-us/mem/intune/apps/apps-win32-prepare

Download url: https://github.com/Microsoft/Microsoft-Win32-Content-Prep-Tool

Package the PowerShell script.

Open IntuneWinAppUtil.exe as an administrator.

Enter source directory.

Specify installation file name.

Specify output folder path.

Package Created

Application deployment in Intune.

Installation & Uninstallation command.

Only change the ps1 file name

Installation Command

powershell.exe -WindowStyle hidden -ExecutionPolicy ByPass -File .\Pycharminstallation.ps1

Uninstall Command

powershell.exe -WindowStyle hidden -ExecutionPolicy ByPass -File .\Pycharmuninstallation.ps1

Review and Create

Install the application form the Company Portal

× How can I help you?