In the digital age, where data is the lifeblood of businesses, safeguarding databases against loss or corruption is paramount. Azure SQL Server, Microsoft’s cloud-based relational database service, offers a suite of powerful tools to ensure the integrity and availability of critical data. At the heart of this arsenal lies Azure SQL Backup, a feature-rich solution designed to protect databases from unforeseen disasters, system failures, or human errors. In this guide, we delve into the world of Azure SQL Backup, exploring its capabilities, benefits, and best practices. From data protection and disaster recovery to cost-efficiency and ease of management, Azure SQL Backup empowers organizations to fortify their data infrastructure and navigate the complexities of modern data management with confidence.
Advantages of Backup Configuration in Azure SQL Server:
- Data Protection and Integrity: Backup configuration in Azure SQL Server enables organizations to create regular backups of their databases, ensuring that critical data is safeguarded against accidental deletion, corruption, or other data loss events. By establishing automated backup schedules, businesses can maintain data integrity and meet regulatory compliance requirements.
- Business Continuity and Disaster Recovery: With backup configuration, organizations can effectively prepare for and mitigate the impact of unexpected disasters or system failures. By regularly backing up databases to Azure Blob Storage, businesses can quickly restore data to a point-in-time state, minimizing downtime and ensuring seamless continuity of operations.
- Flexibility and Scalability: Azure SQL Server offers flexible backup options, allowing organizations to tailor backup configurations to their specific requirements. Whether it’s full backups, differential backups, or transaction log backups, businesses can choose the appropriate backup strategy based on their data volume, retention policies, and recovery objectives. Additionally, Azure’s scalable infrastructure ensures that backup operations can effortlessly accommodate growing data workloads.
Step 1: Initiate your journey into Azure SQL Backup by creating an Azure SQL database and server. This foundational step lays the groundwork for testing various backup configurations and strategies within the Azure ecosystem.
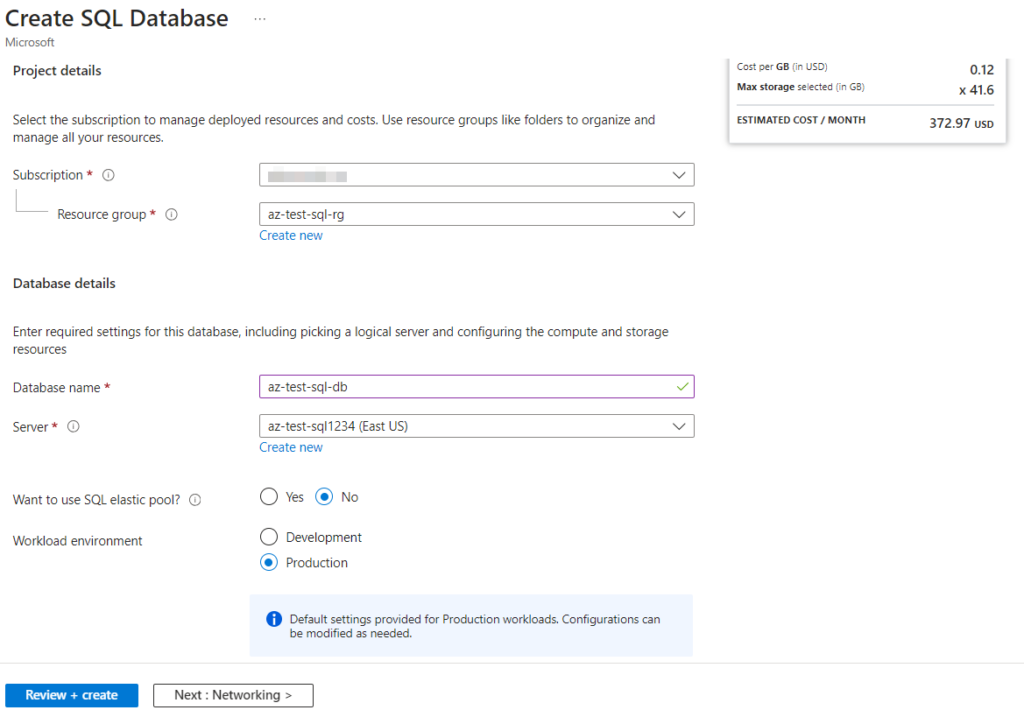
Check the created configurations and click on create.

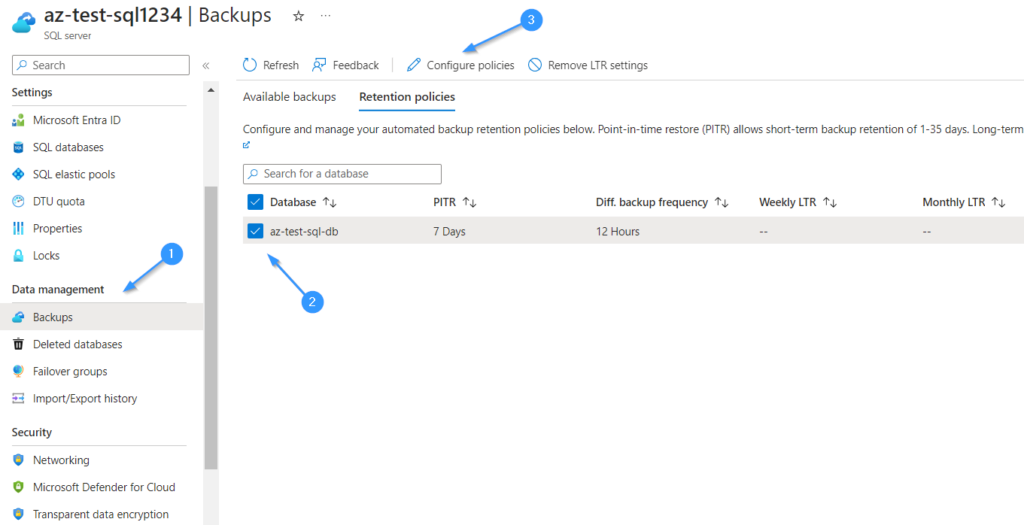
Step 2: Within your Azure SQL Server, navigate to the Data Management section and locate the Backup option. Here, you’ll be prompted to select the specific database you wish to back up. Once selected, proceed to configure the backup policy by clicking on “Configure policy.” This step allows you to define the backup frequency, retention period, and other settings tailored to your data protection needs.
Point-in-time-restore
Point-in-time restore is a feature in Azure SQL Database that allows you to recover your database to a specific moment in time, typically just before an issue occurred. This feature is invaluable in scenarios where you need to roll back your database to a previous state due to data corruption, accidental deletions, or erroneous updates.
With point-in-time restore, you can select a precise timestamp within the backup retention period to restore your database. Azure SQL Database automatically identifies the available restore points based on your backup configuration, enabling you to choose the most appropriate point for recovery.
Once initiated, the point-in-time restore process creates a new database copy based on the selected restore point, preserving data integrity up to the chosen timestamp. This allows you to effectively revert your database to a consistent state, mitigating the impact of data loss or corruption events.
Point-in-time restore empowers you to recover from unexpected incidents with minimal downtime and data loss, providing a crucial layer of resilience and flexibility in your database management strategy.
Long Term Retention
Long-term retention (LTR) in Azure SQL enables you to store database backups beyond the standard 1-35 day period, meeting regulatory or business requirements. LTR utilizes full database backups automatically created by Azure SQL, storing them in redundant Azure Blob storage with retention up to 10 years.
You can define LTR policies based on weekly, monthly, or yearly retention, specifying which backups are copied to long-term storage. For example, you might keep one backup per week for 10 years or the first backup of each month for three months.
Changes to LTR policies only affect future backups; existing backups retain their original retention settings. If you wish to delete old LTR backups prematurely, manual deletion is required.
Examples of the LTR policy:
W=0, M=0, Y=5, WeekOfYear=3The third full backup of each year is kept for five years.W=0, M=3, Y=0The first full backup of each month is kept for three months.W=12, M=0, Y=0Each weekly full backup is kept for 12 weeks.W=6, M=12, Y=10, WeekOfYear=20Each weekly full backup is kept for six weeks. Except the first full backup of each month, which is kept for 12 months. Except the full backup taken on the 20th week of the year, which is kept for 10 years.
The following table illustrates the cadence and expiration of the long-term backups for the following policy:
W=12 weeks (84 days), M=12 months (365 days), Y=10 years (3650 days), WeekOfYear=20 (the week after May 13)
The following dates are in ISO 8601 (YYYY-MM-DD).
Step 3: Navigate to the Azure SQL Database configuration settings and locate the options for Point-in-Time Restore and Long-Term Retention. Configure the Point-in-Time Restore settings to define the maximum retention period for backups, allowing you to restore your database to a specific moment in time within this window. Additionally, set up Long-Term Retention settings to specify the duration and frequency of backups stored in Azure Blob storage for extended retention periods, ensuring compliance with regulatory requirements and providing additional data protection against long-term data loss events.
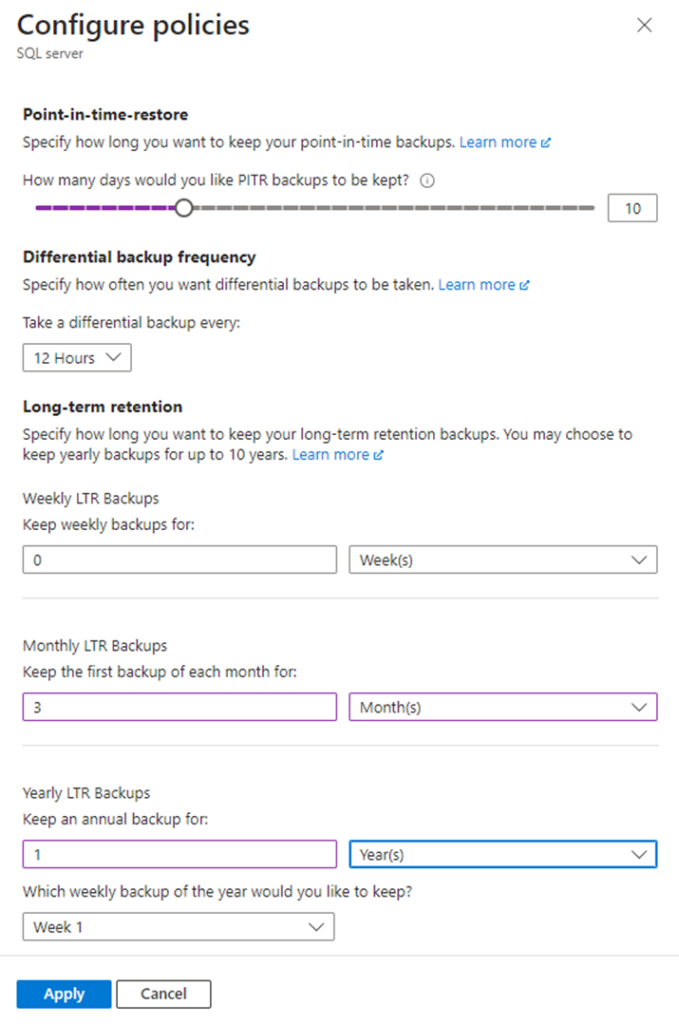
Step 4: Access the “Available backups” section within the Azure SQL Database Backups menu. Here, you’ll find a list of available backups corresponding to your configured backup policies, including both regular and long-term retention backups. Select the backup you wish to restore from, and then choose the destination database to which you want to restore the data. This step initiates the restoration process, enabling you to recover your database to a specific point in time or from a long-term retention backup with ease.

Step 5: When creating a Restore Database, first, choose the desired restore type—either Point-in-Time or Long-Term Retention—based on your recovery needs. If selecting Point-in-Time, specify the date and time to which you want to restore your database. For Long-Term Retention, ensure you’ve configured the appropriate retention policies beforehand. Once the settings are defined, initiate the restoration process by clicking on “create.” This action triggers the database restoration, effectively rolling back your database to the specified point in time or restoring it from a long-term retention backup.

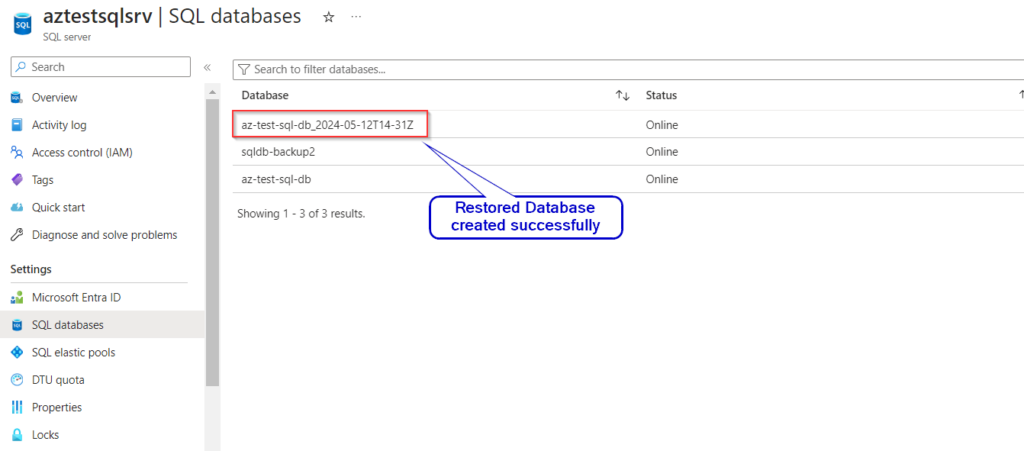
Step 6: Upon completion of the restoration process, you’ll receive a confirmation message indicating the successful creation of the restored database from the backup section. This acknowledgment verifies that your database has been successfully restored to the specified point in time or from a long-term retention backup, ensuring data integrity and enabling you to resume operations with confidence.
