34 C
Dubai
Monday, May 5, 2025
Home Blog Page 109

Deleting a Specific Email from Entire Organization in Exchange 2010

Updated – Supports Exchange 2010/2013/2016 and Office365

There are many scenarios where we need to get rid of some Emails from the whole server

1. Virus

2.Confidential Email sent wrongly – Got to remove it

3. Need to remove a Email with Specific subject from all the mailboxes

Exchange 2010 has Good features on Searching it and Remove it .

So Will Learn how to do that.

For a User to Execute this commands , he needs specific permissions like he should be a member of Discovery Management role and he should be member of Mailbox Import Export

By Default, Administrator is not a member these roles

Use Exchange Management Shell

Replace the User Name with the Person whom you want to give access to Search and delete

Add-RoleGroupMember "Discovery Management" -Member "User Name"

or

You can use GUI or Shell, Adding the Discovery Management Role via GUI is much easier.

image

Login with the Exchange Control Panel URL below –

image

Login with Admin Credentials –

image

Double Click on Discovery Management and Add Administrator as a member of Discovery Management and Save it

image

image

===============

To Add a User in Mailbox Import Export Role – Run in Exchange Management Shell

New-Managementroleassignment –Role "Mailbox Import Export" –User "Administrator"

image

===========

Close and Reopen the Exchange Mangement Shell – so that the new commands will start working

===========

Now Before Deleting in Bulk , We can use a log only switch to verify how many Mails we are going to delete

and to verify the we are going to delete the right one

Get-mailbox | search-mailbox –searchquery "Subject:'virus'" –Logonly –Targetmailbox administrator –Targetfolder Inbox

Now this will show how many mailboxes have this content

image

A mail will be generated to Administrators inbox with Item Count As shown below —

image

=======

Now we will go ahead and delete it

Get-mailbox | search-mailbox –searchquery "Subject:'virus'" –DeleteContent

image

Before — From All the Mailboxes

image

Now its gone from All the mailboxes

image

Reference link –

http://technet.microsoft.com/en-us/library/dd298173.aspx

Hope it helped you to understand better !!

If you feel its too confusing –  Check out the Automated Script to do these tasks for you

Discovery Search Simplified Script to Delete a Specific Email and other Tasks – Exchange 2010


10 Useful Basic commands which make life easy for Troubleshooters

1 . To find User Logged in to which domain ?

Set u

image

Running “Set”

Gives all the basic information

2 . To find user resides in which Active Directory Site ?

nltest /dsgetsite

image

3 . To find which DC is Domain Joined system in binding to ?

nslookup

image

4 . To find how many DC’s the Environment has ?

netdom query dc

image

5 . To find where the FSMO roles are ?

netdom query fsmo

image

6 . To Sync all the available Domain Controllers  to the Current DC  ?

(To be run on DC)

repadmin /sycall /Aped

image

7.  To Find DC connectivity is healthy from the Domain Joined Machine ?

dcdiag /s:”DC FQDN”

image

8. To find the Computer name ?

hostname

image

9. To find which are the ports are listening ?

netstat -an | find /i "listening"

image

10 .  To Find the Statistics of the LAN and the Route Table ?

Netstat -Reports

image

To Replicate DNS

dnscmd ny-dc1 /zonerefresh test.contoso.com

To Move Cluster Group

Cluster Group “Cluster Group”/MOVETO:ServerName

Hope its a Useful Blog to have this Commands Handy in One place


Exchange Hosting to Exchange 2010 Sp2

Hosting Mode Came to an End , Where No hosting versions of Exchange will be released by Microsoft

Two whitepapers released to get Exchange Migrated to Exchange 2010 sp2

No in place upgrade is possible on both the situations

Migrating Exchange from HMC 4.5 to Exchange Server 2010 SP2

Migrating from Exchange Server 2010 in Hosting Mode to Exchange Server SP2

Download Microsoft White Paper


Rapid Migration Guide from Exchange 2003 to Exchange 2010

After a short run we came up with this plan, where getting migration steps in one place and doing it in a systematic procedure.

This Plan should be more suitable for Medium and Small Business environments

Meeting these requirements you can install Exchange 2010:

# Exchange 5.5 Should be completely removed

# Windows Server 2003 native Domain Functional Level and Forest functional level

Domain Functional Level should be at least 2003 Native

https://www.azure365pro.com/how-to-raise-domain-functional-level/

How to Raise Forest Functional Level

https://www.azure365pro.com/how-to-raise-forest-functional-level/

# Exchange 2003 Server has to be in Native mode

https://www.azure365pro.com/how-to-change-exchange-2003-server-to-native-mode/

Now you can install Exchange 2010

Step 1:

Installing Exchange 2010 Sp2 on Windows Server 2008 R2 Sp1 (Coexistence)

https://www.azure365pro.com/installing-exchange-2010-sp2-on-windows-server-2008-r2-sp1/

Step 2:

Creating Send Connector in Exchange 2010 to Send Mails to Internet
https://www.azure365pro.com/creating-send-connector-in-exchange-2010/

Step 3:

Configure Receive Connector in Exchange 2010 to receive Mails to Internet

https://www.azure365pro.com/configure-receive-connector-in-exchange-2010/

Step 4:

Configure Outlook Web App, ActiveSync, Exchange Control Panel (ECP), Configure Outlook Anywhere

https://www.azure365pro.com/configuring-client-access-server-role-migrating-from-exchange-2003-to-exchange-2010/

Configuring Certificates –

3rd Party –

https://www.azure365pro.com/configuring-3rd-party-exchange-certificate-in-exchange-2010/

or

Self-Signed –

https://www.azure365pro.com/how-to-use-a-self-signed-certificate-in-exchange-2010/

Step 5:

How to Move offline address book from Exchange 2003 to Exchange 2010

https://www.azure365pro.com/how-to-move-offline-address-book-from-exchange-2003-to-exchange-2010/

Step 6:

Upgrading Email Address Policies and Address lists from Exchange 2003 to Exchange 2010
https://www.azure365pro.com/upgrading-email-address-policies-and-address-lists-from-exchange-2003-to-exchange-2010/

Step7:

Moving Mailboxes from Exchange 2003 to Exchange 2010
https://www.azure365pro.com/moving-mailboxes-from-exchange-2003-to-exchange-2010/

Step 8:

Moving Public Folders from Exchange 2003 to Exchange 2010

https://www.azure365pro.com/moving-public-folders-from-exchange-2003-to-exchange-2010/

Step 9:

Configure your firewall rules to Exchange 2010 Server (if no smart hosts used)

Public IP NAT to Exchange 2010 IP

If you’re using smart hosts like barracuda, Change it in the (Smart host) barracuda settings

Step 10:

Remove Recipient Update Service

https://www.azure365pro.com/removing-recipient-update-services-using-adsiedit-msc/

Step 11:

Remove Routing Group Connector

Get-RoutingGroupConnector | Remove-RoutingGroupConnector

Say “Y” for Confirmation

image

Step 12:

Uninstall Exchange Server 2003

Open Add or remove programs – Remove Exchange 2003

image

If that fails

Remove Exchange 2003 manually

http://support.microsoft.com/kb/833396

Great !!

You learnt the rapid migration Process from Exchange 2003 to Exchange 2010

Download the Rapid Migration Guide

Happy Migration !!


Configuring Client Access Server Role migrating from Exchange 2003 to Exchange 2010

Client Access Server handles all Client Requests

OWA , Outlook , Active Sync , Outlook anywhere , Everything Client request is handled by Client access server only

Will Learn Configuring these things one by one , migrating from Exchange 2003

Outlook Web App –

  • Open EMC, locate and expand Server Configuration in navigation pane
  • Select Client Access from the list.
  • In the result pane select the Exchange 2010 server name.
  • Select Outlook Web App from the work pane, right click and select properties.

image

Now you can set Internal and External Url here

image

or

You can Use Exchange Management Shell

Set-OwaVirtualDirectory -Identity "EXCHANGE2010\owa (Default Web Site)" -ExternalUrl https://mail.careexchange.in/owa -InternalUrl https://Exchange2010.careexchange.in/owa

If you are publishing your Outlook Web App through ISA server or TMG 2010 you need to enable additional logon methods.

Basic Authentication & Integrated Windows Authentication

image

or

You can use Exchange Management Shell

Set-OwaVirtualDirectory -Identity "EXCHANGE2010\owa (Default Web Site-BasicAuthentication:$True -WindowsAuthentication:$True

Exchange Control Panel –

Follow the Exact same process which was followed for Outlook web app

  • Open EMC, locate and expand Server Configuration in navigation pane.
  • Select Client Access from the list.
  • In the result pane select the Exchange 2010 server name.
  • Select Exchange Control Panel from the work pane, right click and select properties

image

Configure your URL’s in the properties pane

image

or You can use Exchange Management Shell

Set-EcpVirtualDirectory -Identity "EXCHANGE2010\ecp (Default Web Site-BasicAuthentication:$True -WindowsAuthentication:$True

If you Enabled Basic Authentication & Integrated Windows Authentication in Outlook web app , have it configured the same for ECP (Exchange Control Panel ) virtual directory as well

image

Configure Microsoft Server ActiveSync –

  • Open EMC, locate and expand Server Configuration in navigation pane.
  • Select Client Access from the list.
  • In the result pane select the Exchange 2010 server name.
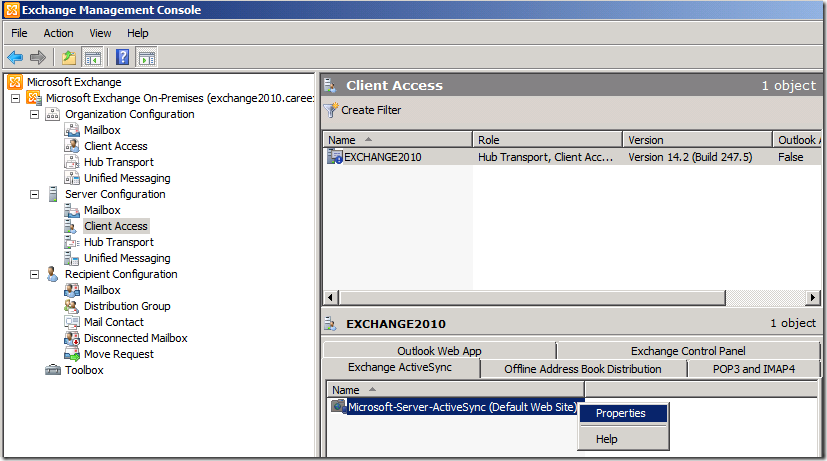
  • Select Microsoft Server ActiveSync from the work pane, right click and select properties.

image

Configure your URL’s in the properties pane

image

Or You can use Exchange Management Shell

Set-ActiveSyncVirtualDirectory -Identity "EXCHANGE2010\Microsoft-Server-ActiveSync (Default Web Site)" -InternalUrl https://Exchange2010.careexchange.in/Microsoft-Server-ActiveSync –ExternalUrl "https://mail.careexchange.in/Microsoft-Server-ActiveSync"

Offline Address Book Distribution –

You can set Offline Address book distribution URL

  • Open EMC, locate and expand Server Configuration in navigation pane.
  • Select Client Access from the list.
  • In the result pane select the Exchange 2010 server name.
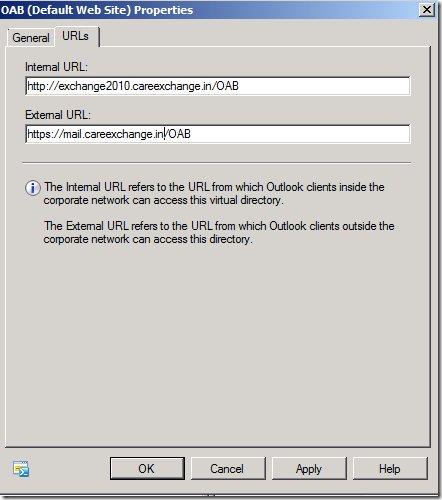
  • Select Offline Address Book Distribution from the work pane, right click and select properties.

image

Configure your URL’s in the properties pane

image

If you want to know about Polling Interval you refer this link –

https://www.azure365pro.com/how-offline-address-books-works-in-exchange-2010/

or You can use Exchange Management Shell

Set-OabVirtualDirectory -Identity "EXCHANGE2010\OAB (Default Web Site)" -PollInterval 480 -InternalUrl http:// Exchange2010.careexchange.in/OAB -ExternalUrl https://mail.careexchange.in/OAB

Configure Outlook anywhere –

image

image

or You can use Exchange Management Shell

Enable-OutlookAnywhere -Server 'EXCHANGE2010' -ExternalHostname 'anywhere.careexchange.in' -DefaultAuthenticationMethod 'Basic' -SSLOffloading $false

Great !!

You learnt to configure OWA , Exchange Control Panel (ECP), Active Sync , Outlook anywhere, Offline address book distribution


Moving Public Folders from Exchange 2003 to Exchange 2010

Moving public folders is simple if your mail flow is fine between Exchange 2003 and Exchange 2010

Cause all the mails are replicated via Email from Exchange 2003 to Exchange 2010

To Add replica and remove Replica from PF folders you can Use

  1. ExFolders
  2. PFDAVadmin (Windows Server 2003 with .net 1.1)
  3. Scripts like AddReplicaToPFRecursive.ps1
  4. Exchange System Manager (Exchange 2003)

If your Public Folder Database Size is too Large I won’t recommend to use scripts because it will add replicas for all the mails

which might create a PF Storm and get your mail flow down . so use tools like Exfolders or Use Exchange System Manager and add replicas , Folder by Folder and Proceed further

Do some basic Checks , that your Email flow is fine between Exchange 2003 to Exchange 2010

If this works you are good to proceed

For Small PF Database you can go ahead and use Scripts

This will add replica of public folders on Exchange Server 2003 to Exchange Server 2010.

Open your Exchange Management Shell , Browse your prompt into the Scripts folder

and you can run this command

.\AddReplicaToPFRecursive.ps1 -TopPublicFolder "\" -ServerToAdd "Exchange2010"

Hold On,,,Wait for sometime. Because your PF emails are Less priority Emails it will take sometime to replicate

You can check the PF database size on both the ends and verify , It won’t be the exact same

cause the database structure is different

Once that completes . Dismount your PF database in your Exchange 2003 and Try to access data from your Exchange 2010 Mailbox

This verifies Your data has been replicated fine

Now you can run this script ,

CAUTION : Be cautious , Before doing this . make 100 % sure that your PF database is replicated fine to the Exchange 2010 , You can verify by turning off Exchange 2003 or Dismounting Exchange 2003 PF database

Once the replica is added and data has been replicated over to finish of the PF migration

we got to move the replica from Exchange 2003 to Exchange 2010.

Open your Exchange Management Shell , Browse your prompt into the Scripts folder

and you can run this command

.\MoveAllReplicas.ps1 -Server "Exchange2003" -NewServer "Exchange2010"

Great !! your PF migration is done !!

One more Last Step

Moving Folder Hierarchies

You got to move this so that your Public Folders will be completely migrated to Exchange 2010

Open your Exchange System Manager

Right click on Exchange Administrative Group –> New –> Public Folders Container

image

Now you Can See Public Folders Container (Folders)

Expanding First Administrative Group you can see “Public Folders”

image

Now Click and Drag “Public Folders”  from

First Administrative Group (Folders) to Exchange Administrative Group (Folders) container

image

Great !!

Your PF Folders are completely migrated


× How can I help you?