We should look for options when “Exchange Databases are not mounting”
- Good backup Available.
- No Backup – Exchange mailbox Databases are down.
- Mounting a blank database – Keeping the messaging alive until you repair the exchange databases.
- Soft recovery and Repairing the Exchange Databases
- Recovery Databases
Have tried to include as many scenarios as possible.
Good backup Available
The best option is restoring from Backup software like Symantec / veeam / veritas / avamar which is the best option to have minimal downtime. but make sure you have to retain the live data whichever is on the existing drives – As you will lose data from the Backup taken time to the Storage Failure time.
if you have a good backup First Restore from the Backup get the production running. Then you can create a recovery database and repair the broken databases and merge them with your production.
you may have to take a copy or rename the database file before restoring using the backup software as they can overwrite the database files residing on the existing drives.
No Backup – Exchange mailbox Databases are down
Some Organizations start depending on DAG. Backup less solutions. Still, there are chances where your Database didn’t failover due to a network issue or various other reasons. Try forcing the failover. Check you can access the storage and bring that back. The stability of the databases has increased where the server or storage undergoes an intermittent failure new exchange versions cure themselves in few scenarios when it comes to database copies.
If you don’t have a backup, repairing the existing databases takes time approximately 5-10 Gb per hour. Totally depends on the IOPS/processor. if you don’t have a backup always take a copy of the broken databases. so that even if your repair is interrupted you don’t lose hope, you can copy it again for recovery purposes. Before that, There are various ways to get your databases healthy, 5-10 GB per hour is the worst-case scenario.
You got to check the health of the database, Where Exchange cannot connect back to a database again. if it’s not gracefully dismounted or disconnected from storage or server or anti-virus removes sometimes hold the log files mistakenly. let’s see how to check the health of the databases.
Open PowerShell
Locate to the .\eseutil.exe, Default location –
cd "C:\Program Files\Microsoft\Exchange Server\V15\Bin"
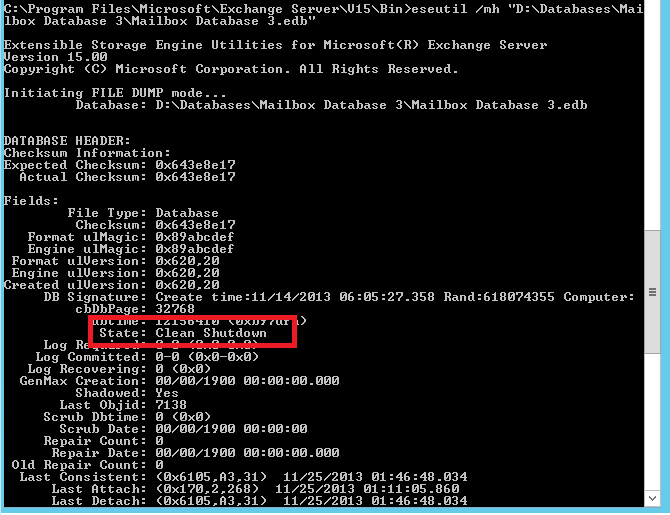
To check the status of the Exchange database :
locate to the bin folder to check the health of the exchange database
.\eseutil.exe /mh "D:\log files\Mailbox Database\Mailbox Database.edb"
there are two results, It may say clean or dirty, will go through both.
showing CLEAN SHUTDOWN – The database is healthy and it’s in a good shape. It couldn’t mount as it’s not able to understand the existing sequence of the log files.
Removing all the logs files from the logs files location and Mount the database. It should generate a new series of log files and mounting the database gracefully.

To get log file Location –
Get-mailboxdatabase | fl Name,*path
To force mount the databases –
Get-mailboxdatabase "Database Name" | Mount-database –Force
showing Dirty SHUTDOWN – The database is not in a good state (worst case), if the database sizes are massive, you cannot keep the environment down until the databases are repaired. here is the trick of mounting a blank database to keep the environment active going with a blank mailbox. and repair the broken databases and swap them again then merge them. if you don’t want to mount a blank database. skip it.
Mounting a blank database – Keeping the messaging alive until you repair the exchange databases.
- Stop Microsoft Exchange Search Service
- Stop Microsoft Exchange Search Host Controller Service

Now you can rename the database folder. Create an identical folder.

Mounting the store will force the creation of an empty database.

As soon as you mount a blank database in the messaging environment. Outlook will prompt for a restart. Once the outlook is restarted.
Users get an option of getting into a Temporary mailbox to send and receive emails or Use Old data to look at their cached PST if they are in Outlook cache mode.

if health check shows dirty –
.\eseutil.exe /mh "D:\log files\Mailbox Database\Mailbox Database.edb"
Let’s see how we can handle the broken database. you can see a row called “logs required”
Check the required logs are available or not. in my case, it’s 6079 – 6104

Check if you have the logs available

if you have the logs available – Make sure you got the .chk file in the same location. If you don’t have the required log files skip this step.
You can try running the soft recovery – (/r)
Have the database and log files in the default location
If you cannot have in the default location use /D for database location, /s for checkpoint file location, /l for the log file location.
if you don’t mention it. it will take the default location
“/a” is for – even if some log files are missing it will try to get the database to a good shape (Data loss will be there)
E01 – Go to the log file location check how it starts E00 or E01 or E02
.\eseutil.exe /r e01 /l "D:\log files\Mailbox Database" /d "D:\Program Files\Microsoft\Exchange Server\V15\Mailbox\Mailbox Database\Mailbox Database.edb" /a

Check the status after the soft Recovery – If its showing Clean Shutdown – You can mount the database, if it doesnt , you can always move the logs and try mounting it as the databases are in clean shutdown.
If its not in Clean shutdown . Even after soft recovery Process
Repairing the Exchange Database : (5 to 8 GB /hour) (Exchange 2010 and later versions are much faster)
.\eseutil.exe /p "D:\Databases\Mailbox Database\Mailbox Database.edb"
It will repair the database with 98% of success – Where data loss will be there in the corrupted portion of it. Mostly it’s minimal.
Once the repair process is completed. We can see the database to Clean shutdown.
I would recommend getting the mailboxes moved to a different database as soon as possible, to be on the safer side. also the Microsoft supportability point of view.
Recovery Databases –
when it comes to recovery databases, you have to understand database swapping as well. if you repaired 500 Gb databases and your temporary database is 5 GB. there is no point in merging the 500 GB recovery database with a 5 GB temporary database. Also, the outlook will always want the old database back in place to overcome the initial prompt when you have a temporary database mounted. As you dismount the blank database and mount the repaired database as a primary and smaller database on the recovery. So that merging can be done quicker and simpler.
Creating a recovery database with existing database –
New-MailboxDatabase -Recovery -Name RDB -Server mail -EdbFilePath "C:\Program Files\Microsoft\Exchange Server\V15\Mailbox\Recover\Mailbox Database.edb" -LogFolderPath "C:\Program Files\Microsoft\Exchange Server\V15\Mailbox\Recover"

Merge them for one mailbox –
New-MaiboxRestoreRequest -SourceDatabase "RDB" -SourceStoreMailbox "vaishika sathesh" -TargetMailbox vaishika@localhost
If you have different users with the same display name – the below command should help you.
New-MailboxRestoreRequest -SourceDatabase "RDB" -SourceStoreMailbox 3965757c-f9f4-4c8d-a8c2-56a410257b52 -TargetMailbox vaishika@localhost -SkipMerging StorageProviderForSource
Merge them in bulk –
Foreach ($mailbox in Get-MailboxStatistics -Database RDB)

{

New-MailboxRestoreRequest -SourceDatabase RDB -SourceStoreMailbox $mailbox.DisplayName -TargetMailbox $mailbox.DisplayName

}
In Some cases. if the user took everything took to PST. you will see all the items to Recover Deleted Items
There is a good command to restore all deleted items to Mailbox –
Get-RecoverableItems "username" | Restore-RecoverableItems
Remove Recovery Database –
Get-MailboxDatabase recover01 | Dismount-Database
Remove-MailboxDatabase recover01
Known Errors :
he call to 'net.tcp://mail.azure365pro.com/Microsoft.Exchange.MailboxReplicationService mail.azure365pro.com(15.0.620.24 caps:3F)'
failed. Error details: must be logging in with GUIDs, not legDN
Parameter name: owner.
+ CategoryInfo : NotSpecified: (:) [New-MailboxRestoreRequest], CommunicationErrorTransientException
+ FullyQualifiedErrorId : 436EF2E5,Microsoft.Exchange.Management.RecipientTasks.NewMailboxRestoreRequest
+ PSComputerName : mail.azure365pro.com
Resolution –
Use
Foreach($mailbox in Get-MailboxStatistics -Database RDB)

{

New-MailboxRestoreRequest -SourceDatabase RDB -SourceStoreMailbox $mailbox.DisplayName -TargetMailbox $mailbox.DisplayName -SkipMerging StorageProviderForSource

}
Now Consider Database Repair Failed –
Mount a blank database.
Go to the cached outlook – Export to PST via Outlook.
Create a new Outlook Profile – Import PST
Other options – you can consider 3rd party solutions for EDB to PST conversion.
After repairing the databases if users have issues in accessing the folder you can run a repair on the mailbox
New-MailboxRepairRequest -Mailbox vaishika@localhost -CorruptionType ProvisionedFolder,SearchFolder,AggregateCounts,Folderview
Known issues –
Issue :
Unable to submit online integrity check request for database Mailbox Database. Failure:An unexpected error occurred

while trying to submit the request. Detailed error information follows

Microsoft.Mapi.MapiExceptionInvalidParameter: MapiExceptionInvalidParameter: Queue online isinteg request failed.

(hr=0x80070057, ec=-2147024809)
Resolution –
The database is in bad share after repair – Create a new database and move them
Issue :
Log Name: Application
Source: MSExchangeIS
Event ID: 2006
Level: Error
Description:
Microsoft Exchange Information Store worker process (12584) has encountered an unexpected database error (Illegal duplicate key) for database ‘Mailbox Database’ with a call stack of
at Microsoft.Exchange.Server.Storage.PhysicalAccessJet.JetTableOperator.Insert(IList`1 columns, IList`1 values, Column identityColumnToFetch, Boolean unversioned, Boolean ignoreDuplicateKey, Object& identityValue)
at Microsoft.Exchange.Server.Storage.PhysicalAccessJet.JetInsertOperator.ExecuteScalar()
at Microsoft.Exchange.Server.Storage.PhysicalAccess.DataRow.Insert(IConnectionProvider connectionProvider)
at Microsoft.Exchange.Server.Storage.StoreCommonServices.ObjectPropertyBag.Flush(Context context)
at Microsoft.Exchange.Server.Storage.LogicalDataModel.Item.Flush(Context context)
at Microsoft.Exchange.Server.Storage.LogicalDataModel.Message.Flush(Context context)
at Microsoft.Exchange.Server.Storage.LogicalDataModel.Message.SaveChanges(Context context)
at Microsoft.Exchange.Server.Storage.LogicalDataModel.TopMessage.SaveChanges(Context context, SaveMessageChangesFlags flags)
at Microsoft.Exchange.Protocols.MAPI.MapiMessage.SaveChangesInternal(MapiContext context, MapiSaveMessageChangesFlags saveFlags, ExchangeId& newMid)
Log Name: Application
Source: MSExchangeIS
Event ID: 1046
Level: Error
Description:
Unexpected error encountered in critical block. Location:(Microsoft.Exchange.Diagnostics.LID), scope: (MailboxShared), callstack: ( at Microsoft.Exchange.Server.Storage.StoreCommonServices.Context.OnCriticalBlockFailed(LID lid, CriticalBlockScope criticalBlockScope)
at Microsoft.Exchange.Server.Storage.StoreCommonServices.Context.CriticalBlockFrame.Dispose()
at Microsoft.Exchange.Server.Storage.LogicalDataModel.TopMessage.SaveChanges(Context context, SaveMessageChangesFlags flags)
at Microsoft.Exchange.Protocols.MAPI.MapiMessage.SaveChangesInternal(MapiContext context, MapiSaveMessageChangesFlags saveFlags, ExchangeId& newMid)
Log Name: Application
Source: MSExchangeIS
Event ID: 1002
Level: Error
Description:
Unhandled exception (Microsoft.Exchange.Server.Storage.Common.DuplicateKeyException: JetTableOperator.Insert —> Microsoft.Isam.Esent.Interop.EsentKeyDuplicateException: Illegal duplicate key
at Microsoft.Isam.Esent.Interop.Server2003.Server2003Api.JetUpdate2(JET_SESID sesid, JET_TABLEID tableid, Byte[] bookmark, Int32 bookmarkSize, Int32& actualBookmarkSize, UpdateGrbit grbit)
at Microsoft.Exchange.Server.Storage.PhysicalAccessJet.JetTableOperator.Insert(IList`1 columns, IList`1 values, Column identityColumnToFetch, Boolean unversioned, Boolean ignoreDuplicateKey, Object& identityValue)
Resolution –
The database is in bad shape after repair – Create a new database and move them
—
Another Scenario –
[PS] C:\Program Files\Microsoft\Exchange Server\V14\Bin>eseutil.exe /r e05 /l “E:\Mailbox\Logs\VW” /d “G:\Mailbox\VW\VW.edb” /a
Extensible Storage Engine Utilities for Microsoft(R) Exchange Server
Version 14.02
Copyright (C) Microsoft Corporation. All Rights Reserved.
Initiating RECOVERY mode…
Logfile base name: e05
Log files: E:\Mailbox\Logs\VW
System files: <current directory>
Database Directory: G:\Mailbox\VW\VW.edb
Performing soft recovery…
Restore Status (% complete)
0 10 20 30 40 50 60 70 80 90 100
|—-|—-|—-|—-|—-|—-|—-|—-|—-|—-|
………………………………………….X
Operation terminated with error -1216 (JET_errAttachedDatabaseMismatch, An outstanding database attachment has been detected at the start or end of r
[PS] C:\Program Files\Microsoft\Exchange Server\V14\Bin>eseutil.exe /r e05 /l “E:\Mailbox\Logs\VW” /d “G:\Mailbox\VW\VW.edb” /a /i
Extensible Storage Engine Utilities for Microsoft(R) Exchange Server
Version 14.02
Copyright (C) Microsoft Corporation. All Rights Reserved.
Initiating RECOVERY mode…
Logfile base name: e05
Log files: E:\Mailbox\Logs\VW
System files: <current directory>
Database Directory: G:\Mailbox\VW\VW.edb
Performing soft recovery…
Restore Status (% complete)
0 10 20 30 40 50 60 70 80 90 100
|—-|—-|—-|—-|—-|—-|—-|—-|—-|—-|
……………………………………………
The operation completed successfully in 0.219 seconds.
Sometimes Even after showing Completed. Couldn’t see the database coming to a clean shutdown.

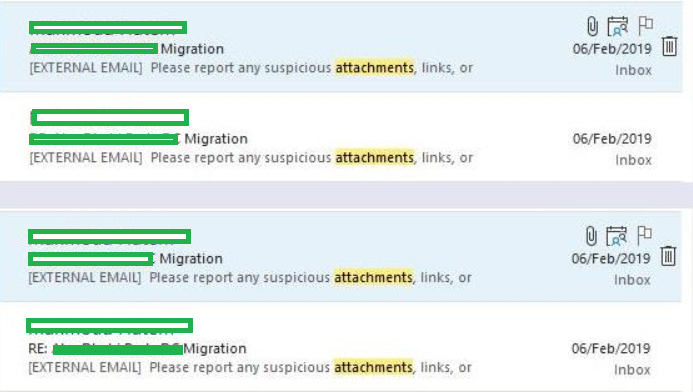
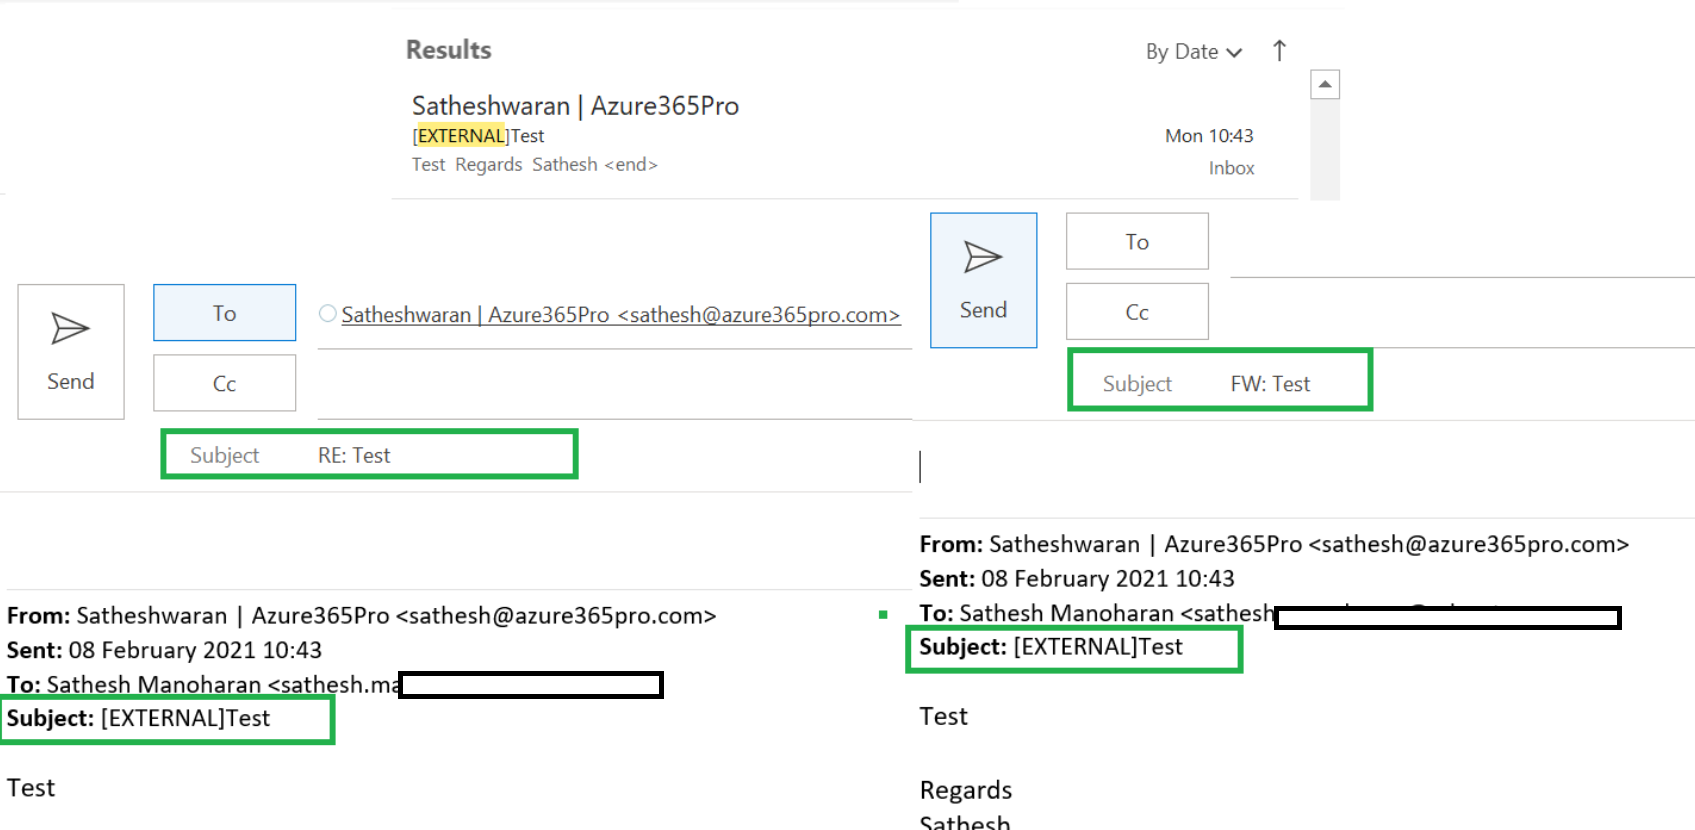
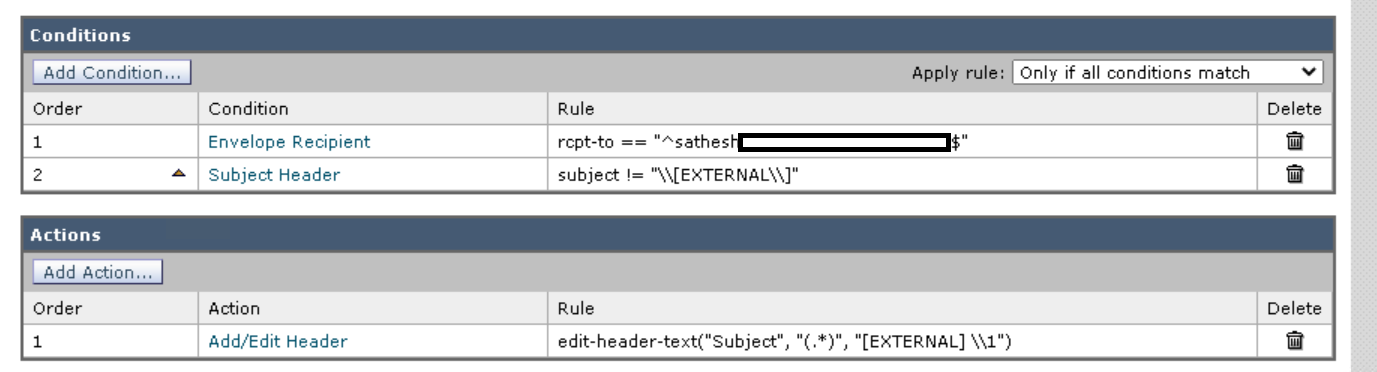
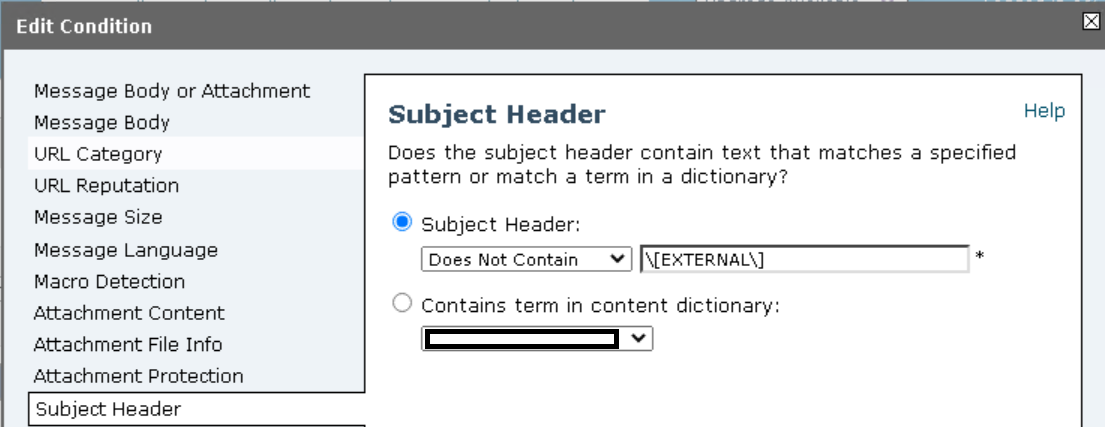
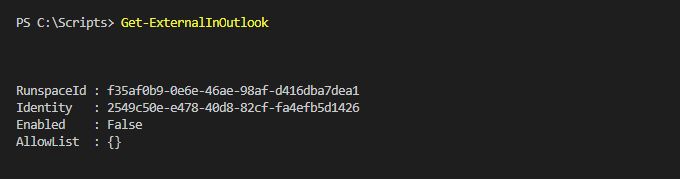
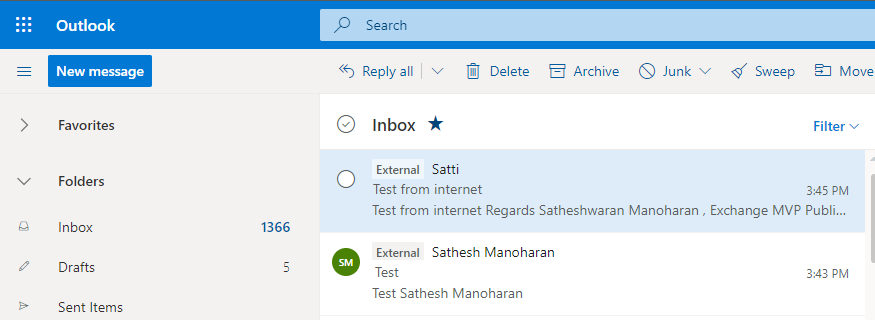
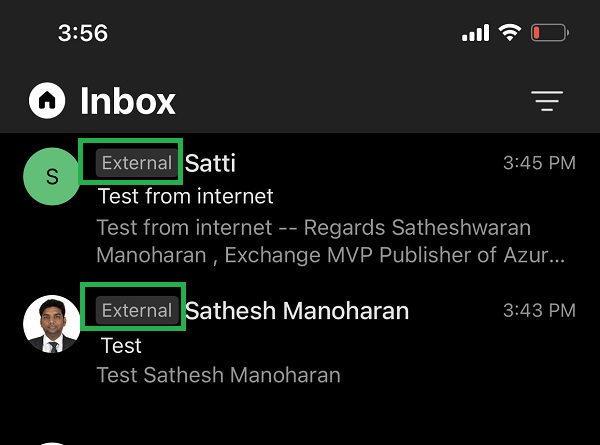
![Adding [EXTERNAL] for emails with Auto Remove on Reply](https://www.azure365pro.com/wp-content/uploads/2021/02/Outlook-Web-App-Experience-768x281.png "Adding [EXTERNAL] for emails with Auto Remove on Reply")