29 C
Dubai
Saturday, May 3, 2025
Home Blog Page 26

Azure Resource Mover to move resources to another region

We had to move some Azure Resource groups from UAE North to Central US to improve the latency of the sites without using any additional Azure technologies. let’s see how we can achieve that using the Azure Resource Mover.

Please note all the resource types are not supported at the moment. Currently, it supports

  • Azure VMs and associated disks
  • NICs
  • Availability sets
  • Azure virtual networks
  • Public IP addresses
  • Network security groups (NSGs)
  • Internal and public load balancers
  • Azure SQL databases and elastic pools

It uses Azure site recovery to create a replica of the Virtual machines disks. For all other resources it generates ARM templates and it will use them to recreate it automatically in the new the datacenter and it will allow us to remove the source data after migration which is optional.

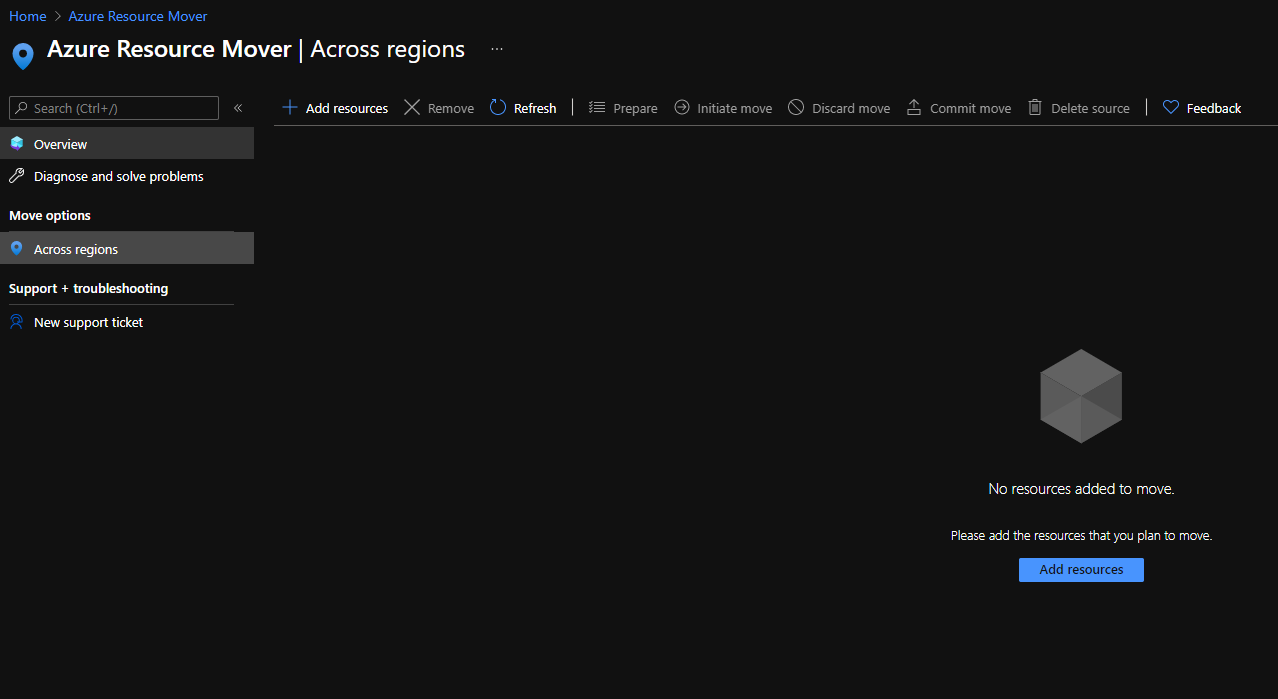
Open Azure Resource Mover in Azure Portal

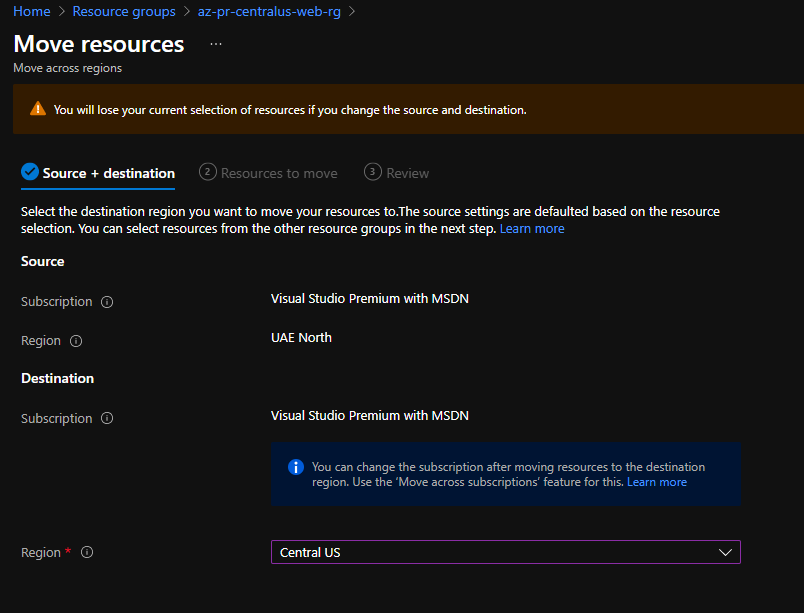
Click on Add resources choose the Source and Destination Region. In my case, it’s UAE North to Central US.

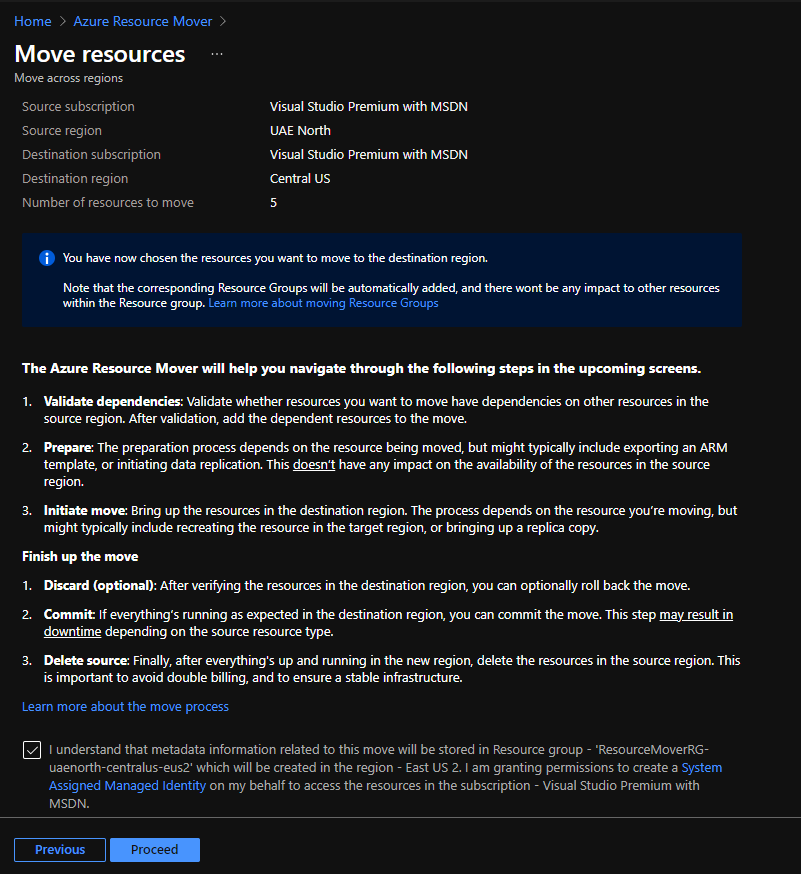
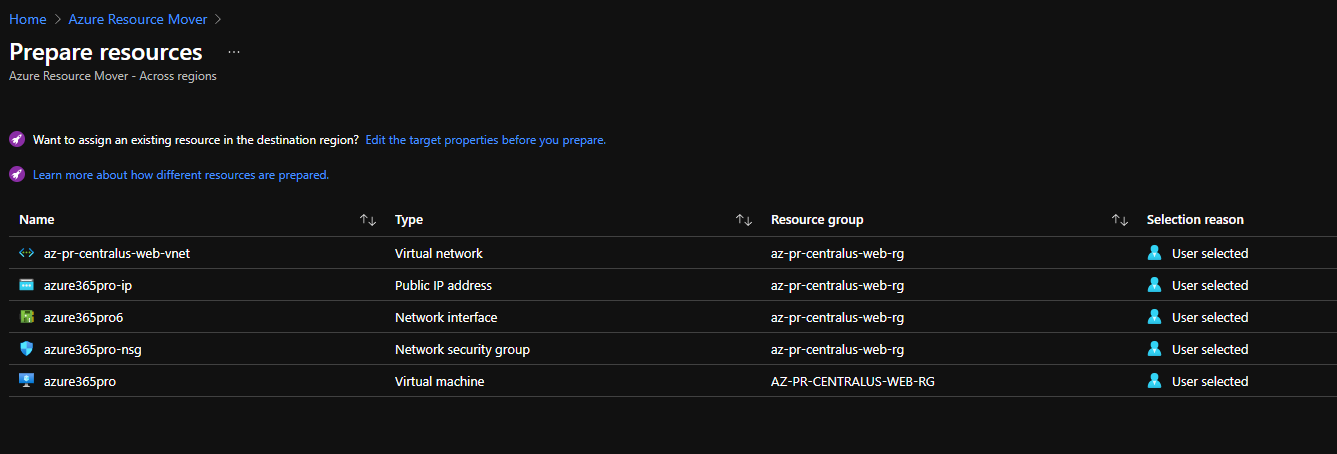
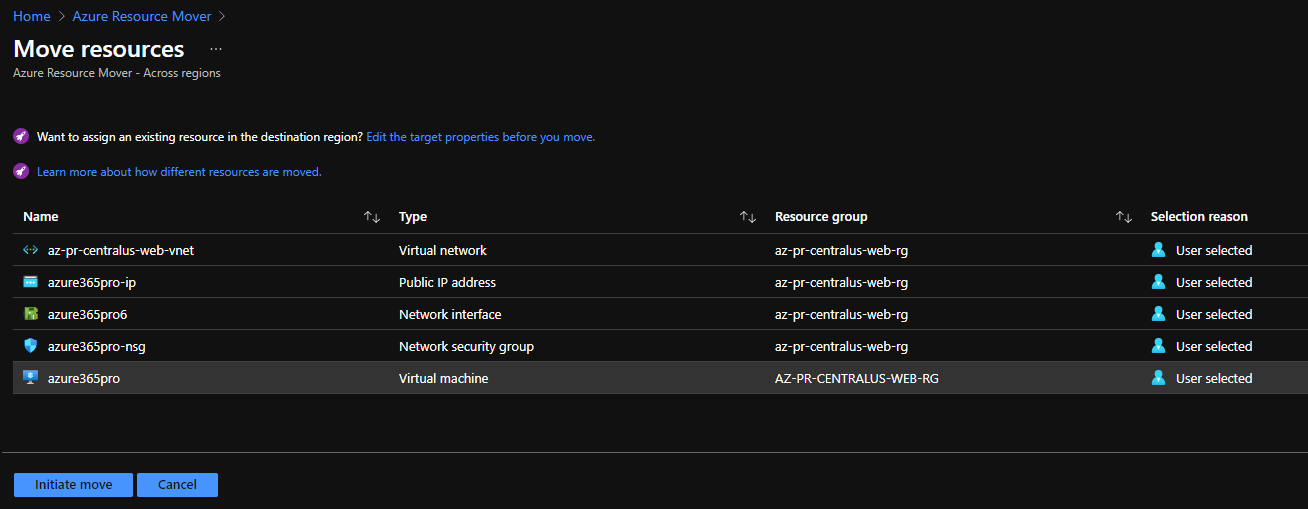
You have now chosen the resources you wish to move to the destination region.

Note that the corresponding Resource Groups will be automatically added, and there won’t be any impact on other resources within the Resource group.
The Azure Resource Mover will help you navigate through the following steps in the upcoming screens.

Validate dependencies: Validate whether resources you want to move have dependencies on other resources in the source region. After validation, add the dependent resources to the move.

Prepare: The preparation process depends on the resource being moved, but might typically include exporting an ARM template or initiating data replication. This doesn’t have any impact on the availability of the resources in the source region.

Initiate move: Bring up the resources in the destination region. The process depends on the resource you’re moving, but might typically include recreating the resource in the target region or bringing up a replica copy.
Finish up the move

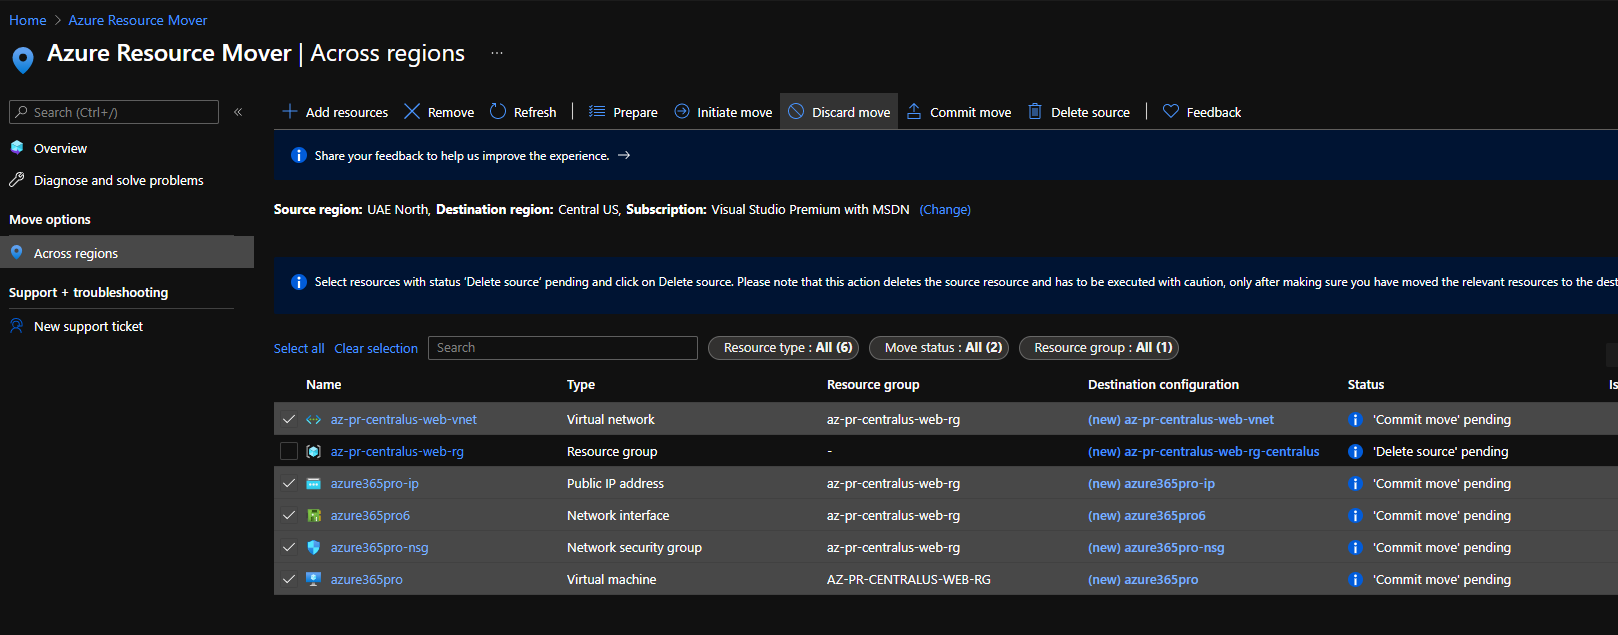
Discard (optional): After verifying the resources in the destination region, you can optionally roll back the move.

Commit: If everything’s running as expected in the destination region, you can commit the move. This step may result in downtime depending on the source resource type.

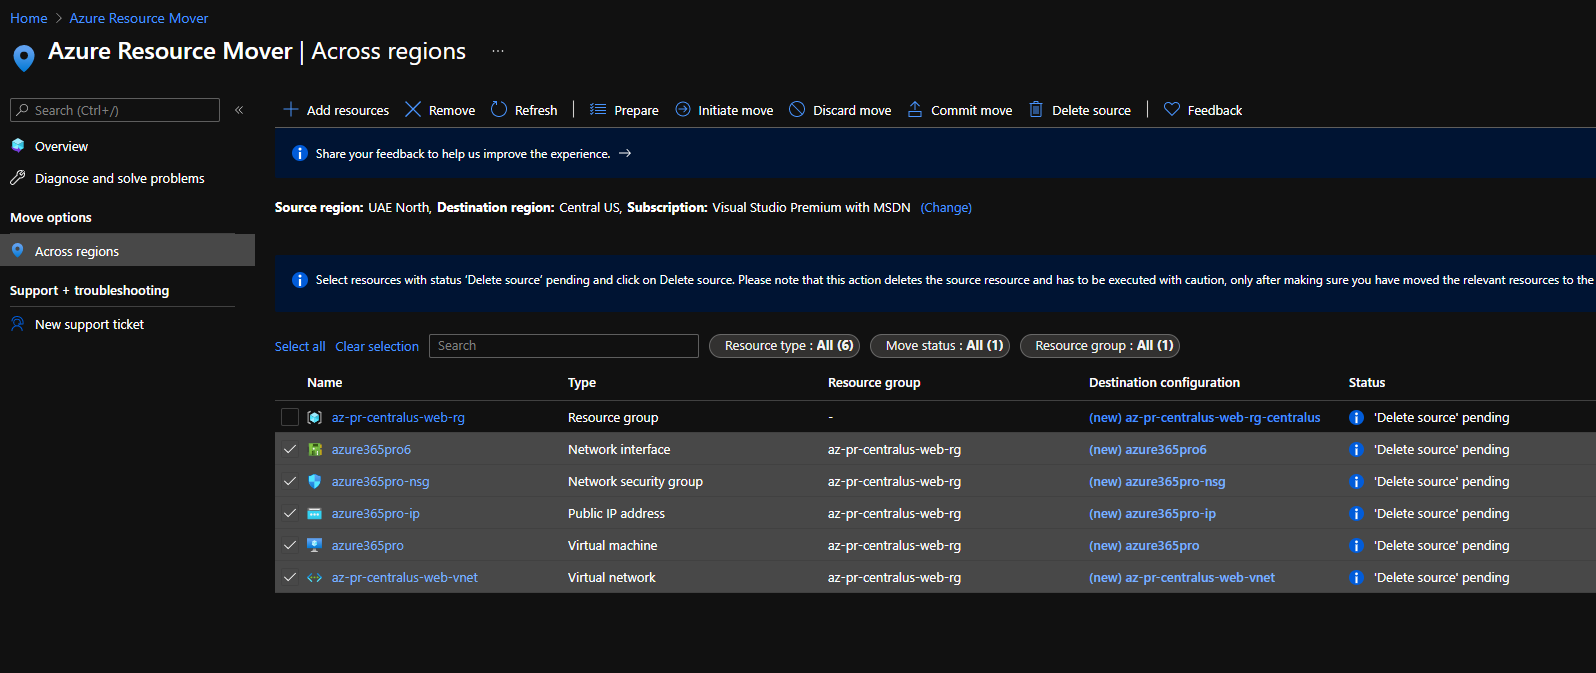
Delete source: Finally, after everything’s up and running in the new region, delete the resources in the source region. This is important to avoid double billing, and to ensure a stable infrastructure.

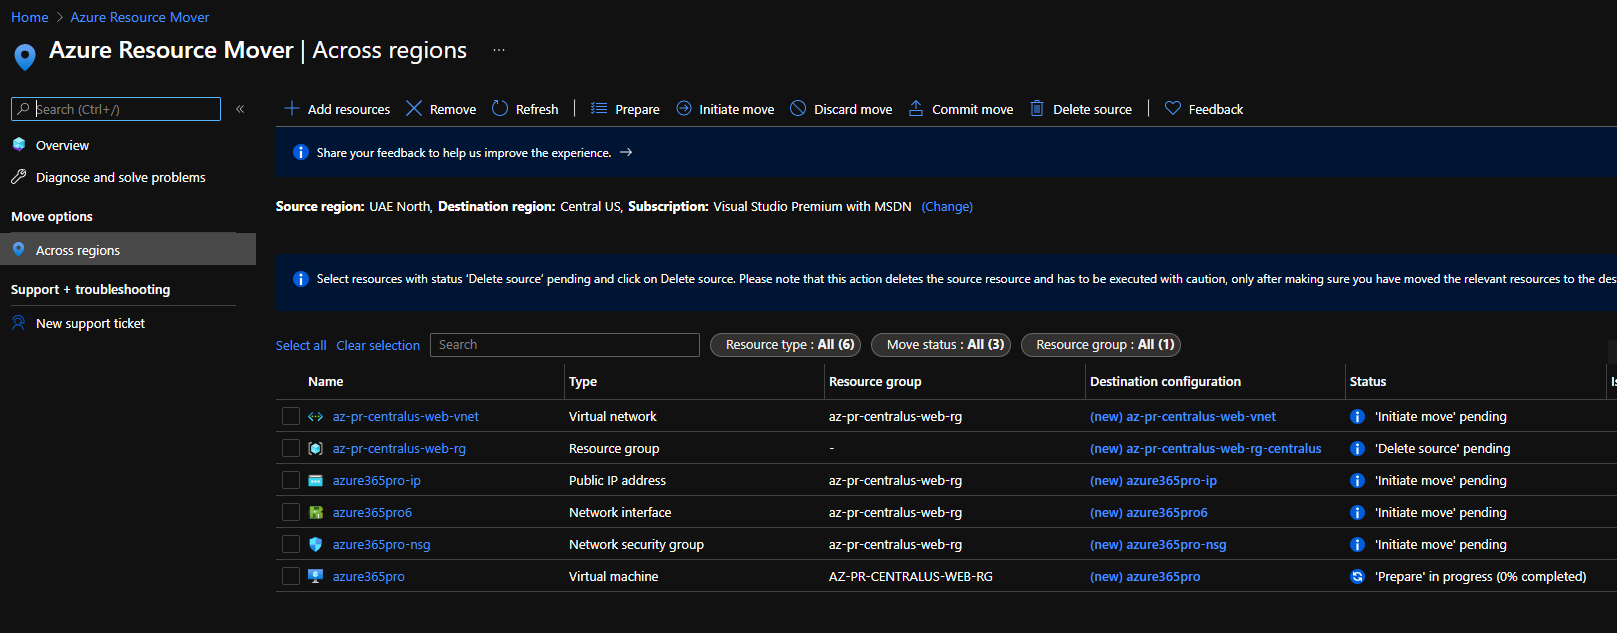
Metadata information related to this move will be stored in Resource group – ‘ResourceMoverRG-uaenorth-centralus-eus2’ which will be created in the region – East US 2. I am granting permission to create a System Assigned Managed Identity on my behalf to access the resources in the subscription.

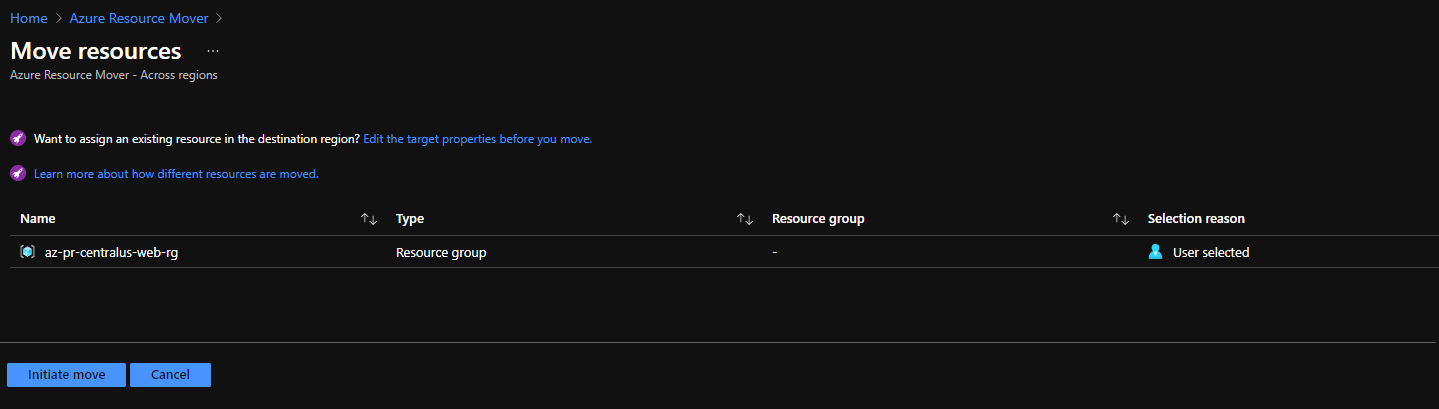
Choose the resources you wish to move from that source region and click on next

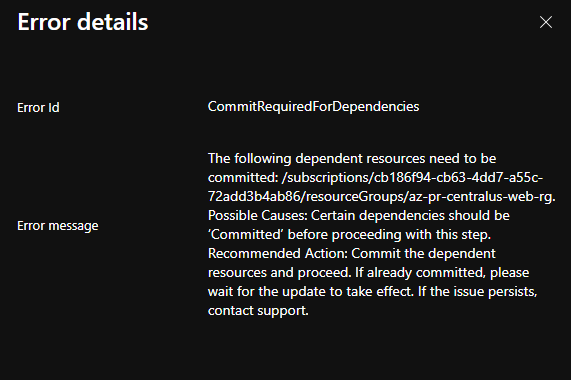
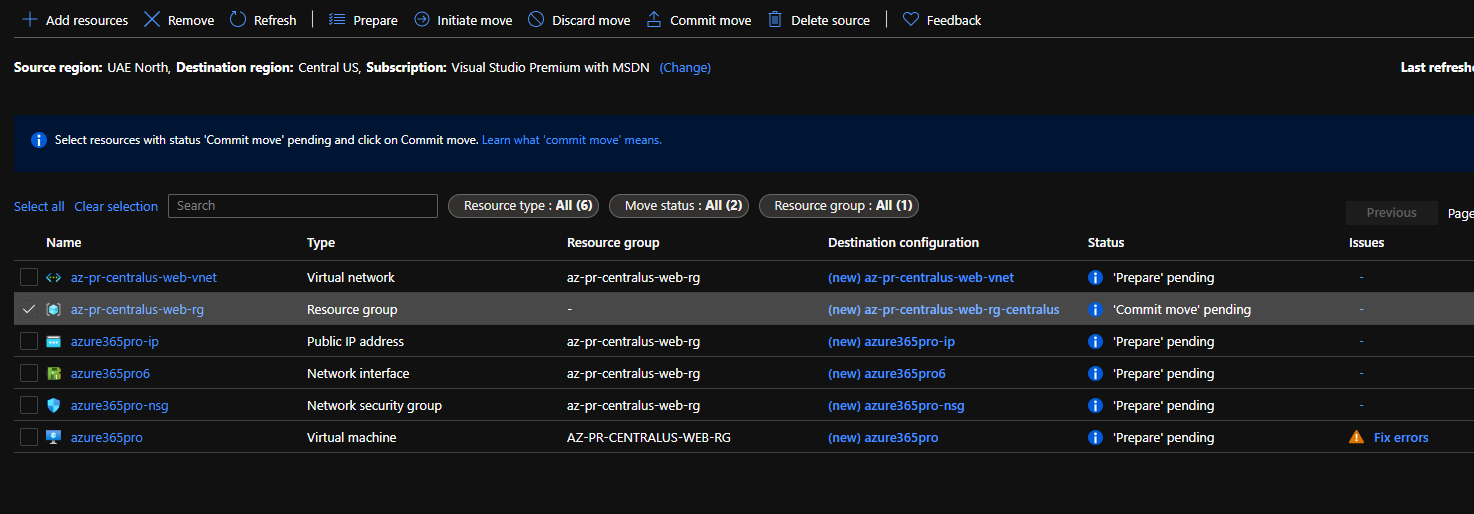
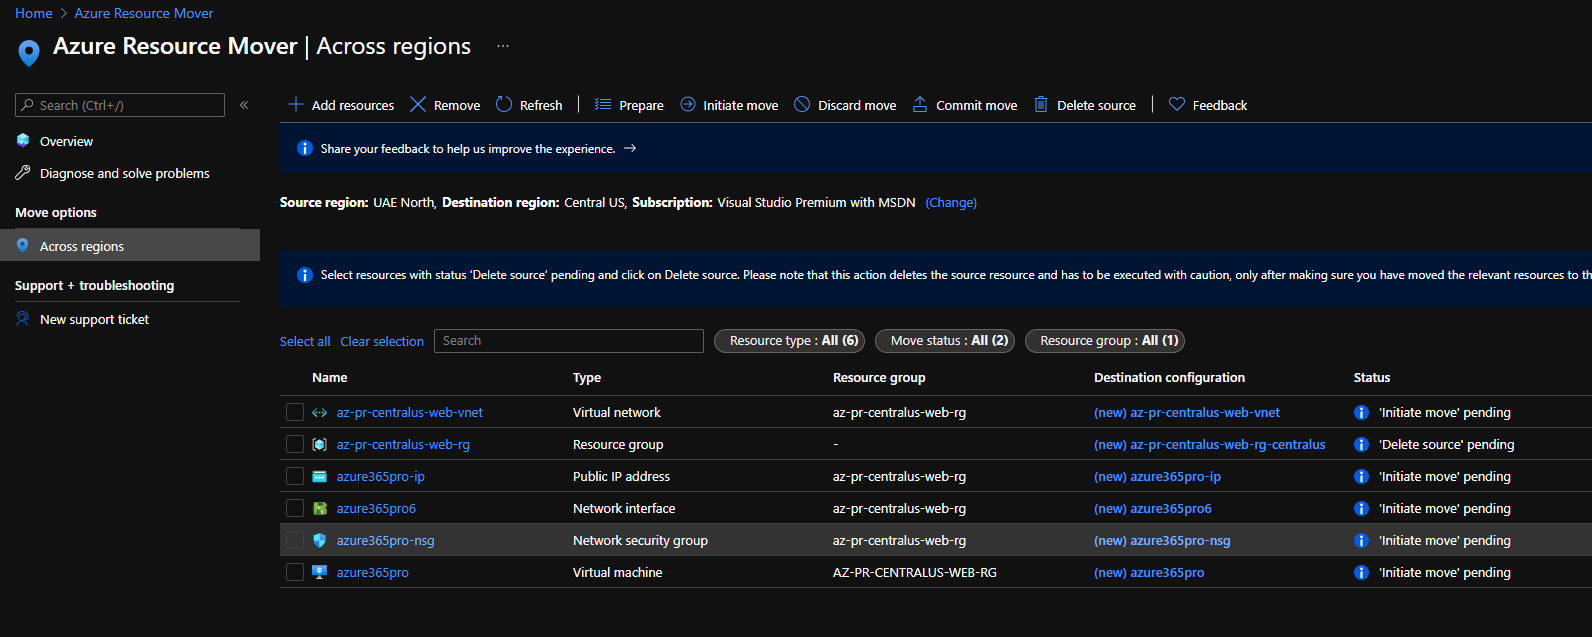
You can see an error that says to move the resource group first in order to move the resources within them.

Let’s prepare, Initiate and commit the resource group name, but you will note delete source as we haven’t moved the resources within the resource group yet.

  • Prepare
  • Initiate Move
  • Commit Move

Error details
Error Id CommitRequiredForDependencies
Error message
The following dependent resources need to be committed: /subscriptions/cb186f94-cb63-4dd7-0000-72add3b4ab86/resourceGroups/az-pr-centralus-web-rg.
Possible Causes: Certain dependencies should be ‘Committed’ before proceeding with this step.
Recommended Action: Commit the dependent resources and proceed. If already committed, please wait for the update to take effect. If the issue persists, contact support.

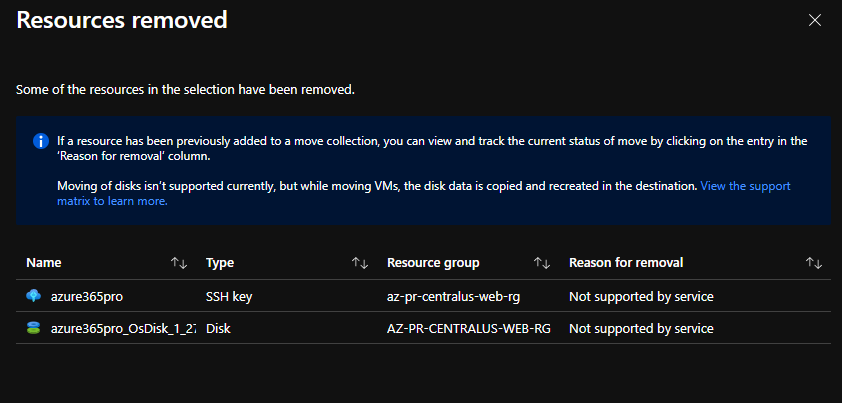
You can see some unsupported resources like SSH Key. if you move the virtual machine the disk associated with them will get copied automatically and you can safely ignore that disk is showing as unsupported and being removed.

Now, let’s prepare to initiate and commit the resource group creation to Central US. Preparing resource group creation which creates it with a new name. where the ARM template can be customized if you wish to change the name.

Initiate Move of the resource group
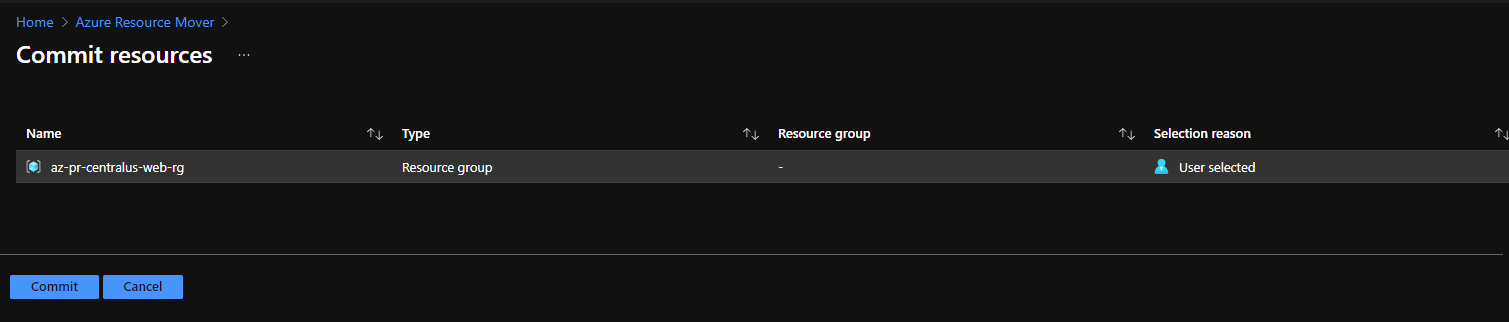
Now, let’s commit.

Now commit the resource group creation.

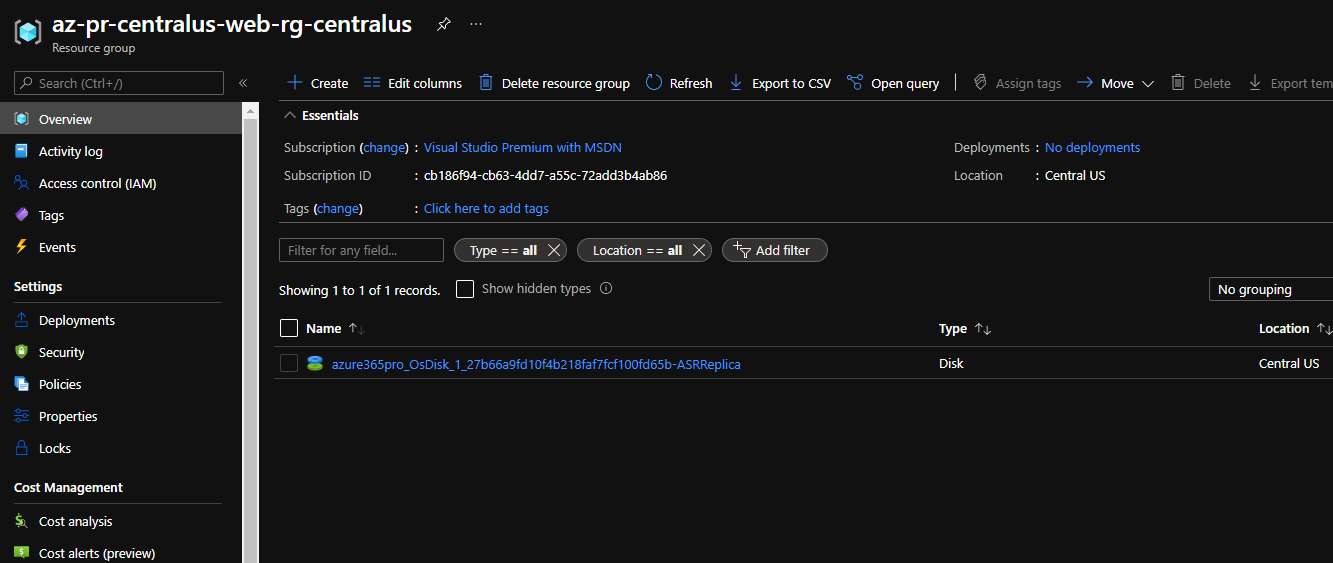
Now the resource group is created in Central US with a new name. let’s get started with the other resources.

Prepare the other resources.

Virtual Machine Prep takes a bit longer as the associated disks are being replicated in the backend.

You can see the replicated disk in the destination resource group.

Now let’s initiate the move as the preparation is completed.  (Requires Down Time for Source Resources – Initiate Move take the Source Virtual Machine to stopped state )

Initiate move

Once you feel the target resources are up with a new public IP. Change the required public DNS.  Now you can commit a move.

We had issues moving the moving when resources having the resource lock is enabled. we removed the resource lock and re did the whole process Virtual machine booted just fine. but still not sure resource lock was causing the issue or ASR. ( Just a guess – if you encounter such issue)

Now the Virtual Machine came up online and recreated the SSH keys in my case and deleted the source resource group and its resources.

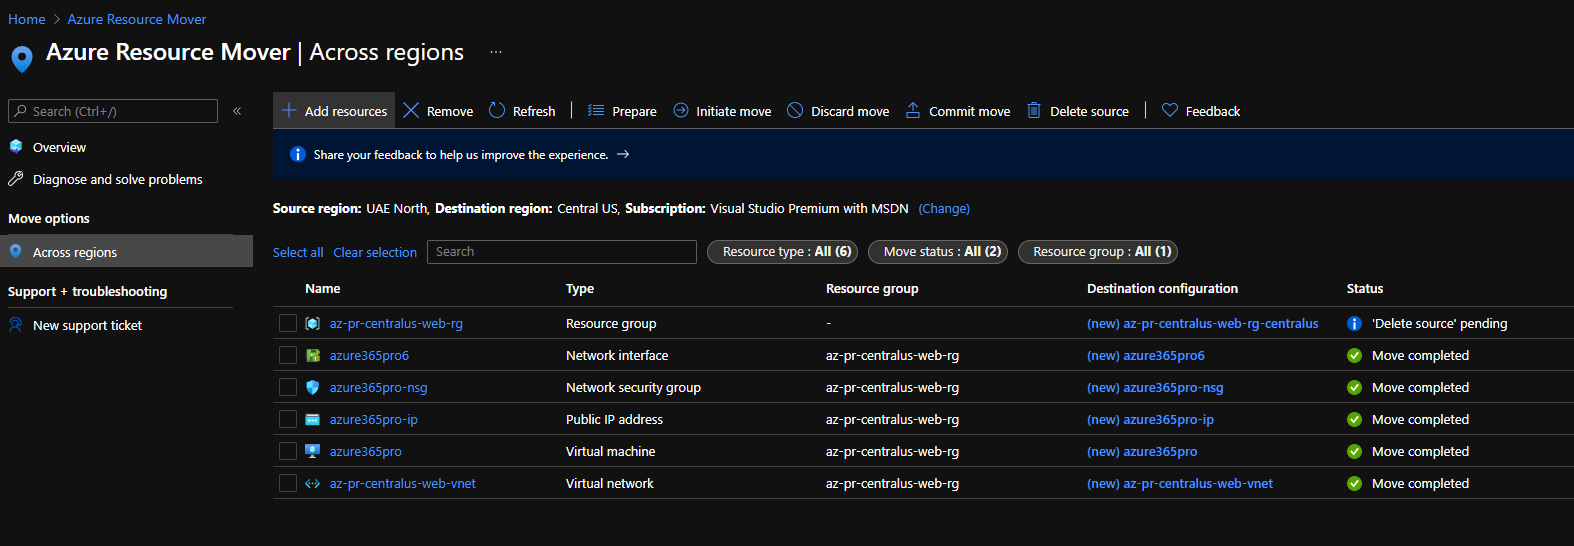
Move Completed from UAE North to Central US seamlessly.

Tenant Organization is dehydrated on Hybrid Configuration

“Tenant Organization is dehydrated error” while running Hybrid Configuration

if you don’t have the exchange online module installed. Install it using the below PowerShell command to check the dehydrate status of the Office 365 tenant.

Install-Module -Name ExchangeOnlineManagement -Force
Connect-ExchangeOnline

We can check the dehydrate status using the below command

Get-OrganizationConfig | fl Identity,IsDehydrated

Microsoft consolidates certain objects to save space.
When you use Exchange Online PowerShell or the Exchange admin center or run hybrid for the first time to modify these consolidated objects you may encounter an error message that the tenant is dehydrated.
It is completely safe to run Enable-OrganizationCustomization on a Production Tenant.

if the office 365 tenant is dehydrated. we can hydrate the tenant using the below command.

Enable-OrganizationCustomization

Get-OrganizationConfig | fl Identity,IsDehydrated

Now your Office 365 Tenant looks healthy you can safely re-run the Exchange Hybrid configuration.

Azure Management Groups and Subscriptions Design

In this video, we will discuss recommended management group’s design with subscriptions having the Microsoft Cloud Adoption framework in mind. Also, I have placed a sample design with two business units hosted in azure sharing the same set of domain controllers, As you know to efficiently manage your access policies and compliance. Management groups would be the ideal choice in azure.

Download Resources which are shown in the video –

https://drive.google.com/drive/folders/1sXUqesjlRM2mYWQOu_hkn_0HNDE2aP9r?usp=sharing


Azure B2C White label URLs with Azure Front Door

Azure B2C is allowing white label URLs through Azure Front Door now. it was a long ask from the community. In order to achieve this. The custom domain has to be added in Azure Front door and Azure B2C custom domain so that it can allow it seamlessly to pass through the URLs with custom domains. So that b2clogin.com or Microsoft domains are not visible in the URLs.

You can allow multiple login URLs through the Azure front door. So that several apps can share the same Azure B2C Tenant.

For Example, all below URLs can share the same Azure B2C. When you manage these URLs via Azure front door. you can allow the front door to manage the SSL. so that you don’t have to worry about managing them and renewing them. Also, it supports self-managed SSL certificates via key Vault.

  • https://loginapp1.azure365pro.com
  • https://loginapp2.azure365pro.com
  • https://loginapp3.careexchange.in

Now let’s see how to do it. Create a B2C tenant –

Setup – Recommended Default Signup-Sign in / password reset flows by clicking new user flow

Go to Azure Active Directory from the B2C tenant – Please note that you are not leaving the b2c tenant in this case. Azure B2C will trust the custom domains only within this  Azure B2C tenant

Add all the custom domains needed and verify them using DNS records.

Get the backend b2c domain from azure B2C – App Registrations – Endpoints – azure365pro1.b2clogin.com for example.

Create a front door – azure365pro –

  • Session Affinity (Disabled)
  • Web Application Firewall (Disabled)

Add a backend pool now – In my case it’s azure365pro1.b2clogin.com

Health Probes (Disabled)

Add a rule –

Route Type – Forward
Forwarding request – Match Request

Add a custom domain – verify the CNAME records – Some DNS providers will not allow you to add a CNAME record if the txt record exists which you created earlier.
So delete those txt records if you verified the custom domains already. and add the CNAME record for the front door.
Enable Custom Domain HTTPS – Let front door manage by SSL. Peace of mind.

Now update the routing rule to use additional frontend domains.

Create an app registration

Add some redirect uri in the app we created. Enabling access tokens / ID tokens. In a later blog we can discuss about re direct uris

Take the user flow endpoint URL  – To make sure the page is opening as that we can confirm that we have a working configuration.

My Default URL
https://azure365pro1.b2clogin.com/azure365pro1.onmicrosoft.com/oauth2/v2.0/authorize?p=B2C_1_azure365prosignup&client_id=769fce93-5a5b-487b-b42e-3cb93cafb494&nonce=defaultNonce&redirect_uri=http%3A%2F%2Flocalhost%2Fazure&scope=openid&response_type=id_token&prompt=login
Replacing by Azure B2C Tenant ID with azure365pro1.onmicrosoft.com
https://azure365pro1.b2clogin.com/b0abaace-aad4-4356-9b06-38714dee3d69/oauth2/v2.0/authorize?p=B2C_1_azure365prosignup&client_id=769fce93-5a5b-487b-b42e-3cb93cafb494&nonce=defaultNonce&redirect_uri=http%3A%2F%2Flocalhost%2Fazure&scope=openid&response_type=id_token&prompt=login
https://loginapp1.azure365pro.com/b0abaace-aad4-4356-9b06-38714dee3d69/oauth2/v2.0/authorize?p=B2C_1_azure365prosignup&client_id=769fce93-5a5b-487b-b42e-3cb93cafb494&nonce=defaultNonce&redirect_uri=http%3A%2F%2Flocalhost%2Fazure&scope=openid&response_type=id_token&prompt=login
https://loginapp2.azure365pro.com/b0abaace-aad4-4356-9b06-38714dee3d69/oauth2/v2.0/authorize?p=B2C_1_azure365prosignup&client_id=769fce93-5a5b-487b-b42e-3cb93cafb494&nonce=defaultNonce&redirect_uri=http%3A%2F%2Flocalhost%2Fazure&scope=openid&response_type=id_token&prompt=login
https://loginapp3.careexchange.in/b0abaace-aad4-4356-9b06-38714dee3d69/oauth2/v2.0/authorize?p=B2C_1_azure365prosignup&client_id=769fce93-5a5b-487b-b42e-3cb93cafb494&nonce=defaultNonce&redirect_uri=http%3A%2F%2Flocalhost%2Fazure&scope=openid&response_type=id_token&prompt=login

Now you can see URLs are live through the front door – fully white-label URLs from azure b2c through the azure front door.

Attach ACR Error Are you an owner on this subscription

ERROR: Could not create a role assignment for ACR. Are you an Owner on this subscription?

while running terraform with default contributor permission from Azure DevOps you end up with this error when you try to create a role assignment.

In our case, we are using the service principal for Azure DevOps.

Solution #1

let see how to create a custom role with minimum permission to avoid this error.

Choose subscription “Access control (IAM) – Add – Add custom role –

Clone a role – Contributor

Friendly name for the custom role – aks custom role

Delete this “Microsoft.Authorization/*/Write from NoAction.

Choose next

choose next finish. In Assignable scopes, if you want the same custom role on different subscriptions you need to include them.

Now let’s use the custom role created and add service principal to the custom role

add role assignment – role – aks custom role – select the service principal you want to use.

Choose to add.

Solution #1 –

The quick solution is to change the service principal to Owner permission on the subscription and give legacy graph permission. This is one way of doing it. but certainly not a recommended way. Custom role to give minimum permission to achieve the same. without owner permission on the subscription.

Choose Application Permission – Application.ReadWrite.OwnedBy

Add Permission and click on “Grant Admin Consent”

Service Principal Permissions for Terraform in Azure DevOps

The service Principal requires more permission on few cases in Azure. But it doesn’t apply to all in this case. as the security model differs for the environment. Below is a scenario that vnet peering is failing on terraform as both the vNETs are managed by the same DevOps Project.

Search for Management Groups which are associated – Add all these service principals to a security group and then Add them to the network contributor role on the specific management group.

2021-04-13T09:31:48.6597731Z 
2021-04-13T09:31:48.6605992Z Error: creating/updating Virtual Network: (Name "az-mw-pr-uaen-vnet" / Resource Group "az-mw-pr-uaen-net-rg"): network.VirtualNetworksClient#CreateOrUpdate: Failure sending request: StatusCode=0 -- Original Error: Code="NetcfgInvalidSubnet" Message="Subnet 'mw-pr-uaen-waf-snet' is not valid in virtual network 'az-mw-pr-uaen-vnet'." Details=[]
2021-04-13T09:31:48.6608395Z 
2021-04-13T09:31:48.6610661Z   on ../../../Modules/Azure-VirtualNetwork/1.5/main.tf line 8, in resource "azurerm_virtual_network" "this":
2021-04-13T09:31:48.6611956Z    8: resource "azurerm_virtual_network" "this" {
2021-04-13T09:31:48.6612719Z 
2021-04-13T09:31:48.6613568Z 
2021-04-13T09:31:49.0598260Z Releasing state lock. This may take a few moments...

Add Network Contributor level on the management group in my case. in your case, it could be your resource group / virtual network level. whichever suits your environment.

2021-04-14T00:59:14.4932179Z 
2021-04-14T00:59:14.4934162Z Error: No group found matching specified parameters (display_name: "az-aks-admins")
2021-04-14T00:59:14.4945202Z 
2021-04-14T00:59:14.4947770Z   on modules/aks_agic/main.tf line 26, in data "azuread_group" "aks_cluster_admins":
2021-04-14T00:59:14.4948806Z   26: data "azuread_group" "aks_cluster_admins" {
2021-04-14T00:59:14.4949351Z 
2021-04-14T00:59:14.4950117Z listing Groups for filter "displayName eq 'az-aks-cluster-admins'":
2021-04-14T00:59:14.4950920Z graphrbac.GroupsClient#List: Failure responding to request: StatusCode=403 --
2021-04-14T00:59:14.4951499Z Original Error: autorest/azure: Service returned an error. Status=403
2021-04-14T00:59:14.4951962Z Code="Unknown" Message="Unknown service error"
2021-04-14T00:59:14.4952898Z Details=[{"odata.error":{"code":"Authorization_RequestDenied","date":"2021-04-14T00:59:10","message":{"lang":"en","value":"Insufficient
2021-04-14T00:59:14.4953543Z privileges to complete the
2021-04-14T00:59:14.4954191Z operation."},"requestId":"fa522586-9c44-4851-9d85-0f2d7a733d23"}}]
2021-04-14T00:59:14.4955045Z 

Add the service principles used in – Directory Readers group
Which should allow reading azure ad groups

× How can I help you?