31 C
Dubai
Tuesday, May 6, 2025
Home Blog Page 28

Adding Office 365 License via PowerShell

Assigning Office 365 license via PowerShell is the need of the hour if the tenant doesn’t have a p1 license and you got to apply them manually.
the only easy way is to use PowerShell for bulk license assignment. Also, it’s useful to upgrade or renew different licensing.

Connect-AzureAD

if you don’t have the module

Install-Module -Name AzureAD
Get-AzureADUser -ObjectID username@localhost | Select DisplayName, UsageLocation

Got the usage location as US

Import-Csv .\assignexchstandard.csv | ForEach-Object {Set-AzureADUser -ObjectId $_.upn -UsageLocation "US"}

use the below command to Cross-checking on applied values – or use GUI

Import-Csv .\assignexchstandard.csv | ForEach-Object {Get-AzureADUser -ObjectId $_.upn | FT UsageLocation }

Now usage location is updated on the required accounts. as it’s mandatory before assigning a license via PowerShell. in my case, I don’t have a p1 license in this tenant that’s the reason I got to do this via PowerShell otherwise I would use dynamic licensing

Get-AzureADSubscribedSku | Select SkuPartNumber

In my case, I need to assign ExchangeStandard

$License = New-Object -TypeName Microsoft.Open.AzureAD.Model.AssignedLicense
$License.SkuId = (Get-AzureADSubscribedSku | Where-Object -Property SkuPartNumber -Value EXCHANGESTANDARD -EQ).SkuID
$License.SkuId
4b9405b0-7788-4568-add1-99614e613b69
$LicensesToAssign = New-Object -TypeName Microsoft.Open.AzureAD.Model.AssignedLicenses
$LicensesToAssign.AddLicenses = $License
$LicensesToAssign | FL

AddLicenses : {class AssignedLicense {
DisabledPlans:
SkuId: 4b9405b0-7788-4568-add1-99614e613b69
}
}
RemoveLicenses :

once you have a proper value assigned on this variable $LicensesToAssign
you can use import-csv to assign all users.


Import-Csv .\assignexchstandard.csv | ForEach-Object {Set-AzureADUserLicense -ObjectId $_.upn -AssignedLicenses $LicensesToAssign}

Now you can see licenses got assigned successfully.


Export all distribution Group and all members in Exchange and Office 365

In some situations, we have to Export all the Distribution group/Unified Groups and all the members of it to a CSV file. There is no command let available to retrieve the distribution group and distribution group members in bulk. The pipeline won’t work in this case.

NEW

****2021 Export all Unified Groups as well***

**** Export all the Distribution group and Distribution Group managers as well***

***Export all the Dynamic Distribution group and Dynamic Distribution Group managers as well***

DisplayName
Alias
RecipientType
Recipient OU
Primary SMTP address
Distribution Group
Distribution Group Primary SMTP address
Distribution Group Managers
Distribution Group OU
Distribution Group Type
Distribution Group Recipient Type
Not Allowed from the Internet

I have written a script that will make Exchange Administrators’ life Easy to export distribution group and its members.

Requires Exchange Management Shell – For Option 9 and 10 you will need Exchange Online Shell

.\DistributionGroupMemberReport.ps1 – It Can Display all the Distribution Group and its members on a List

Or It can Export to a CSV file

Download the Script

Browse the Shell to the Appropriate Location

Run it as above

The output of the CSV file looks like Below

You can add some more entries if required

image

Download the Script

How to use this Script for Office 365 – 

Local desktop. PowerShell – Run as Administrator

image

Make Sure your Execution Policy is set to RemoteSigned or Unrestricted

Set-ExecutionPolicy RemoteSigned

my Case is unrestricted.

To Get Execution Policy Status

Get-ExecutionPolicy

image

Connect-ExchangeOnline

Now Run the Script – It should work.

Git Public Repository Link –

azure365pro/DistributionGroupMemberReport (github.com)


Export all Teams Channels and all members in Office 365

In some situations like if we wish to study a new environment or restructure a existing environment or check user teams channels membership across the tenant. we have to Export all the Teams Channels and all the members of it to a CSV file. There is no command let available to retrieve the Teams and Channel members in bulk. Pipe line won’t work in this case. Its very similar to Distribution Group and its members like in Exchange online.Which i wrote a script many years back.

Lets see how to do similar stuff in Microsoft Teams PowerShell native module. if you want to know how to install latest repositories and

PLEASE NOTE YOU HAVE TO USE PRE RELEASE version for the script to work which is covered in below article. Get-TeamChannelUser doesn’t work on Production PowerShell Respository.

Install-Module PowerShellGet -RequiredVersion 2.2.4.1

To use pre-release version – (Get-TeamChannelUser is available only on pre release version for now)

Install-Module -Name MicrosoftTeams -RequiredVersion 1.1.3-preview -AllowPrerelease

Connect to Microsoft Teams Powershell i have covered in this article.

Download the Script

Choose the Task 1 to Export the minimal data and display in shell.

PS C:\Scripts> .\TeamsChannelMemberReport.ps1

Teams Channel Member Report
—————————-

1.Display in Microsoft Teams Shell

2.Export to CSV File

3.Display Specific Microsoft Team in Shell
4.Export Specific Microsoft Team to CSV File

Choose The Task: 1

User SMTP Address Role Channel DisplayName Team DisplayName
—————– —- ——————- —————-
xx@localhost Owner General Teams_Azure365pro
xx01@localhost Member General Teams_Azure365pro

Download the Script

Choose the Task 2 to Export the all the Teams Channels Membership data with Teams settings to a CSV File.

PS C:\Scripts> .\TeamsChannelMemberReport.ps1

Teams Channel Member Report
—————————-

1.Display in Microsoft Teams Shell

2.Export to CSV File

Choose The Task: 2
Enter the Path of CSV file (Eg. C:\Teams.csv): c:\Scripts\Teams.csv

CSV Will Export Below Columns

  • DisplayName
  • UserId
  • User SMTP Address
  • Role
  • Channel DisplayName
  • Channel Description
  • Channel MembershipType
  • Team GroupID
  • Team DisplayName
  • Team Description
  • Team Visibility
  • Team MailNickName
  • Team Classification
  • Team Archived
  • Team AllowGiphy
  • Team GiphyContentRating
  • Team AllowStickersAndMemes
  • Team AllowGuestCreateUpdateChannels
  • Team AllowGuestDeleteChannels
  • Team AllowCreateUpdateChannels
  • Team AllowCreatePrivateChannels
  • Team AllowDeleteChannels
  • Team AllowAddRemoveApps
  • Team AllowCreateUpdateRemoveTabs
  • Team AllowCreateUpdateRemoveConnectors
  • Team AllowUserEditMessages
  • Team AllowUserDeleteMessages
  • Team AllowOwnerDeleteMessages
  • Team AllowTeamMentions
  • Team AllowChannelMentions
  • Team ShowInTeamsSearchAndSuggestions

CSV File will look like –

Git Public Repository Link –

azure365pro/DistributionGroupMemberReport (github.com)

Embed Power BI content with Service Principal

You can embed power BI into any web-based solution you want. where you use an Azure AD App to connect, you will not need any power BI pro license to access it. Also, you will need a Power BI Premium capacity for the same when it goes production depends on the queries made on the custom portal you are planning to display the report.

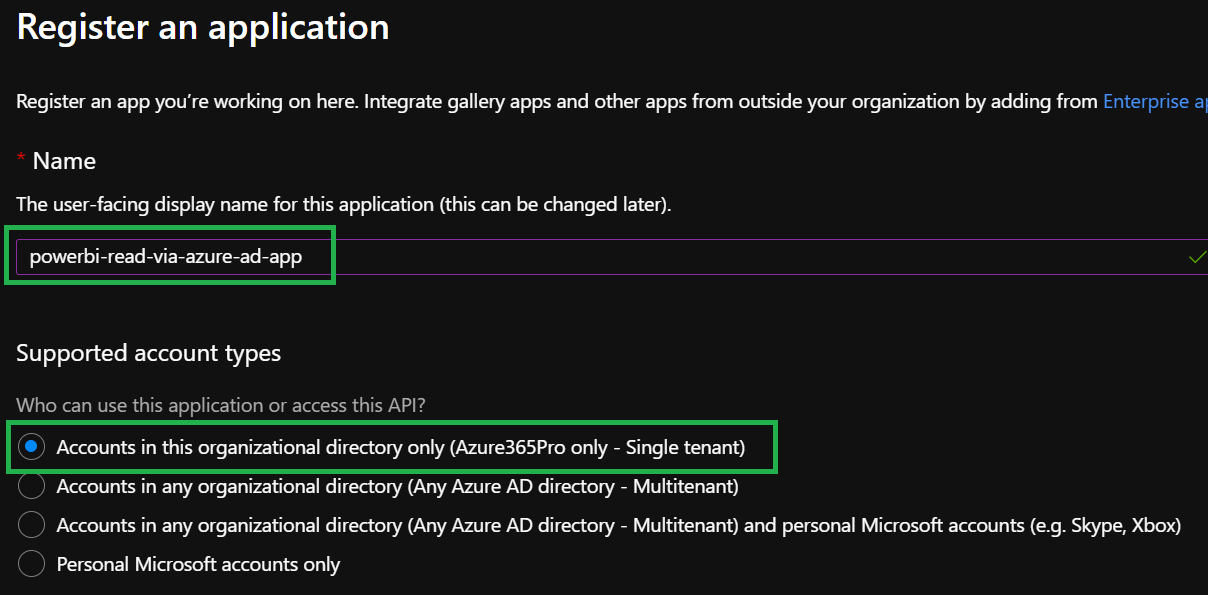
Let’s see how to implement it. Create an App registration to start with

Home – Azure Active Directory – Enterprise Applications
App registrations – Microsoft Azure

new registration – name – Accounts in this organizations directory only (most cases)

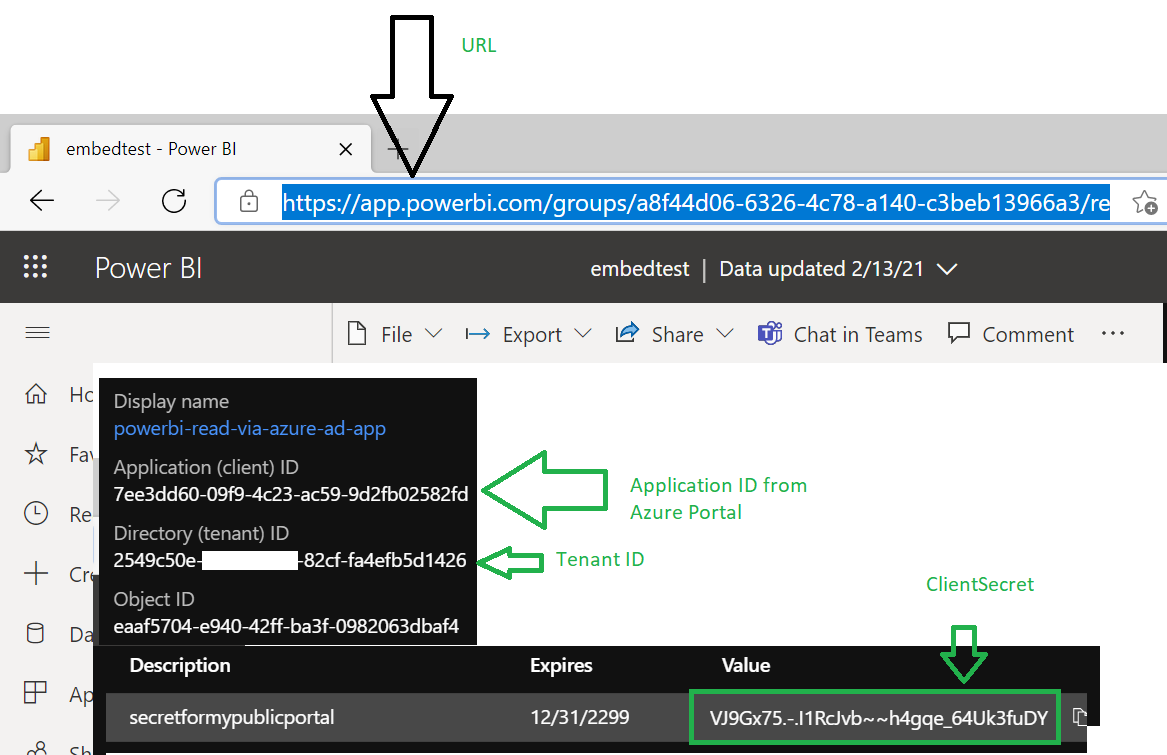
You will be using the tenant ID in later steps.

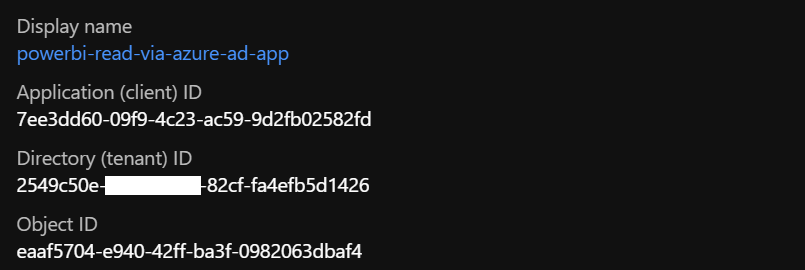
Copy the Client Secret you created – VJ9Gx75.-.I1RcJvb~~h4gqe_64Uk3fuDY

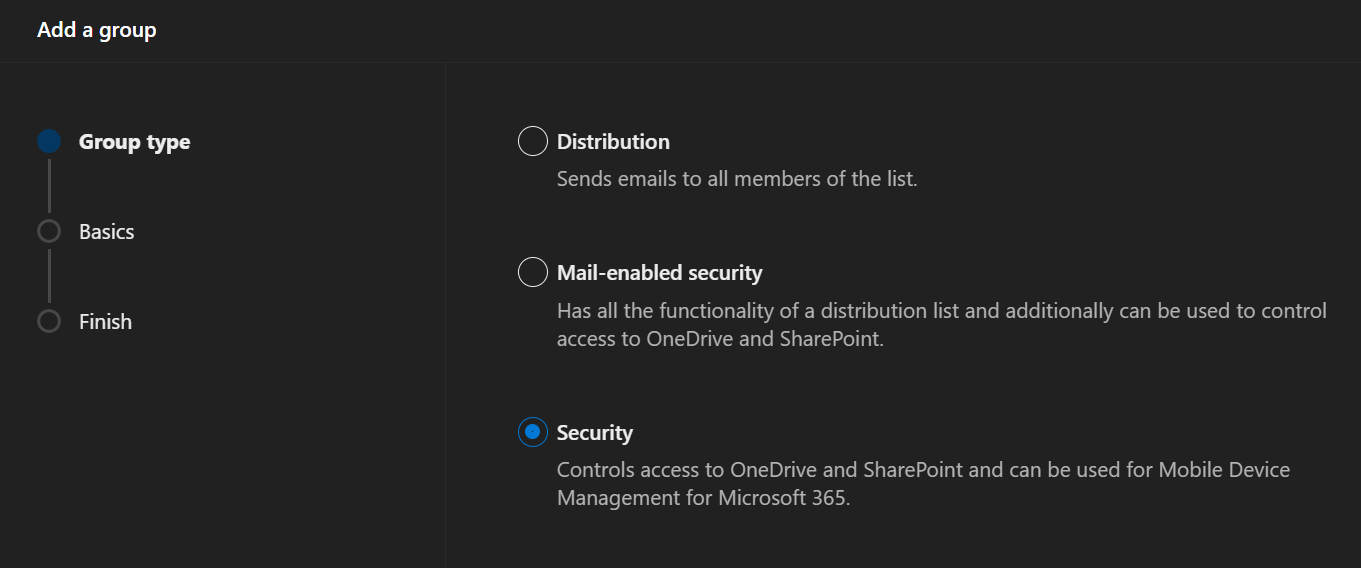
We are creating this security group to reduce the landscape of the access instead of allowing for the whole organization. we will allow only this azure ad app to access power BI.

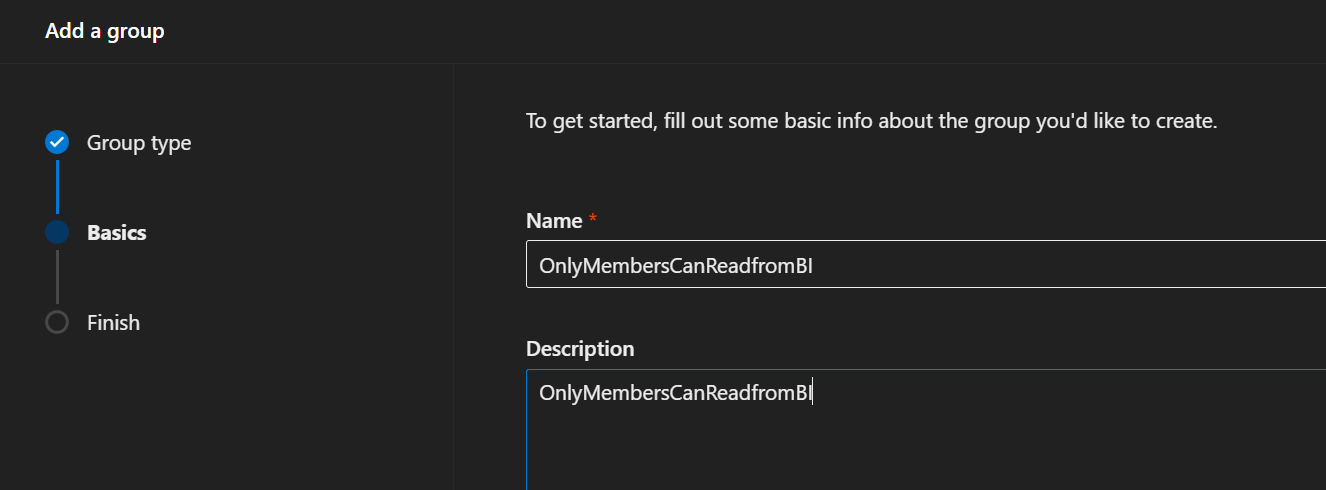
Admin Portal – Groups – Active Groups – Add a Group – Security Group

https://admin.microsoft.com/#/groups

Enter a friendly name.

We need to get the object ID of the security group we created

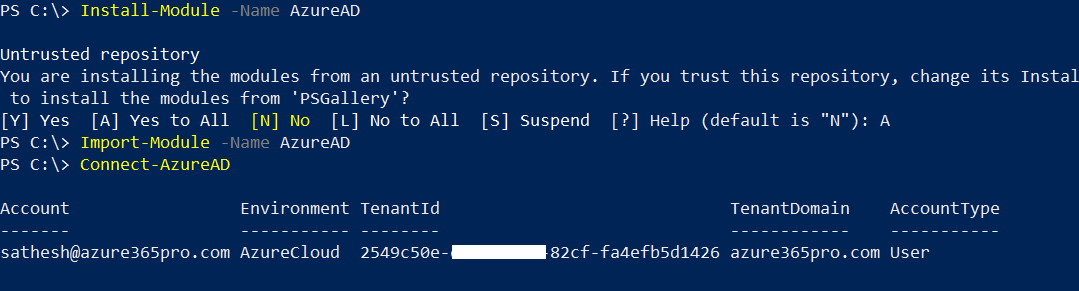
if you don’t have the azure ad module installed

Install-Module -Name AzureAD
Import-Module -Name AzureAD
Connect-AzureAD

Now copy the object id of the group

Get-AzureADGroup | Where-Object{$_.displayname -like "OnlyMembersCanReadfromBI"}

Get Security Group Object ID

Get-AzureADGroup | Where-Object{$_.displayname -like "OnlyMembersCanReadfromBI"}

Get Service Principal Object ID (Note Azure app object ID is different from service principal object ID – )

Get-AzureADServicePrincipal -SearchString "powerbi-read-via-azure-ad-app"

Now add service principal to the azure ad security group

Add-AzureADGroupMember -ObjectId 66a95eb3-c534-4fe9-b0d0-ee0b0414c07c -RefObjectId ff3895c2-23d0-43a5-a595-829a549bbbb9

Verify it got added

Get-AzureADGroupMember -ObjectId 66a95eb3-c534-4fe9-b0d0-ee0b0414c07c

Let’s Apply this group in power BI Tenant Settings and create a Power BI workspace and a report if you don’t have one.

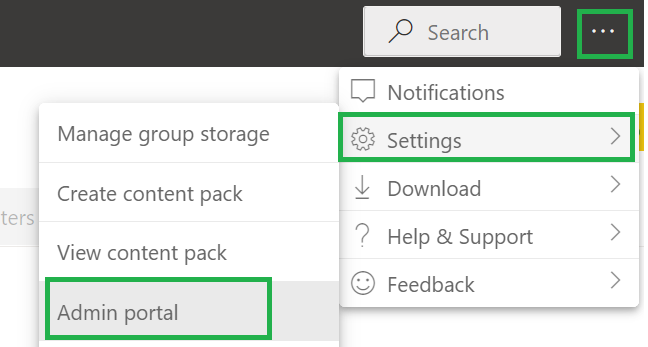
Get into power BI Admin Portal  Power BI

Settings – Admin Portal

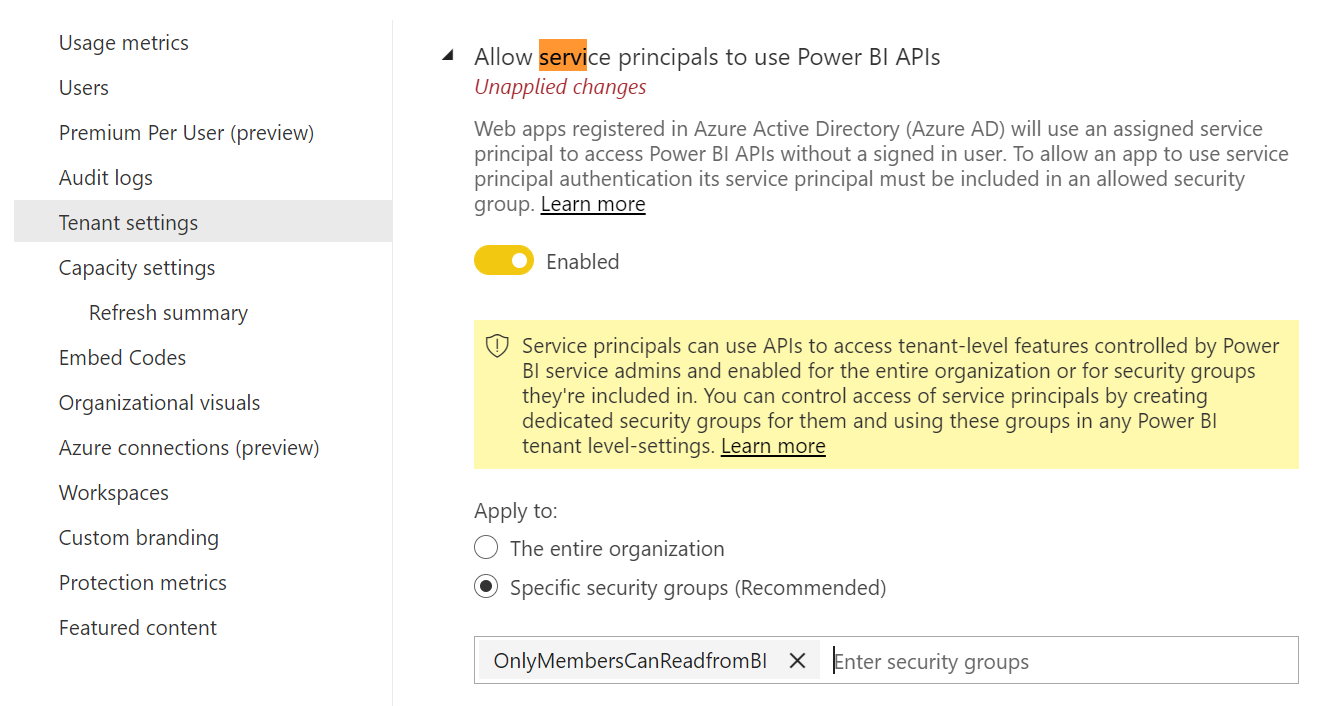
Allow service principals to use Power BI APIs
Enabled for a subset of the organization
Specific Security Groups – Enter the security group we created
Save

There is something in the preview. Which will allow only read-only. I tried putting the preview . doesn’t seem to work when I am writing this article. Allow service principals to use read-only Power BI admin APIs (Preview).

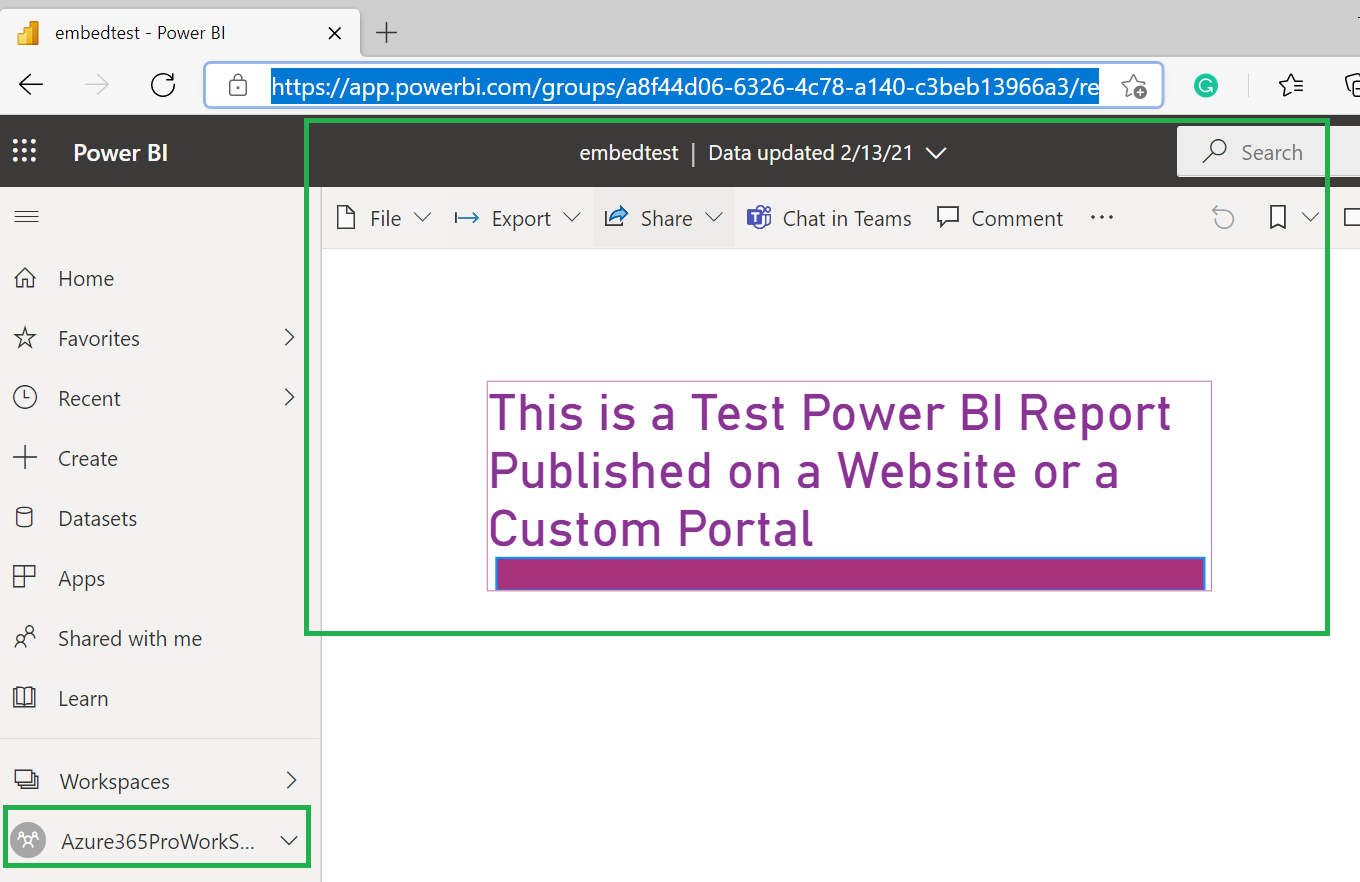
Now create a workspace if you don’t have one, create a test report if you don’t have one.

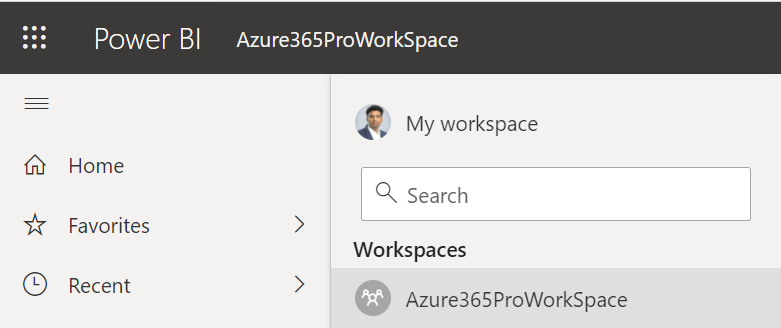
Please note: This will not work on “My workspace” you need to create a workspace. In my case, I created something called Azure365ProWorkSpace

Created a test report

Login-PowerBI in Powershell. if you don’t have the modules install them.

Install-Module -Name MicrosoftPowerBIMgmt

Import-Module MicrosoftPowerBIMgmt

Login-PowerBI

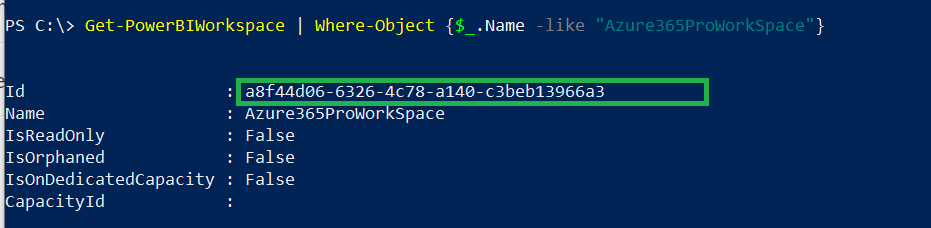
Now Copy the Workspace ID

Get-PowerBIWorkspace | Where-Object {$_.Name -like "Azure365ProWorkSpace"}

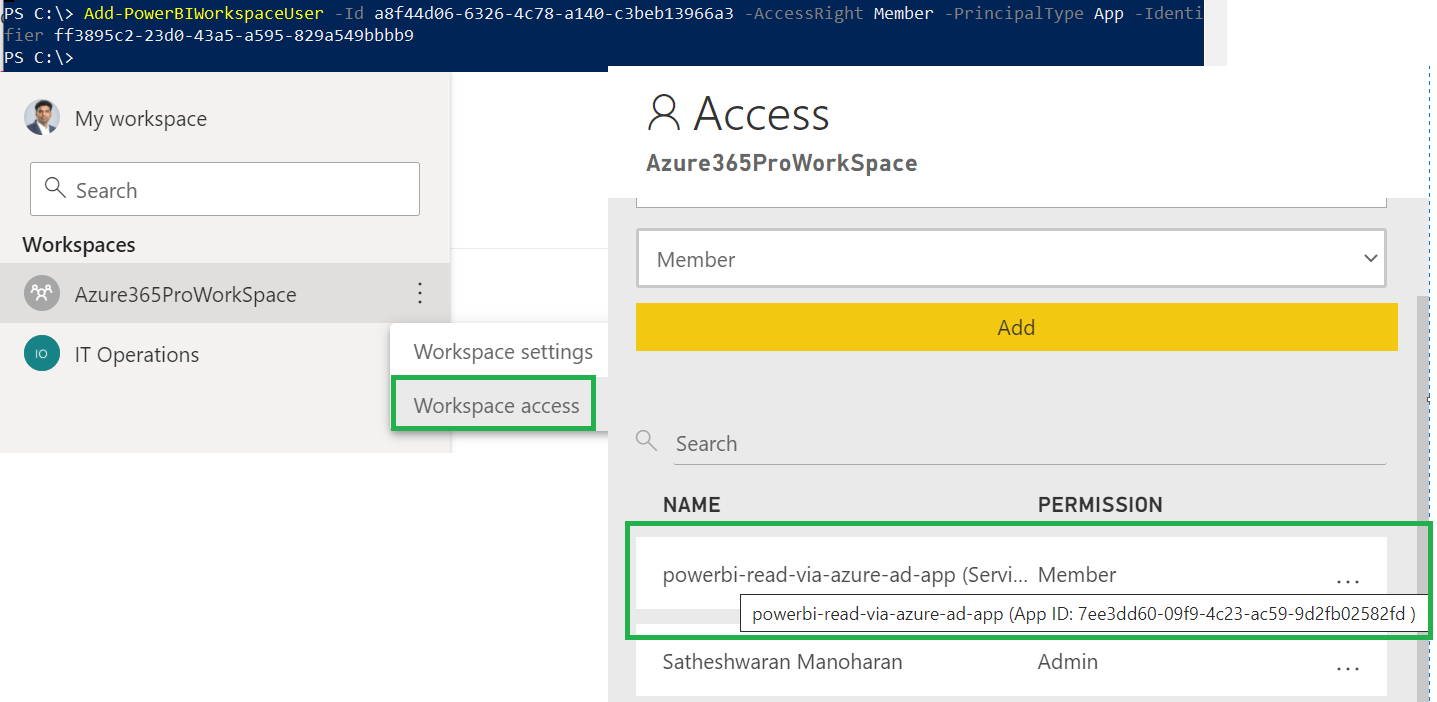
Using the ID and Service Principal Object ID retrieved earlier.

Add-PowerBIWorkspaceUser -Id a8f44d06-6326-4c78-a140-c3beb13966a3 -AccessRight Member -PrincipalType App -Identifier ff3895c2-23d0-43a5-a595-829a549bbbb9

you can toggle the access right to admin if you need it. but it works seamlessly as a member of custom portals. Depends on your requirement.


Now let’s see how to get an Embed token and make sure the application works. Always know that your azure ad token is different from the embed token. I tried several hours to get the embed token via the postman. I couldn’t achieve it. The only way easy way to get the embed token is via PowerShell for now. getting embed token via postman is quite complicated.

Now Collect these values for the script

$url (you need to customize the url to generate token – check script/screenshot ) / $applicationId / $clientsecret


$applicationId = "7ee3dd60-09f9-4c23-ac59-9d2fb02582fd";
$clientsecret = "VJ9Gx75.-.I1RcJvb~~h4gqe_64Uk3fuDY" | ConvertTo-SecureString -AsPlainText -Force
$credential = New-Object -TypeName System.Management.Automation.PSCredential -ArgumentList $applicationId, $clientsecret
Connect-PowerBIServiceAccount -ServicePrincipal -Credential $credential -TenantId "2549c50e-e478-40d8-82cf-fa4efb5d1426"

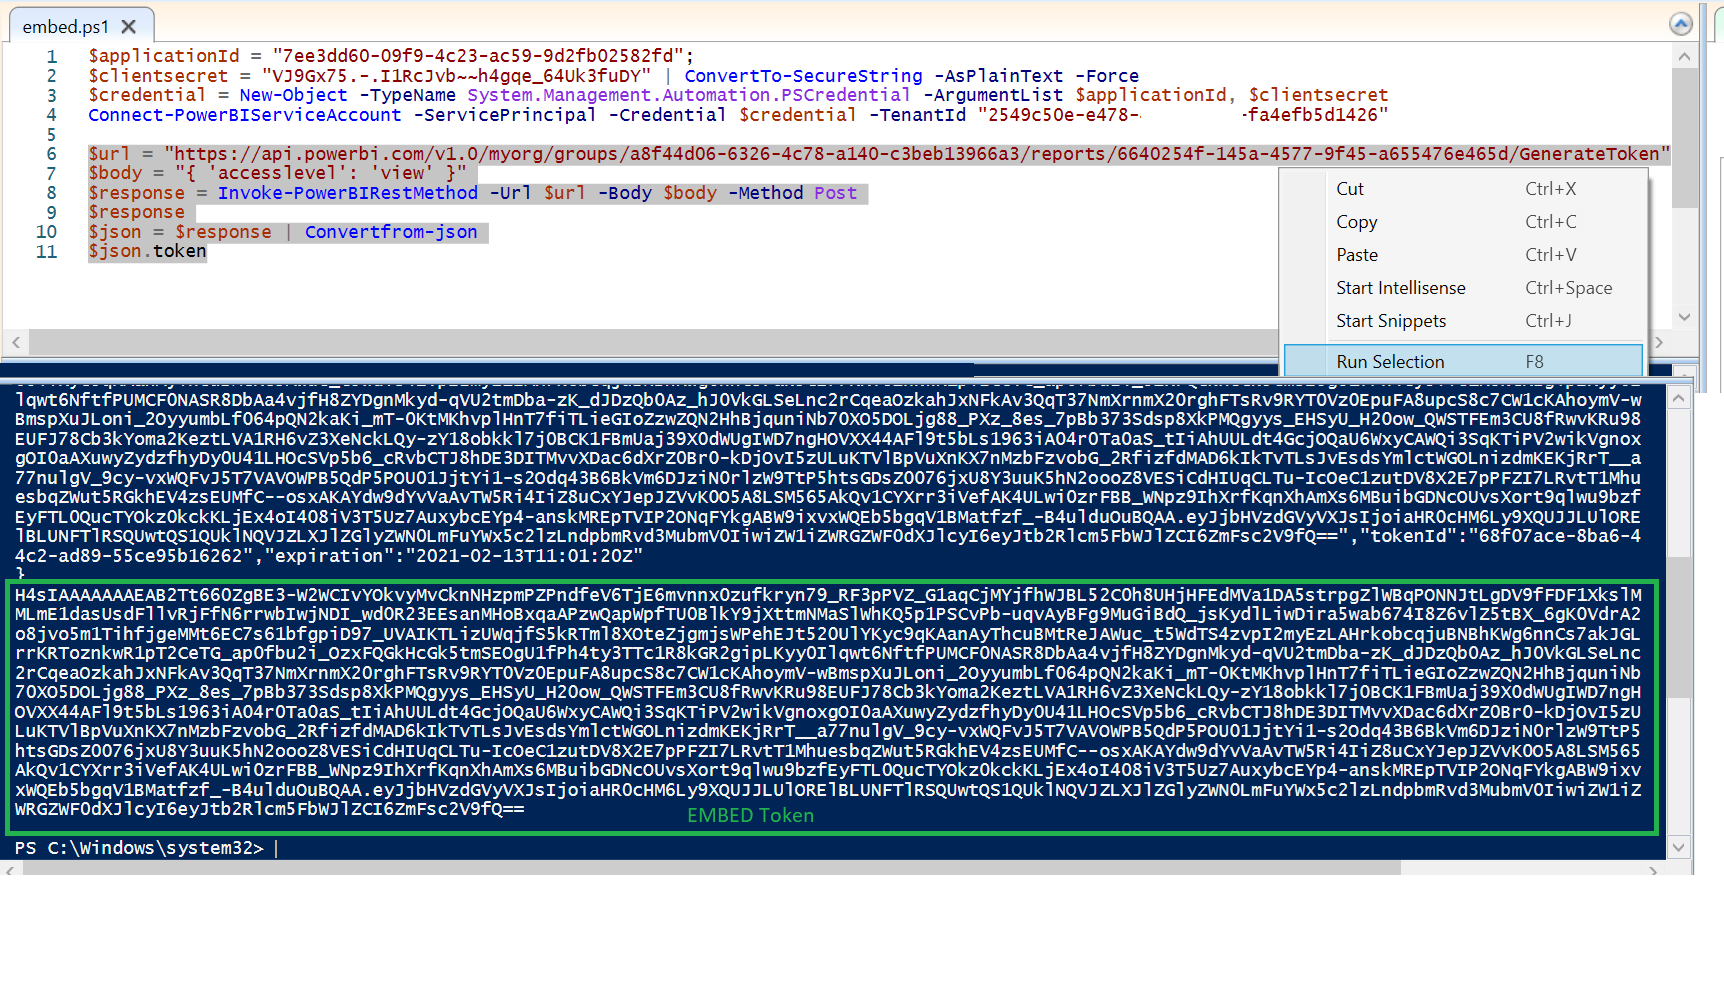
$url = "https://api.powerbi.com/v1.0/myorg/groups/a8f44d06-6326-4c78-a140-c3beb13966a3/reports/6640254f-145a-4577-9f45-a655476e465d/GenerateToken"
$body = "{ 'accesslevel': 'view' }"
$response = Invoke-PowerBIRestMethod -Url $url -Body $body -Method Post
$response
$json = $response | Convertfrom-json
$json.token

Now use Powershell ISE. Much easier to run selection.
Run Selection so that you can make sure you can connect to the Power BI service.

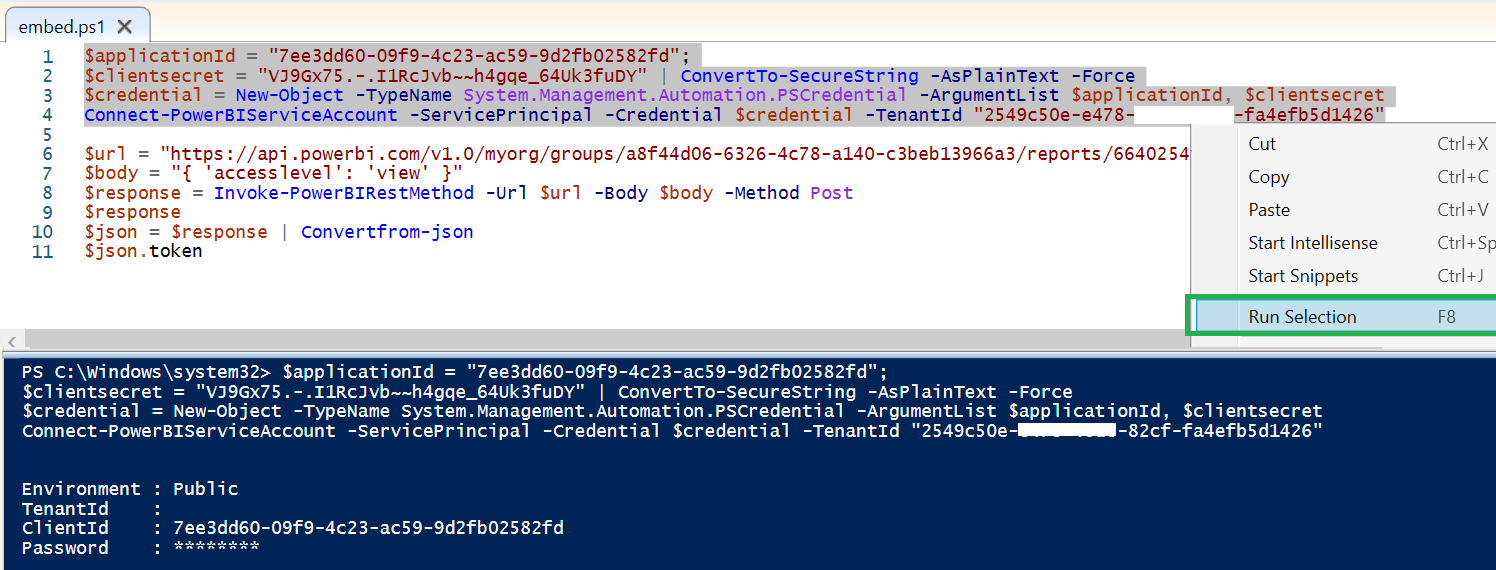
Once you see a successful login you can run the next part of the script. As you know you call always save to ps1 and run as much as you want. This is for better understanding.

When you copy the embed token from PowerShell you need to make it to the single line without spaces to work smoothly.
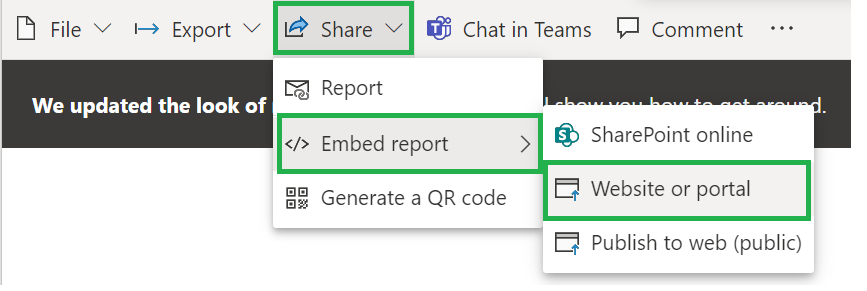
Get the Embed URL

Collect the report ID from the same embed URL

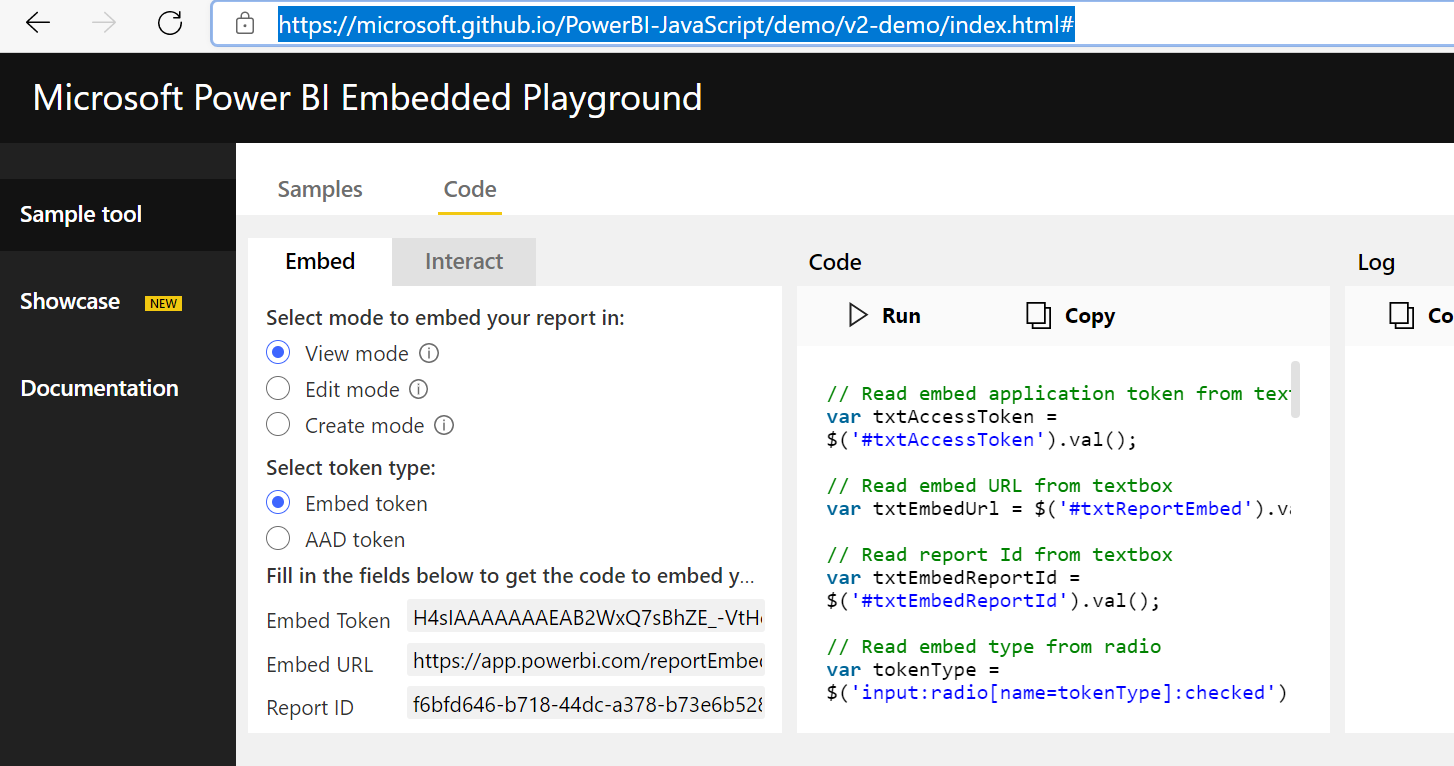
Embed Token – Sample

H4sIAAAAAAAEAC3Sx66DVgBF0X95UyIBpkfKgGI6pl7a7FJNxzQDUf49T1Hme3C0dP7-ceDVT7D4-fPHGI_WX9PH2ojPzsLisYnwMBkaucKCg53DNbhQ0miHMnlCWTkas-6MPQpQVTghvQZ2HY2MrTs8Z4ekLlr5Jz2KCi360mUsyy5Fh4A5L0hvtxEc_mNrVXRaJvRxb5OkbAvkh34ugerWELreIyW8uqGsOEV17Nao3FEfep5HbqDSJk2-5OQxofVJItMu-F4HZjEDZ9mK4iMujrrnGz7BjZQizHttxo6NCAVk0e5W2S6wp0u3zeDT8Sh4RMhAsfkaQDLlIBnL-Yk5CD9eiAbniHBjdS7FrVJ3uzWMgBm_LyehH18NujTdt_qyEdLYLiPfjp-tyYl6VwFG6022DV5BPQ3FVxQRL21pwyWOM_J5sg3XWTqZcuXzNLDejiTGYTYnkcMCjV6zDPQwfhwFxs_Ft2tLE5H0YxtF378MUZK-lwr4cA_xNO37LqzmgO60YnBkqe95LnmiinOFtRUArbVQFjczlDGtYWjdNchZ8HF35r33227O6tGm9OxelS1yxmruNKWmLBdhTfjG6Q7A0CyNidTCvAPtwrJLvzeIepUQWbGk3NEzvIvbslV7bJGtk06GkNAAJLUBRGC-Ei_ArCdJhOL1DPmthNa0BjQOQsk6PdzskHEp8zb-HZQmouLAhwSCy-Tzet577QBbBFzpqD-uN2B3D2ftLaWICFr_EehASERWpbu_fv74EZdr3iajvH6vy7dytB2CxOuxwXf2c5wsF09usgE6qX9ChtsXD2dDvy74LTq8dl7oozSNVF2V8jwn7Q3jmnjh4DWd8yPwmIbzzi1xaMhw9-bgJMM6obCG9xp5JuAkyOBMqNWYJAcmABRejMfRbOMqqYvDJf3zIeVnmJe97xjZt-9yeDl9Z-lLjBq1lLbhwLpU8Xma9dZKH5-2u5Vi0veLrlCH4VDMQ4d9ycJca1rZjbMjunkYt23cpoK_cEgHtSn7rHMwTyX7LV6gYrHBKHphvhQ0Ih3RXDeMYL6fhsAEXcpy5jiq0AzLNGoZLZW0ucJBe1NWOcDpUfTU8Kp23s826-l4Baif4Eu3vmrWf_3HfM3vctHCX-WOPVWoFqX_XFRqIRXSfQz_V35Tj3Dbl_I3KyXxDBzexfPEfTUwrd_PMhO04PDyMtwpkxAzBZh0_VXuKBa5rZ6rjUQJ0SSXr_HYVDCDoIgvbBr5MyoLDbjOToqvYzEQfbZ8vVCluqeuwUzUPFOVW54kSrmcprMDv9aKd7s4jG5GVJp6G6SEBehxbEwd62aRfq4K-00RgkoAMdsL_cRV-Dj1GhkWdbpFvKXvNwUbQa_54JhsqKfHQvcnOFpRuwj7CBCrUlIhcIDxzdDmWun70xXZCWtE94Iz2W2bBzkTToNQs4MQ-1yKekT6mbiEv2fj7W1V1TfEJNvDYcvzx9yhMCATTO0z-iT7ykeIP3zbcp8PbAeS5BTk6vU1arq_zP_8C1v0jcWuBQAA.eyJjbHVzdGVyVXJsIjoiaHR0cHM6Ly9XQUJJLUlORElBLUNFTlRSQUwtQS1QUklNQVJZLXJlZGlyZWN0LmFuYWx5c2lzLndpbmRvd3MubmV0IiwiZW1iZWRGZWF0dXJlcyI6eyJtb2Rlcm5FbWJlZCI6ZmFsc2V9fQ==

Embed URL – Sample

https://app.powerbi.com/reportEmbed?reportId=f6bfd646-b718-44dc-a378-b73e6b528204&groupId=be8908da-da25-452e-b220-163f52476cdd&config=eyJjbHVzdGVyVXJsIjoiaHR0cHM6Ly9XQUJJLVVTLU5PUlRILUNFTlRSQUwtcmVkaXJlY3QuYW5hbHlzaXMud2luZG93cy5uZXQiLCJlbWJlZEZlYXR1cmVzIjp7Im1vZGVybkVtYmVkIjp0cnVlfX0%3d

Report ID – Sample

6640254f-145a-4577-9f45-a655476e465d


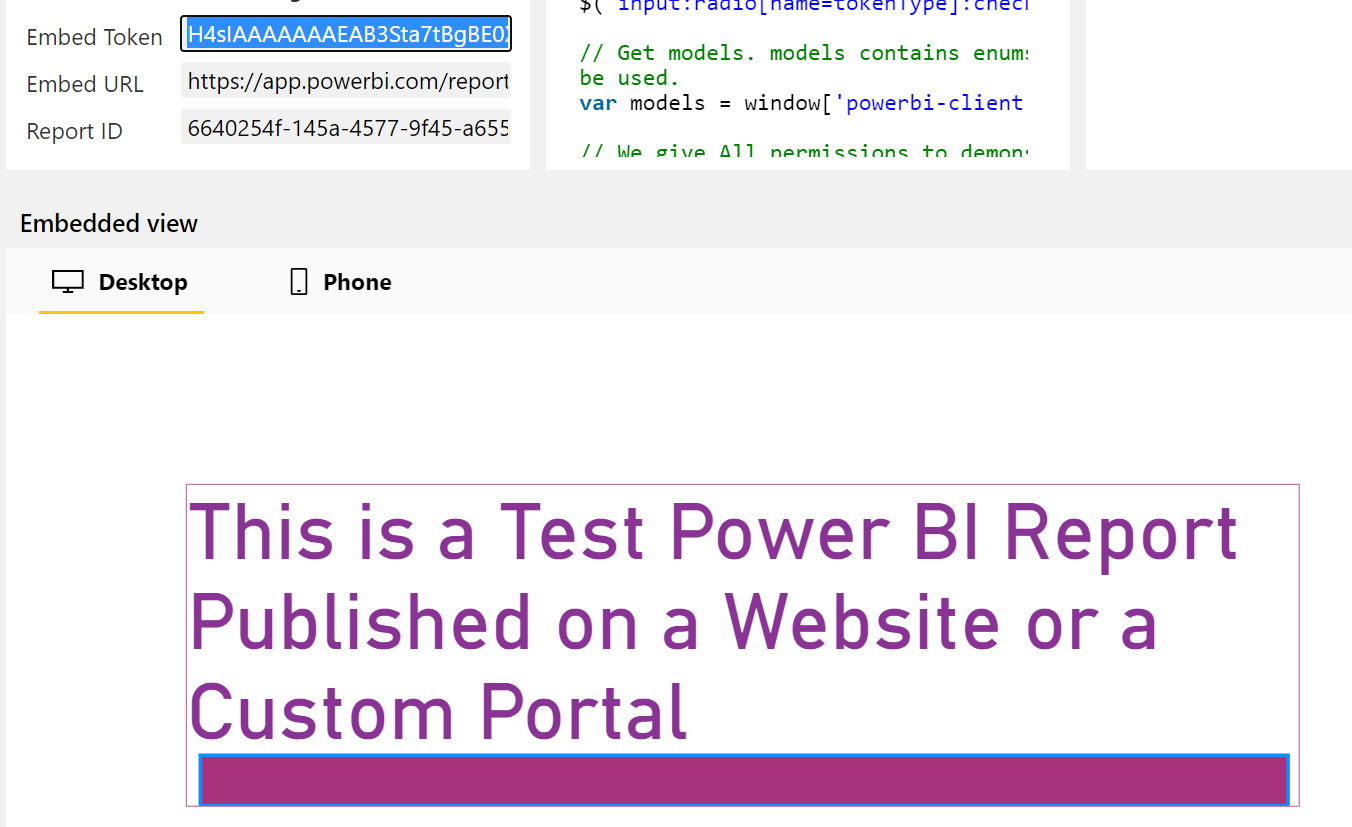
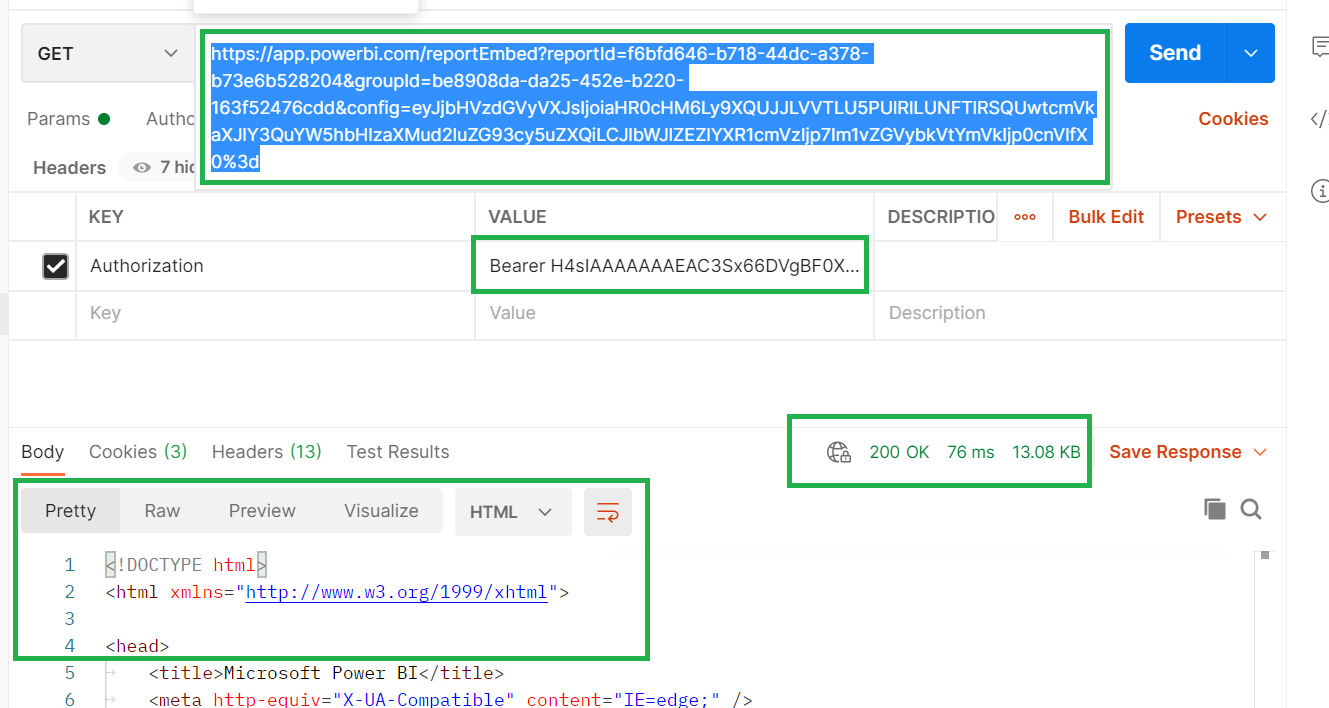
You can verify the same using postman.
Get embed URL
Authorization Bearer Embedtoken

Export CSV using Employee ID in Active Directory

When you have only employee ID as input in CSV. lets see how to export the appropriate Active directory accounts to a csv file with employeeID,displayName,givenName,sn,sAMAccountName, mail, Department. You can always modify the scripts to get desired output.


Import-csv c:\employeeids.csv | ForEach-Object {
$ID = $_.employeeID
get-aduser -filter {employeeid -eq $ID} -Properties * | select-object employeeID,displayName,givenName,sn,sAMAccountName, mail, Department | Export-csv empo.csv -Append
}

Save as ps1 and update the CSV file location.

Removing Unwanted or Over Provisioned Veeam Licenses

Removing unwanted Veeam License using Veeam Powershell module.

Remove specific users. make sure it works properly before running the script. Please note that as per veeam if the user has a content allocated it will not get removed. test more before running it.

Make sure you have complete knowledge of the subject before using it. In our case user assigned licensed to all without having enough licenses so we had to run this to remove over-provisioned licenses.

Removing Single user –


$b = Get-VBOLicensedUser -Organization $org -Name username@localhost

Remove-VBOLicensedUser -User $b

Removing all user licenses –


$org = Get-VBOOrganization

$all = Get-VBOLicensedUser -Organization $org

foreach ($a in $all)
{
$b = Get-VBOLicensedUser -Organization $org -Name $a.username
Remove-VBOLicensedUser -User $b
}

× How can I help you?