App Protection Policies in Microsoft 365 are a part of the Microsoft Endpoint Manager suite designed to enhance security for mobile apps and protect organizational data on devices enrolled in the system. These policies provide a set of rules and restrictions that can be enforced on apps to safeguard corporate data while maintaining user privacy.
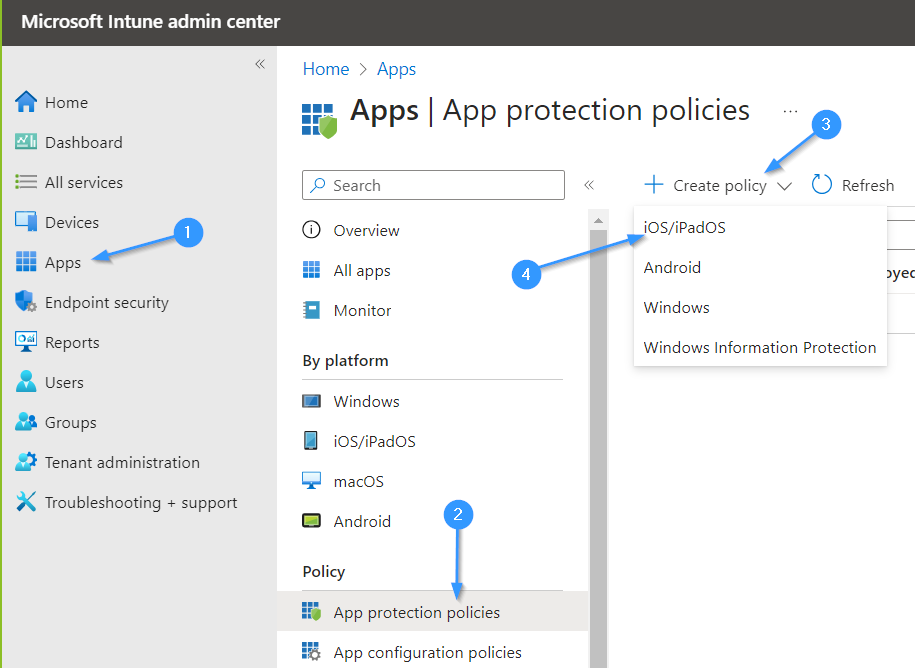
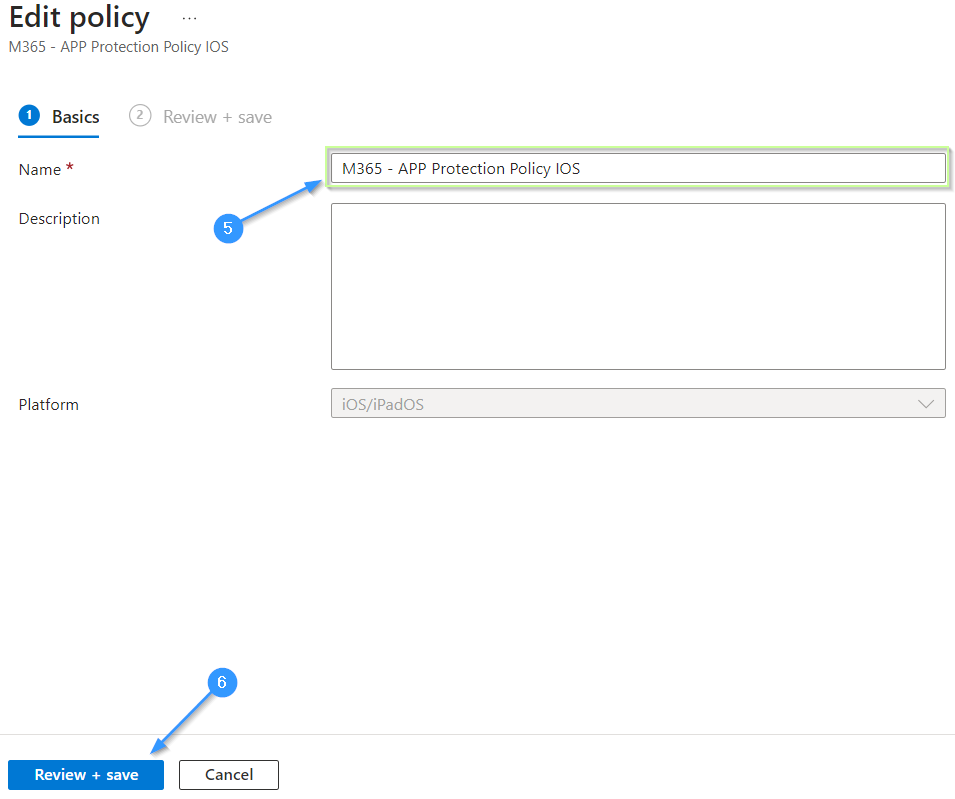
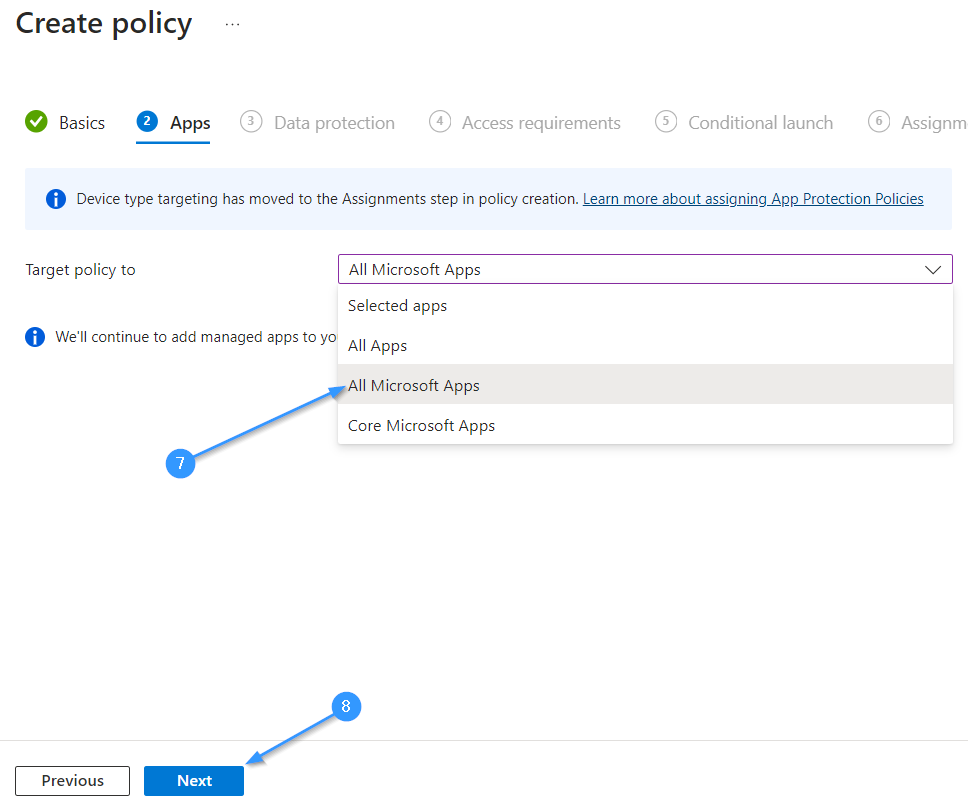
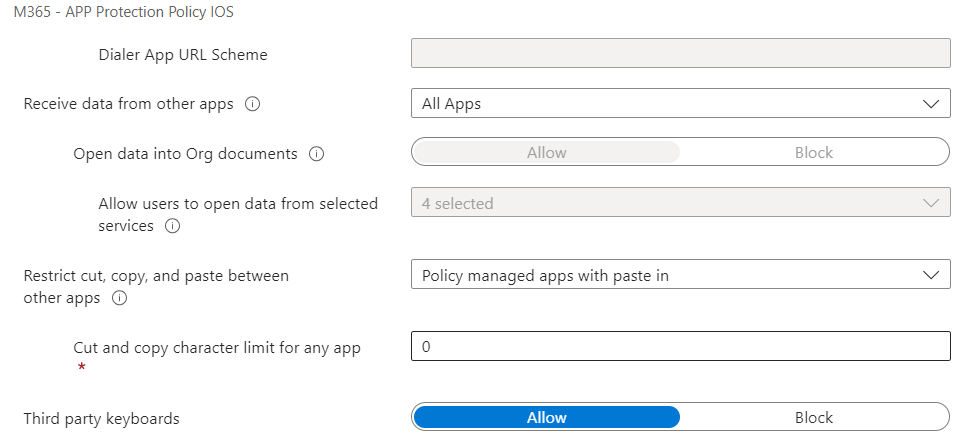
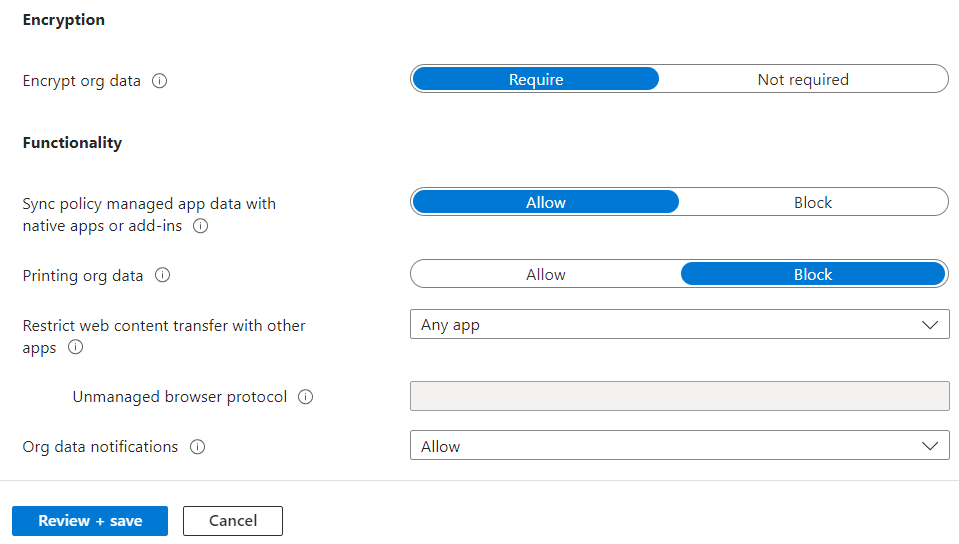
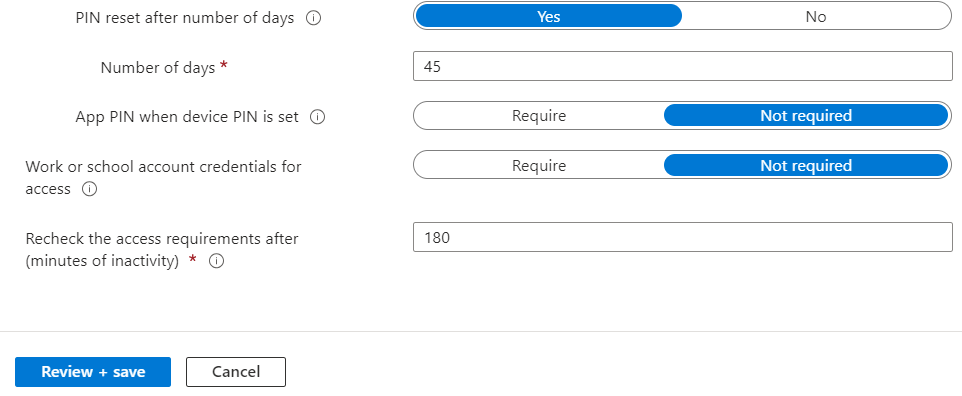
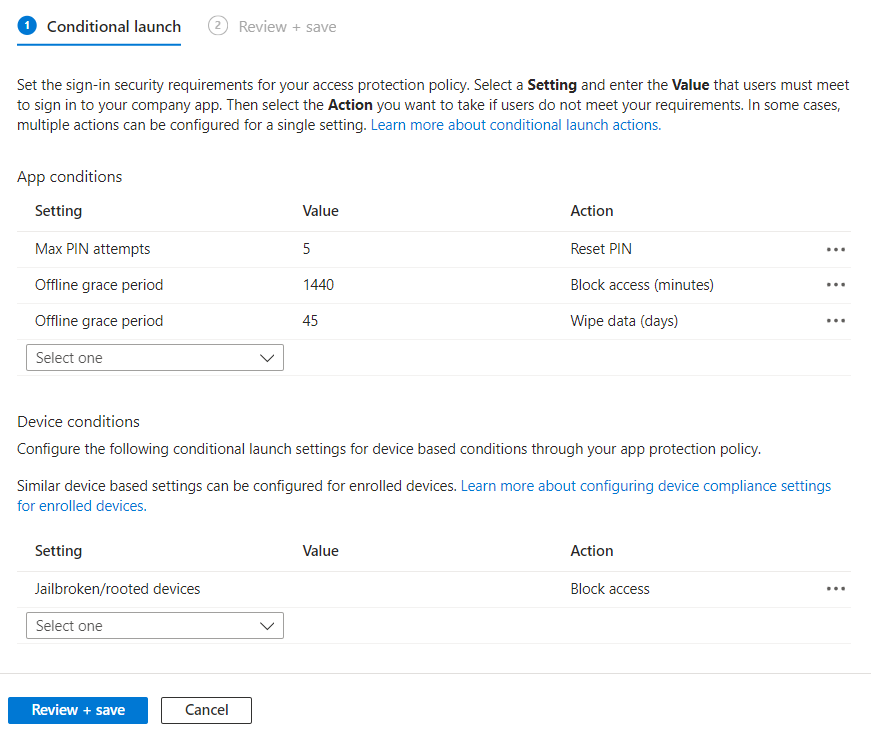
App Protection Policy for iOS/iPadOS devices.
..
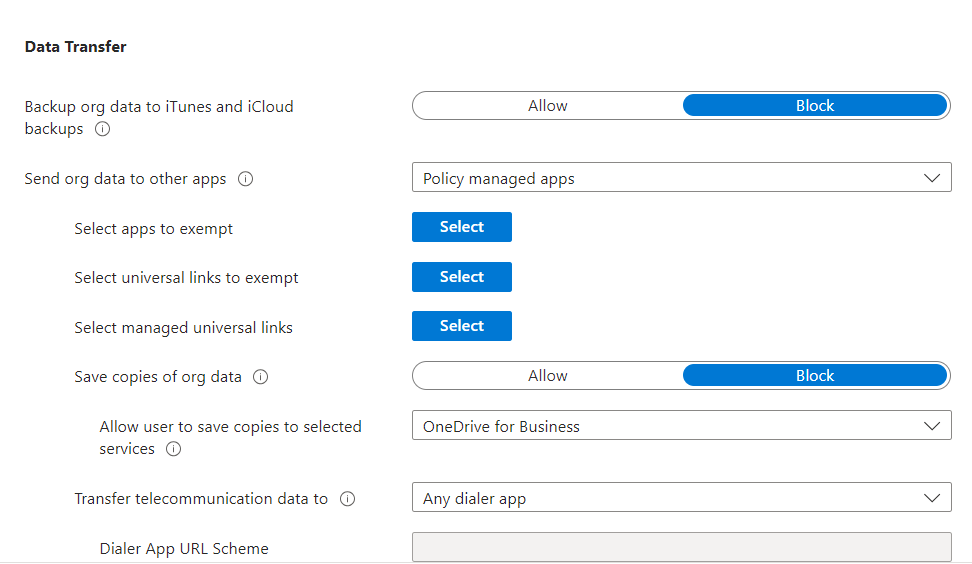
Data Protection
Access Requirements
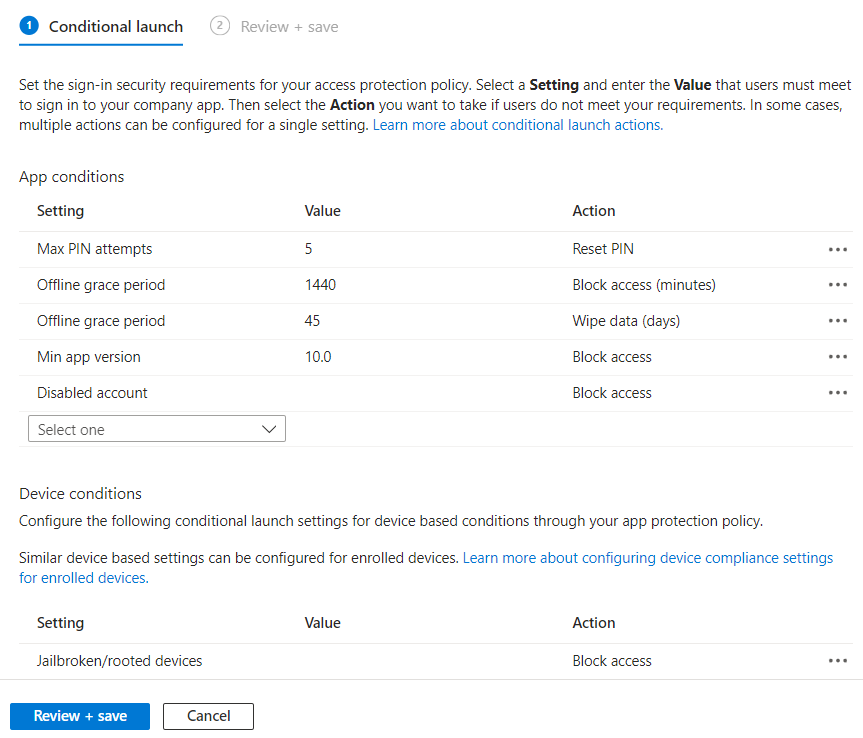
Conditional Launch
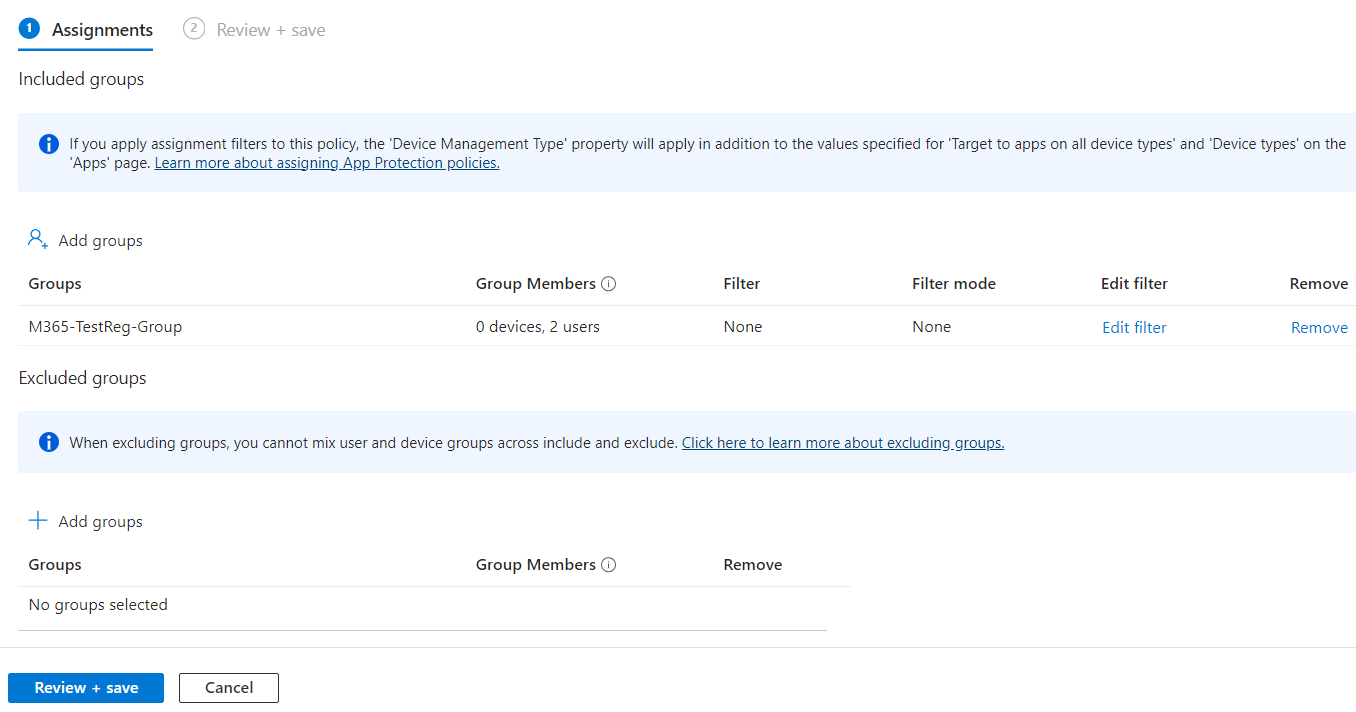
Assignments
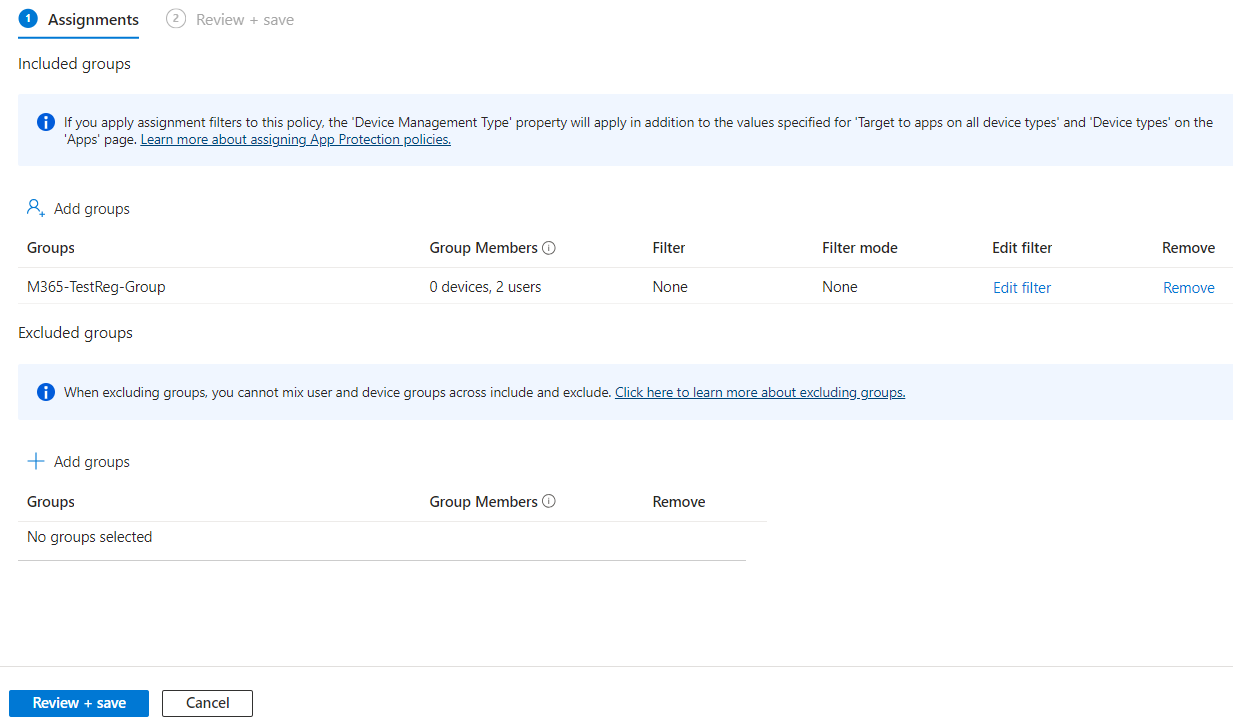
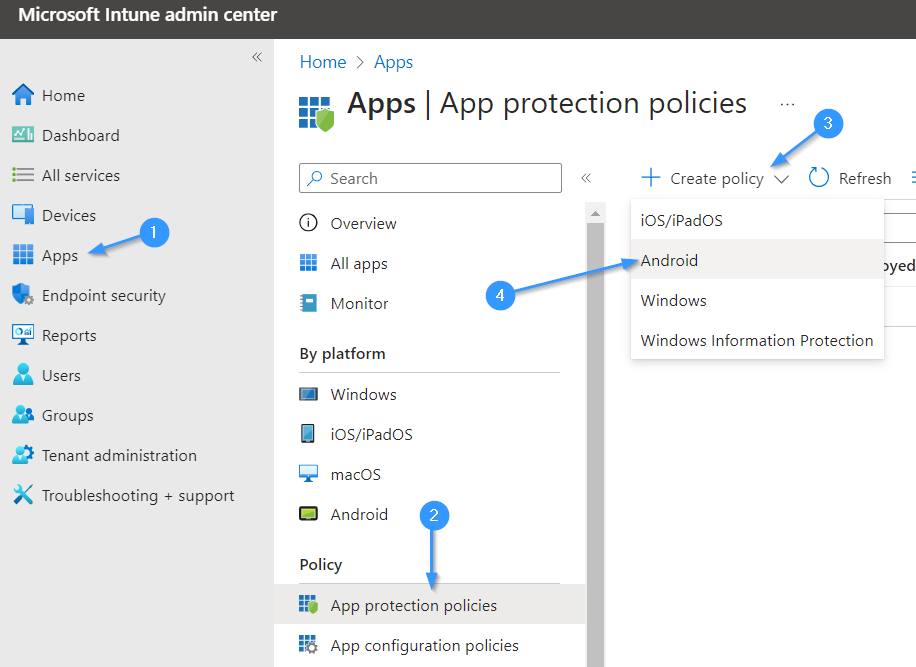
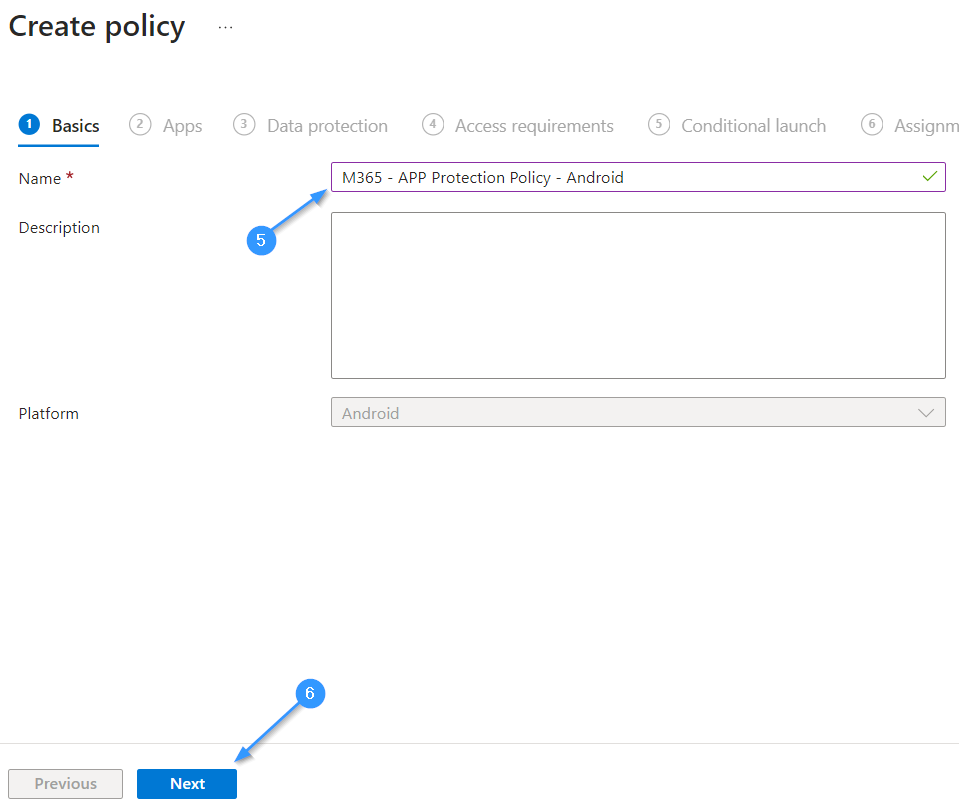
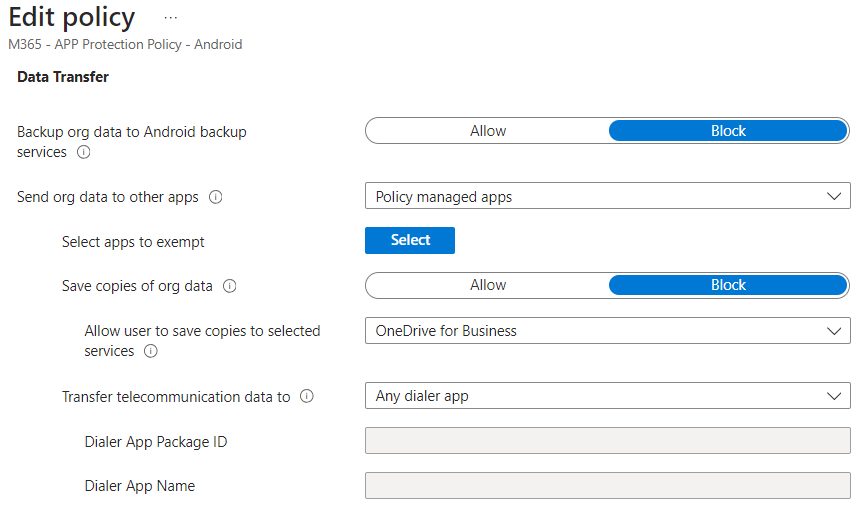
App Protection Policy For Android Devices
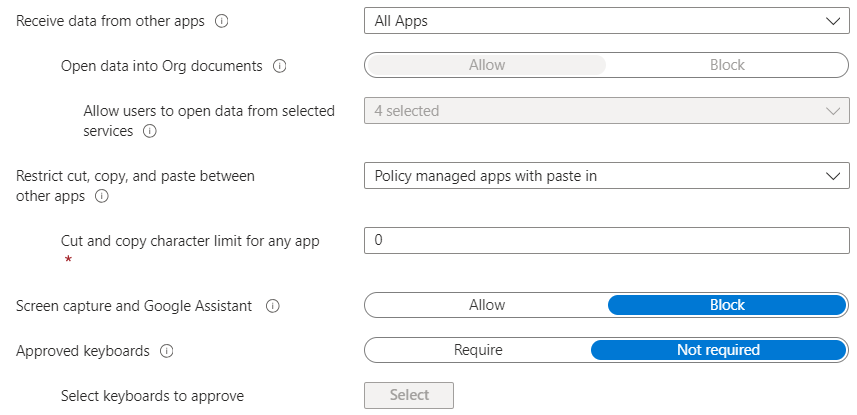
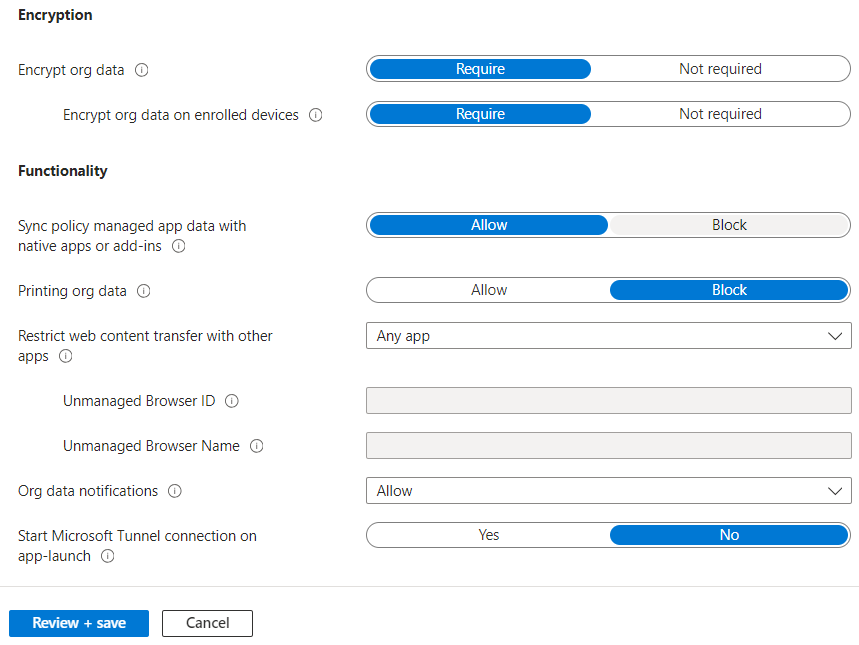
Data Protection
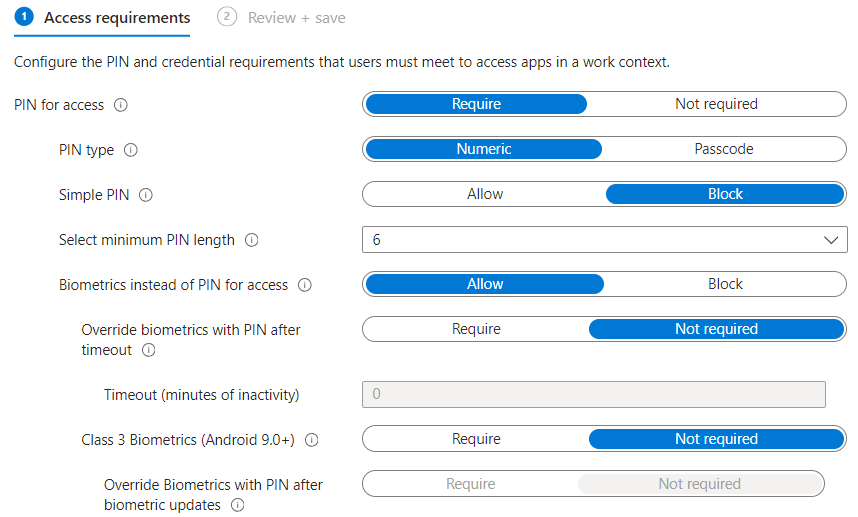
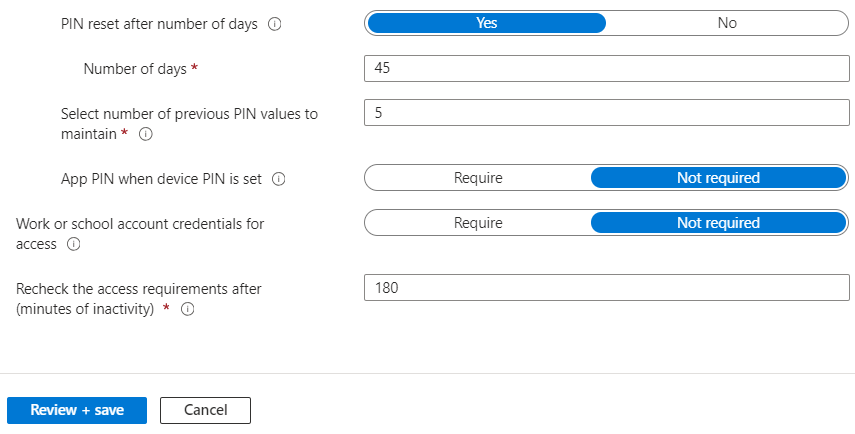
Access Requirements
Conditional Launch
Assignments
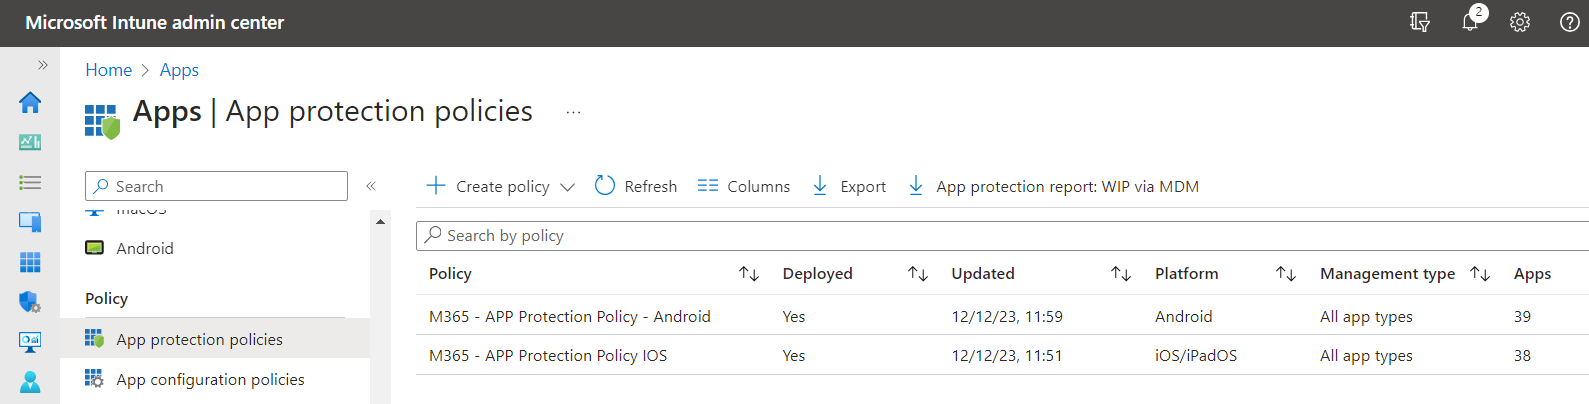
App Protection for both iOS/iPadOS and Android has been created.
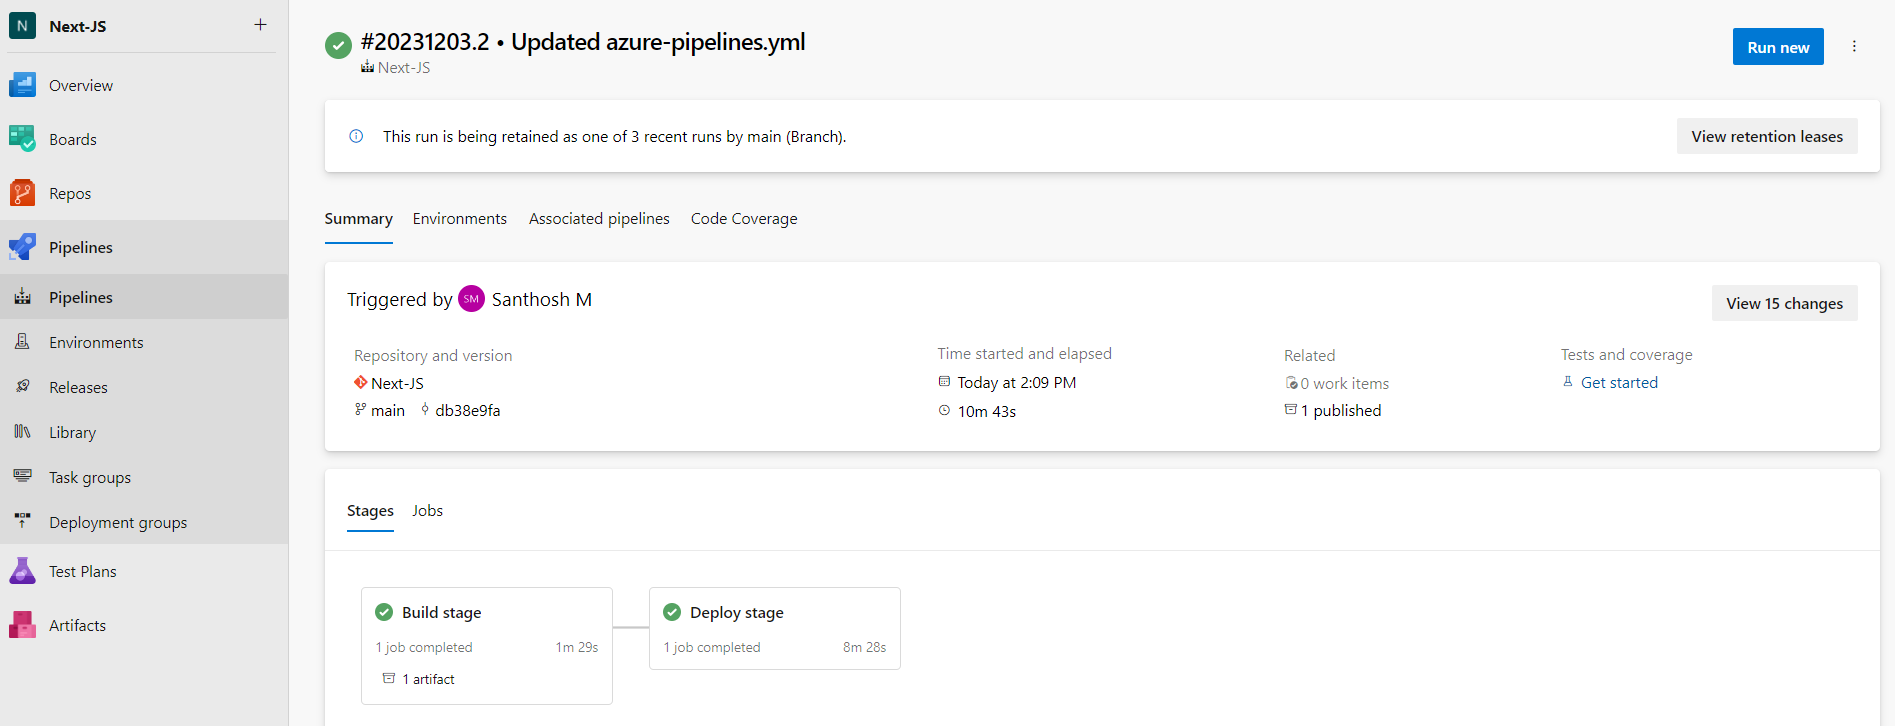
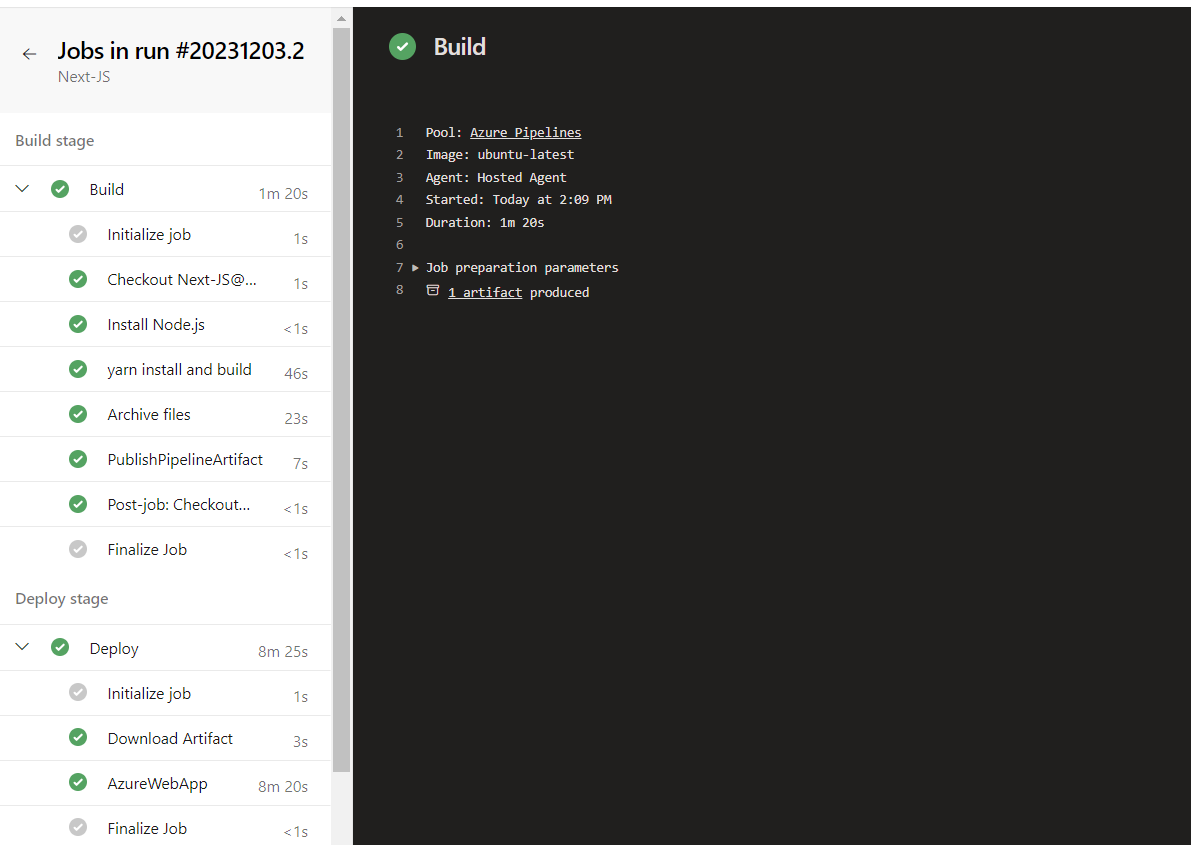
Deploying a Next.js app on Azure App Service using Azure DevOps Pipelines can be done directly within the YAML file itself, incorporating the deployment steps into the build pipeline. By defining deployment configurations in the YAML file, you integrate the deployment process seamlessly into the overall build process without a separate release pipeline.
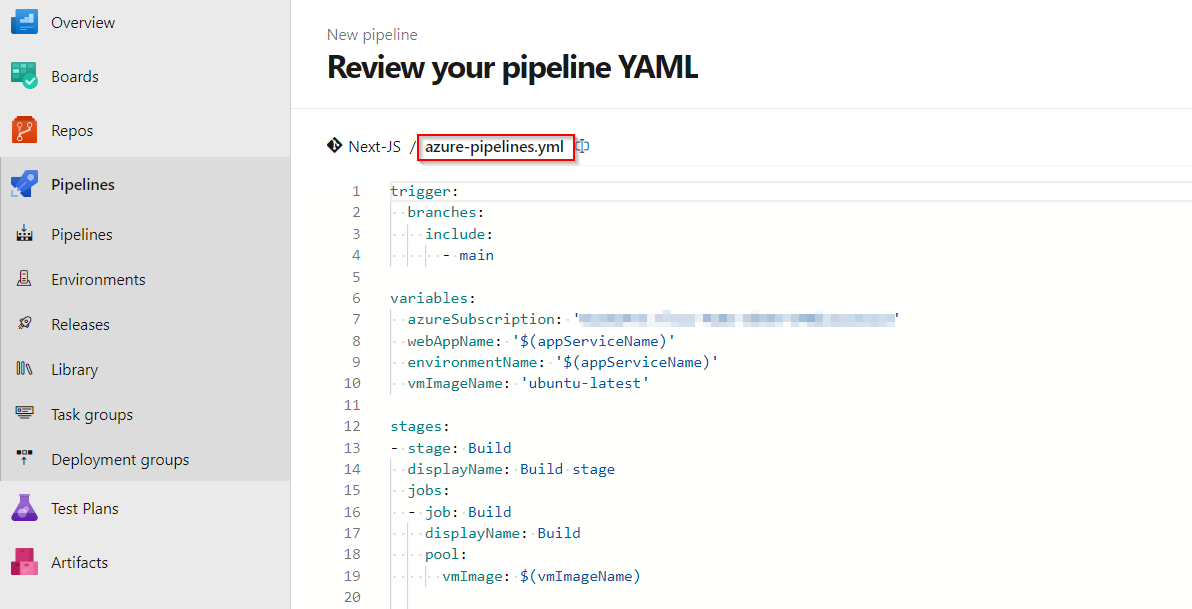
YAML Configuration: Within the YAML file, define different stages or jobs for building and deploying your Next.js app. This can include steps such as installing dependencies, building the app, and packaging it for deployment.
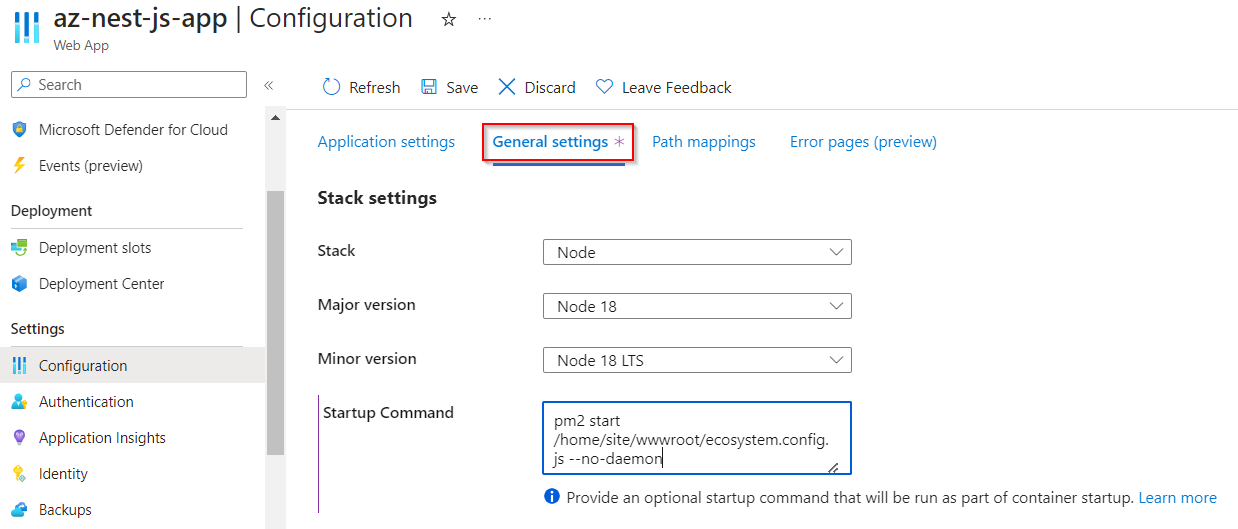
Deployment Stage: Specify a deployment stage within the YAML file. This stage includes steps tailored to deploy your Next.js app to Azure App Service. You’ll define tasks like configuring the Azure subscription, specifying the app type (webAppLinux in this case), providing the package path, defining the runtime stack, and more.
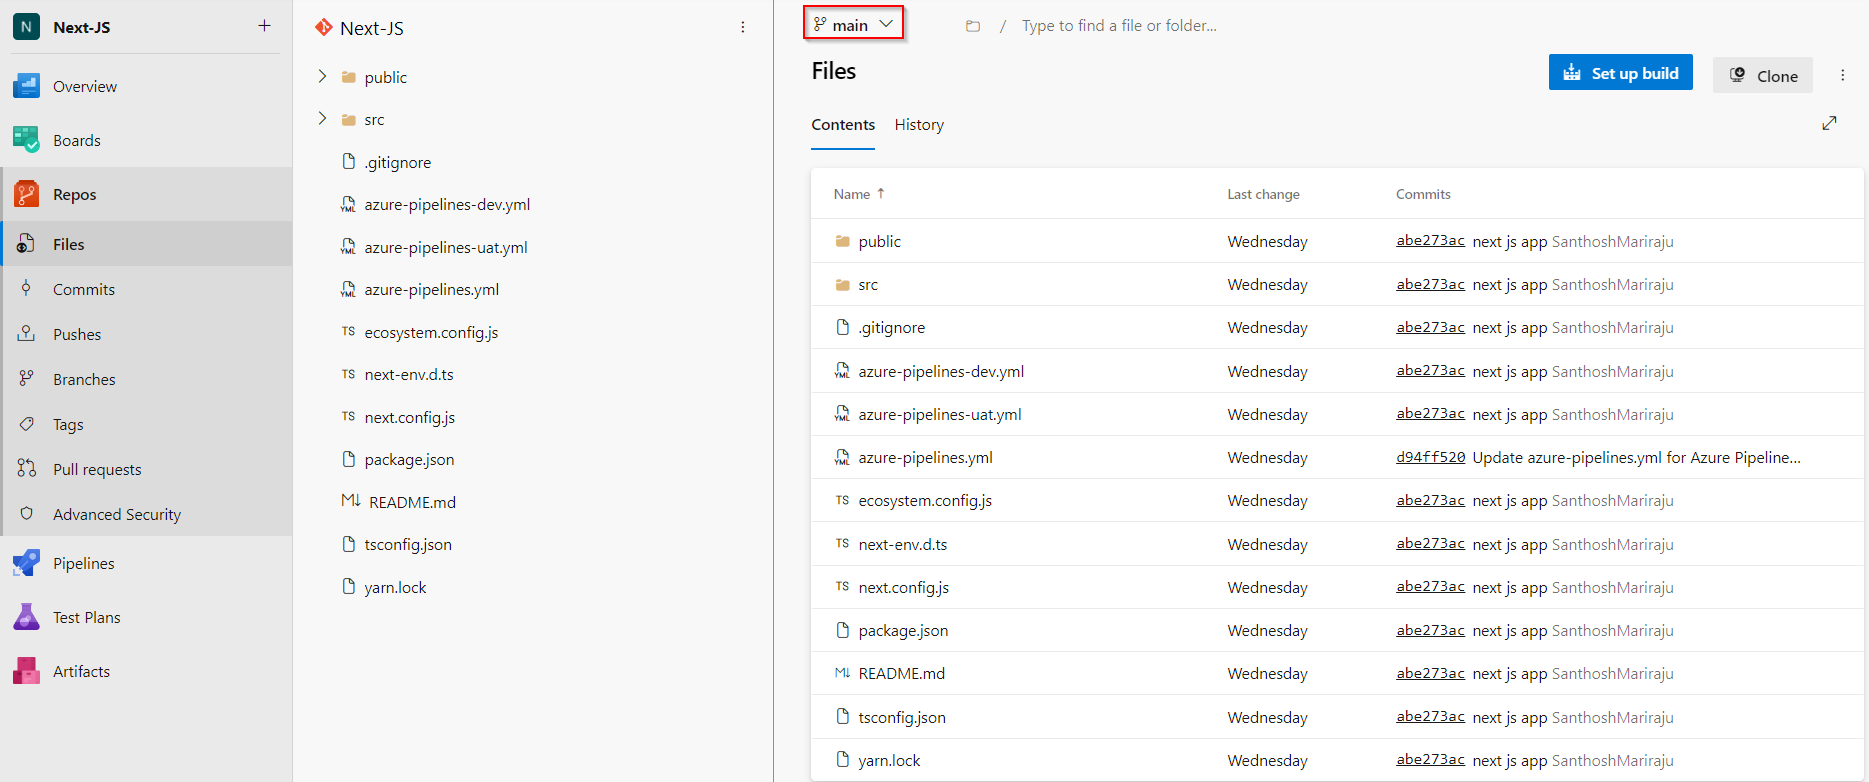
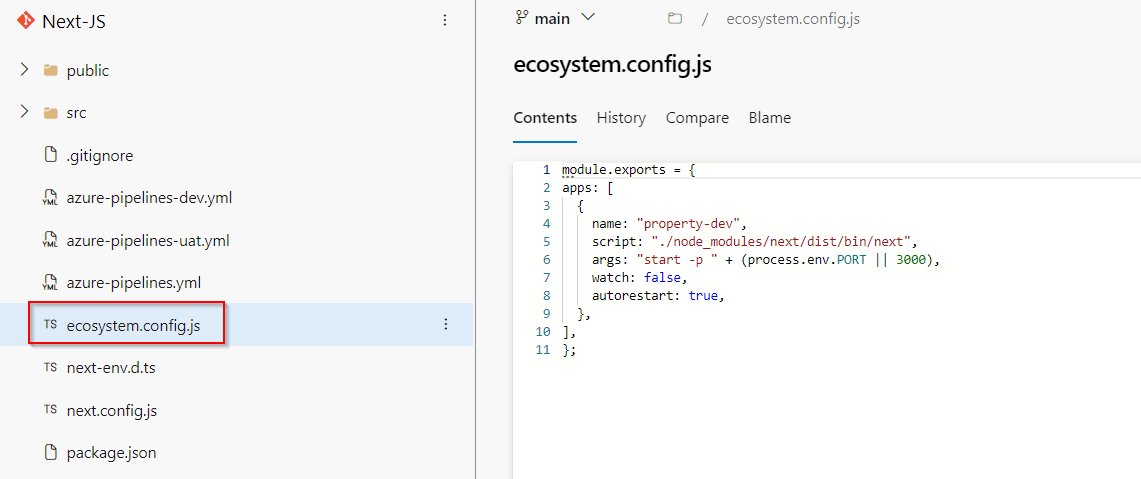
Step 1 : Create a new project in Azure Devops and add the respective Next js Codes to the repository accordingly.
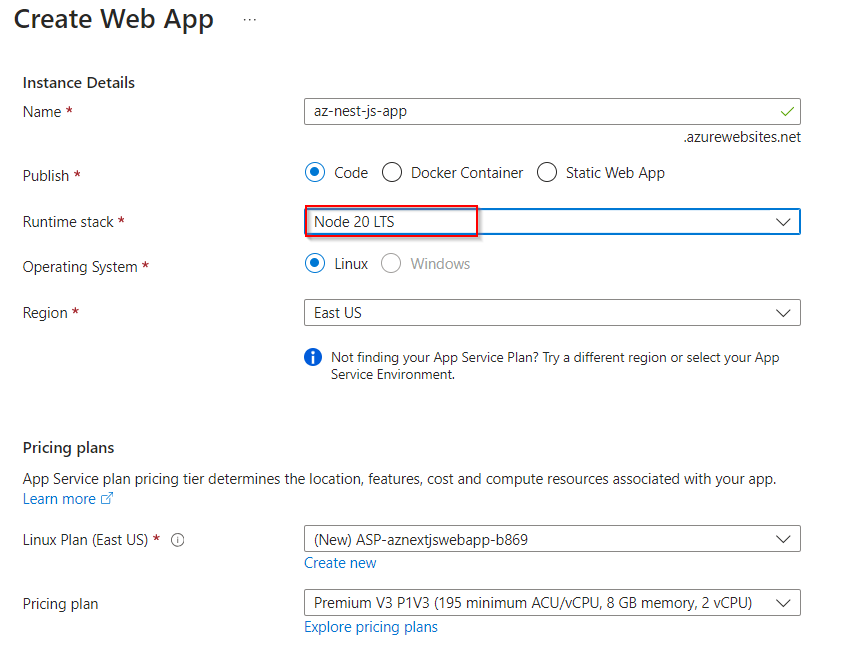
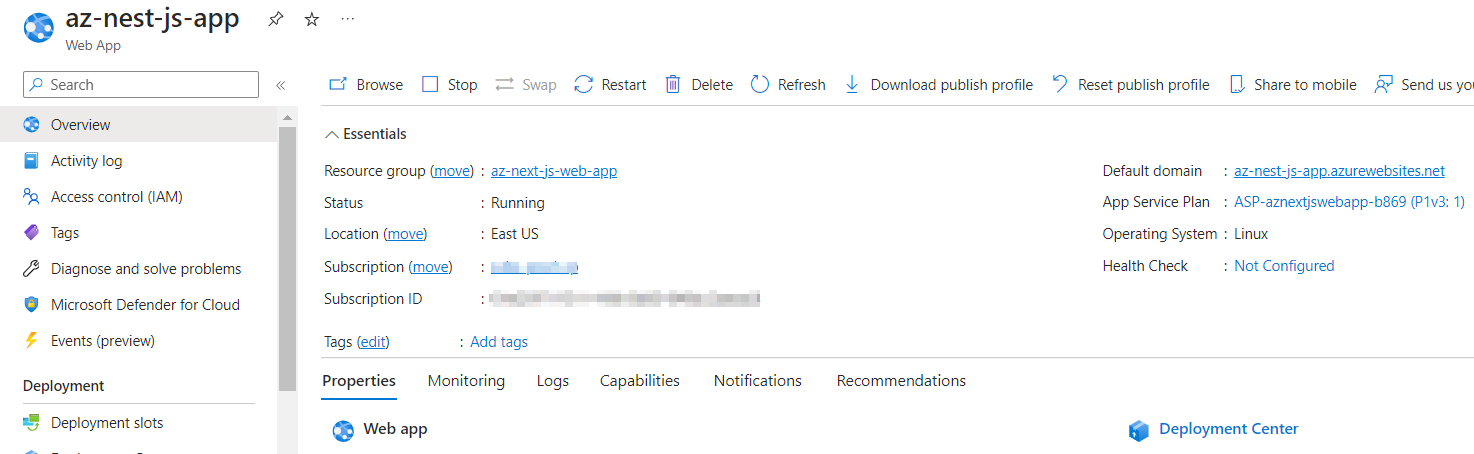
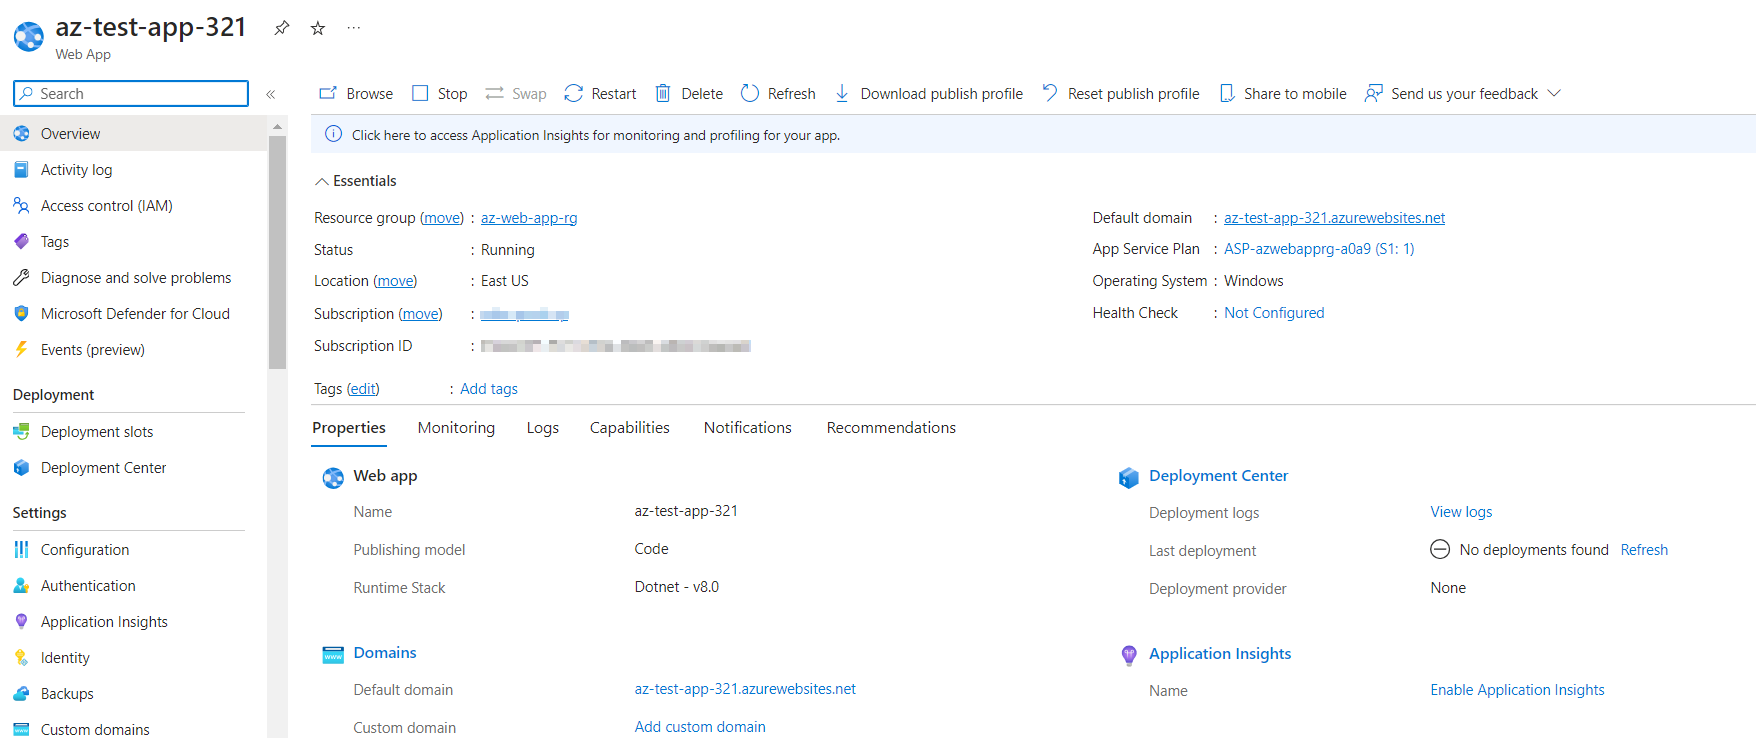
Step 2 : The Next js application is ready in our repository in main branch. Now lets create a Azure App Service for the Next js application to be deployed.
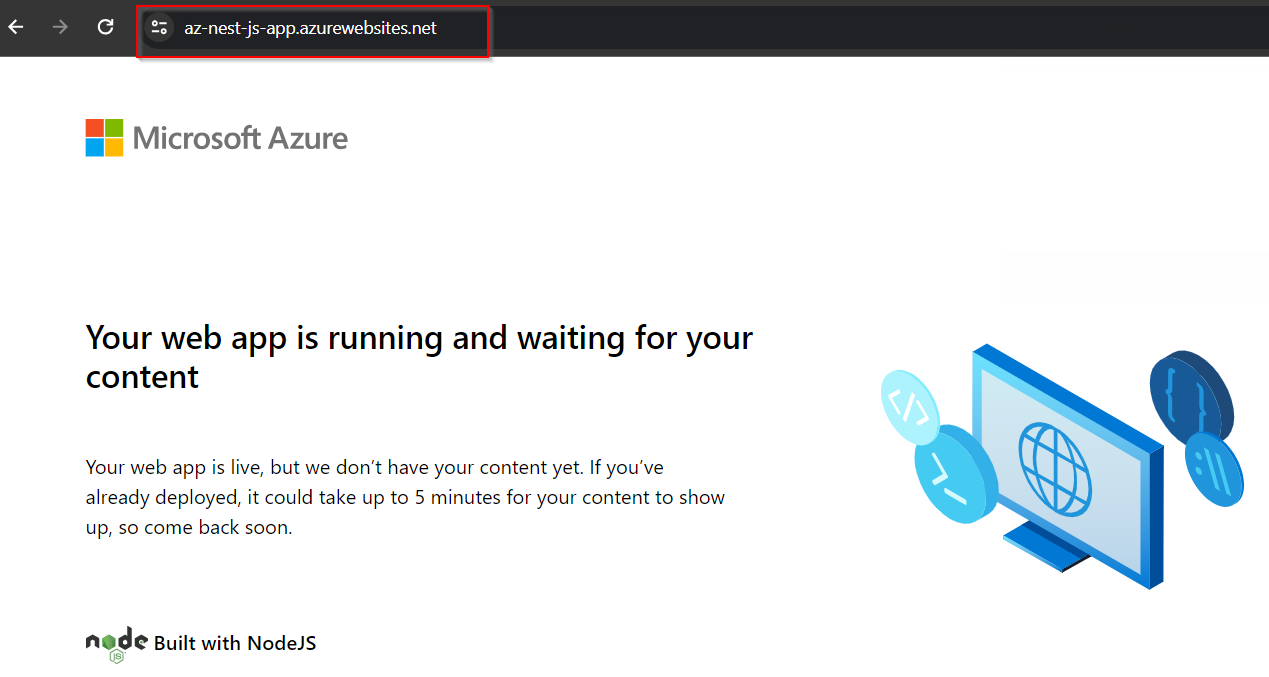
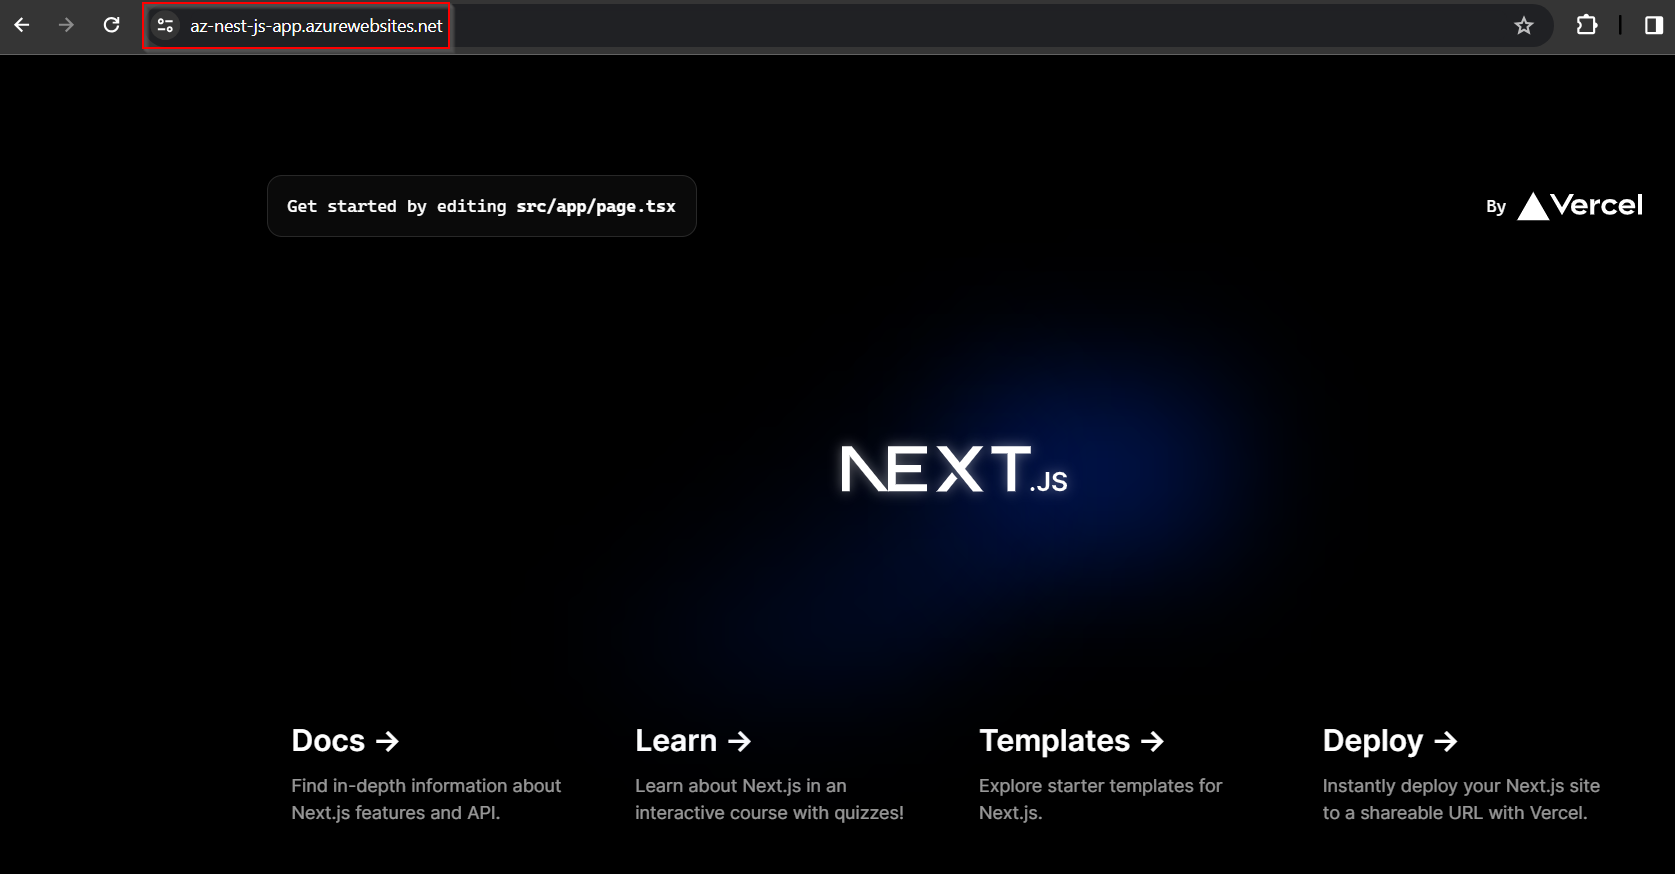
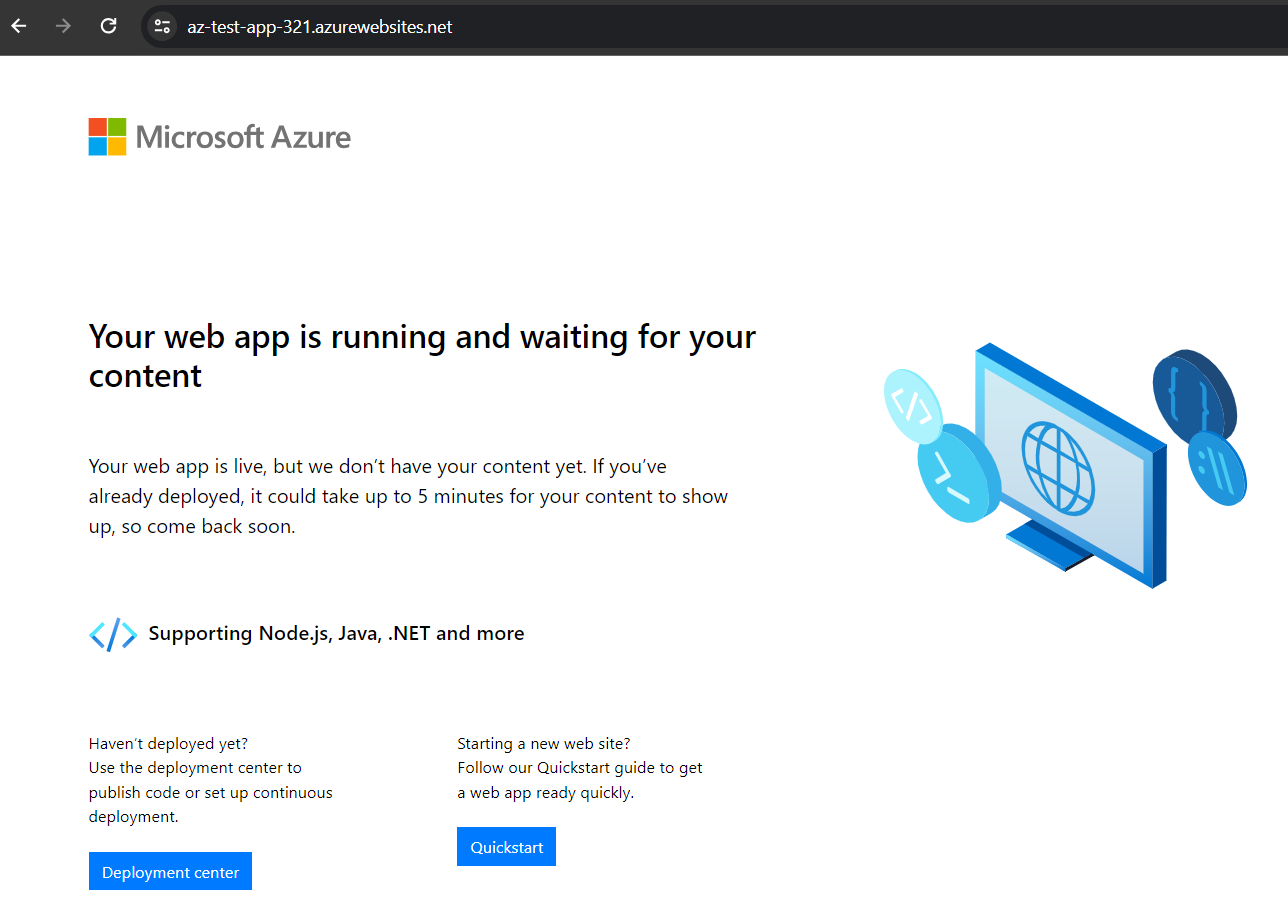
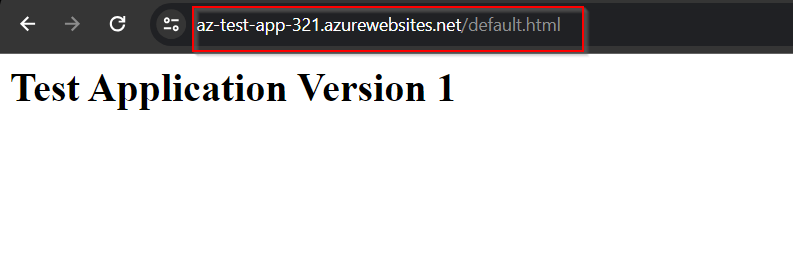
Check the Default domain URL of the app service this is created.
.
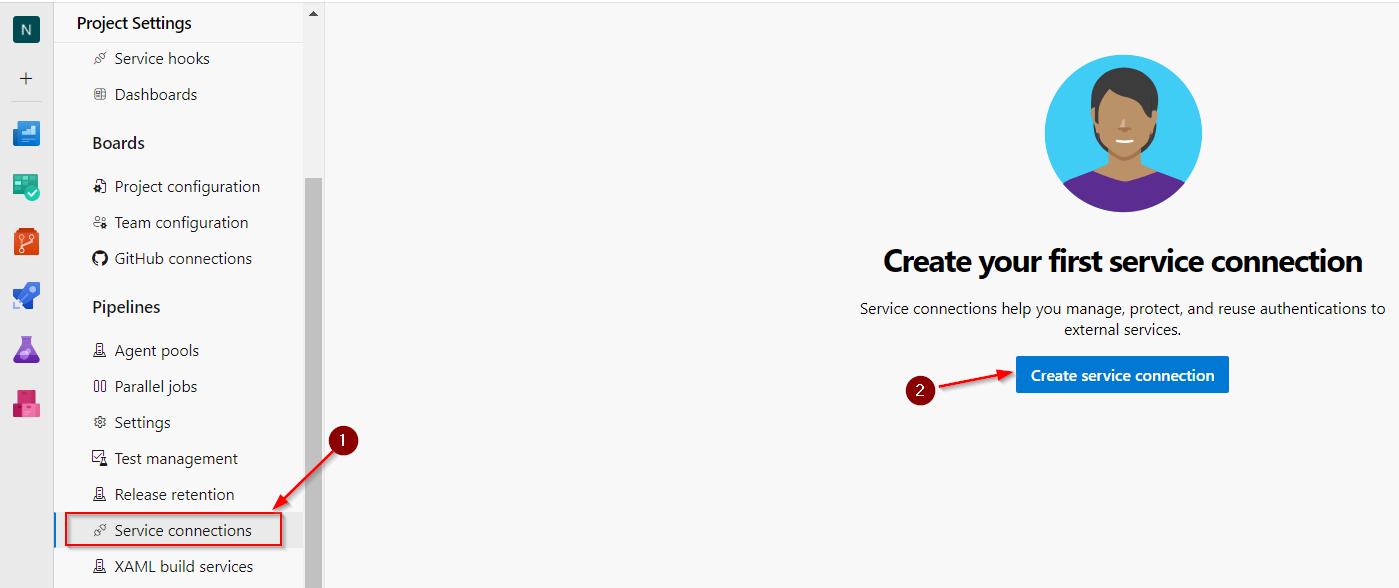
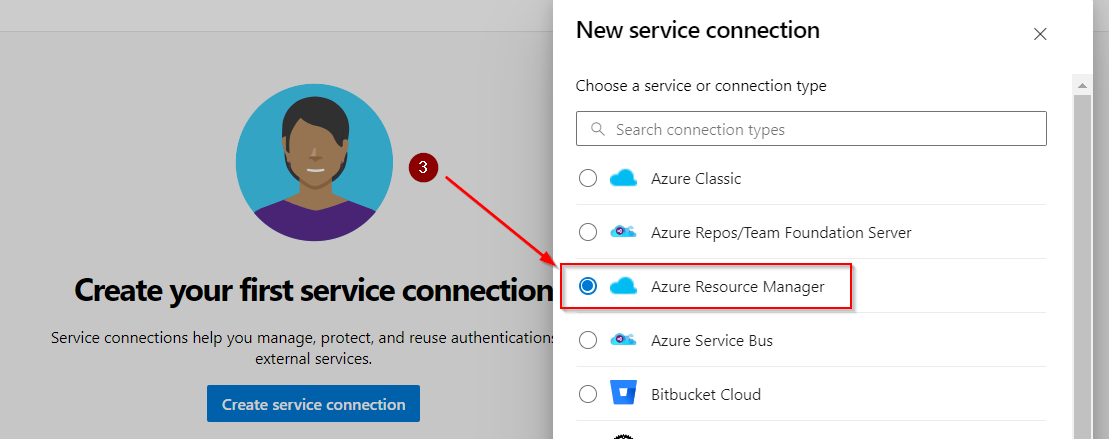
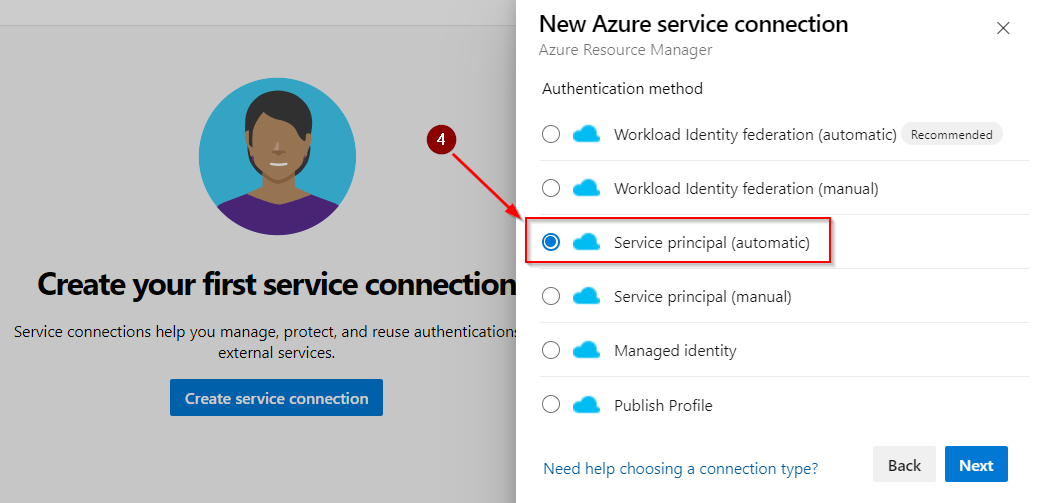
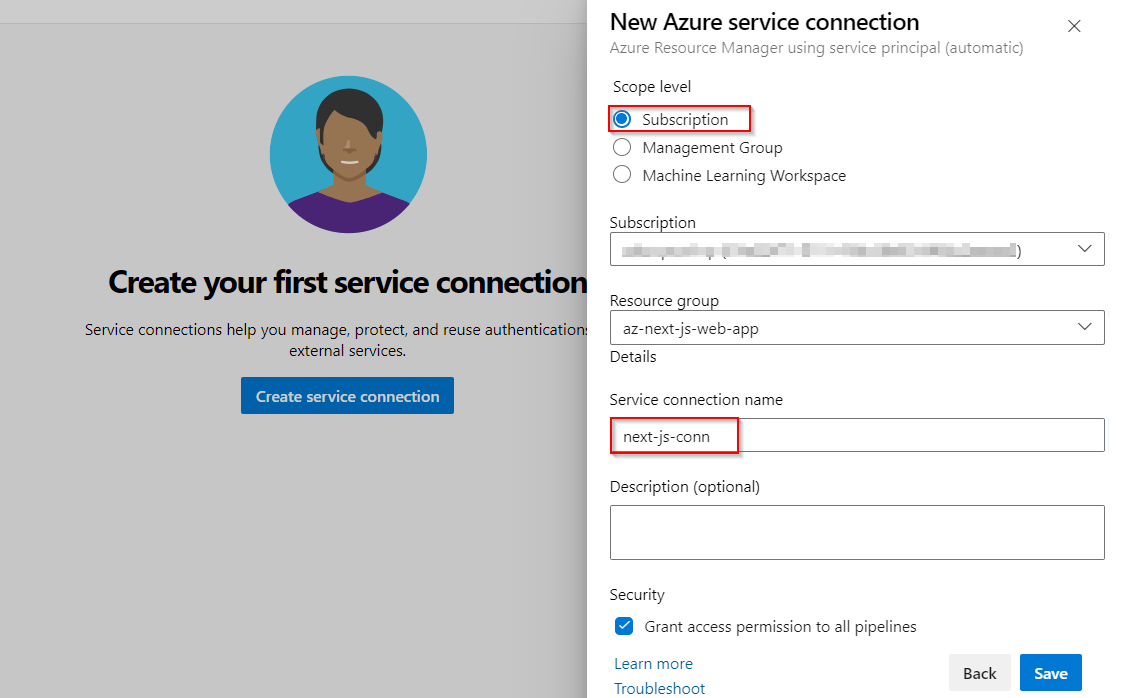
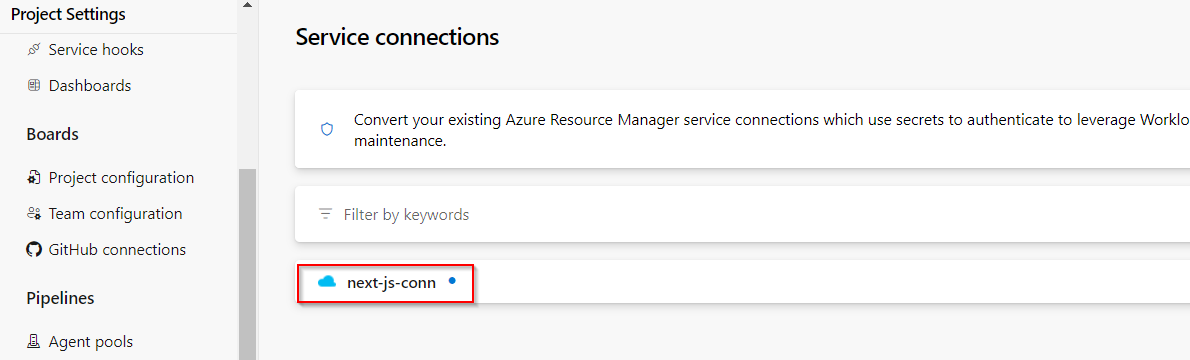
Step 3 : Create a Server Connection between the Azure Web App in the Azure Subscription and Azure Devops.
In Azure Devops click on Project Settings> Server Connection> New Connection. And fill the required parameters for the connection.
..
Select the Subscription and the Resource Group that contains the Azure Web App and fill the check box Grand access permissions to all the pipelines.
.
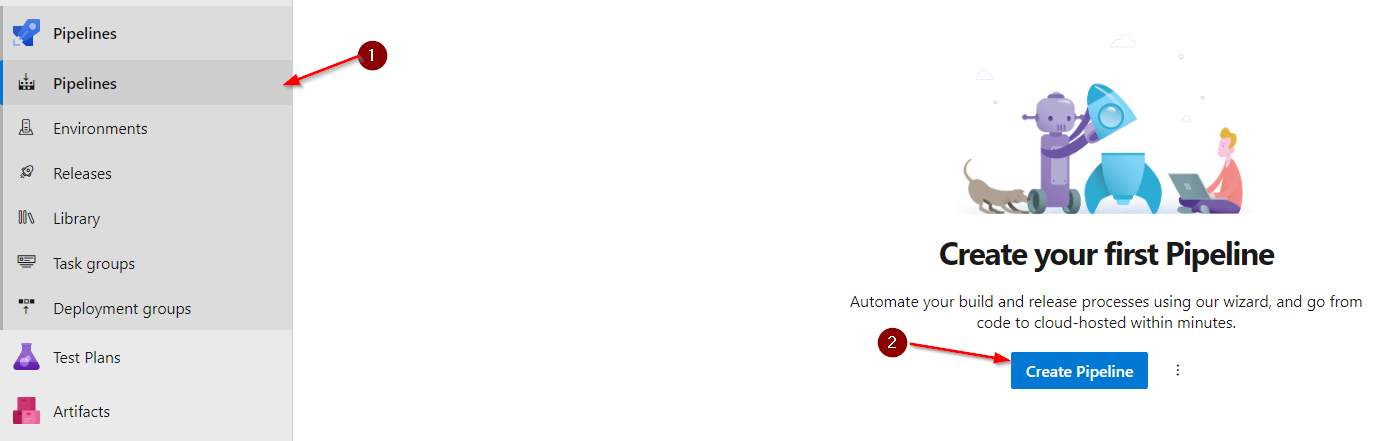
Step 4 : Lets start creating a Pipeline for the Application. Click on Pipelines> New Pipelines.
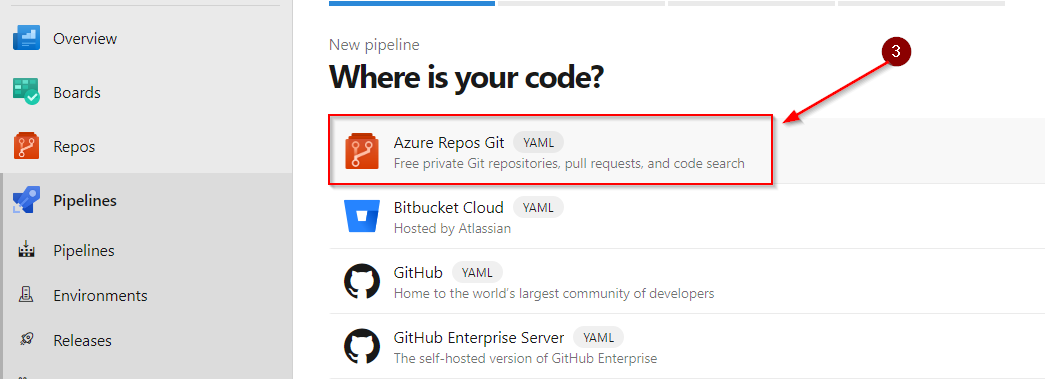
Select what type of Repository of the Project.
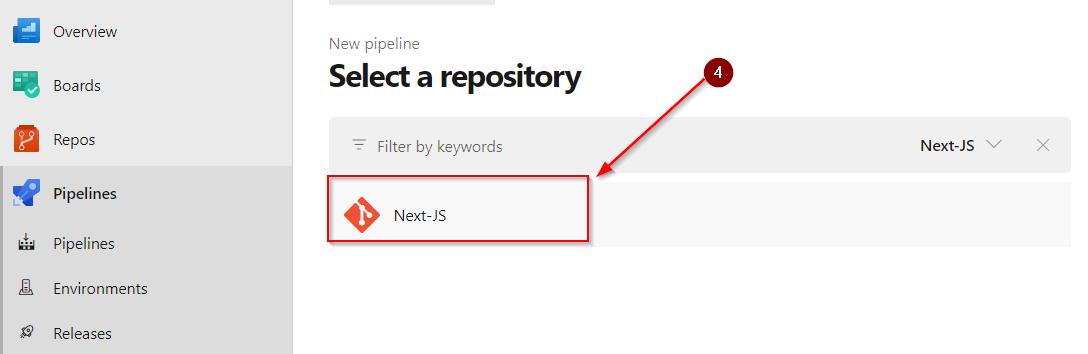
Select the Repository where the application is placed.
Now assign a Create or Assign a YAML file configuration in the Pipeline line creation.
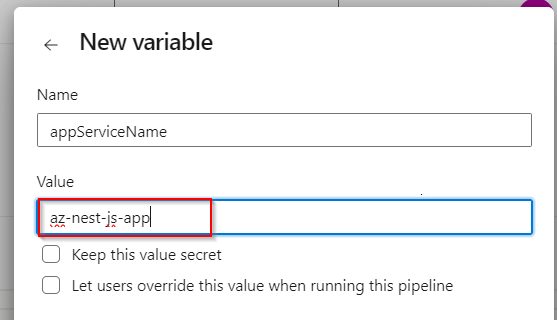
Step 5 : Create variables in for Azure Web Apps this may help us when we use multiple stages of deployment(Dev UAT and Prod).
To create a variable click on Variables> New Variable. Give value as App Service Name.
Container images are a lightweight, standalone, and executable software package that includes everything needed to run a piece of software: the code, runtime, system tools, libraries, and settings. These images are the foundation of container-based technologies like Docker, allowing applications to be abstracted from the underlying infrastructure.
Portability: Container images are highly portable and can run consistently across different environments, including development machines, testing environments, and various cloud or on-premises platforms.
Isolation: Containers provide isolation at the application level, allowing multiple containers to run on the same host without interference. Each container runs as an independent process with its own filesystem and resources.
Layered Structure: Images are built in layers, allowing for efficient sharing of common components. When changes are made, only the affected layers need to be updated, reducing image size and improving speed in image distribution and deployment.
Immutable and Reproducible: Container images are immutable, meaning they cannot be modified once built. This immutability ensures consistency and reproducibility across different environments.
Dockerfile and Registries: Images are created using a Dockerfile, which defines the configuration and dependencies needed for the application. Images are stored and distributed via container registries such as Docker Hub, Azure Container Registry, or others.
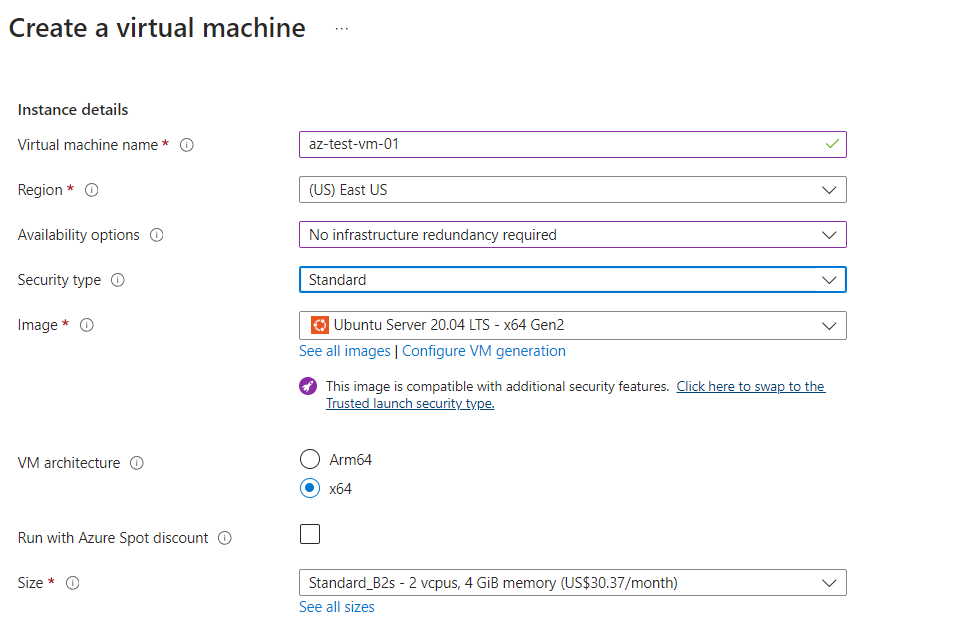
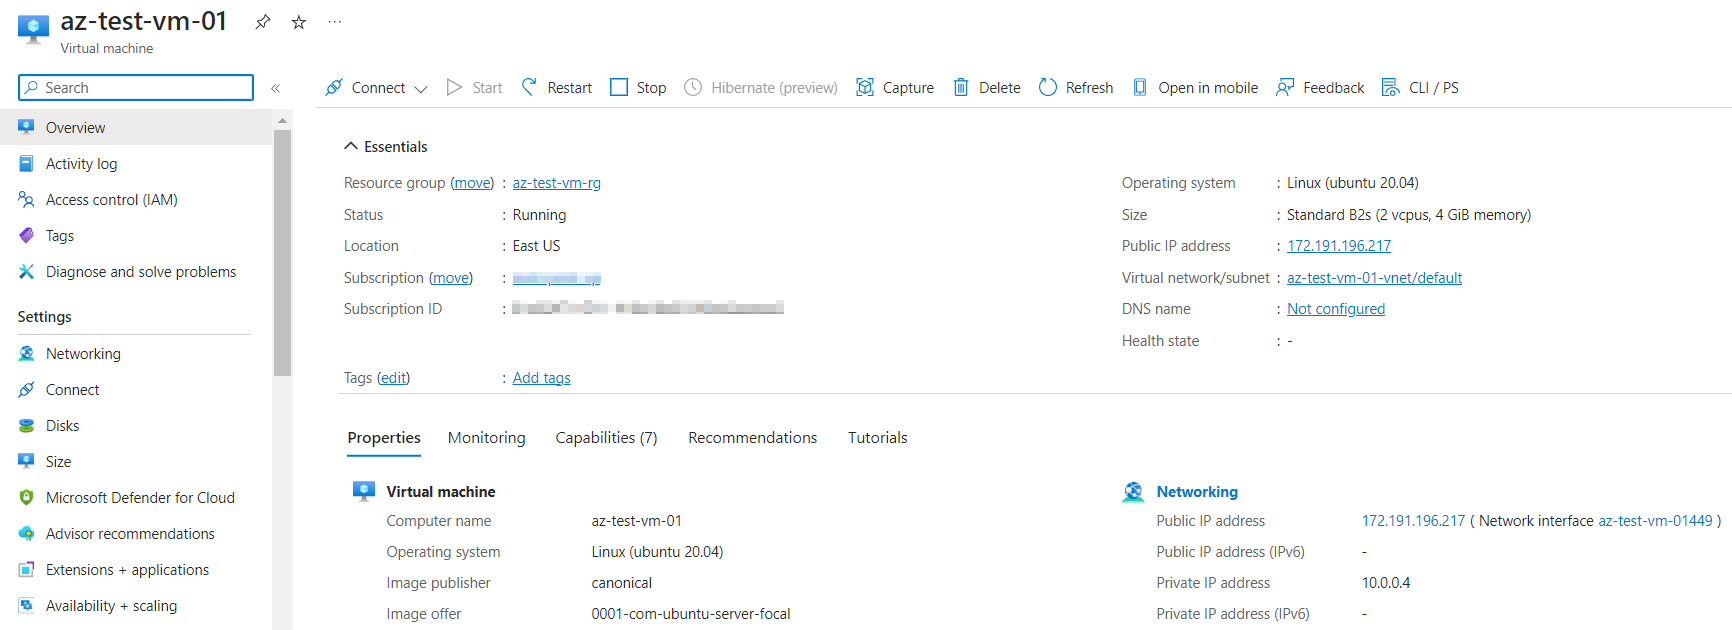
Step 1 : Now lets create a Linux Virtual Machine and then deploy a Containerized Image in it.
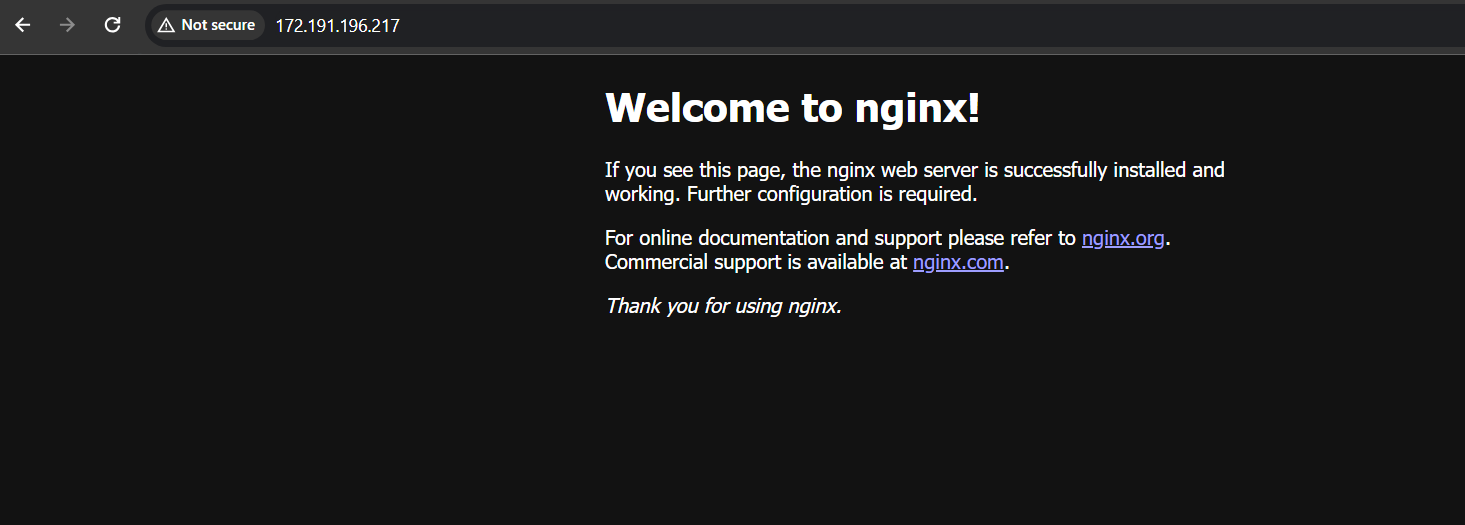
The Linux is deployed, here I have allowed SSH and HTTP
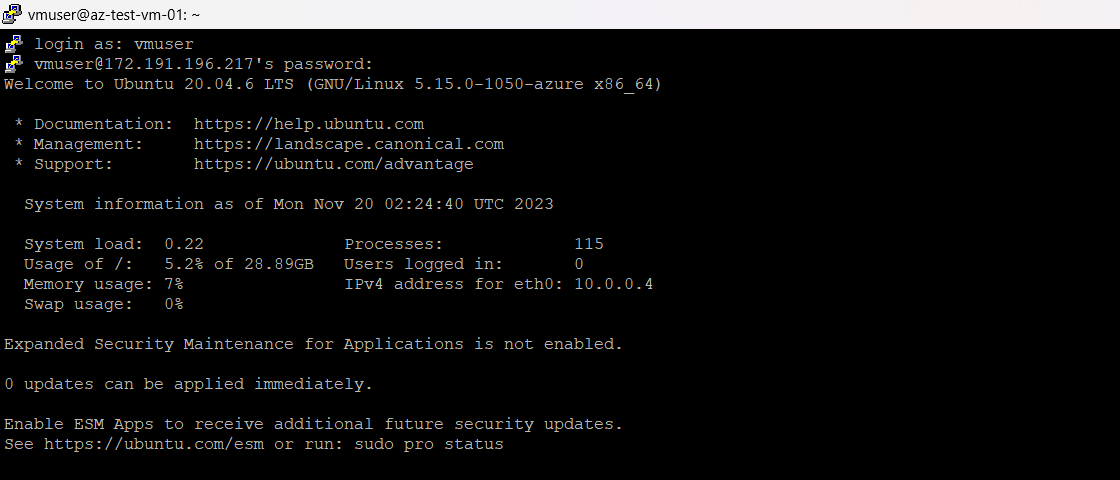
Step 2 : Lets connect to the Linux Virtual Machine using Public IP, with the help of Putty Software.
Login to the Virtual Machine with your credentials.
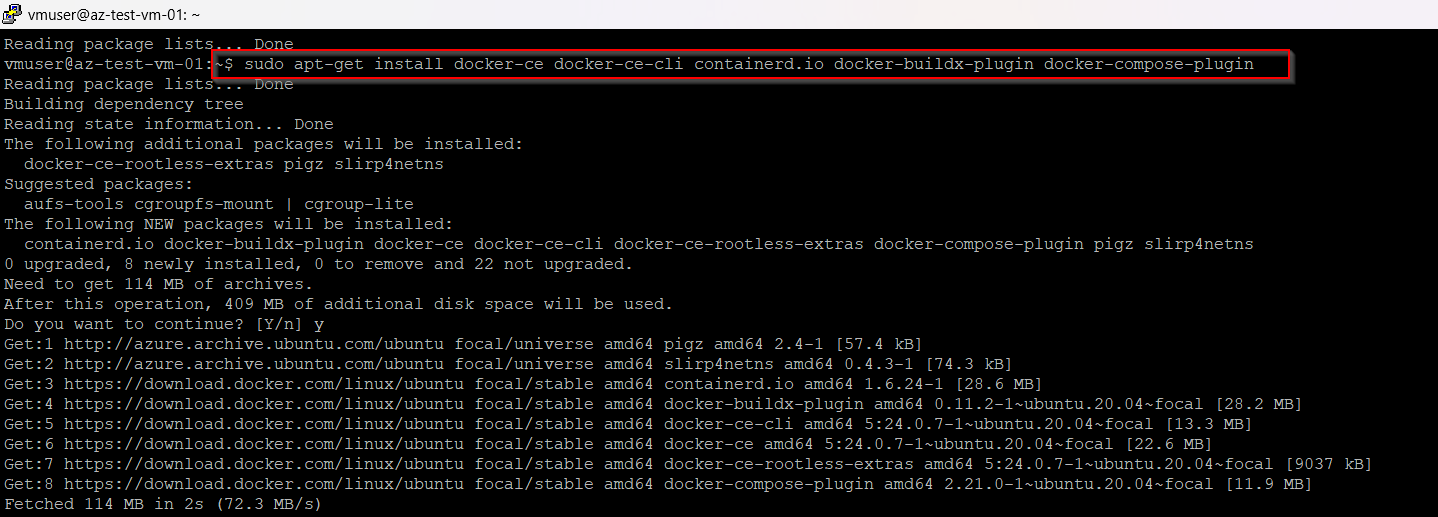
Step 3 : Once we login into our VM, lets start updating the packages to set up an environment to install Docker in the system.
Use the below codes to create an environment to install Docker.
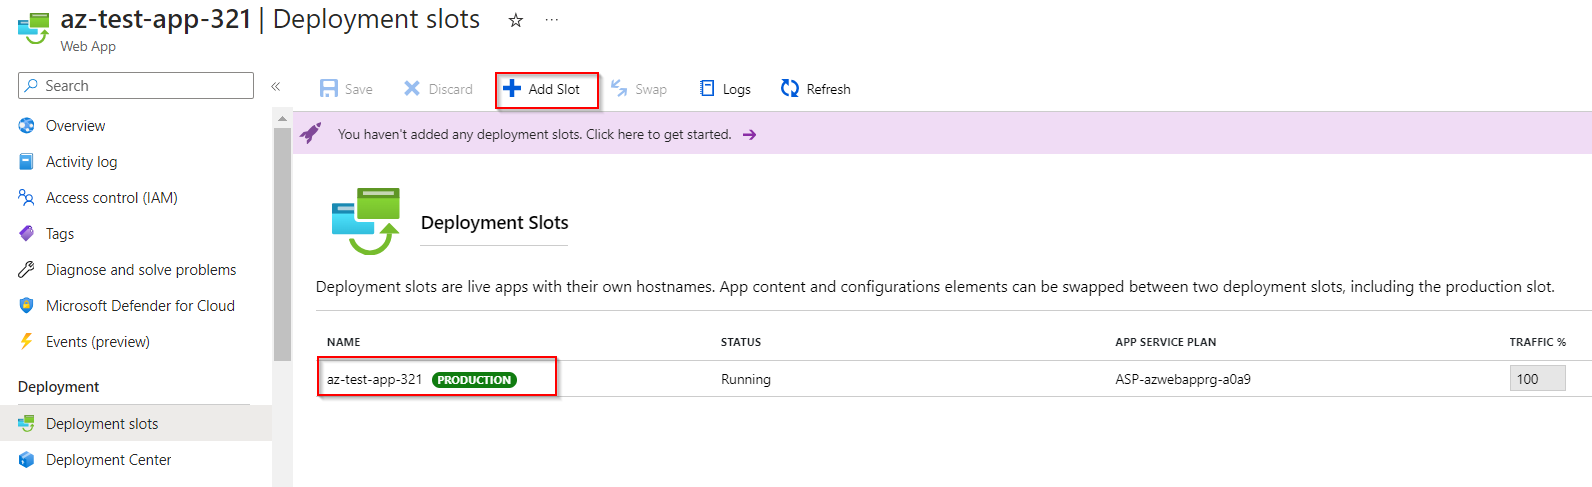
Azure App Service Deployment Slots provide a feature that allows you to create multiple deployment slots (or environments) within an Azure App Service. These slots are live web apps with their own hostnames and can be used to deploy different versions of your application, perform testing, and swap between slots for seamless deployment and rollback strategies without causing downtime.
Environment Isolation: Each slot represents a separate environment with its own settings, configurations, and version of the application. This isolation allows you to deploy, test, and validate changes without affecting the production environment.
Staging and Testing: Deployment slots are commonly used for staging and testing purposes. You can deploy your application to a non-production slot, perform testing, and validate changes before swapping it to the production slot.
Zero Downtime Deployment: By leveraging slot swapping, you can achieve zero-downtime deployments. Swapping ensures a smooth transition between slots by redirecting traffic seamlessly without interruptions to end-users.
Rollback Capability: If an issue arises after a deployment to the production slot, you can instantly swap it back to the previous version, allowing for quick rollbacks in case of unexpected problems.
Step 1 : Lets create an Azure App Service with any configuration. But ensure that the app service plan is Standard or Premium, because Deployment Slot feature is only available in those plans.
Lets check whether the App Service URL.
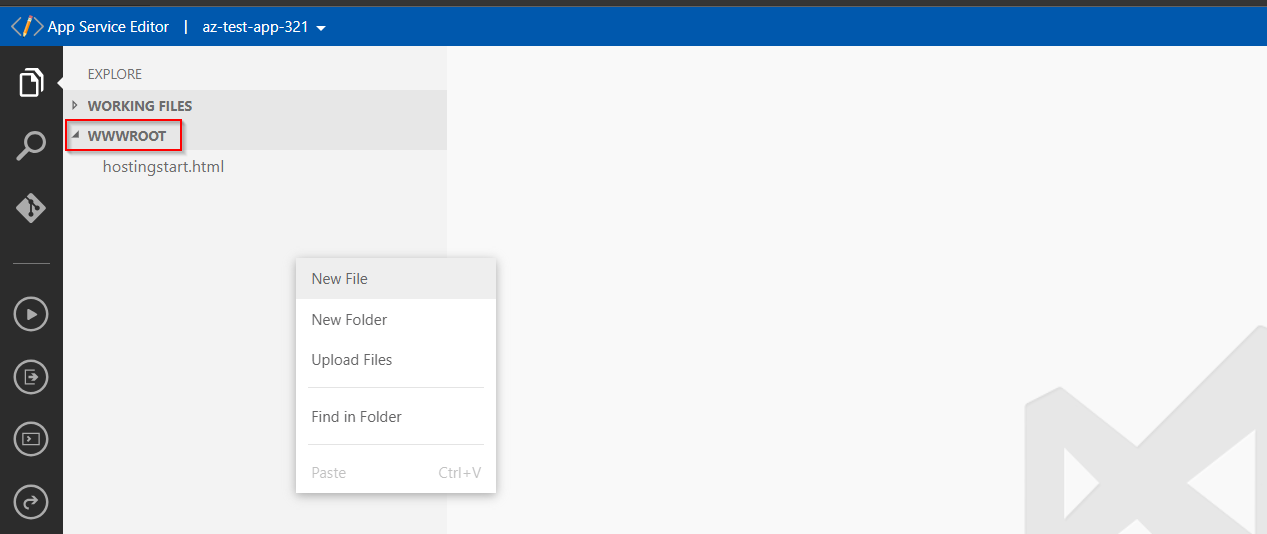
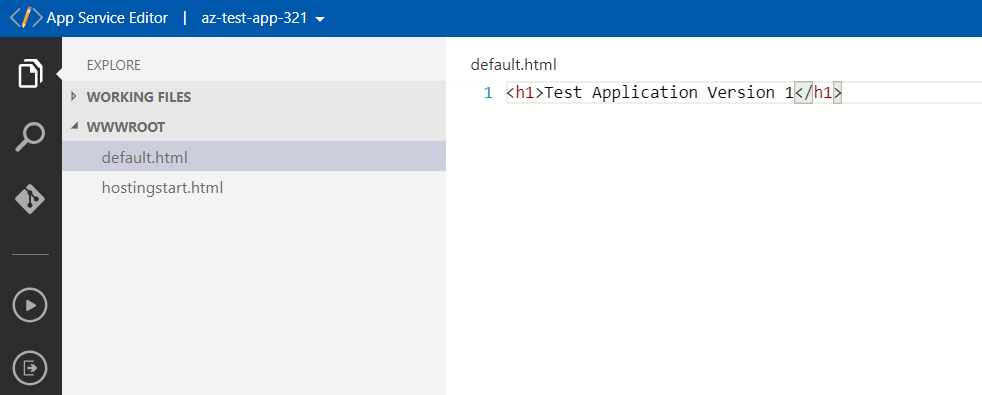
Step 2 : In App Service plan click on App Service Editor, to create a sample application.
Click on WWWROOT folder and create a sample file.
Step 3 : Here I have created a default page for the App Service. So that when we view with the App Service URL in a browser we will be able to view the Default.html file.
Currently the default.html page is available for the App Service
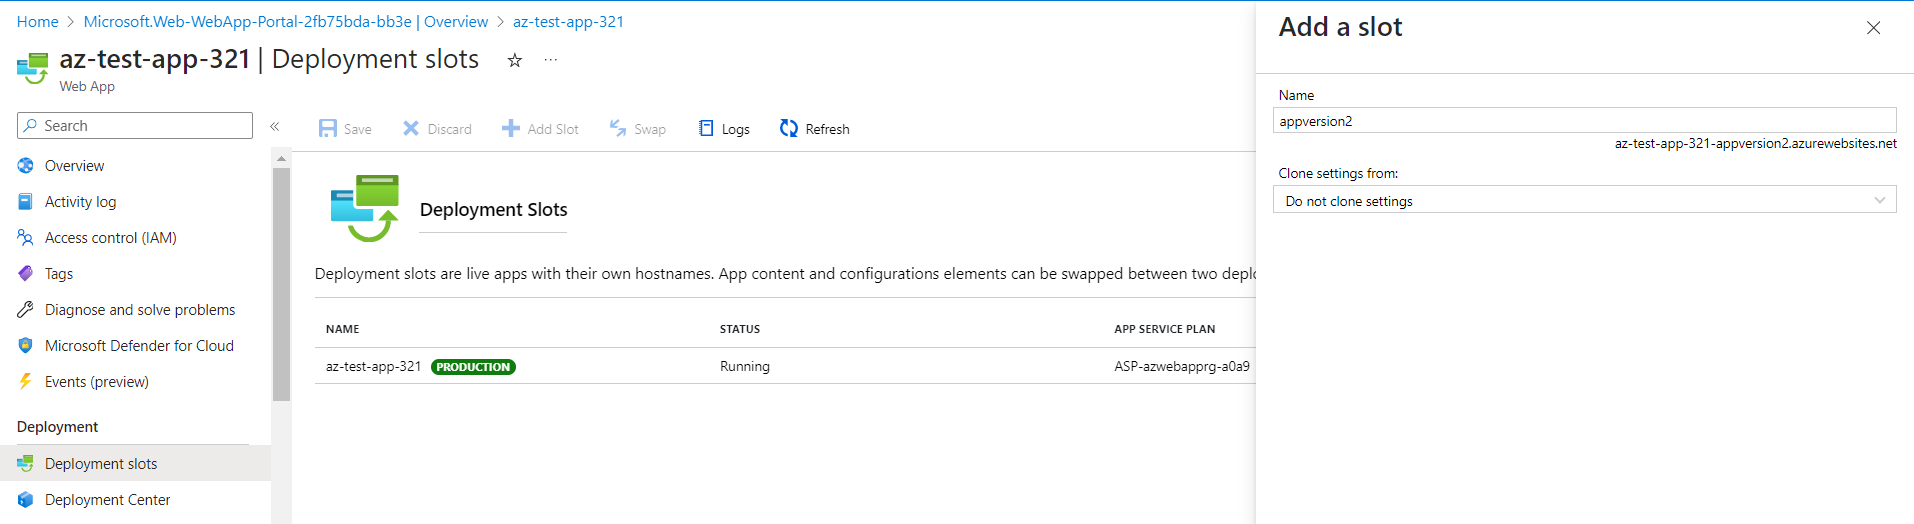
Step 4 : Now in the Deployment section of the App Service, Lets add a slot for the second version of the Application.
Provide the required parameters for the deployment slot.
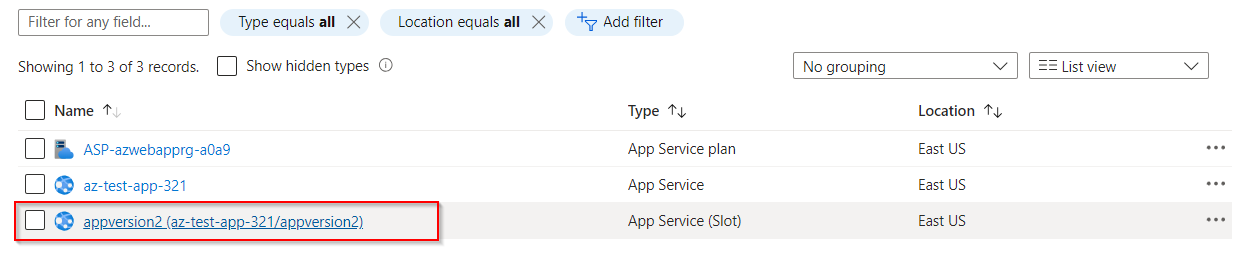
Now we have created a deployment slot for the second version of the application. It has its own URL
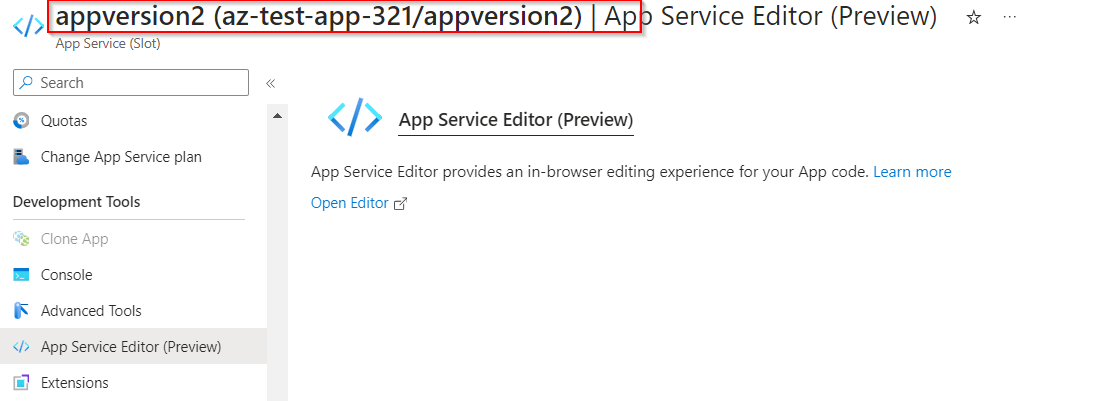
Step 5 : Click on the App service which was created from deployment slot and navigate to App Service Editor.
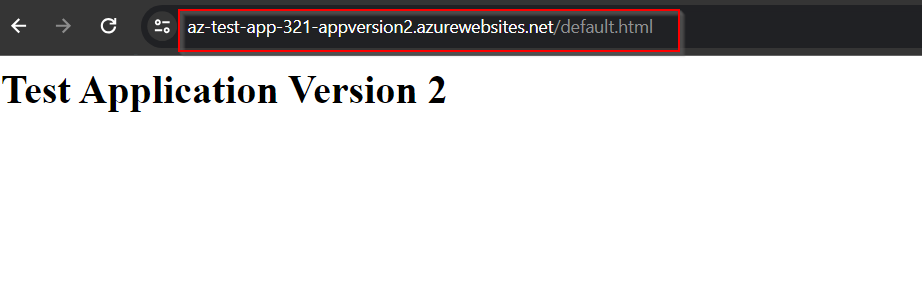
Create a default. html page and view it with the second app service.
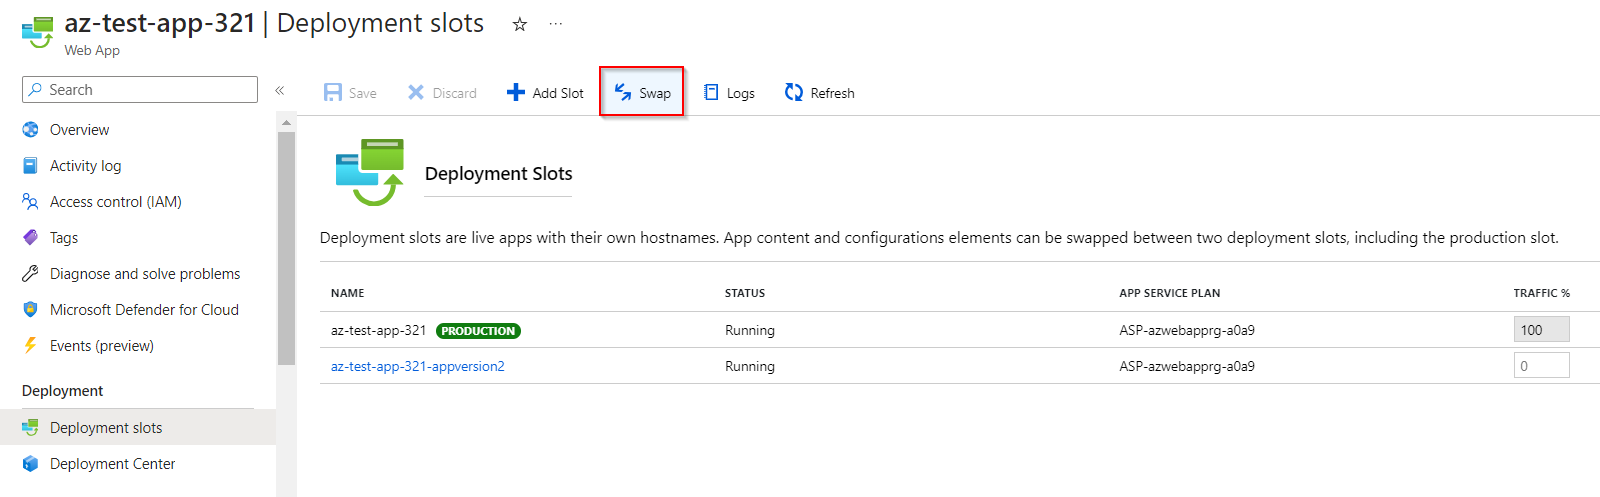
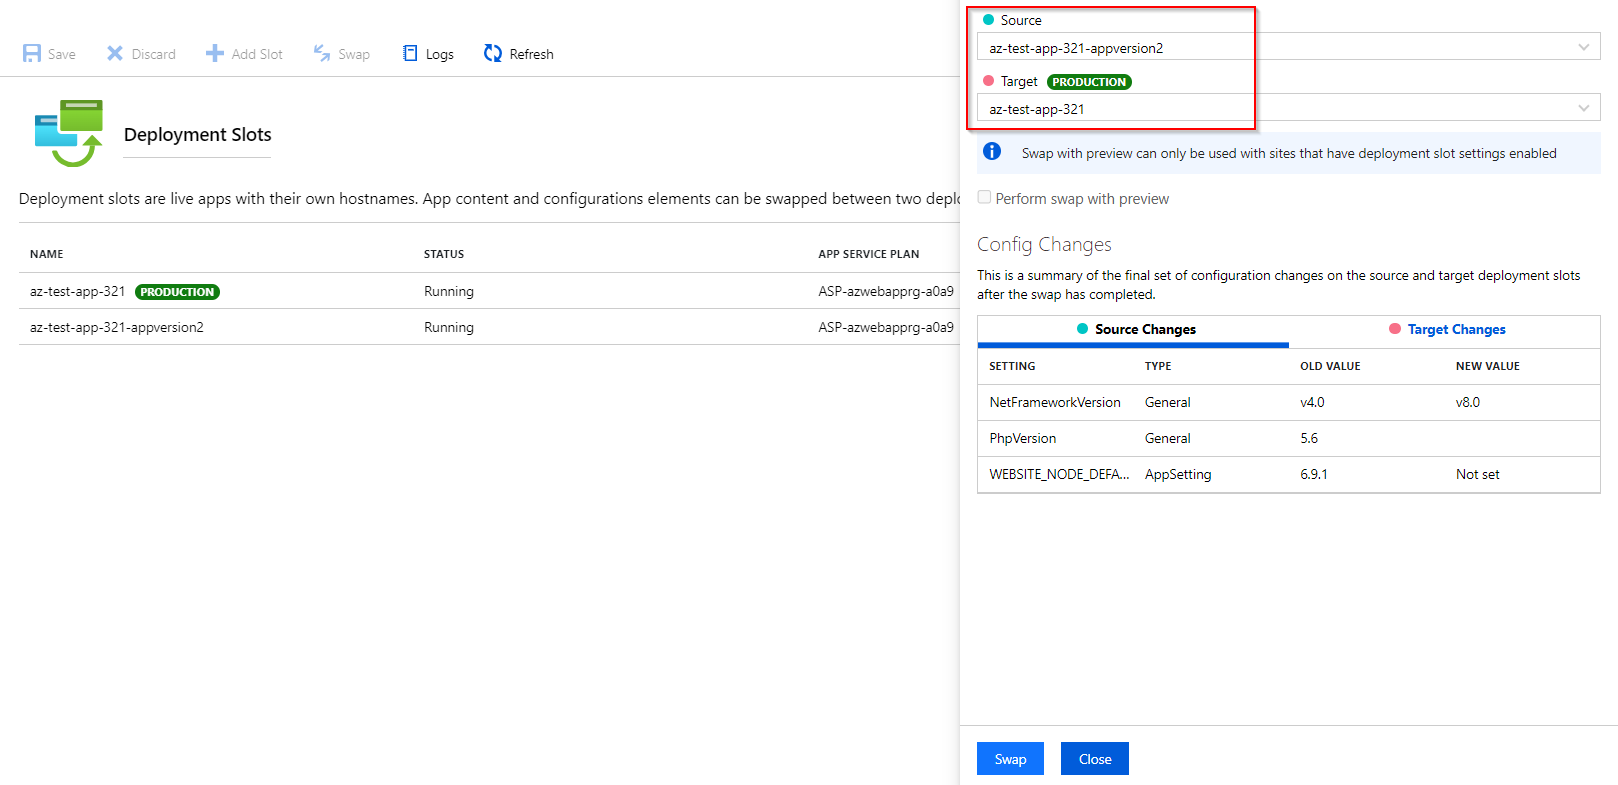
Step 6 : Now navigate to Deployment slot of any App Service and click on Swap.
Select the Source App Service and target App service and click on Swap.
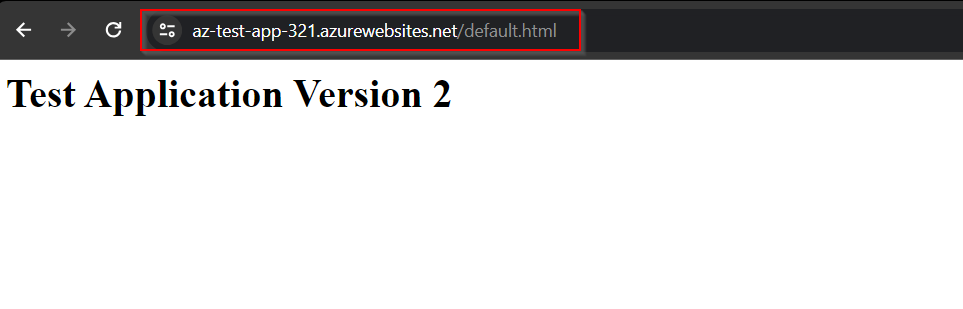
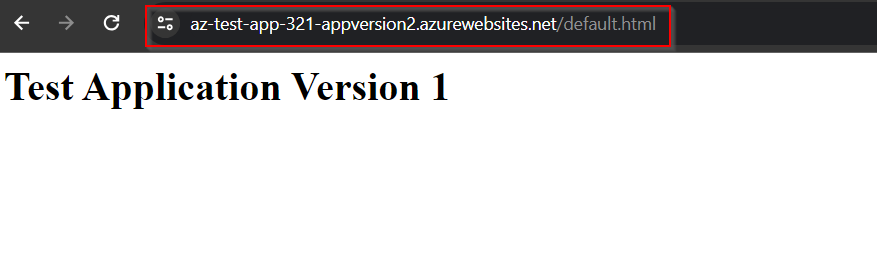
Step 7 : Lets check whether the Swap process between the App Service one and two is successful or not.
App Service 1 with Version 2 of the Application.
App Service 2 with Version 1 of the Application. Swap is Successful.
Azure Disk Encryption is a security feature provided by Microsoft Azure that helps safeguard data on Azure Virtual Machine disks using encryption. It employs industry-standard encryption methods to encrypt both the OS and data disks associated with Azure VMs, helping to protect sensitive information from unauthorized access.
Data Protection: It encrypts the operating system and attached data disks, ensuring that data remains encrypted at rest to prevent unauthorized access even if someone gains physical access to the storage media.
Integration with Azure Key Vault: Azure Disk Encryption uses keys stored in Azure Key Vault, providing a centralized management point for encryption keys and enabling secure key management separate from the encrypted data.
Supported Disk Types: Azure Disk Encryption supports both managed and unmanaged disks and is compatible with Windows and Linux VMs across various Azure services.
Step 1 : Currently we have a Virtual Machine with OS and Data Disk attached to them, and the disks are under “Platform Managed Keys“.
Now we have to convert them to “Customer Managed Keys” for higher Data Encryption.
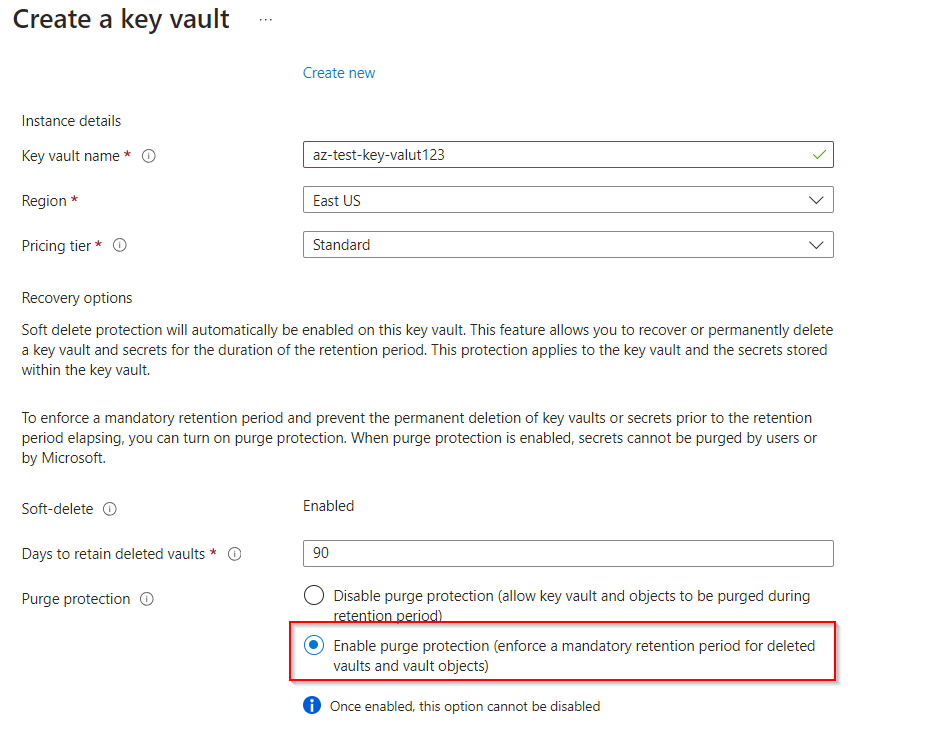
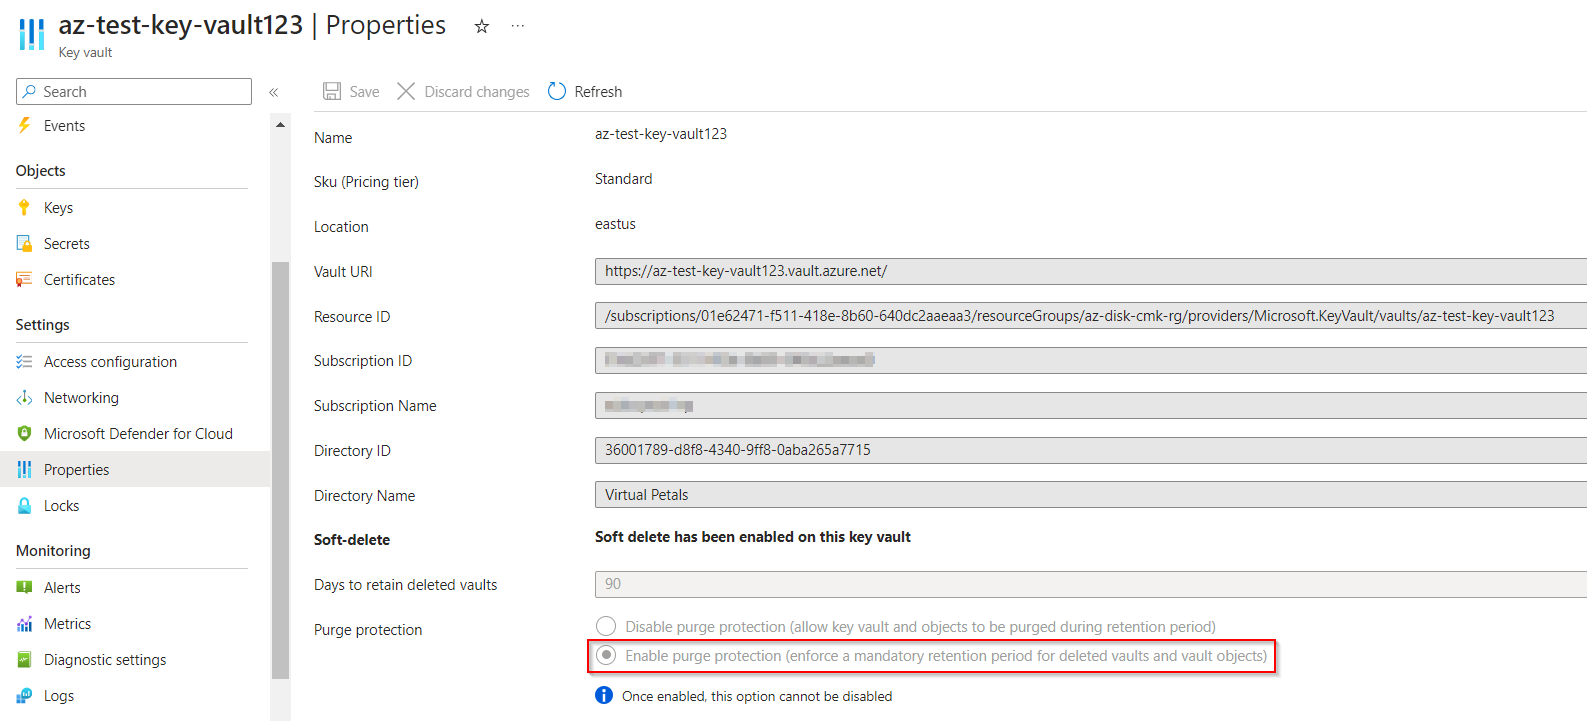
Step 2 : Now to start the process of encryption, lets create an Azure Key Vault. While creating the Key Vault enable the Purge Protection.
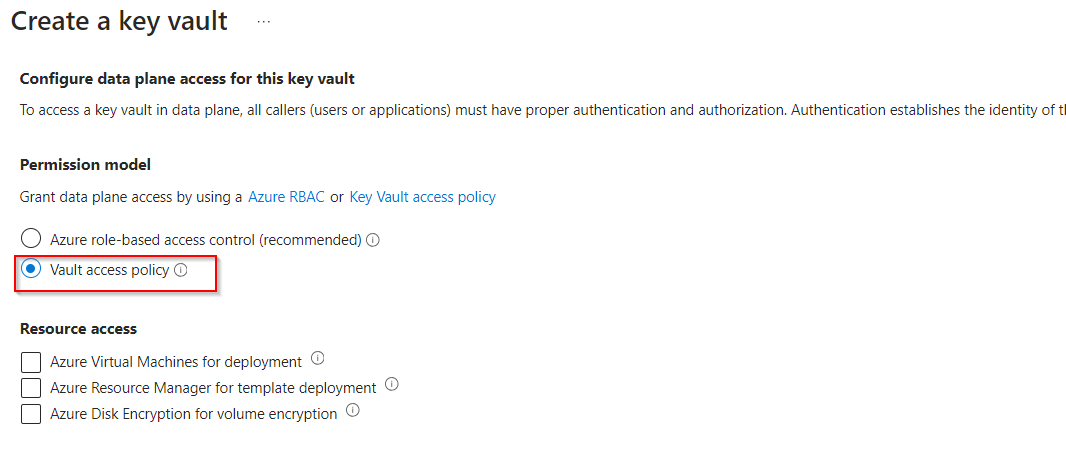
In the next section Select Vault access policy, now leave the other settings in Default and create the Azure Key Vault.
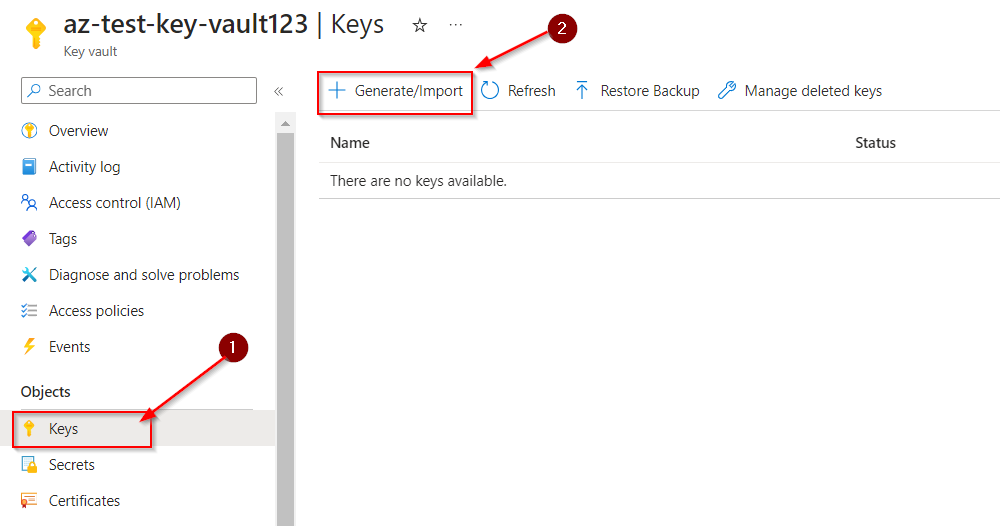
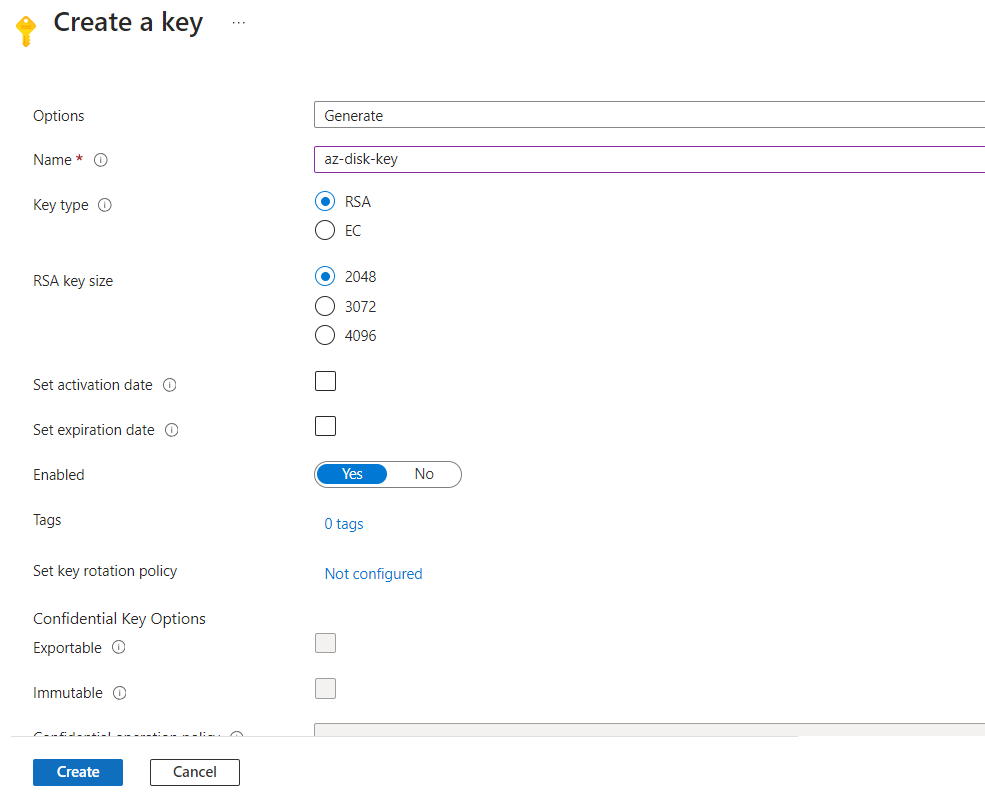
Step 3 : Now we have created a Key Vault, Lets create Key in Azure Key Vault.
Select the preferred Key size and create the keys
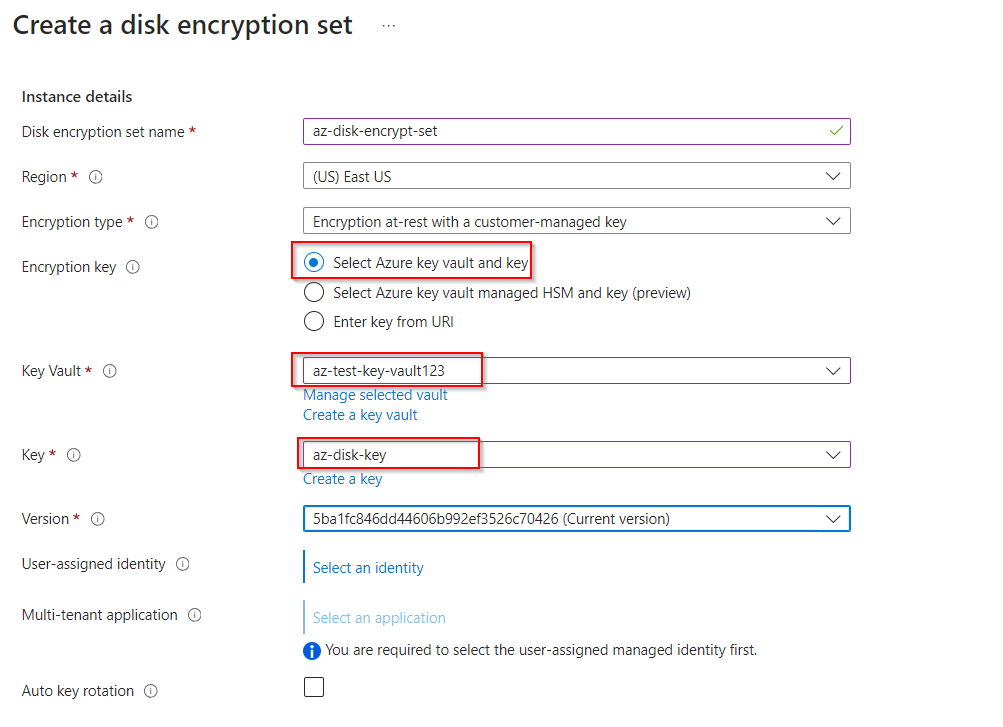
Step 4 : Now for Encrypting the Disk we need to create a “Disk Encryption Set“. While creating select the Azure Key Vault that is already created.
Once you created all the required resources Verify that Purge protection is Enabled in the Azure Key Vault
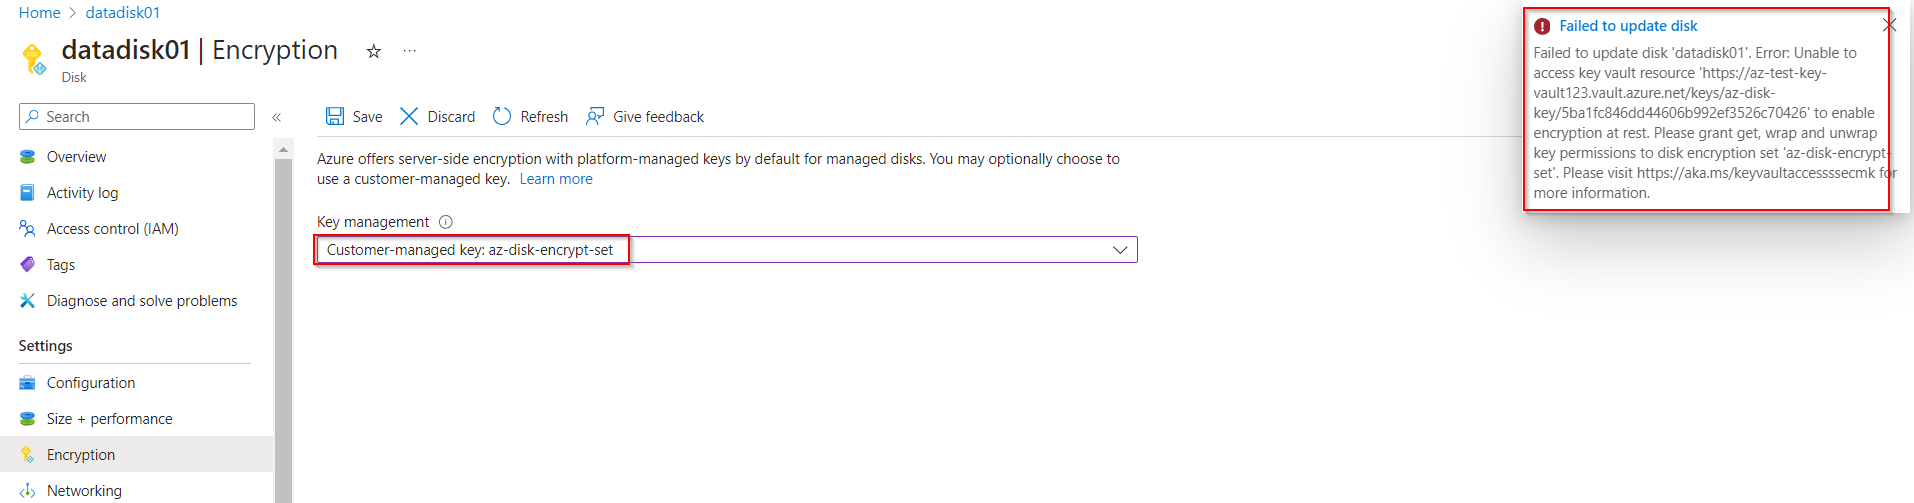
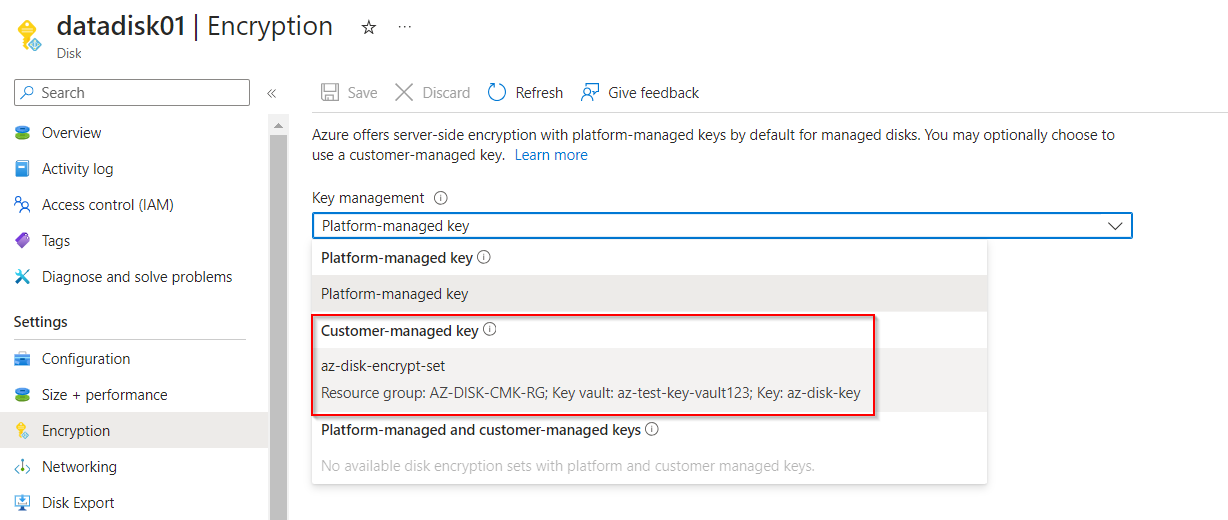
Step 5 : Click on the Required disk that you want to Encrypt and click on Encryption from the left side.
Now lets change the type from Platform Managed Keys to Customer Managed Keys. But we are getting an error here.
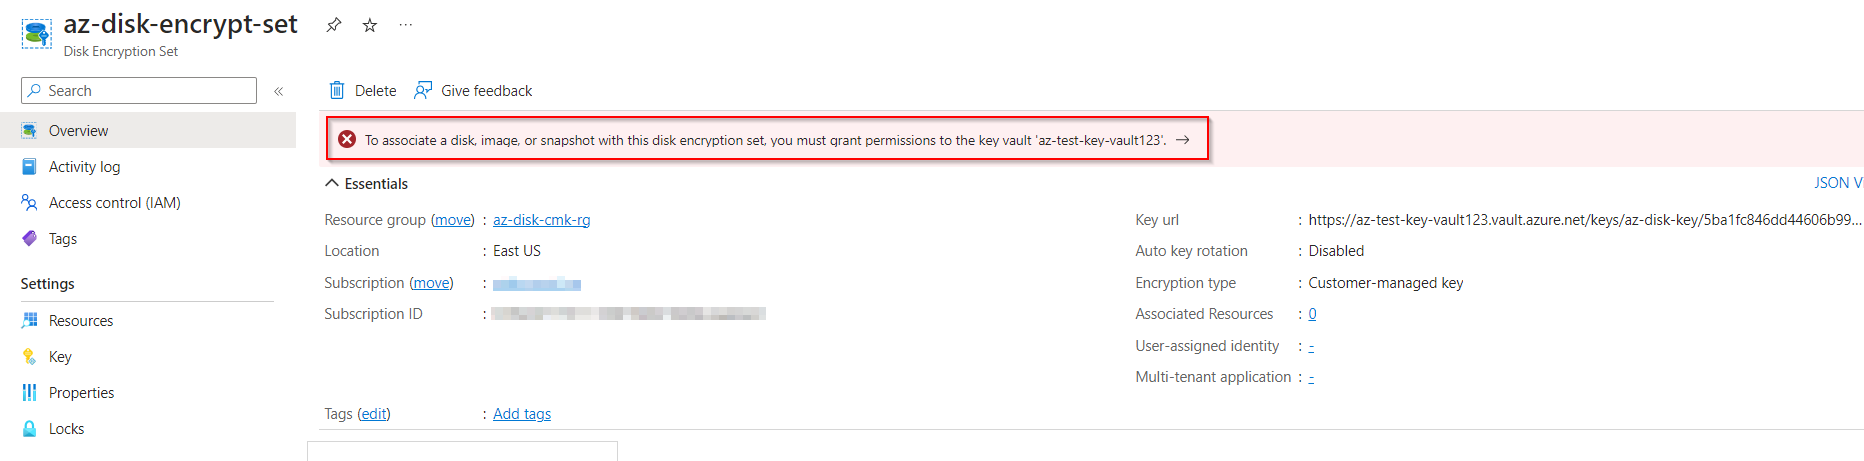
Step 6 : To solve the error move to Disk Encryption Set, we have have a pop up to allow permission from the key vault to provide Platform Managed Keys. Click on the option to allow.
Step 7 : Again lets navigate to the disk that we want to encrypt and select the Disk Encryption Set.
Now to process of Encrypting the disk is done.
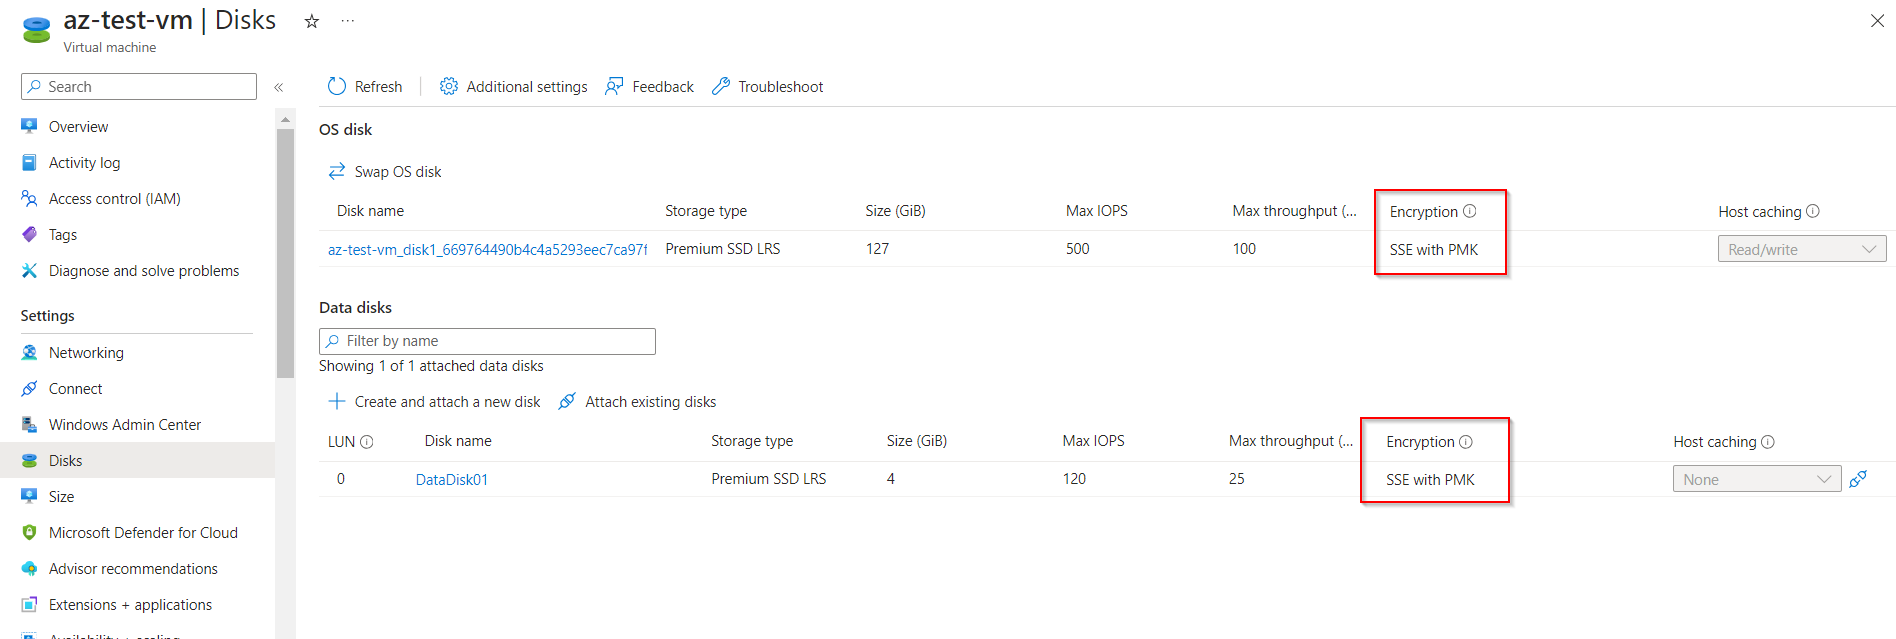
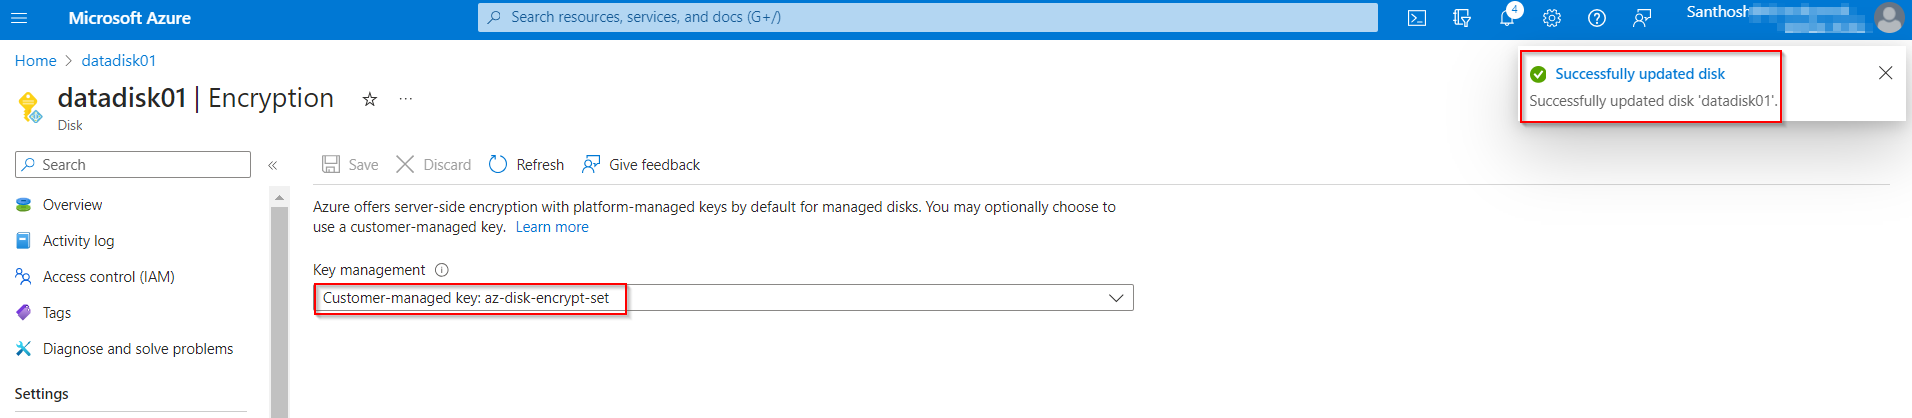
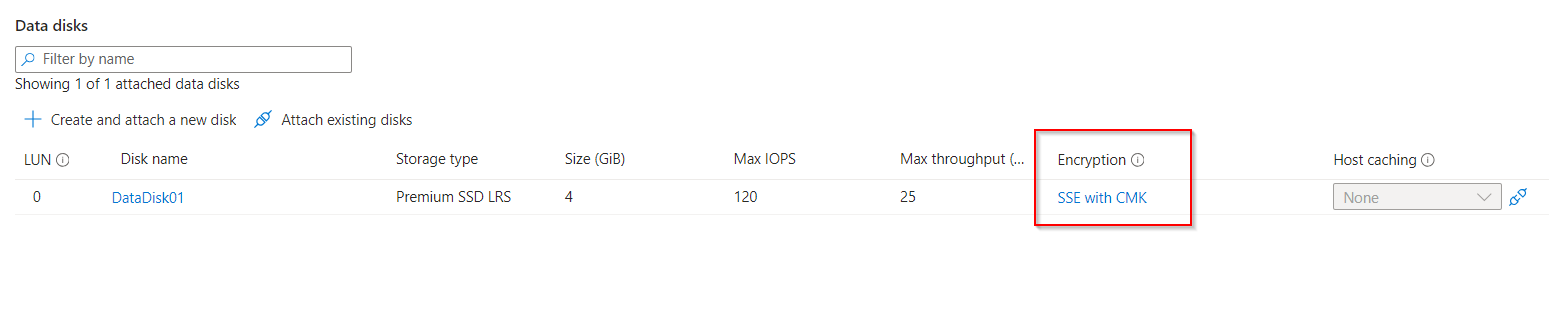
Step 8 : Lets check weather the Disk Encryption has been moved to Customer Managed Keys.
In Azure, a specialized VM image refers to a virtual machine image that has been pre-configured and customized for specific tasks or roles within an application or system. It typically includes a specific operating system, software configurations, and other settings tailored to meet the requirements of a particular workload or application. Specialized VM images are designed to streamline the deployment process and ensure consistency in the infrastructure, reducing the time and effort required to set up virtual machines for specific purposes.
Custom Configurations: Specialized VM images in Azure are crafted with customized configurations, including operating system settings, software installations, and specific application setups, tailored to meet the unique needs of a particular workload.
Consistent Environments: By using specialized VM images, organizations can ensure consistent and standardized environments across their infrastructure. This reduces the likelihood of configuration errors and enhances overall system reliability.
Version Control and Updates: Specialized VM images can be versioned and updated, allowing for efficient maintenance and management. When there are changes or updates to the configuration, a new version of the specialized image can be created, ensuring that all future deployments incorporate the latest improvements.
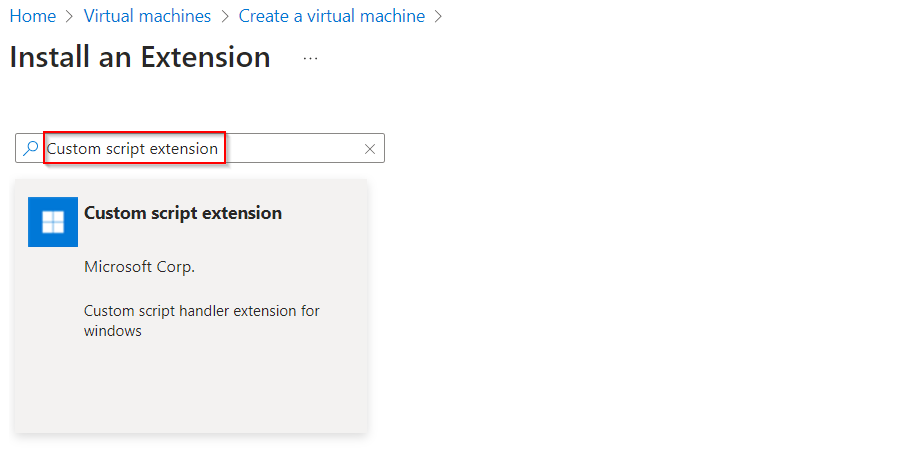
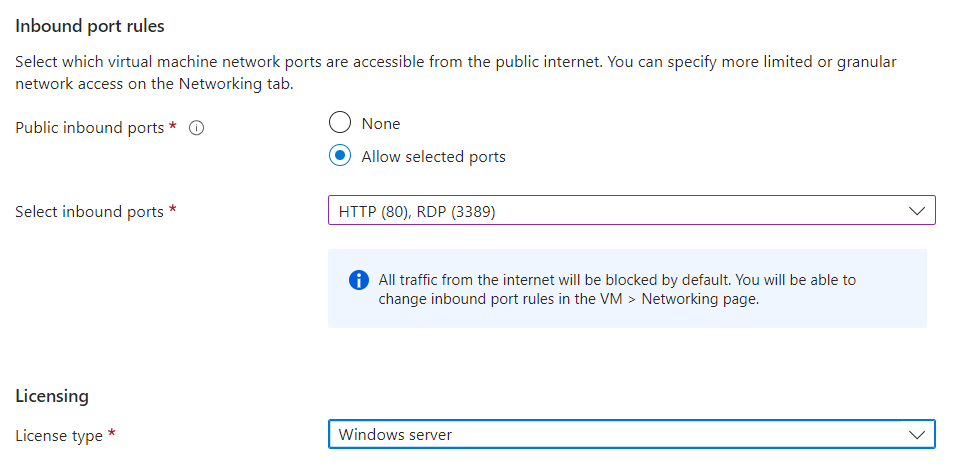
Step 1 : Lets create a Virtual Machine and add a Custom Script in it to install Internet Information Services(IIS). So we can use this Virtual machine as a base machine to create a Specialized Image.
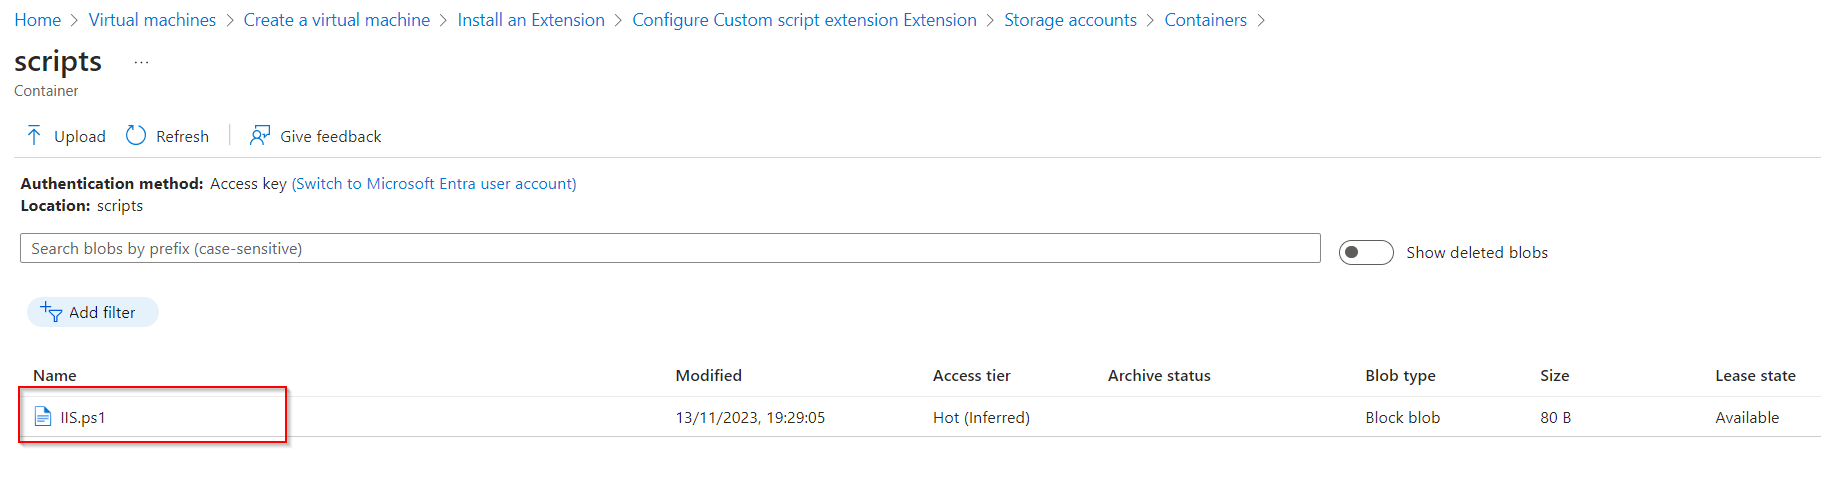
In Advance section select on Custom Script Extension and upload the script to install Internet Information Services.
.
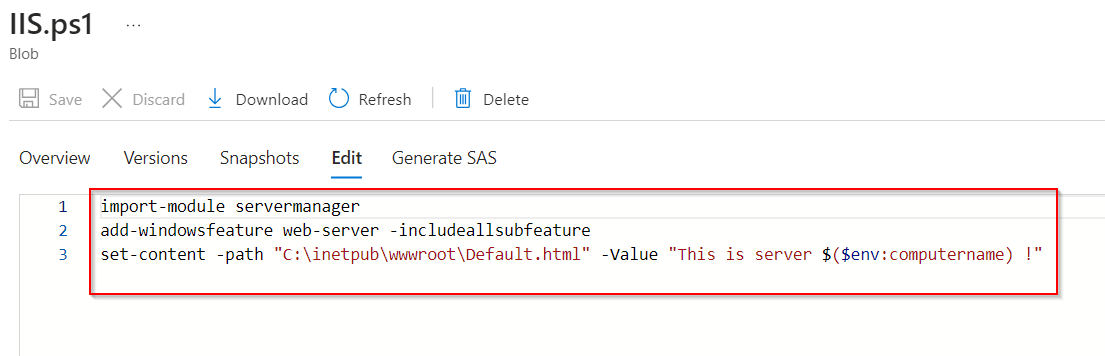
The script contains info to install IIS and create a Defalut.html page in it.
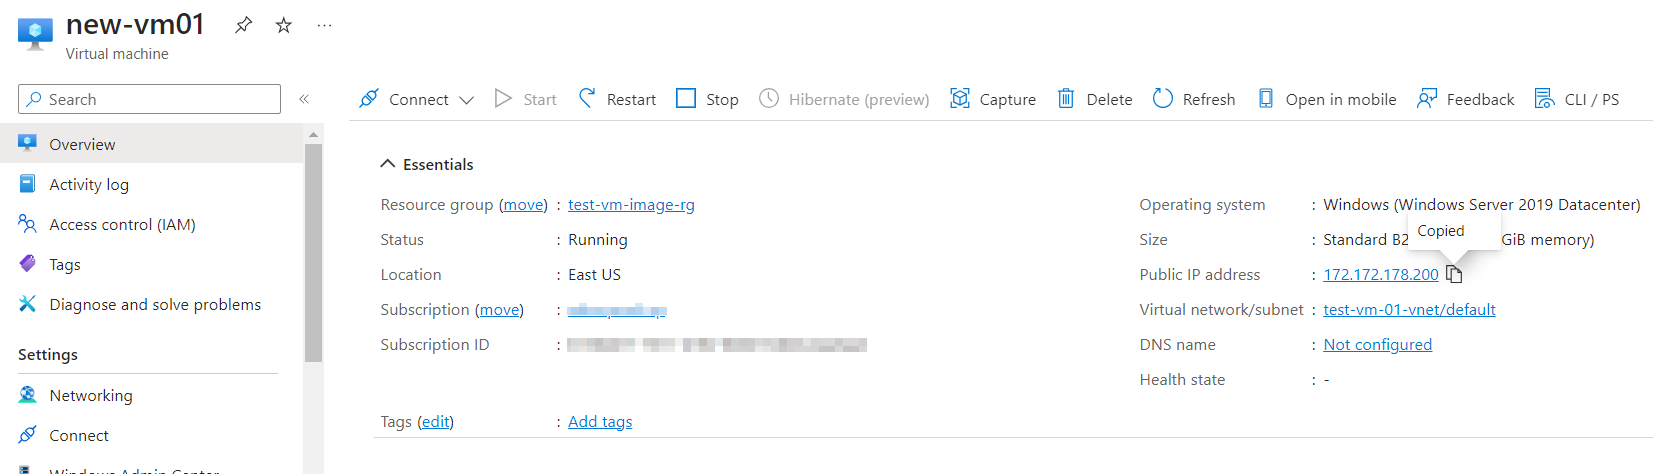
Step 2 : Check the deployed Virtual Machine contain IIS installed on it and also to have a Script to produce computer name.
.
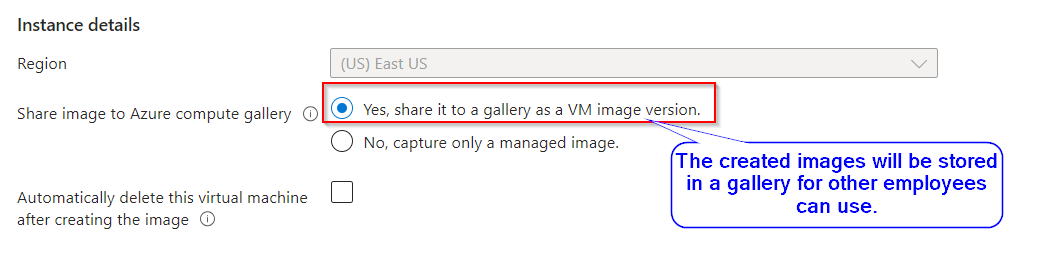
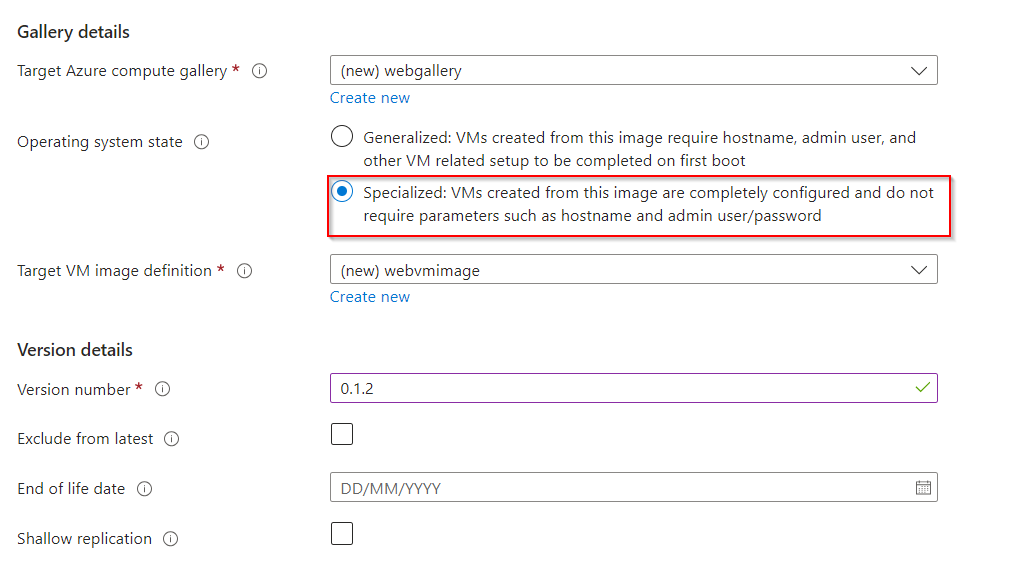
Step 3 : Lets start creating Specialized VM Image out of the base virtual machine. In the overview page of the Virtual machine, click on Capture to create a Specialized Image.
..
Select the Image type, provide a Target Definition and version number.
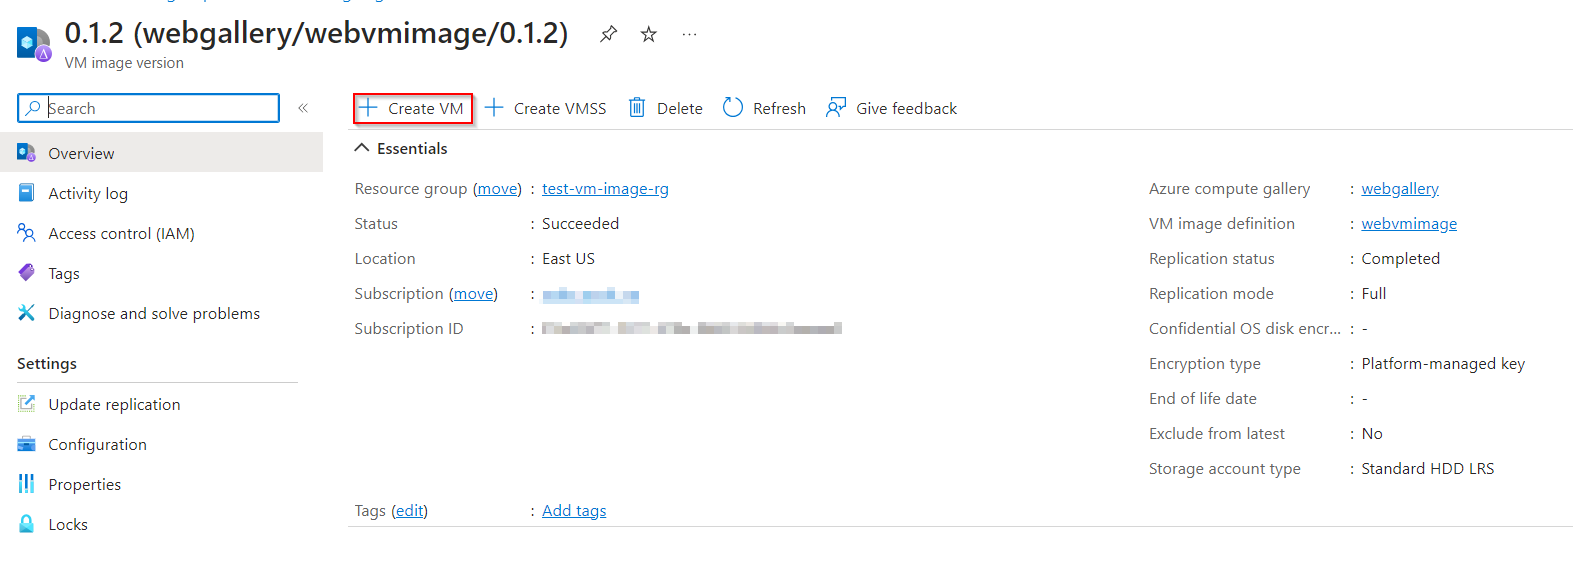
Step 4 : Once the image is created lets create VM from the Specialized Image.
Select the Specialized VM Image the we have created already.
..
Note : The ability to create Username and Password for Administrator in creating a Specialized Image, the information’s about Admin login’s and the Computer name is embedded in the image. So we cannot create new user name and password for the Virtual Machine.
We have to user the same VM credentials which we have created for the base virtual machine.
This is the key difference between the Specialized image and a Generalized image(we can new create user name and password).
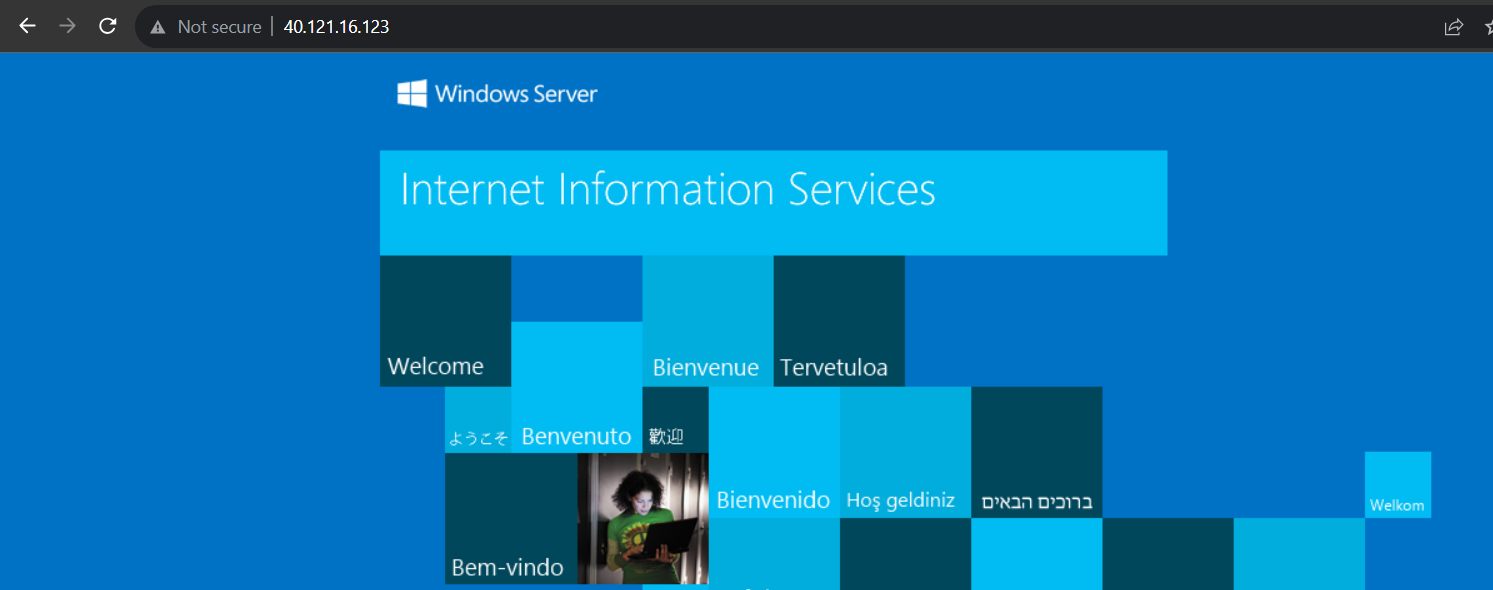
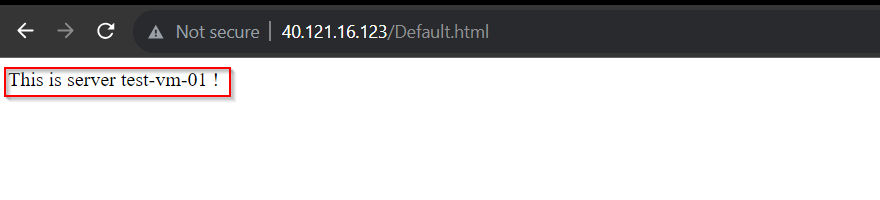
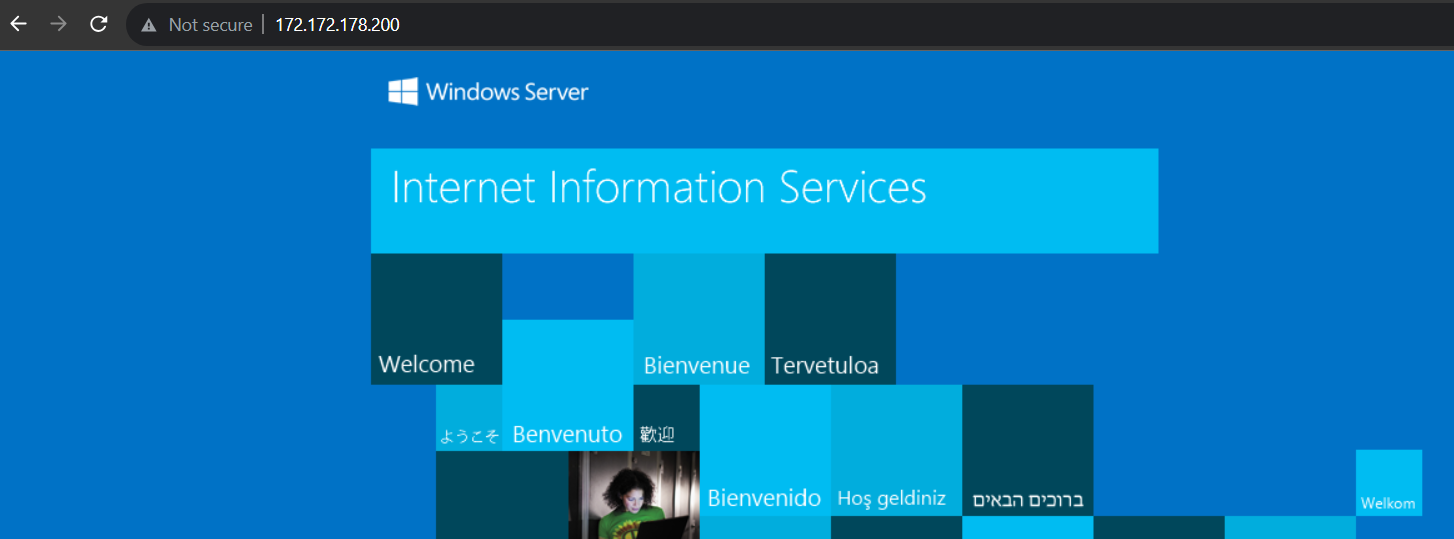
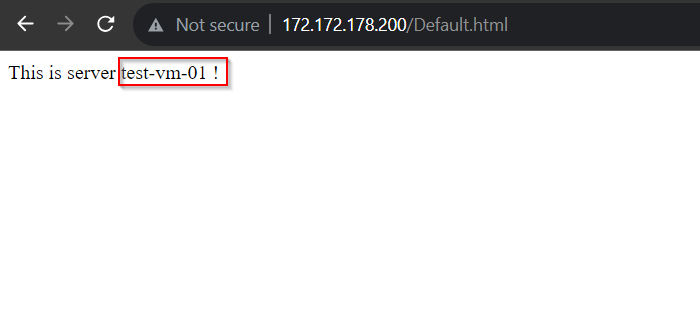
Step 5 : Lets check weather the IIS is install and also check for the Default Html page.
Internet Information Services:
Default Html Page:
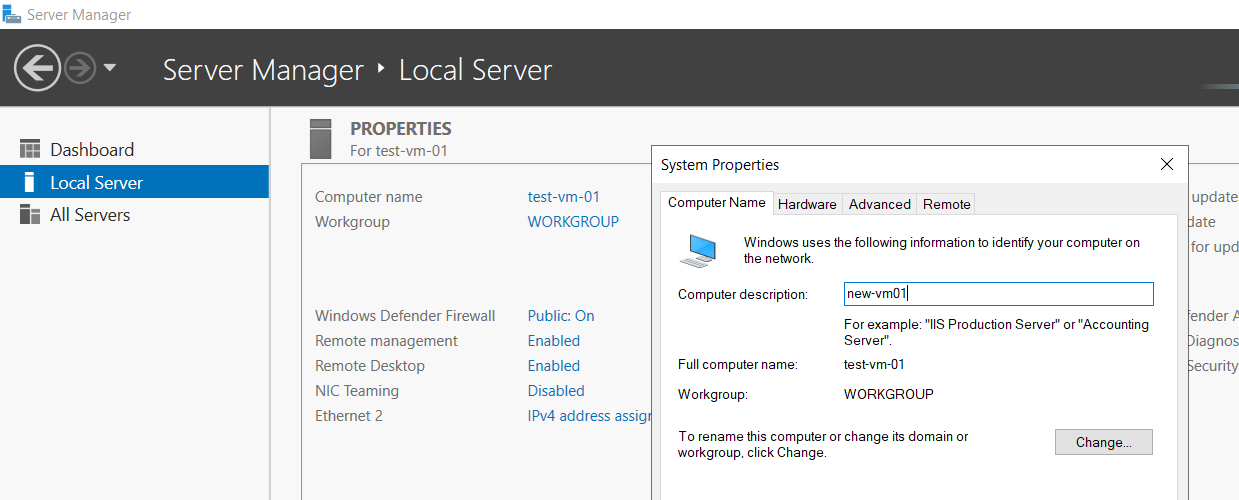
Note : The Computer name is still embedded in the New Virtual Machine.
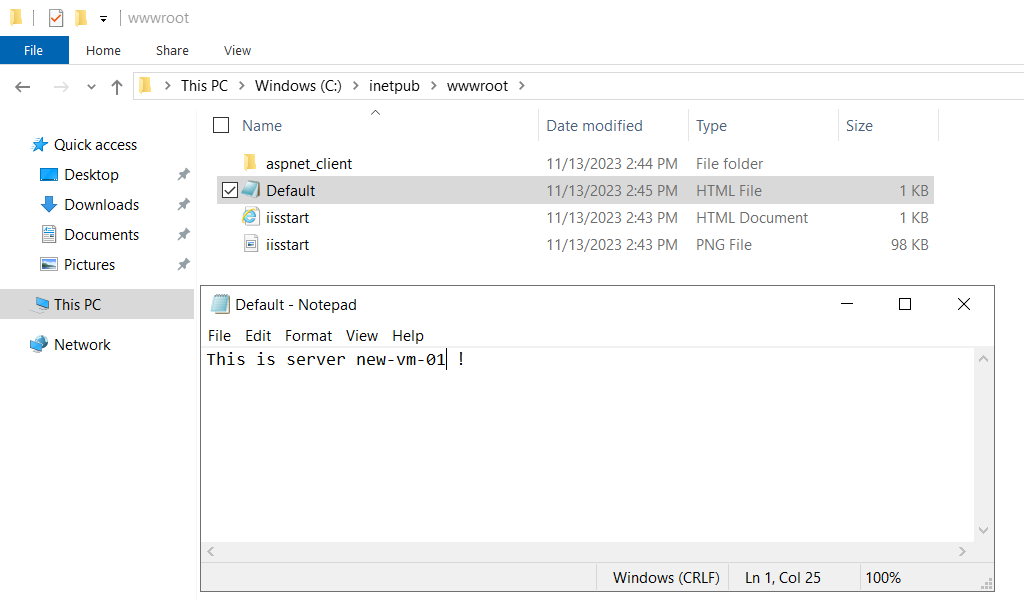
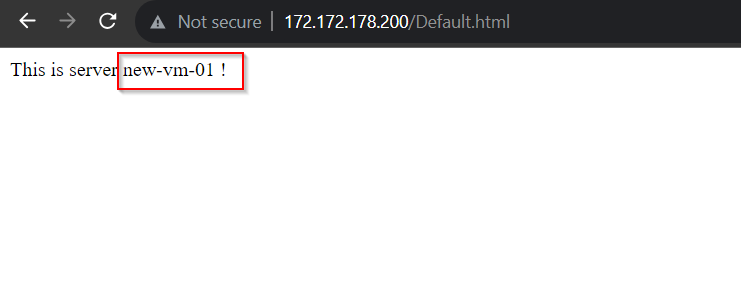
To change the Computer name, we should login the VM and do it manually. But the New computer name will be reflected in the Default Html page only if we edit that page.