33 C
Dubai
Tuesday, May 6, 2025
Home Blog Page 101

How to Create a Recovery Database in Exchange Server 2010

Its a Guest Post

There are several ways Exchange 2010 administrators can protect their users’ critical data, and a mix of approaches may be the best way to do this, depending upon your users’ needs. You can create Database Availability Groups (DAGs) to ensure that that mail remains available even if you suffer a server failure. You can span a WAN with a DAG to keep mail available even if you have a data Center outage. You can implement Exchange archiving to capture a copy of every email message that goes in or out of your environment to ensure you have a copy. You can create regular backups and store the tapes offsite to ensure you can restore content even after a user has accidentally deleted something critical. In this post we are going to take a look at how to create a recovery database in Exchange Server 2010 so that you can recover data from a backup in the event something happens.

Recovery databases are similar to other Exchange mailbox databases in that they require storage, will have both database and log files, and will consume the same amount of space for the same amount of data. However, that is where the similarities end. How recovery databases differ is important to understand.

1. A recovery database doesn’t count against any maximum number of databases your license entitles you to, so if you are using Exchange 2010 Standard, you can still have your five mailbox databases plus one recovery database.

2. You can only have one recovery database per server.

3. Client connections are blocked to recovery databases. You can mount a database and access mailboxes using MAPI based tools, but no client can connect.

4. Recovery databases aren’t treated like other mailbox databases. You cannot enable circular logging, retention policies are not applied, and you cannot run online maintenance.

5. ACLs are not maintained when you restore data to a recovery database. You get the content, but not the permissions.

You should also note that recovery databases are intended only to restore mailbox data. Public folder content cannot be recovered to a recovery database. You can recover data from the regular mailbox database or databases used for Exchange archiving, but not for public folders.

When you create a recovery database, consider that even with the limitations above, it is still an Exchange database. It will have a database file and also log files, and the I/O demands will be similar. You will also want to ensure that the volumes you use for the database and the log files have more free space than the largest mailbox database you may need to recover, as it will be a waste of time to start a recovery only to find you don’t have enough space to restore the backup database.

When you are ready to begin, open an Exchange Management Shell and run the following command, where you specify the full path for both the database and log files (different volumes are recommended) and you use the –recovery keyword to designate this as a recovery database:


New-MailboxDatabase –recovery –name “Recovery Database” –server MBXServer01
-edbfilepath d:\exchange\databases\ -logfolderpath l:\exchange\logfiles\ [enter]


While you can have multiple recovery databases in your Exchange organization, remember that you can have only one per server. Ensuring that the volume has enough space to accommodate the largest mailbox database you may need to recover will help speed those operations along, so consider reserving space on the fastest mailbox server you have so that if you do need to perform a recovery, you can do so as quickly as possible.

To enhance your backup and recovery plans, you should also implement Exchange archiving for users. You can copy all messages to the archive, or use DAGs to provide high availability to the most recent mail and provide each user with access to Exchange archiving to store messages that are older. Retention policies can move data from the primary mailbox to the Exchange archive as needed, so you get the best mix of high availability for the newest content, and you can use backups to ensure content store in Exchange archiving is safe as well.


This guest post was provided by Casper Manes on behalf of GFI Software Ltd. Read more on how to improve your Exchange archiving.

All product and company names herein may be trademarks of their respective owners.

How to Send an Smtp Email using Powershell – Send-MailMessage

Sending an Smtp mail using power shell as been simplified using “Send-MailMessage” Cmdlet

Lets see how to do it !!

Send-MailMessage –From "administrator@careexchange.in" –To "User1@domain.com", "User2@careexchange.in" -Subject "Mail using Powershell !!" –Body "Body of my Power shell Email" -Priority High -SMTPserver "Exchange2010 Server FQDN"

image

Logging into User1 or User2

Received the below email

image

Mail Generated to User1 and User2 Successfully !

Understanding Search with Outlook and Exchange – Special characters and substrings

Understanding Search queries with special characters is always important.

Searching a Special character – Let say the Subject contains “How are you ?” you search “?”


Understanding Search of substrings is also important

Searching a Substring – Let say the Subject Contains “Testtrick1” you search “Trick1”


1.When Outlook is in Online mode it uses the Exchange Search

2.When Outlook is in Cache mode it uses the Desktop Search otherwise called as Instant search


1. When Outlook is in Online mode it uses the Exchange Search


Searching a Special Character alone does not search in Exchange 2003,2007,2010


For Example “Subject: Do you have 10$”

image

Searching for a Special Character “$” Does not give us appropriate Results

!@#$%^&*()etc

image

Whole String 10$ Searches it

image

But Searching for 0$ – Substring does not work

Some Examples – subject is “Exchange2010?” – Searching for “2010?” substring does not work

image


2.When Outlook is in Cache mode it uses the Desktop Search otherwise called as Instant search


Searching a Special Character alone does not search in Outlook 2003,2007,2010


Instant Search will ignore this special characters as the index of Instant Search is word-based only


For the same example “Subject: Do you have 10$”  having Outlook in Cache Mode

image

Searching for a Special Character “$” Does not give us appropriate Results

!@#$%^&*()etc

image

Whole String 10$ Searches it

image

But Searching for 0$ – Substring does not work

Some Examples – subject is “Exchange2010?” – Searching for “2010?” substring does not work

image


This how its designed to give out better search results instantly !!

How to Turn Off User account Control In Windows Server 2008 R2

In Some Scenarios , we end up in Turning of UAC , User account Control to get rid of Permission issues on the server.


Let see , How to do it.

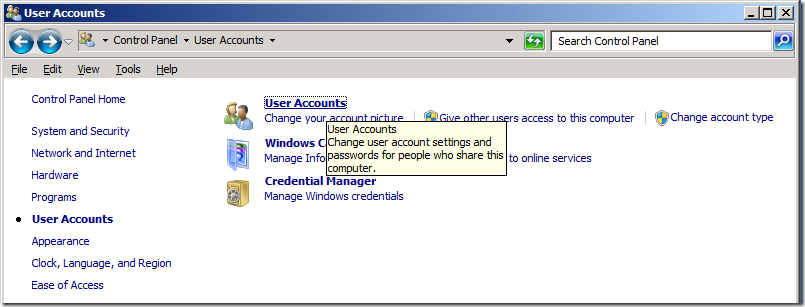
Start – Control Panel – User accounts

image

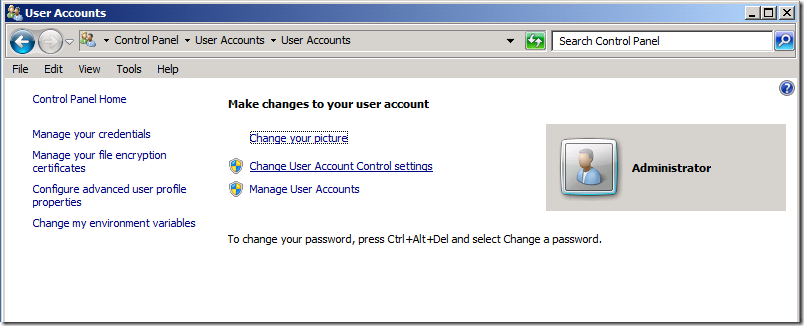
User accounts

image


Change User Account Control Settings

image


Get this dragged to “Never Notify” – Which gets the UAC “User account Control” disabled

image


This requires a Reboot to get it applied on the user completely


Its not over . If you feel User account control still interrupts – Which might be managed via Local Policy on the computer


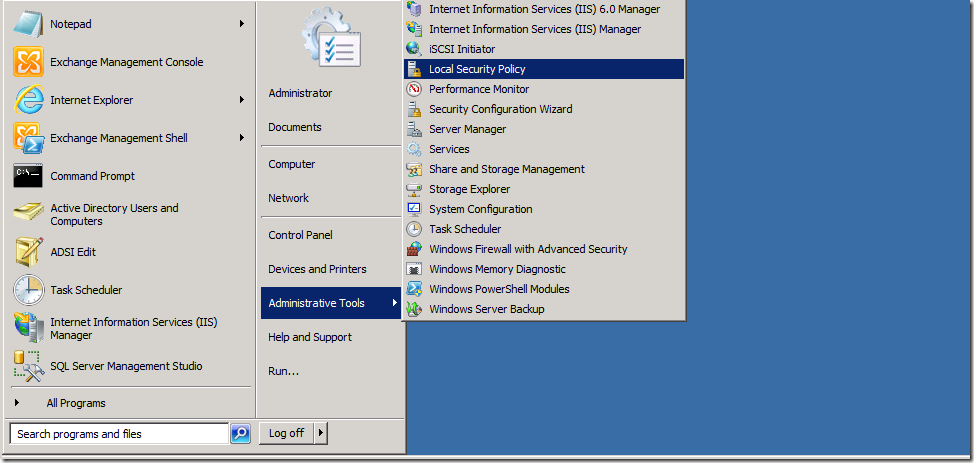
Start – Administrative Tools – Local Security Policy

image


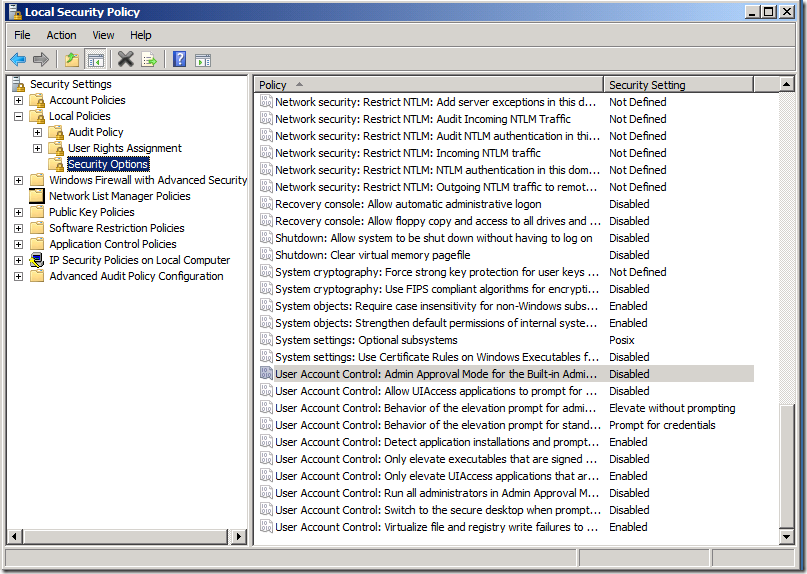
Security Settings – Local Policies – Security Options

image


Check “User account Control : Admin Approval Mode is disabled


Verifying the above things. User account Control (UAC) – Does not interrupt or create permission issues on the server


Reference link:

http://technet.microsoft.com/en-us/library/cc709691(v=ws.10).aspx#BKMK_S3


Regards

How to Remove or Replace or Add a Entry in a Attribute in Bulk using ADmodify Tool

Lets say I want to Clear or modify or set a attribute in Active Directory for more objects in Bulk


ADModify is the best tool to do it , I would say


Let us see how to Add a Entry in a attribute

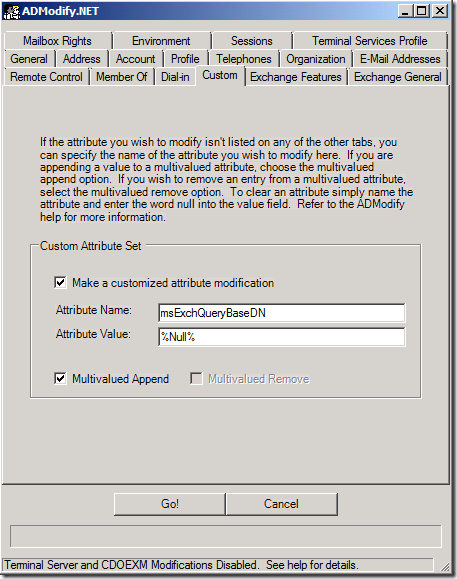
For Example – I may have to set or clear the value of this attribute “msExchQueryBaseDN” in Exchange 2010

Clearing for some users might be simple to do it , But in Bulk Admodify is one of the best tool to do it


image

Download Admodify

Extract in – Use it on a DC or Exchange Server

I prefer it on a DC

Run Admodify.exe

image


3 Tasks on this Page

——————————

1. Choose “Domain Partition”

2. Choose “Domain Controllers List”

3. Uncheck “Show Containers only”

image

Choose the Whole OU or Specific Users

and Add to List

image


Now Choose “Select All”

image

You can choose any tab and Customize in Bulk

image

In our Case its – attribute “msExchQueryBaseDN”

Choose “Custom” tab


5 Tasks

————-

1. Have Checked “Make a customized attribute modification”

2. Entered the attribute Name – Where I need to modify

3. Attribute Value

4. Check “MultiValued Append”

— Why yo Choose “MultiValued Append”

If there is Entry already available – Where some attributes have multiple entries – It does not going to remove the Existing ones.

Instead adds an Extra entry to the same attribute

— Check or Uncheck – Depends on your situation –

By default you can check it Cause it won’t bring you harm if you happen to edit a attribute which has multiple values

5. Choose Go

image

It will add the Entries on all the Chosen objects

image


To Clear an Existing Attribute


5 Tasks

————-

1. Have Checked “Make a customized attribute modification”

2. Entered the attribute Name – Where I got to modify

3. Attribute Value “%Null%

4. Check “MultiValued Append”

5. Choose Go


image

It takes the Attribute to “Not Set”

image


Great !!


You learnt to Use Admodify Tool

Cross forest Move Mailbox in Bulk – Exchange2010 to Exchange 2010

As a Initial Process Please Follow

Cross Forest Migration Guide – Exchange 2010 to Exchange 2010


Lets see how to Move Mailboxes in Bulk in Cross forest scenario

Taking the Dump is always  the same way , Whatever the version your migrating to

I have collected the my users in the same OU so that I can take the Dump easily


my OU (Organizational Unit)  Name is “SourceUsers”

image

I need the Distinguish name of my OU (Organizational Unit)

View->Advance Features

image

Right Click – Properties of your OU (Organizational Unit) – Attribute Editor

Get the Value of “Distinguished Name”

In my case its “OU=SourceUsers,DC=CareExchange,DC=in”

image


Open Command prompt

Run

csvde -d “OU=SourceUsers,DC=CareExchange,DC=in” -f c:\SourceUserDump.csv -r (objectclass=user) –l mail

image

Now it Collected the 5 Mailboxes available

Now your Notepad will look like this

image

Remove the first Column – Use Excel or Use Notepad – Its up to you –

Note – First Line contains the title – Identity

Now it should look like below

image


To Verify Run Import-Csv “SourceUserdump.csv”

image


Now you can Import the CSV Pipe it to the Script as Below

Import-Csv “SourceUserdump.csv” | .\Prepare-MoveRequest.Ps1 -RemoteForestDomainController “FQDN of Source DC” -RemoteForestCredential $RemoteCredentials -LocalForestDomainController “FQDN of Target Forest DC” -LocalForestCredential $LocalCredentials -TargetMailUserOU “Distinguished name of OU in TargetForest” –UseLocalObject


If your doing for many objects , Its going to run fast and Errors won’t get saved

I would recommend to run Start-Transcript C:\MoveDump.txt

So that you have the right data in hand

To stop the Transcript – Stop-Transcript

image


Now you got your disable accounts Created

image


Now move the Users using ADMT migrating with SIDs

How to Migrate Users Across forest (Cross Forest) using ADMT 3.2 with sid and Passwords

image


Now accounts are activated with SID

image


Now Moving the mailbox using Remote Move


Import-Csv “SourceUserdump.csv” |New-MoveRequest –Remote –Remotehostname ‘sourceExchange.CareExchange.in’ -RemoteCredential $RemoteCredentials –TargetDeliverydomain ‘targetexchange.in


image


image


Now you won’t be able to logon on the new forest directly as you required to change password as first logon

To avoid that situation

see

How to Disable “User must change password at next logon” after cross forest move using ADMT 3.2


Great !!


you Learnt how to Move in Bulk in Cross forest Scenario


Regards

Satheshwaran Manoharan

× How can I help you?