38 C
Dubai
Saturday, May 3, 2025
Home Blog Page 45

MS Filtering Engine Update process was unsuccessful to download

Log Name:      Application
Source:        Microsoft-Filtering-FIPFS
Event ID:      6027
Level:         Error
Keywords:
User:          NETWORK SERVICE
Computer:      EXCH1.azure365pro.com
Description:
MS Filtering Engine Update process was unsuccessful to download the engine update for UM from Primary Update Path.
Update Path:http://amupdatedl.microsoft.com/server/amupdate
UpdateVersion:
Reason:”There was an error while downloading the universal manifest. Error:Unable to load universal manifest from: http://amupdatedl.microsoft.com/server/amupdate/metadata/UniversalManifest.cab : The operation timed out
(Universal Manifest)”

Solution –

Make sure Proxy is Configured

Load PowerShell Snap in

Add-PsSnapin Microsoft.Forefront.Filtering.Management.Powershell

You can check its not updating – UpdateAttemptFailed

Get-EngineUpdateInformation

image

Get-ProxySettings

image

Set-ProxySettings -Enabled $true -Server 172.17.17.10 -Port 80

image

Browse to

C:\Program Files\Microsoft\Exchange Server\V15\Scripts
.\Update-MalwareFilteringServer.ps1 -Identity mbx.azure365pro.com

image

Now you can see Malware engine is updated.

You can see UpdateAttemptNoUpdate with lastUpdated date

image

You can see a successful event.

Log Name:      Application
Source:        Microsoft-Filtering-FIPFS
Event ID:      6036
Level:         Information
User:          NETWORK SERVICE
Computer:      exch1.azure365pro.com
Description:
MS Filtering Engine Update process has successfully committed and handed off updates for Microsoft
Last Checked:2018-04-28T17:23:07Z
Last Updated:2018-04-28T17:23:17Z
Engine Version:1.1.14800.3
Signature Version:”1.267.523.0″
Update Version:1804280009
Last Definition Update:?2018?-?04?-?28T10:16:10.000Z
Update Path:http://amupdatedl.microsoft.com/server/amupdate

Policies you should never configure on Windows 10 with WSUS

When you have windows 10 in your environment and machines are configured with Windows Server Update Services. You should never configure Branch readiness level or tried to delay or defer feature  upgrades or quality updates using group policy.

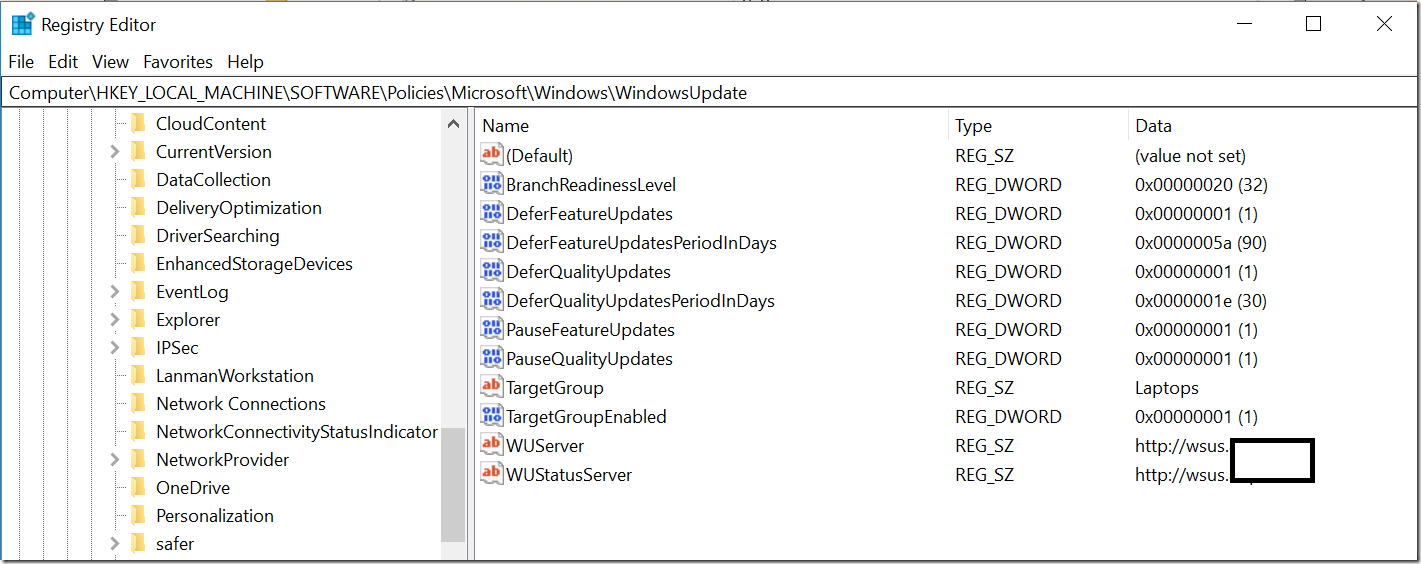
If you do that . The moment any one of these policies are configured, even if these are set to be “disabled”, a new behavior known as Dual Scan is invoked in the Windows Update agent. where windows will try to update from Online servers directly and from wsus. and you can see random clients getting feature upgrades.

image

Random clients will start getting feature upgrades in a windows environment like below. Causing inconsistent versions in the environment. when you have various clients computers using legacy applications. you never want to roll out something which you never tested.

image

Once you set these Policies to “Not Configured”

Windows Updates Registry – When any of the policies configured.

image

When all the policies set to Not Configured. Requesting the Windows 10 clients to talk to Speak to wsus only for upgrades and updates.

image


Reference link –

https://cloudblogs.microsoft.com/windowsserver/2017/01/09/why-wsus-and-sccm-managed-clients-are-reaching-out-to-microsoft-online/

Certificate is invalid and revocation check failure in Exchange Server

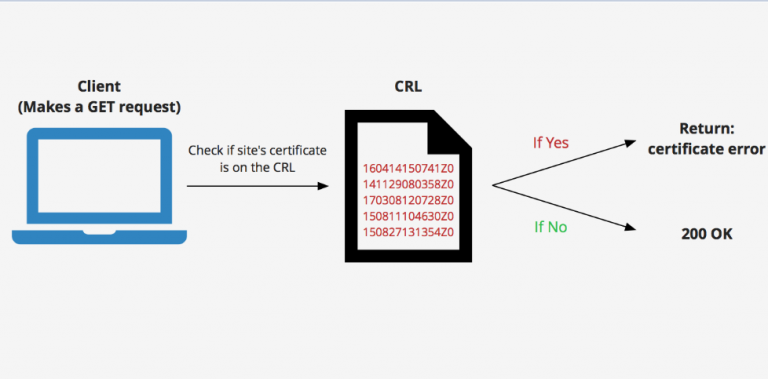
When you import a certificate from a certificate authority . It checks the revocation status of an SSL Certificate, the client connects to the URLs and downloads the CA’s CRLs. Then, the client searches through the CRL for the serial number of the certificate to make sure that it hasn’t been revoked.

but when exchange servers has internet. It will not have any issues. But when its behind the proxy. it may not have issues if your proxy is configured through .use automatic detect settings.

As it uses the system account  –  System account has its own proxy settings – Lets see how to access the systems account proxy settings.

image

image

Revocation Check failure

image

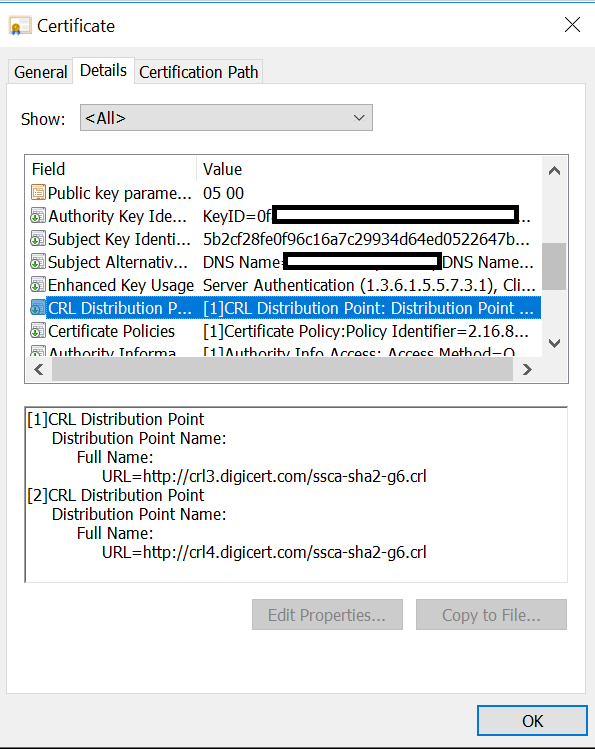
To check your CRL urls – Use internet explorer – Security lock – view certificates

Solution –

Download Sysinternals to check the system proxy settings

Get PsExec.exe into a folder. browse to command prompt.

image

PsExec.exe –i –d –s cmd

run whoami make sure you are in system account proxy settings

inetcpl.cpl to access system proxy settings

So that we can change the win http proxy settings of the system.

image

Entered my proxy settings. Click ok.

image

Reboot the server.

Certificate is valid now.

image

Create Shared Disks for Oracle Linux in VMware

Lets see if you wish to create a shared disk on a Oracle Linux virtual machine. The only difference i could see in a oracle linux you choose LSI Logic parallel and its recommended to choose VMware Para Virtual if its only a Oracle Rac cluster.

The multi-writer option allows VMFS-backed disks to be shared by multiple virtual machines. Used by Third-party cluster-aware applications like RedHat 6 or later with GFS File systems and Oracle RAC Clusters.

I do have a dedicated article to  Create Shared Disks for Oracle RAC Clusters in VMware

If the SCSI Controller is not added in the Oracle Iinux Vm, Machine needs to be offline in order to do it.

Lets see how to do it.

Edit Settings of the First Node in the Cluster.

Add SCSI Controller Add

In SCSI Bus Sharing : None

Change Type : LSI Logic Parallel

image

Now Add the Hard Disk in the First node in the Cluster

image

Now Choose

  • Thick Provision Eager Zeroed
  • Sharing Multi Writer
  • Choose Virtual Device Node you just created.
  • Disk mode – Independent Persistent
  • In my Case SCSI Controller 1 – SCSI 1:0

image

Now All done with the First Node. if you need more Shared Disks on the Same Virtual Machine. You can use the Same Physical Controller you Created

Additional Disk2 will be SCSI 1:1

Additional Disk3 will be SCSI 1:2

Now Edit Settings Copy the Disk File Name you just Created. For Example – [DataStore1]Vmname/Vmname_1.vmdk

Note : From Third Disks onwards You have to Choose Manage other disks in order to change its settings.

Now go to Second Node in the Cluster –

Add SCSI Controller Add

In SCSI Bus Sharing : None

Change Type : LSI Logic Parallel

image

Now Add Existing Disk –

Now Choose

  • Thick Provision Eager Zeroed
  • Sharing Multi Writer
  • Choose Virtual Device Node you just created.
  • In my Case SCSI Controller 1 – SCSI 1:0 Matching the First Node to be precise.
  • Disk mode – Independent Persistent

image

Disadvantage of doing this Now Storage Vmotion is not Possible. Unless your bus sharing is physical.

Good to know –

Actions or Features Supported Unsupported Notes
Power on, off, restart virtual machine
Suspend VM
Hot add virtual disks Only to existing adapters
Hot remove devices
Hot extend virtual disk
Connect and disconnect devices
Snapshots Virtual backup solutions leverage snapshots through the vStorage APIs; for example, VMware Data Recovery, vSphere Data Protection. These are also not supported.
Snapshots of VMs with independent-persistent disks Supported in vSphere 5.1 update2 and later versions
Cloning
Storage vMotion Neither shared nor non-shared disks can be migrated using Storage vMotion due to the virtual machine stun required to initiate the storage migration.
Changed Block Tracking (CBT)
vSphere Flash Read Cache (vFRC) Stale writes can lead to data loss and/or corruption
vMotion Supported for ORAC only and limited to 8 ESX/ESXi hosts

If its a Oracle Linux VM . Below ensures that the disks falling out of order will not cause issues in ASM

  1. shut down your virtual machine
  2. right-click on the VM’s entry in the left-hand panel and select Edit Settings
  3. click on the Options tab
  4. select the Advanced -> General item on the left and click on the Configuration Parameters

image

  1. Click on the Add Row button
  2. Click Add Row.
  3. In the Name column, enter disk.EnableUUID
  4. In the Value column, enter TRUE

image

  1. Click OK and click Save.
  2. Power on the virtual machine.

Reference –

https://kb.vmware.com/selfservice/microsites/search.do?language=en_US&cmd=displayKC&externalId=1034165

https://access.redhat.com/solutions/94583

https://access.redhat.com/solutions/158873

Configure f5 LTM with Exchange Server 2016

Had to deploy Exchange server 2016 with F5 Local Traffic manager (LTM) and F5 Application Security Manger (ASM) . Lets see how to configure it

Points to Consider –

  • F5 Local Traffic Manager (LTM) should be the gateway for the exchange server. (Highly recommended to reduce complexity and retain SMTP source IP)

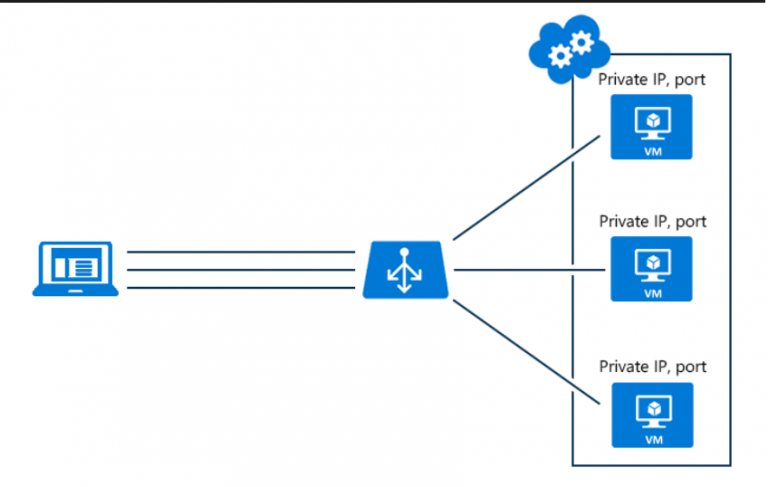
Load balancing SMTP traffic and to retain the source ip in the exchange logs you need to disable SNAT/Auto map. so make sure f5 is your gateway when you deploying exchange with f5.  I have stretched my Exchange server VLAN and added as a Self IP in F5 and self ip will be my gateway for the exchange servers in the same VLAN.

As a first step your f5 should act as a router .Create a forwarding virtual servers and set source address translation snat/automap to none. So that now all my Exchange server outbound traffic goes out to the gateway and but it won’t know the route to come back to exchange server

  • Create a Forwarding IP virtual Server
  • Source address 0.0.0.0/0
  • Destination address 0.0.0.0/0
  • Service Port All Ports
  • State Enabled

image

  • Choose All Protocols so that ICMP will work
  • Choose protocol client Profile as fastL4
  • Choose Enable on Exchange server VLAN only
  • Source address translation set to none

image

Now Exchange servers gateway is f5 on the same VLAN and VLAN is forwarding all traffic from the f5 to its default gateway .

Now whatever is your default gateway Cisco Router or Firewall . Create a static route to route back the traffic to f5 floating ip. So you are making sure all the traffic via exchange servers goes to f5 and comes via f5.

get the ssl ready on exchange servers  Configuring 3rd Party SSL Exchange Certificate in Exchange 2016

we need to export the file as .pfx or use mmc to export the cert as .pfx with the private key.

image

Configuring SSL Profiles in F5 –

  • Import the Exchange Certificate (.pfx with private key)  to the f5 device

image

System – File management – SSL Certificates list –

  • Import type  – PKCS 12 (IIS)
  • Create new – Exch_Cert
  • choose file – Choose .pfx file
  • Enter the password
  • Key security – Normal

Choose Import

image

also import the root chain. get it from your certificate authority. in my case its digicert

image

image

Creating Client SSL Profile.

image

Choose the SSL Client Profile Name

Choose Parent Profile

Choose Custom

Add the Certificate you imported.

image

  • Choose Certificate
  • Choose Certificate for key ( As we imported with private key)
  • Choose Chain
  • Leave the passphrase empty
  • OCSP Stapling – none
  • Click add

image

  • Choose Finished now SSL Client is ready.

Create Server SSL Profile . Redo the same process of choosing the same cert.

image

Now you have a client ssl and server ssl profile.

  • Now we are on the same VLAN
  • Have the SSL profiles ready.

lets go the iApp templates

We need iApp Templates to configure the internal LTM . As you have a f5 account. login to https://downloads.f5.com and download iApp Templates

image

Download iapps .zip and extract it

image

Extract the zip file.

C:\iapps-1.0.0.500.0\Microsoft\Exchange_2016\f5.microsoft_exchange_2016.v1.0.2.tmpl

image

Login to F5 Local Traffic Manager (LTM)

iApps – Templates – Templates + – Choose Import

image

Choose the f5.microsoft_exchange_2016.v1.0.2.tmpl and Click on Upload

image

Click on Application Services – Create

image

Choose Name and Template

  • Exchange-2016_.
  • f5.microsoft_exchange_2016.v1.0.2

image

Choose – Yes , Show all inline help

image

Choose – Local Big-IP load balances and optimizes traffic

image

  • Choose incoming traffic as Encrypted
  • Choose Re-encrypt (SSL Bridging) – You have to choose this as Exchange can’t run on HTTP
  • Choose Client SSL Profile you created
  • Choose Server SSL Profile you created
  • Choose Optimize Connections for WAN clients. (As majority of my users are connecting via WAN)
  • Choose Same Subnet for BIG ip virtual servers and mailbox servers ( In most the network designs you can always stretch the VLAN and use in on F5 .It will be a clean design)

image

  • Choose the maximum number of concurrent users fewer than 6000 . 64,000 concurrent connections is more than sufficient for a 3000+ mailbox environment in this specific case.
  • Choose Use a single IP address for all connections
  • Choose All services will be handled by the same set of mailbox servers (In my case – have 4 nodes with same configuration in parallel )
  • All Services will be handled by the same set of mailbox servers

image

  • Choose – Server pool settings – Use settings recommended by f5
  • choose the Virtual ip will be used
  • Choose yes for deploying ECP ( Disable Admin ECP at Server level if required)
  • Choose Deploy EWS and OAB ( most common)
  • Choose MAPI over HTTP and RPC over HTTP  (Only Exchange 2016 mailboxes use MAPI over HTTP by default)

image

  • Choose Yes of Active sync
  • Yes for Autodiscover
  • Choose yes , if imap and pop3 needs to be enabled
  • Enter the mailbox server ips

image

Choose FQDN for OWA/MAPI/Outlook anywhere/EWS/Active sync/autodiscover

image

Choose finish. Now iApp with Exchange HTTPS traffic is Configured.

Now lets see how to retain the source ip for http/https traffic and Source address translation is enabled by default on the HTTPS pool Configured by the template. I want to keep the design and configuration minimal so that when you import or replace or upgrade templates. no much additional configuration is needed. Also note that X-Forward-For is enabled by default on the http profile which will remain untouched.

image

Now Open Exchange server IIS . Choose logging

image

Select Fields

image

  • Field Name – Source-IP
  • Source Type – Request Header
  • Source – X-FORWARDED-FOR

image

Add the Custom Field

Do iis reset

C:\inetpub\logs\LogFiles\W3SVC1 Check the latest log. you can see the correct source ip and not the F5 floating / non floating ips

Lets configure the SMTP Load balancing now .

As seen above , now choose the SMTP template , Import it.

image

Basic – Use F5’s recommended settings

image

  • Choose BIG IP virtual Server IP and SMTP servers are on the same subnet
  • Choose fewer than 64,000 Concurrent connections per user

image

Choose Encryption – Do nothing (No Encrypted SMTP Traffic)

Choose the same VIP as HTTPs to simplify the setup.

Choose create new pool and add the mailbox servers

image

Choose the fqdn for smtp and choose no authentication required and no message submitted as Exchange will handle the rest.

image

Choose the defaut frontend receive connector

image

  • Uncheck anonymous users to stop using this connector to receive internet email .  ( Recommended )

image

and create anonymous relay connectors for Applications which need to send out to the internet.

Anonymous Application relay connectors in Exchange 2016

and create a dedicated internet connector To receive email from internet or anti-spam appliances

Make sure connector log set to verbose

image

Check connector logs in below location to check your valid source ip of SMTP Traffic

C:\Program Files\Microsoft\Exchange Server\V15\TransportRoles\Logs\FrontEnd\ProtocolLog\SmtpReceive

Hope it will help many . As I wasted too much time on this. F5 deployment guides are huge.  I will be sharing the F5 asm configurations on my next blog

Installation can’t proceed until all Exchange 2003 Servers are removed

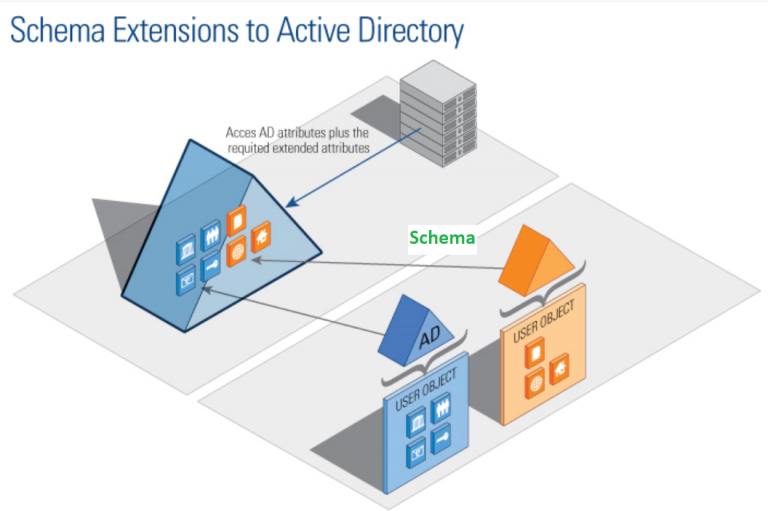
Had to extend schema before installing Exchange 2016 on a Exchange 2010 Server environment. Eventually there was an error stating Exchange schema extension can’t proceed until Exchange 2003 servers are removed. while browsing the server objects in Adsiedit.msc the exchange 2003 old object was still exist in the environment where it wasn’t uninstalled properly.Lets see how to remove it safely using adsiedit as the Exchange 2003 servers already removed from the environment.

Note : Before doing anything using adsiedit.msc . please take a full system state backup of active directory .

image

.\setup /PrepareSchema /IAcceptExchangeServerLicenseTerms

Microsoft Exchange Server 2016 Cumulative Update 9 Unattended Setup

Copying Files…
File copy complete. Setup will now collect additional information needed for installation.ad
Performing Microsoft Exchange Server Prerequisite Check

Prerequisite Analysis                                                                             100%

Cannot find the Recipient Update Service responsible for domain ‘DC=azure365pro,DC=com’. New and existing users may not be
properly Exchange-enabled.
For more information, visit: http://technet.microsoft.com/library(EXCHG.150)/ms.exch.setupreadiness.RusMissing.aspx

One or more servers in the existing organization are running Exchange 2000 Server or Exchange Server 2003. Installation
can’t proceed until all Exchange 2000 or Exchange 2003 servers are removed.
For more information, visit: http://technet.microsoft.com/library(EXCHG.150)/ms.exch.setupreadiness.Exchange2000or2003Pr
esentInOrg.aspx
The Exchange Server setup operation didn’t complete. More details can be found in ExchangeSetup.log located in the
<SystemDrive>:\ExchangeSetupLogs folder.

Solution –

In my case – Public Folder Hierarchies wasn’t moved to Exchange 2010.

Logged in to adsiedit.msc – Configuration Partition –

CN=Services,CN=Microsoft Exchange,CN=<ORGANIZATION>,CN=Administrative Groups,CN=first administrative group,CN=Folder Hierarchies,CN=Public Folders

CN=Services,CN=Microsoft Exchange,CN=<ORGANIZATION>,CN=Administrative Groups,CN=first administrative group,CN=Server,CN=Exchange 2003 object name.

image

Now Created a Folder Hierarchies below Exchange Administrative Group. (Right Click on Exchange Administrative Group)

Create Object – msExchPublicFolderTreeContainer , Enter Folder Hierarchies

image

image

image

Now Right click on CN=Public Folders . Select Move. And move to E

image

Now Move CN=Public Folders move to Folder Hierarchies below Exchange Administrative Group

image

Then Delete the Folder Hierarchies below First Administrative Group. (Which should be empty now)

Remove the Exchange 2003 Server object below servers container. and Remove the empty servers container.

image

Now Extend the schema . Exchange server 2016 schema will extend successfully.

image

× How can I help you?