Enable Endpoint Detection and Response and onboard to Security Portal
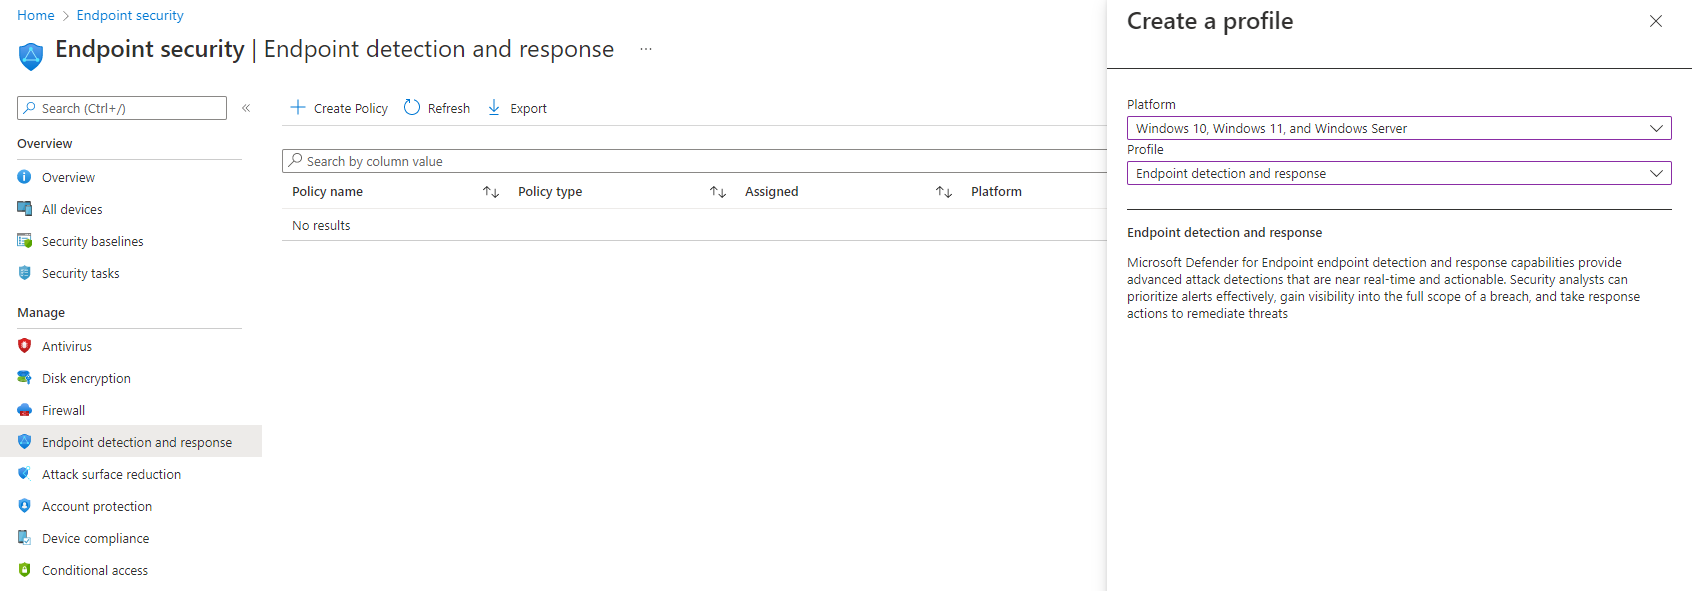
You can see devices are onboarded at https://security.microsoft.com/ Portal


Enable Endpoint Detection and Response and onboard to Security Portal
You can see devices are onboarded at https://security.microsoft.com/ Portal

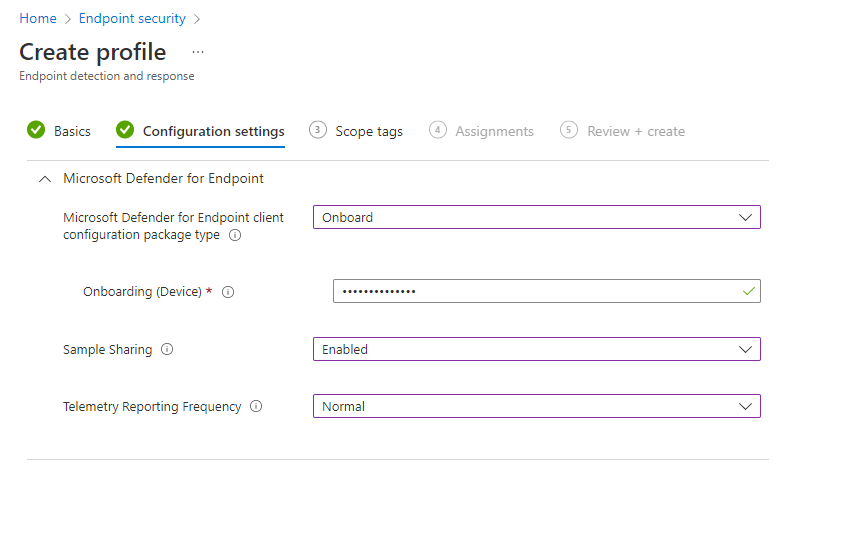
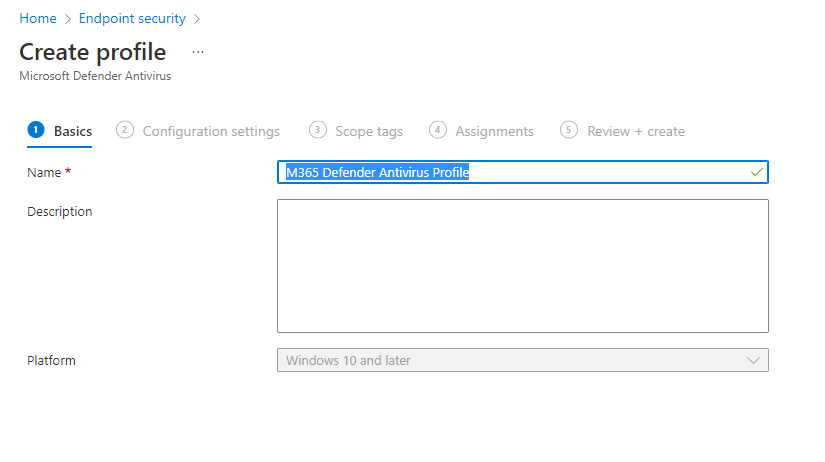
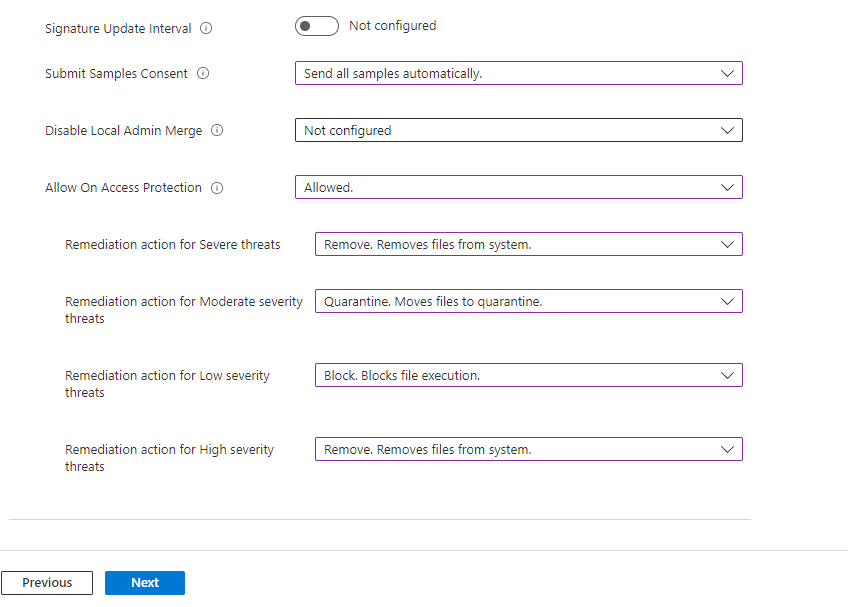
Configuring Defender Antivirus Policy in Microsoft Endpoint Manager.
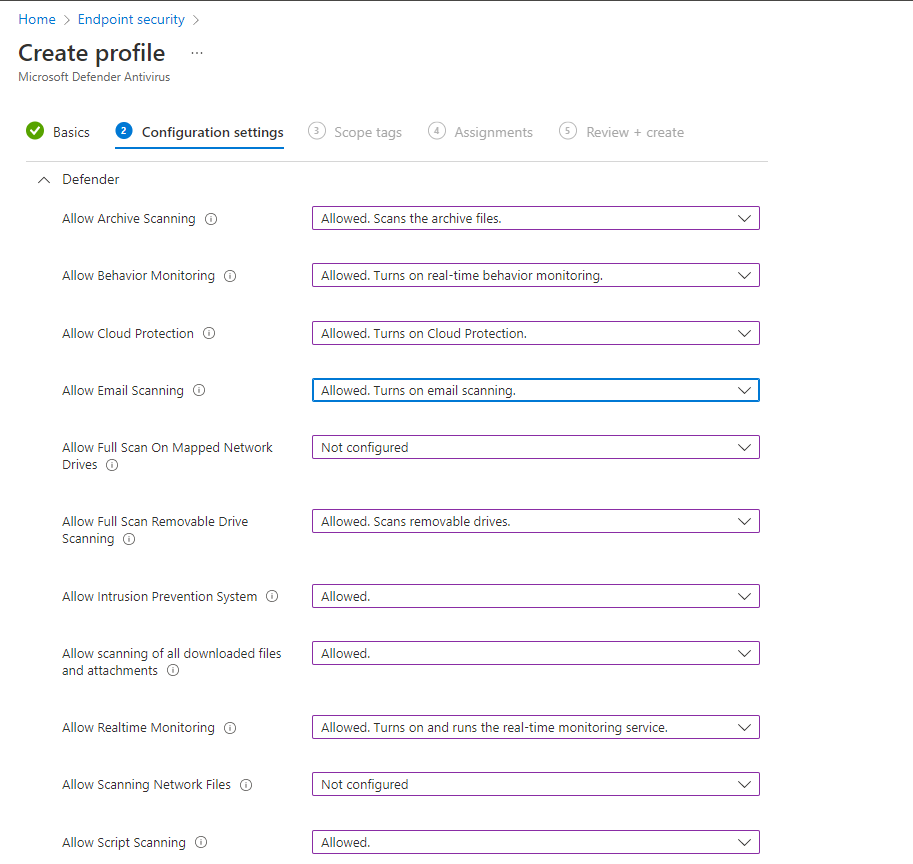
Allow Archive Scanning
Allowed. Scans the archive files.
Allow Behavior Monitoring
Allowed. Turns on real-time behavior monitoring.
Allow Cloud Protection
Allowed. Turns on Cloud Protection.
Allow Email Scanning
Allowed. Turns on email scanning.
Allow Full Scan On Mapped Network Drives
Not configured
Allow Full Scan Removable Drive Scanning
Allowed. Scans removable drives.
Allow Intrusion Prevention System
Allowed.
Allow scanning of all downloaded files and attachments
Allowed.
Allow Realtime Monitoring
Allowed. Turns on and runs the real-time monitoring service.
Allow Scanning Network Files
Not configured
Allow Script Scanning
Allowed.
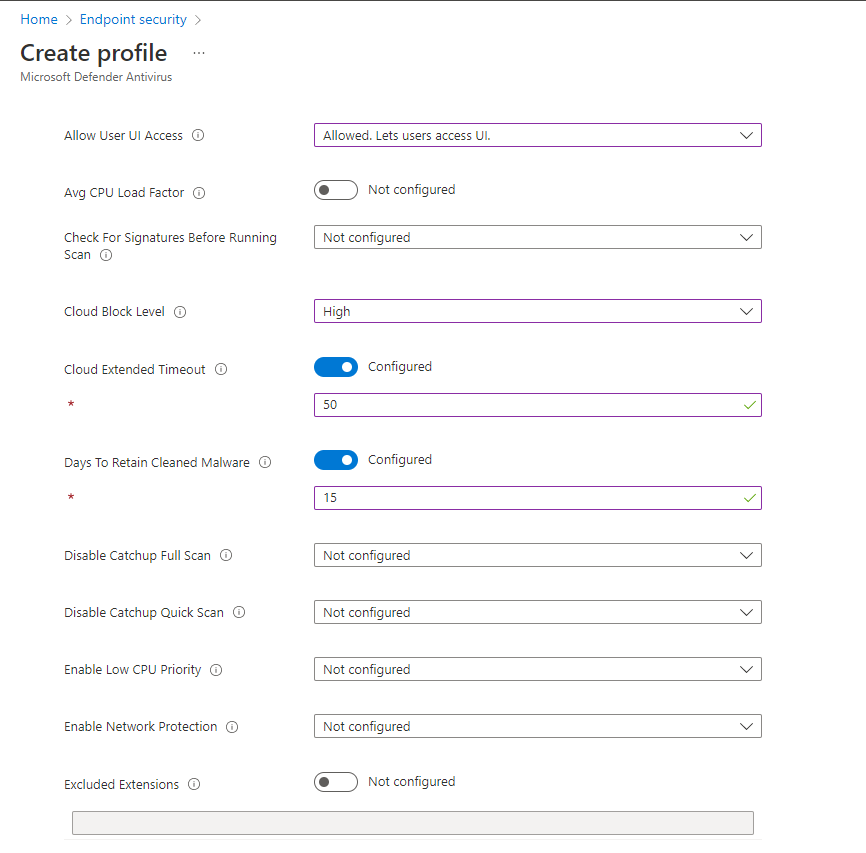
Allow User UI Access
Allowed. Lets users access UI.
Avg CPU Load Factor
Not configured
Check For Signatures Before Running Scan
Not configured
Cloud Block Level
High
Cloud Extended Timeout
50
Days To Retain Cleaned Malware
15
Disable Catchup Full Scan
Not configured
Disable Catchup Quick Scan
Not configured
Enable Low CPU Priority
Not configured
Enable Network Protection
Not configured
Excluded Extensions
Not configured
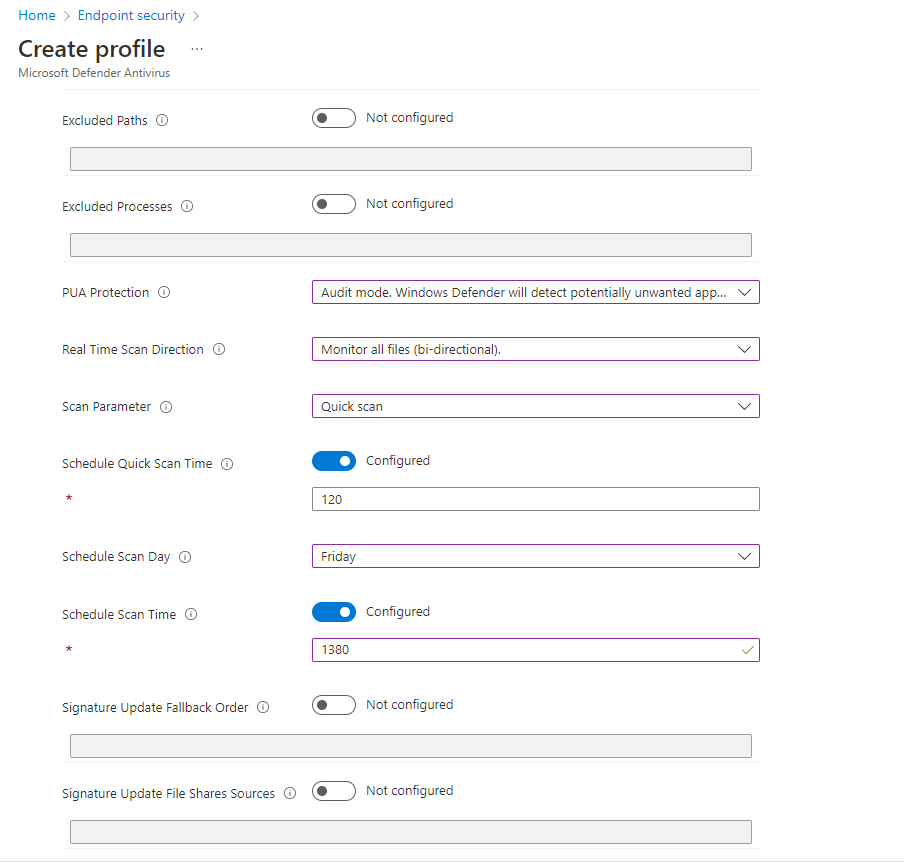
Excluded Paths
Not configured
Excluded Processes
Not configured
PUA Protection
Audit mode. Windows Defender will detect potentially unwanted applications, but take no action. You can review information about the applications Windows Defender would have taken action against by searching for events created by Windows Defender in the Event Viewer.
Real Time Scan Direction
Monitor all files (bi-directional).
Scan Parameter
Quick scan
Schedule Quick Scan Time
120
Schedule Scan Day
Friday
Schedule Scan Time
1380
Signature Update Fallback Order
Not configured
Signature Update File Shares Sources
Not configured
Signature Update Interval
Not configured
Submit Samples Consent
Send all samples automatically.
Disable Local Admin Merge
Not configured
Allow On Access Protection
Allowed.
Remediation action for Severe threats
Remove. Removes files from system.
Remediation action for Moderate severity threats
Quarantine. Moves files to quarantine.
Remediation action for Low severity threats
Block. Blocks file execution.
Remediation action for High severity threats
Remove. Removes files from system.

Creating Conditional Access and applying for a large subset of users is a project by itself. Creating conditional access and populating more and more users into it to increase adoption is perfectly fine. but as we progress new users keep increasing , there comes a stage where you want to make the new users coming into the policy automatically So that you can close out at some stage.
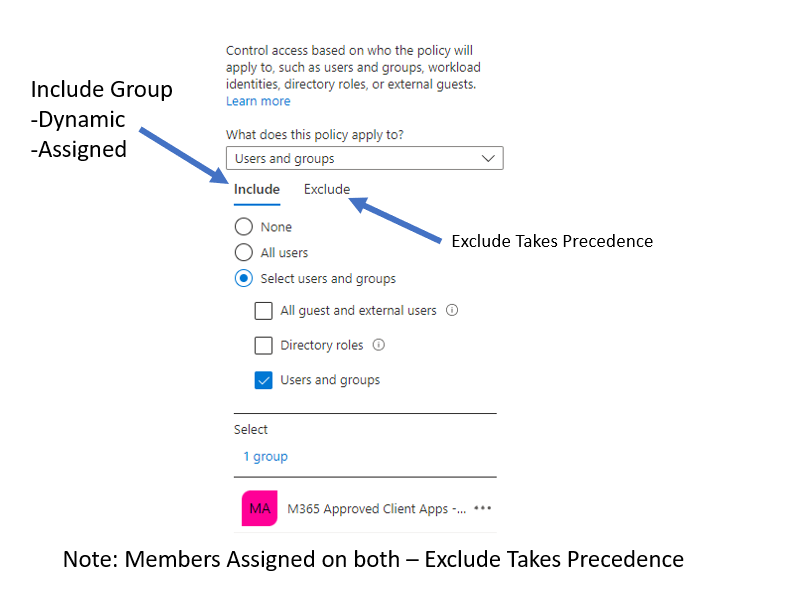
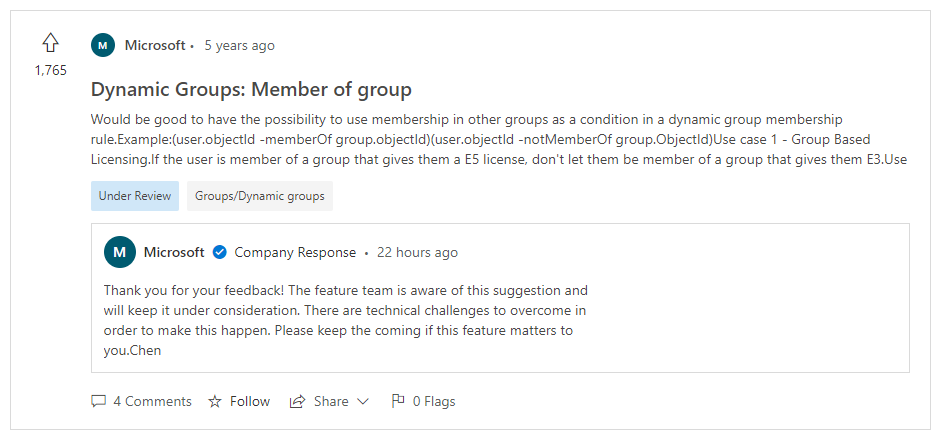
Solutions like Dell Active Roles do it smartly. but Azure AD Dynamic membership rules don’t have all the options we look for.
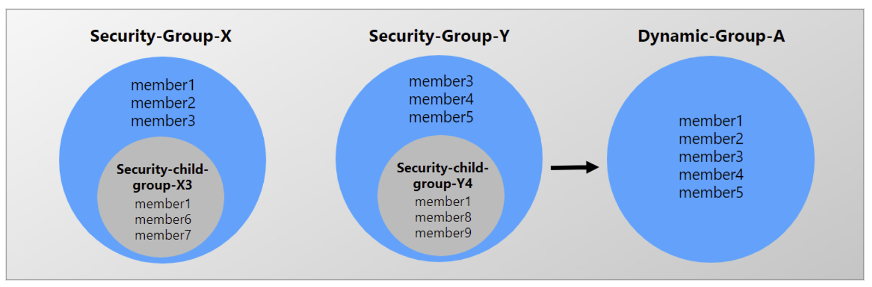
For example, if the dynamic group can exclude memberof and add all users from a specific OU – it could be much easier to include and exclude at the group level. But it’s not the case yet. Azure AD Dynamic Rules doesn’t support them yet.
So let’s consider my scenario. After adding all 75 % of users into my conditional access policy. Created a dynamic membership rule containing my on-premises users OU distinguishedName with all 100 % of users and keep a exclude group of 25 % of users and put them into the Exclude option of conditional access.
In this case, all my 100 % users and new users applied with a conditional access policy, and at the same time, 25 % of users are excluded from applying as exclusion takes precedence.
As we progress only removing members from the exclusion group can get you the conditional access adoption to 100 %. This one solves most of the conditional access scenarios. Still hoping the member of the dynamic group gets released to cover other scenarios without any third-party products.
Dynamic Groups: Member of group · Community (azure.com)
Preview for other Scenarios
Group membership for Azure AD dynamic groups with memberOf – Azure AD – Microsoft Entra | Microsoft Docs

In this article, we will see how to install and get a WordPress site running on Azure Kubernetes Services,
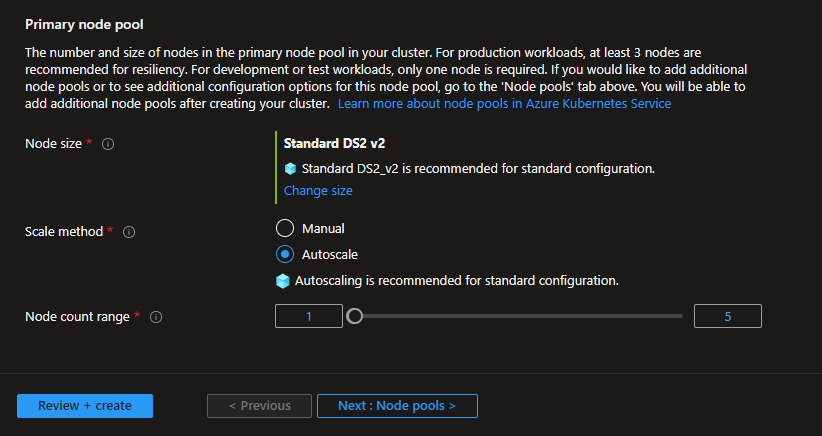
Let’s create a resource group az-pr-uaen-web-rg and create an Azure Kubernetes Cluster in the specified resource group
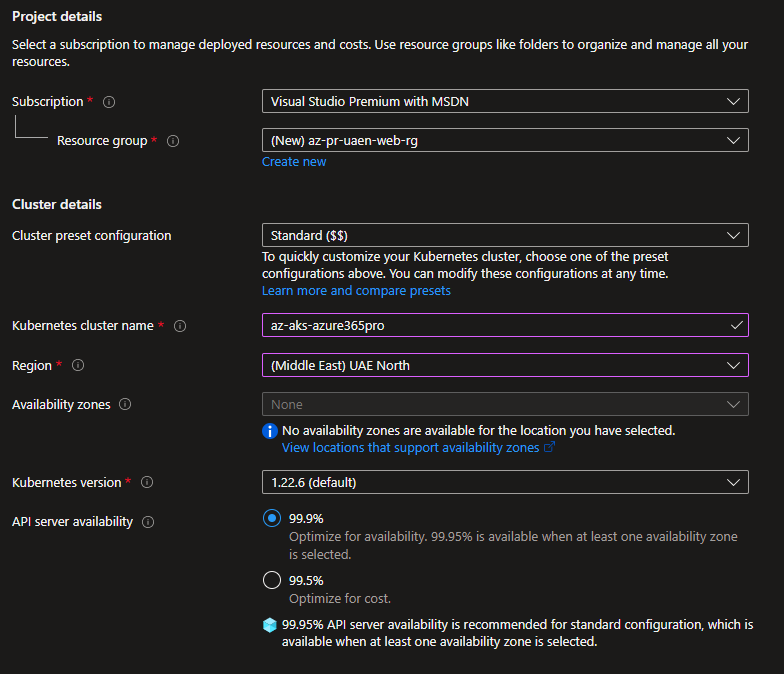
Choose an appropriate SKU and leave the default autoscale
Leave things default
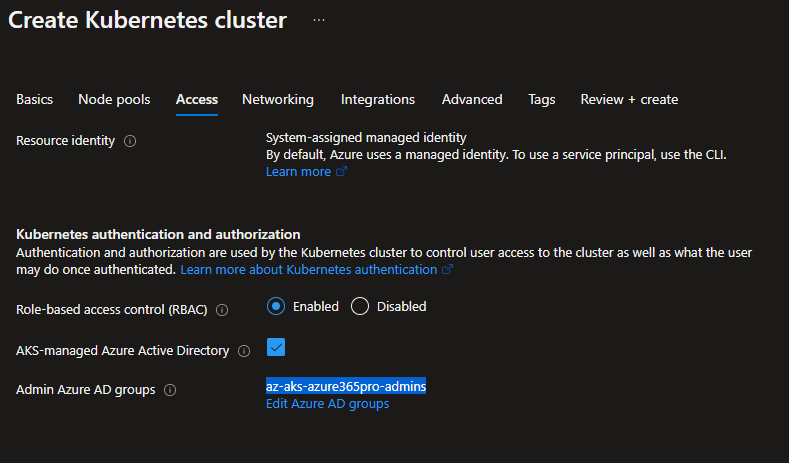
Choose a security group for Kubernetes Administration
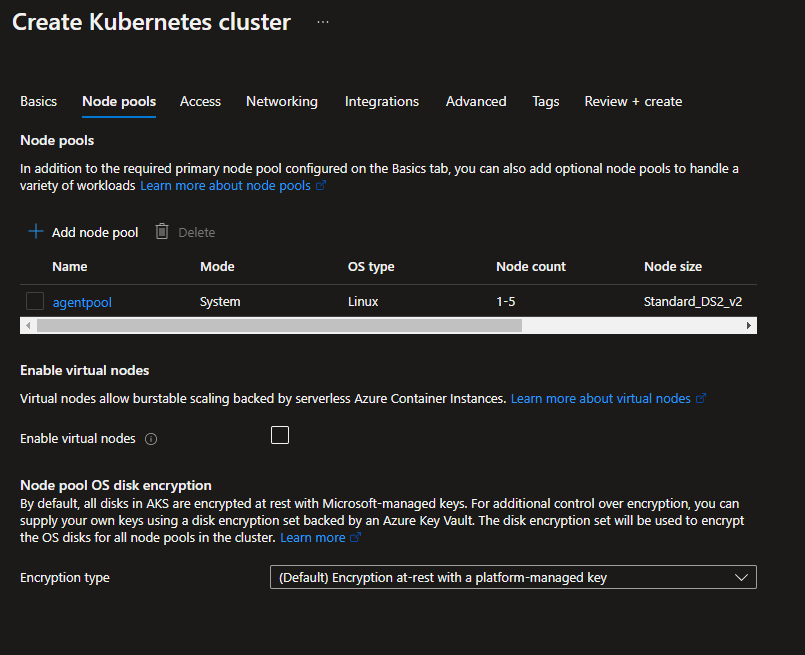
Leave kubenet networking
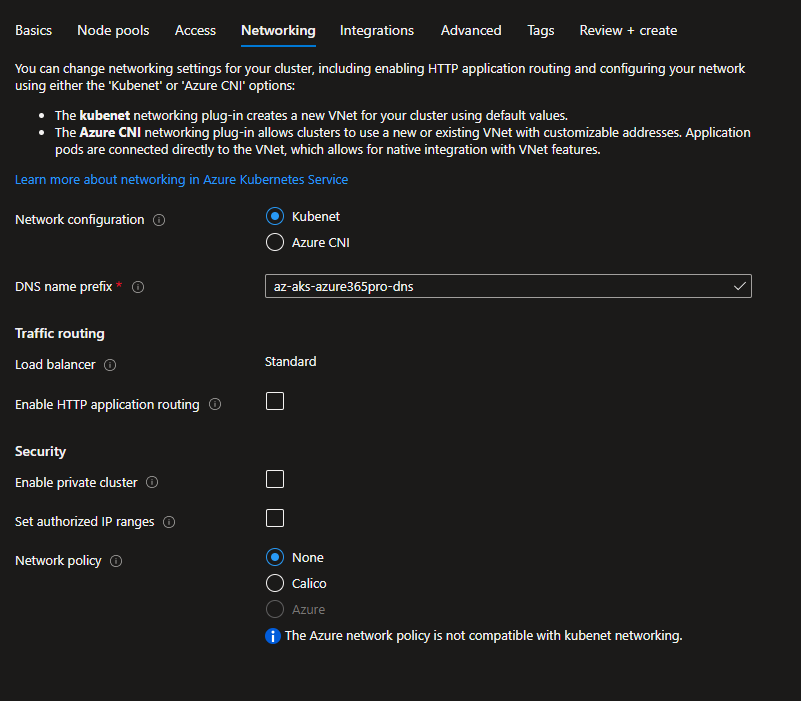
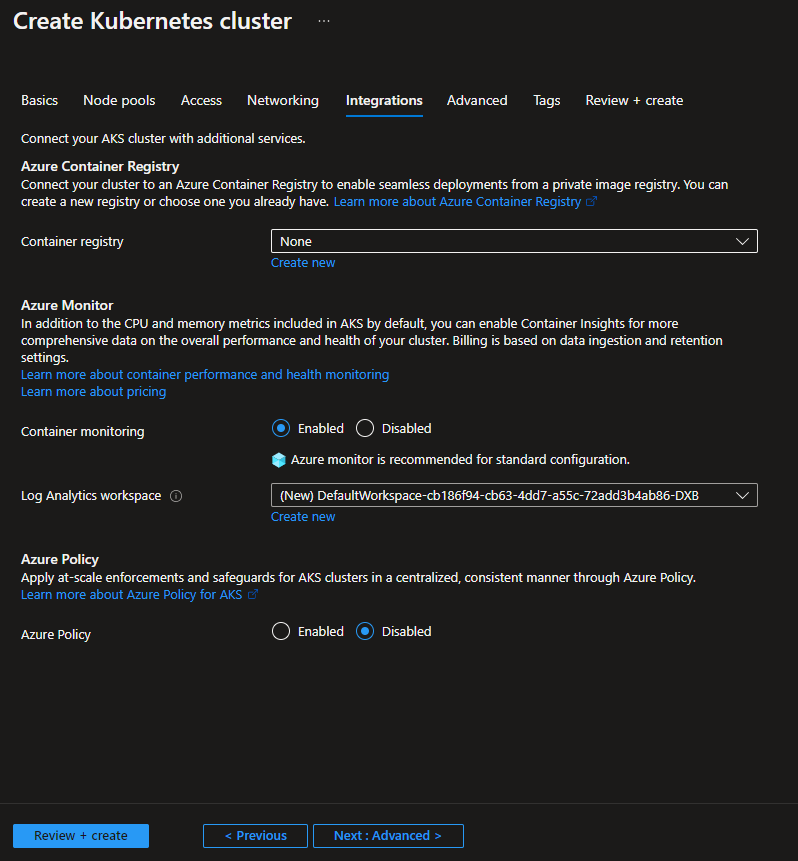
not using calico or container registry in this scenario.
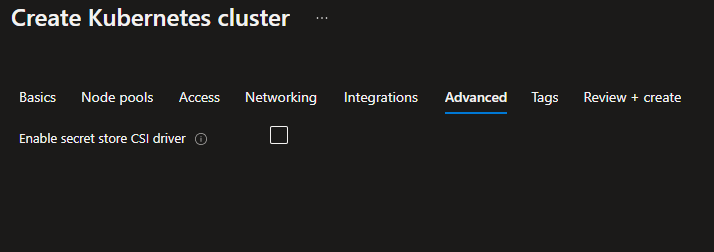
leave the secret store CSI driver disabled by default
Azure Kubernetes Cluster is created .
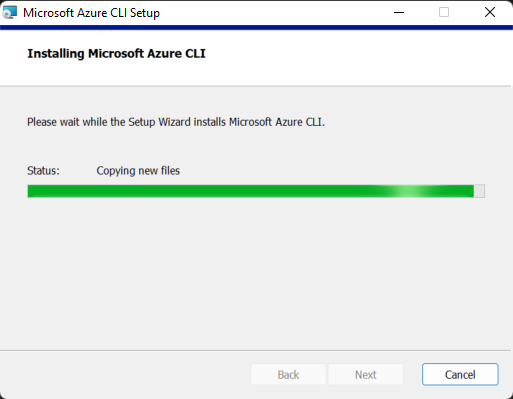
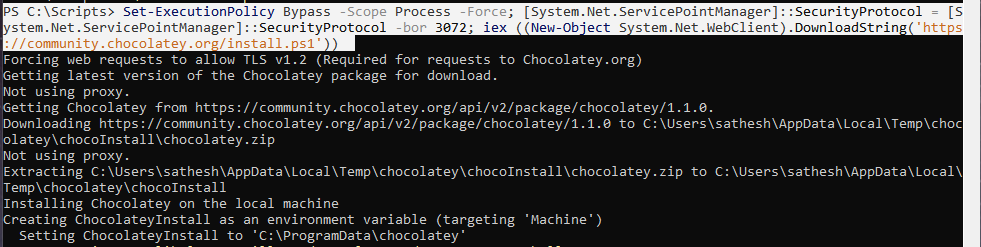
Let’s install Microsoft CLI and Chocolatey on the local machine.
Chocolatey Software | Installing Chocolatey
Install Kubernetes Helm using Choco
choco install kubernetes-helm

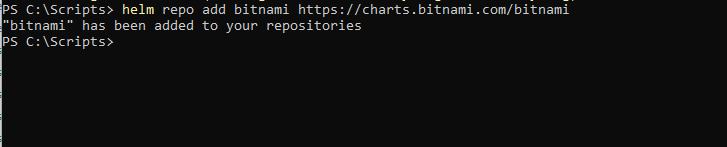
Install Bitnami repo using helm
helm repo add bitnami https://charts.bitnami.com/bitnami
Download kubectl.exe to run kubectl commands
curl -LO "https://dl.k8s.io/release/v1.24.0/bin/windows/amd64/kubectl.exe"

Download and install kubelogin if you want to authenticate to AKS using Azure AD

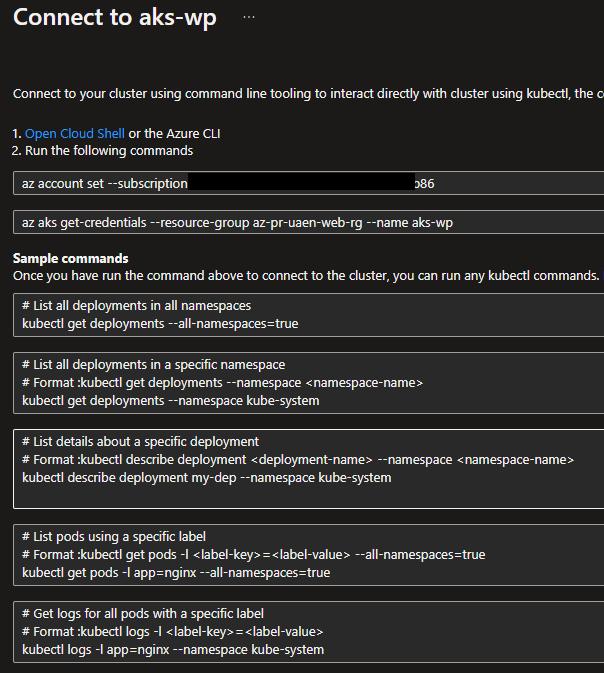
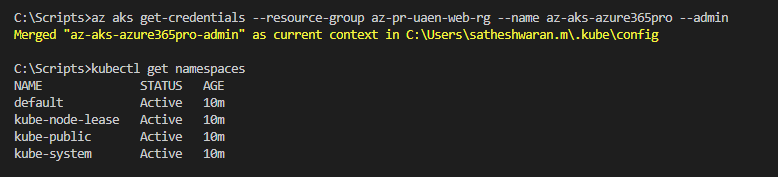
Login to aks cluster
az aks get-credentials --resource-group az-pr-uaen-web-rg --name az-aks-azure365pro --admin
if you have multiple subscriptions
az login
Get the subscription ID you are working on
az account list -o table --all
az account set --subscription e08f63cf-xxxx-44e3-ba41-xxxxxxx
az aks get-credentials --resource-group az-pr-uaen-web-rg --name az-aks-azure365pro --admin
kubectl get namespaces
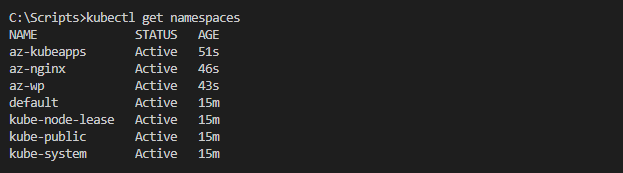
To list all namespaces
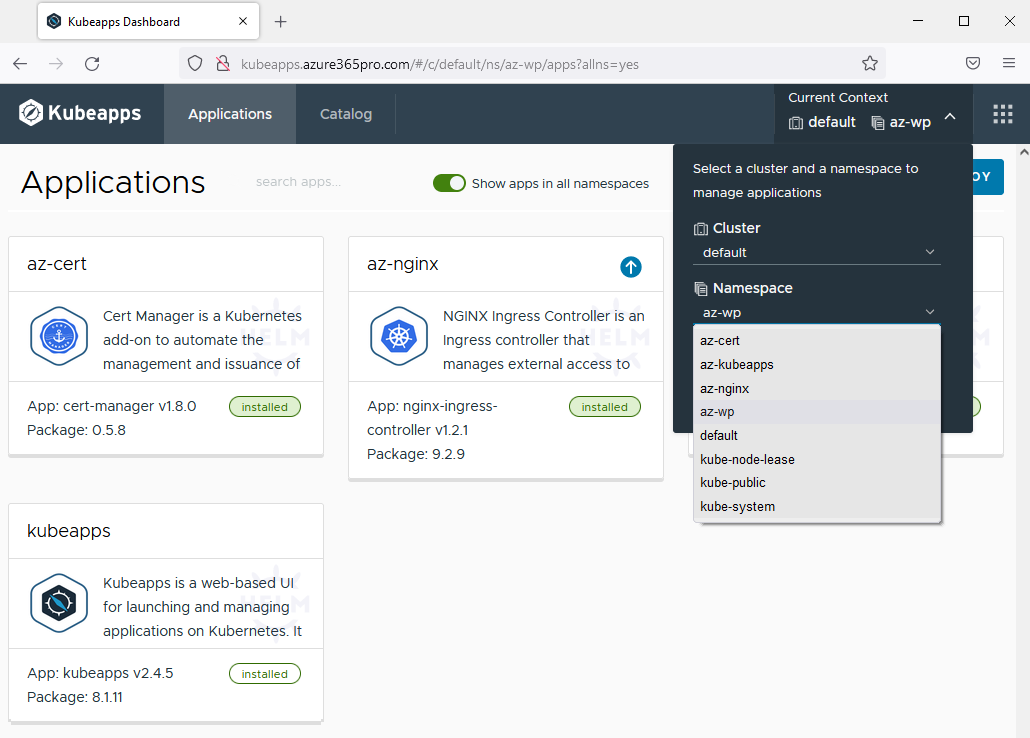
Add Bitnami repo
create kubeapps namespace
Install bitnami kubeapps
helm repo add bitnami https://charts.bitnami.com/bitnami
kubectl create namespace az-kubeapps
helm install kubeapps bitnami/kubeapps -n az-kubeapps
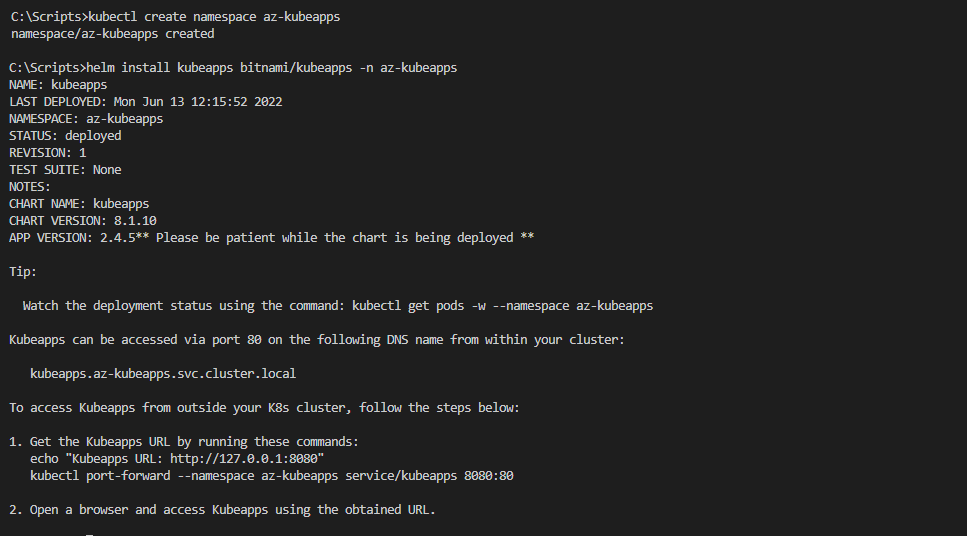
Now kubeapps is installed – We will configure things to access them using an nginx load balancer.
kubectl create serviceaccount kubeapps-operator
kubectl create clusterrolebinding kubeapps-operator --clusterrole=cluster-admin --serviceaccount=default:kubeapps-operator
kubectl get secret $(kubectl get serviceaccount kubeapps-operator -o jsonpath='{.secrets[].name}') -o jsonpath='{.data.token}' -o go-template='{{.data.token | base64decode}}'
if you run on Windows 10
‘base64decode}}” is not recognized as an internal or external command, operable program, or batch file.
switch to Powershell
.\kubectl.exe get secret $(.\kubectl.exe get serviceaccount kubeapps-operator -o jsonpath='{.secrets[].name}') -o jsonpath='{.data.token}' -o go-template='{{.data.token | base64decode}}'
A secret token has to be generated like below to get inside kubeapps , Copy the token to a safe location

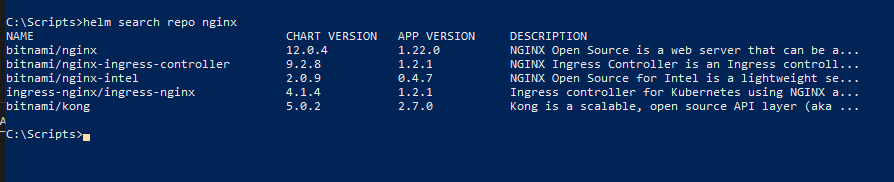
To update helm repo
helm repo update
Install Nginx controller / Please note we are utilizing the native Nginx controller here.
kubectl create namespace az-nginx
helm install az-nginx bitnami/nginx-ingress-controller -n az-nginx
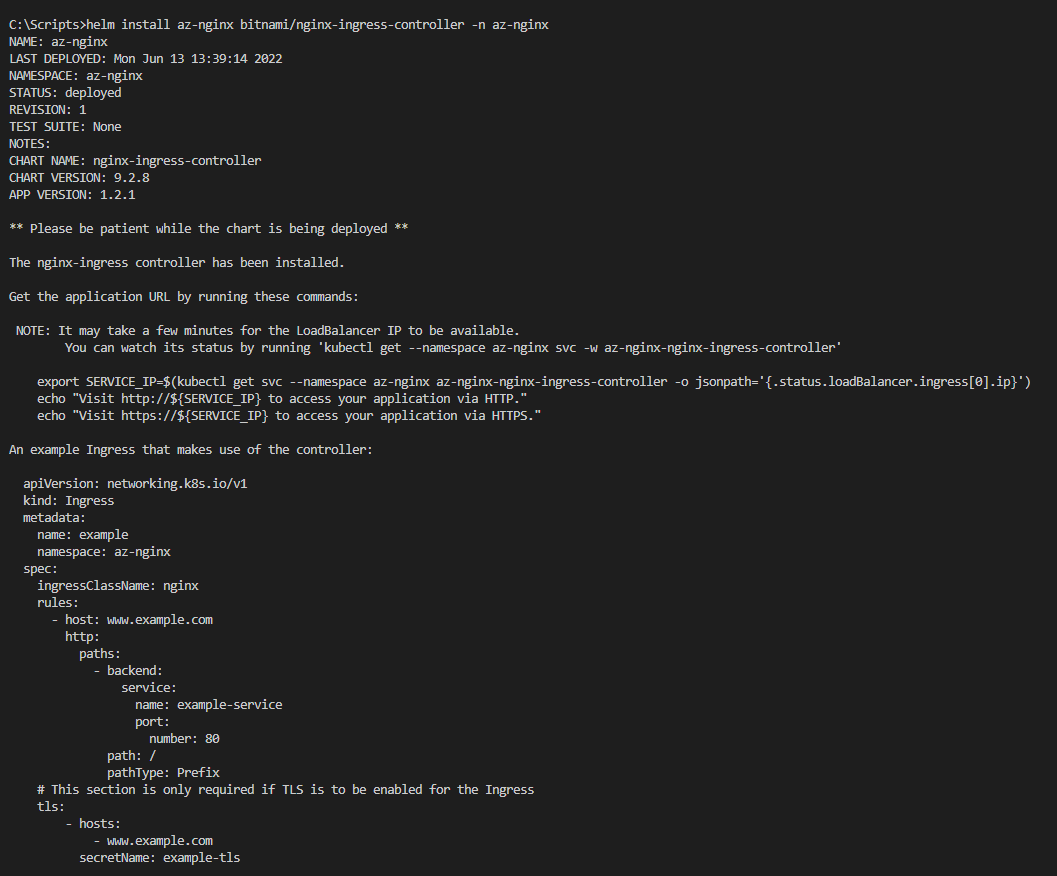
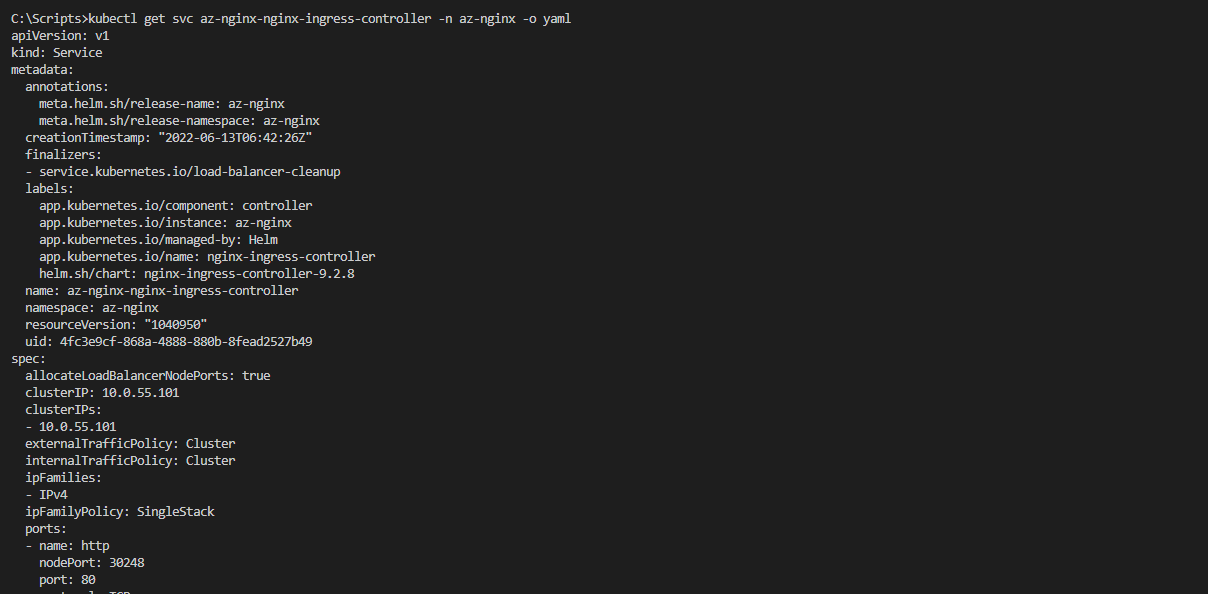
Now Nginx is available with an external IP
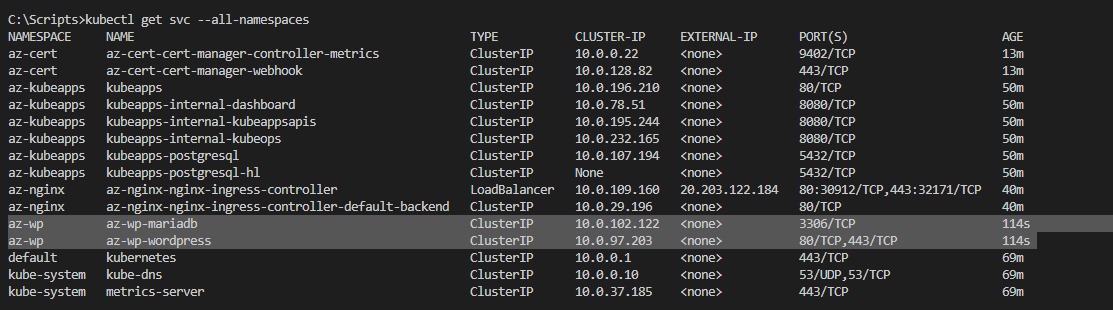
kubectl get svc -n az-nginx
kubectl get svc  --all-namespaces

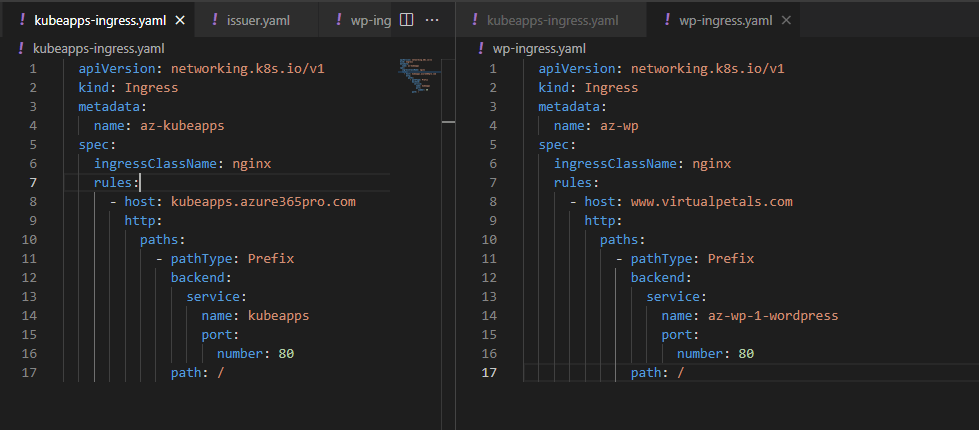
Expose kubeapps at port 80 just to access for now. later we can apply SSL
apiVersion: networking.k8s.io/v1
kind: Ingress
metadata:
name: kubeapps
namespace: kubeapps
spec:
ingressClassName: nginx
rules:
– host: kubeapps.azure365pro.com
http:
paths:
– pathType: Prefix
backend:
service:
name: kubeapps
port:
number: 80
path: /
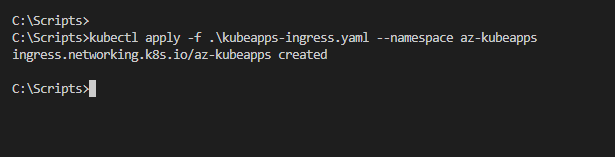
kubectl apply -f .\kubeapps-ingress.yaml –namespace az-kubeapps
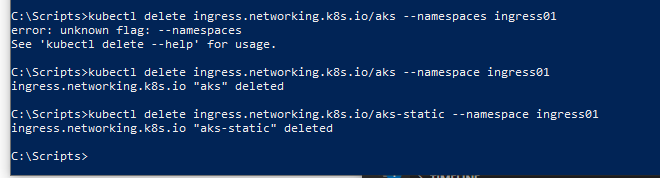
Deleting bad ingress rules – For Examples only
kubectl get all,nodes,ing -A -o wide
To list Helm installations

To uninstall Helm installations – For examples only
helm uninstall az-nginx


Choosing to install with Cluster IP as we will use the nginx IP to publish and Expose using lets encrypt SSL .
ingress without SSL – YAML samples
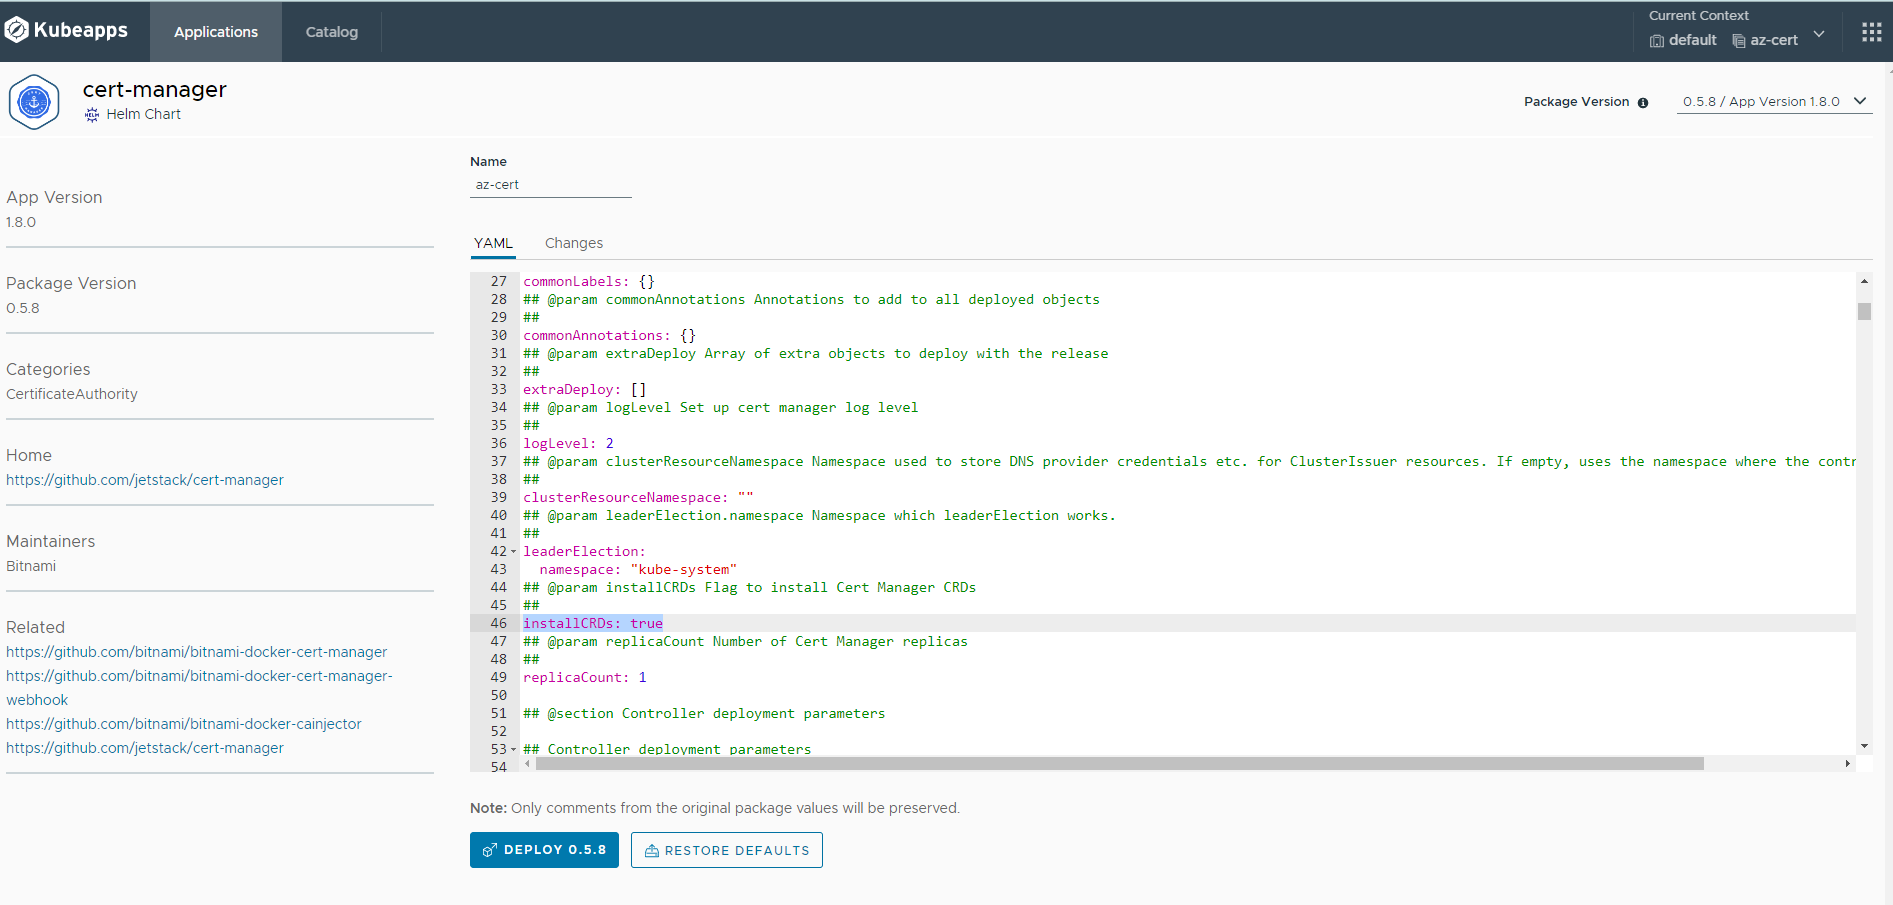
Install cert-manager with InstallCRDs true
issuer.yaml with staging lets encrypt . Once you confirm things are working as expected. you can get the live URL updated.
apiVersion: cert-manager.io/v1
kind: ClusterIssuer
metadata:
name: letsencrypt-staging
spec:
acme:
# Update with real email
email: info@azure365pro.com
server: https://acme-staging-v02.api.letsencrypt.org/directory
# To use on production , use the following line instead:
#server: https://acme-v02.api.letsencrypt.org/directory
privateKeySecretRef:
name: issuer-letsencrypt-staging
solvers:
– http01:
ingress:
class: nginx
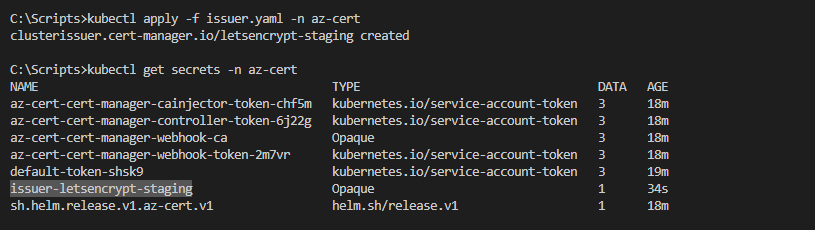
Created issuer
Listing Secrets
kubectl apply -f issuer.yaml -n az-cert
kubectl get secrets -n az-cert
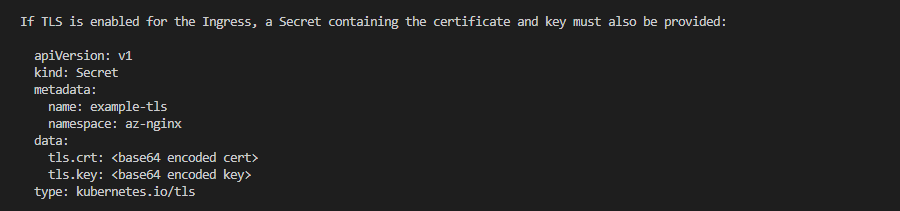
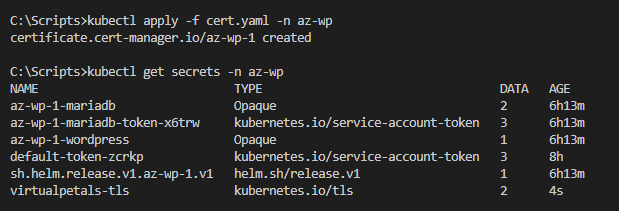
cert.yaml for cluster issuer – secret and WordPress should be in the same namespace inorder to work seamlessly.
apiVersion: cert-manager.io/v1
kind: Certificate
metadata:
name: az-wp-1
spec:
secretName: virtualpetals-tls
dnsNames:
– www.virtualpetals.com
issuerRef:
name: letsencrypt-staging
kind: ClusterIssuer
kubectl apply -f cert.yaml -n az-wp
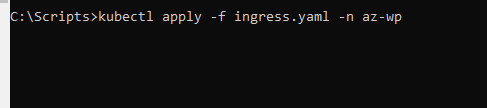
Applying TLS rules on nginx
apiVersion: networking.k8s.io/v1
kind: Ingress
metadata:
name: az-wp
namespace: az-wp
spec:
ingressClassName: nginx
tls:
– hosts:
– www.virtualpetals.com
secretName: virtualpetals-tls
rules:
– host: www.virtualpetals.com
http:
paths:
– path: /
pathType: Prefix
backend:
service:
name: az-wp-1-wordpress
port:
number: 80
kubectl apply -f wp-ingress.yaml -n az-wp
To describe ingress using ing
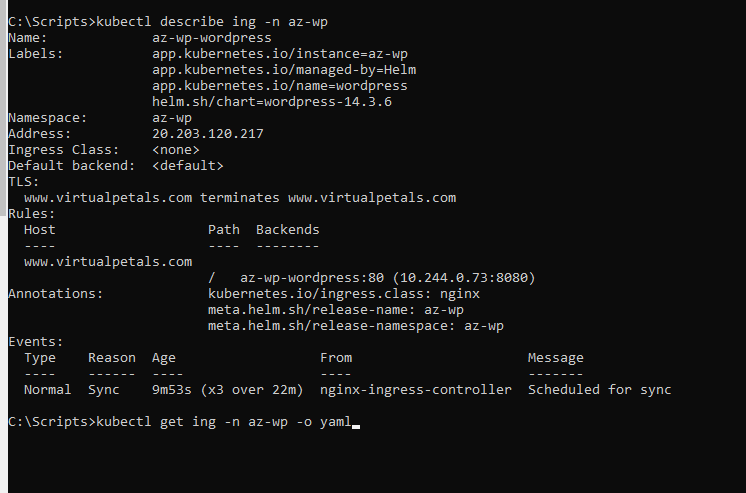
To check current YAML Config
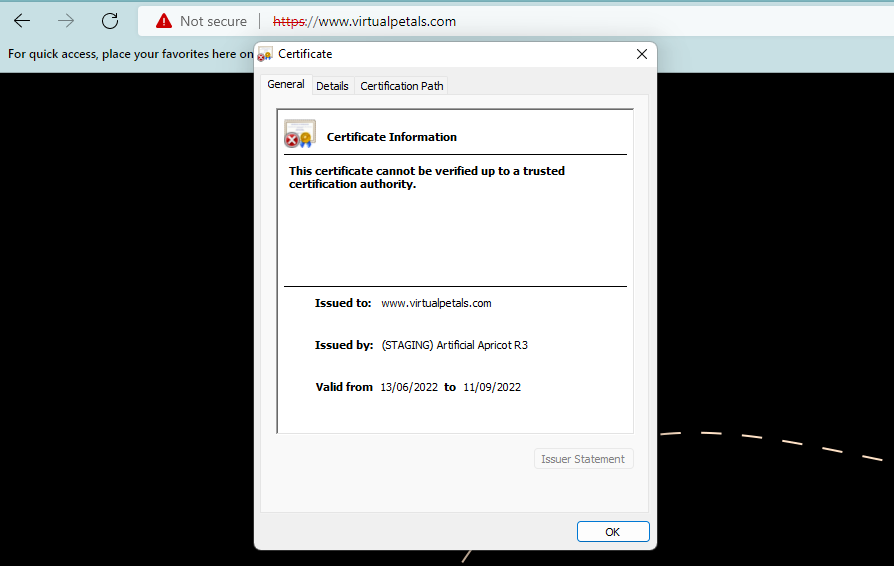
As we are using a staging issuer, It shows staging. Once we feel SSL is getting assigned and staging getting issued.
We are good to convert to production
Good to know – To list and delete files from a running container
kubectl exec az-wp-1-wordpress-6cb985c596-84j8j -n az-wp -- ls /bitnami/wordpress/wp-content/plugins/really-simple-ssl
kubectl exec az-wp-1-wordpress-6cb985c596-84j8j -n az-wp -- sh -c 'rm -rf /bitnami/wordpress/wp-content/plugins/really-simple-ssl/*'
Getting the production URL live and disabling the staging URL
apiVersion: cert-manager.io/v1
kind: ClusterIssuer
metadata:
name: letsencrypt-production
spec:
acme:
# Update with real email
email: info@azure365pro.com
#server: https://acme-staging-v02.api.letsencrypt.org/directory
# To use on production , use the following line instead:
server: https://acme-v02.api.letsencrypt.org/directory
privateKeySecretRef:
name: issuer-letsencrypt-production
solvers:
– http01:
ingress:
class: nginx
kubectl apply -f issuer-prod.yaml -n az-cert

apiVersion: cert-manager.io/v1
kind: Certificate
metadata:
name: az-wp-0
namespace: az-wp
spec:
secretName: virtualpetals-tls-pr
dnsNames:
– www.virtualpetals.com
– virtualpetals.com
issuerRef:
name: letsencrypt-production
kind: ClusterIssuer

To increase body size in ingress for bulk uploads for example.
apiVersion: networking.k8s.io/v1
kind: Ingress
metadata:
name: az-wp
namespace: az-wp
annotations:
nginx.ingress.kubernetes.io/proxy-body-size: 400m
spec:
ingressClassName: nginx
tls:
– hosts:
– www.virtualpetals.com
– virtualpetals.com
secretName: virtualpetals-tls-pr
rules:
– host: “www.virtualpetals.com”
http:
paths:
– path: /
pathType: Prefix
backend:
service:
name: az-wp-1-wordpress
port:
number: 80
– host: “virtualpetals.com”
http:
paths:
– path: /
pathType: Prefix
backend:
service:
name: az-wp-1-wordpress
port:
number: 80

Now website is up using Azure Kubernetes Services.
apiVersion: cert-manager.io/v1
kind: Certificate
metadata:
name: az-wp-1
spec:
secretName: kubeapps.azure365pro.com
dnsNames:
– kubeapps.azure365pro.com
issuerRef:
name: letsencrypt-production
kind: ClusterIssuer
kubectl apply -f cert-prod-kubeapps.yaml -n az-kubeapps

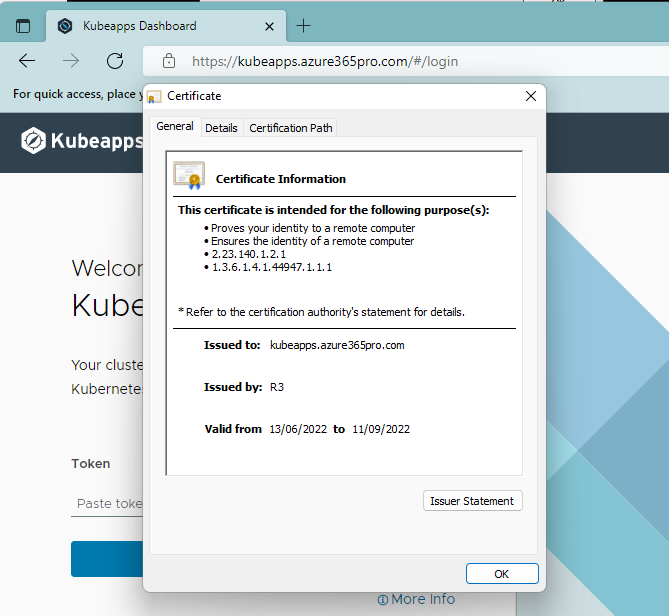
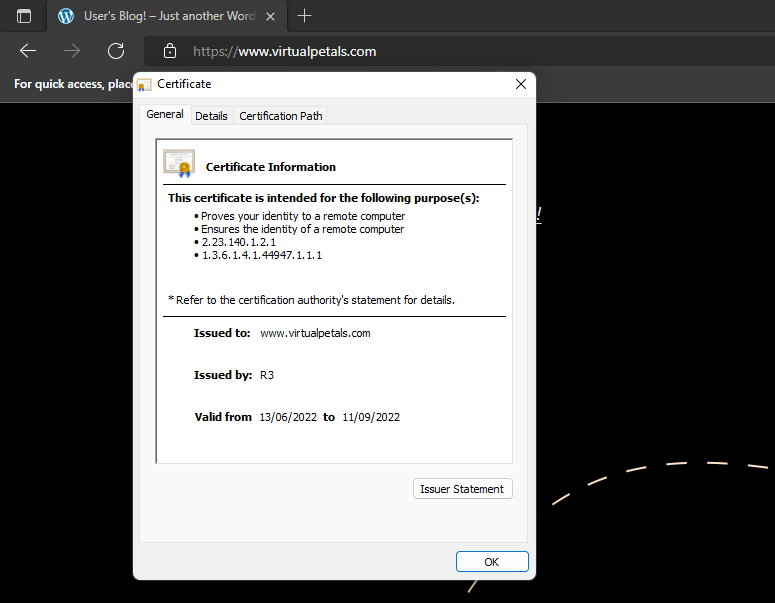
Now you can see Kubeapps is live with SSL / WordPress is live with SSL / Nginx is configured with Cert Manager.

Let’s see how to configure single sign-on with SAP Success Factor as there is some incorrect documentation available on the internet also, every environment is different, Like using employee ID as user name and using email as the username is straightforward, but most of the SAP-based environments are using employee ID as the user name.
As you might know, SAP provides demo instances only to partners. Getting hold of trial instances is not a straightforward process.
In this scenario, we will cover that the Identity Provider will be Azure Active Directory and the Service provider will be SAP Success factor. Let’s see how to achieve seamless sign-on for users.
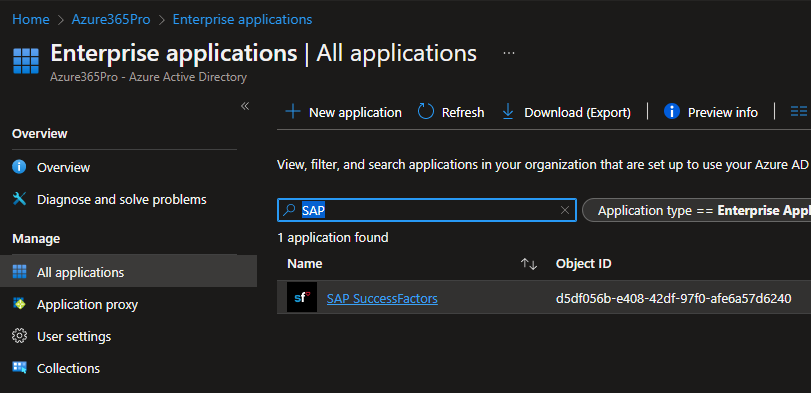
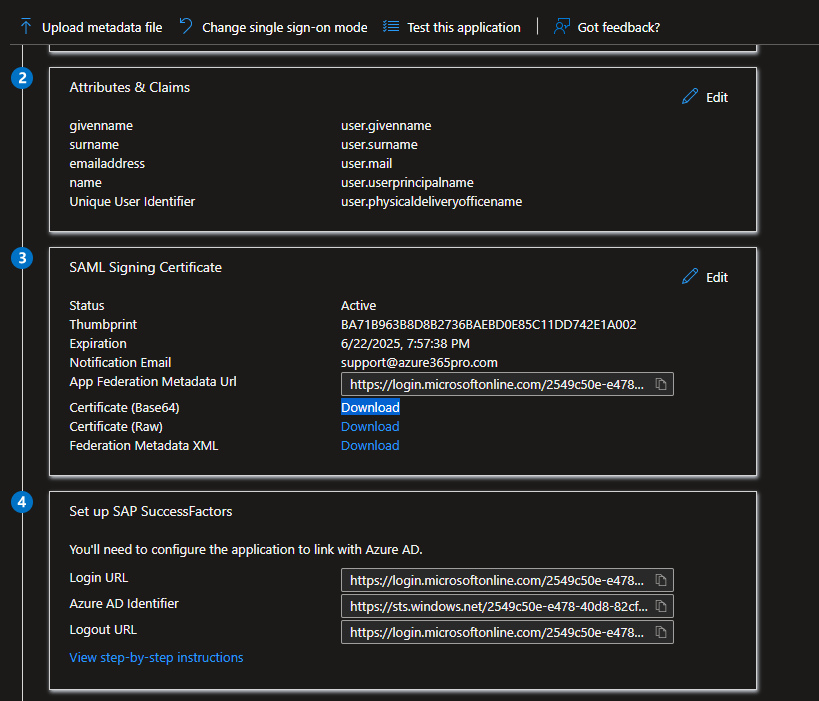
Register SAP Success Factor Enterprise Application from Azure Active Directory.
Finding these details for your instance was quite challenging, As there are a lot of tenant types in SAP Success Factor.
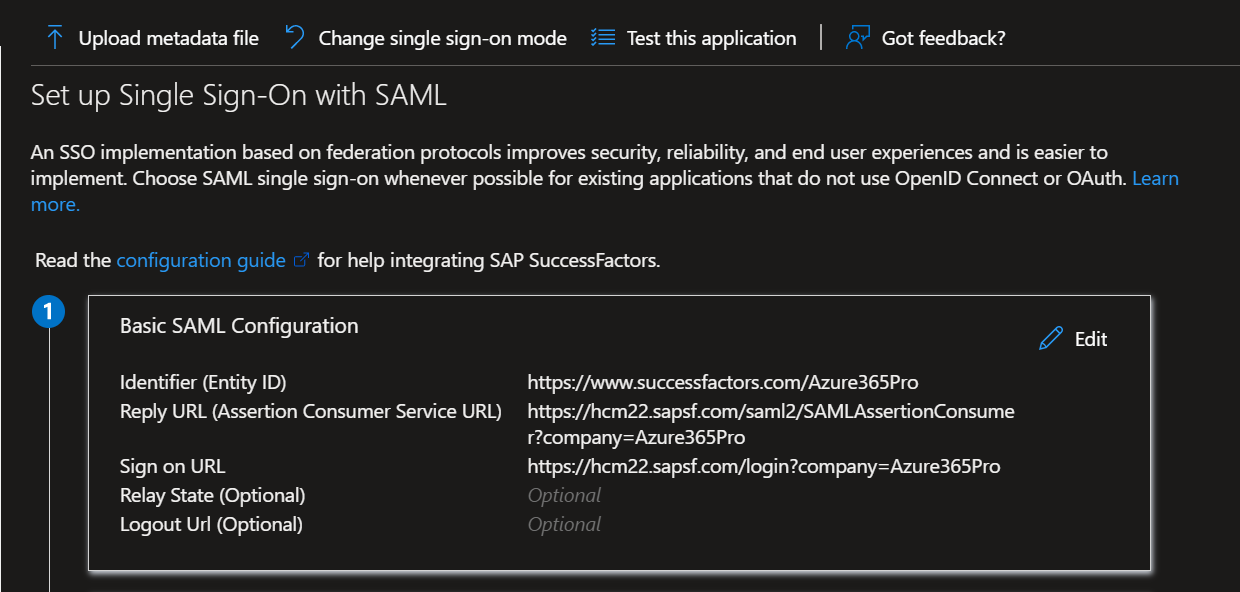
Reference URLs helped me find the Identified (Entity ID) / Reply (Assertion Consumer Service URL and Sign-on URL for my specific SAP Success Factor instance.
https://userapps.support.sap.com/sap/support/knowledge/E/2707993
https://userapps.support.sap.com/sap/support/knowledge/en/2747798
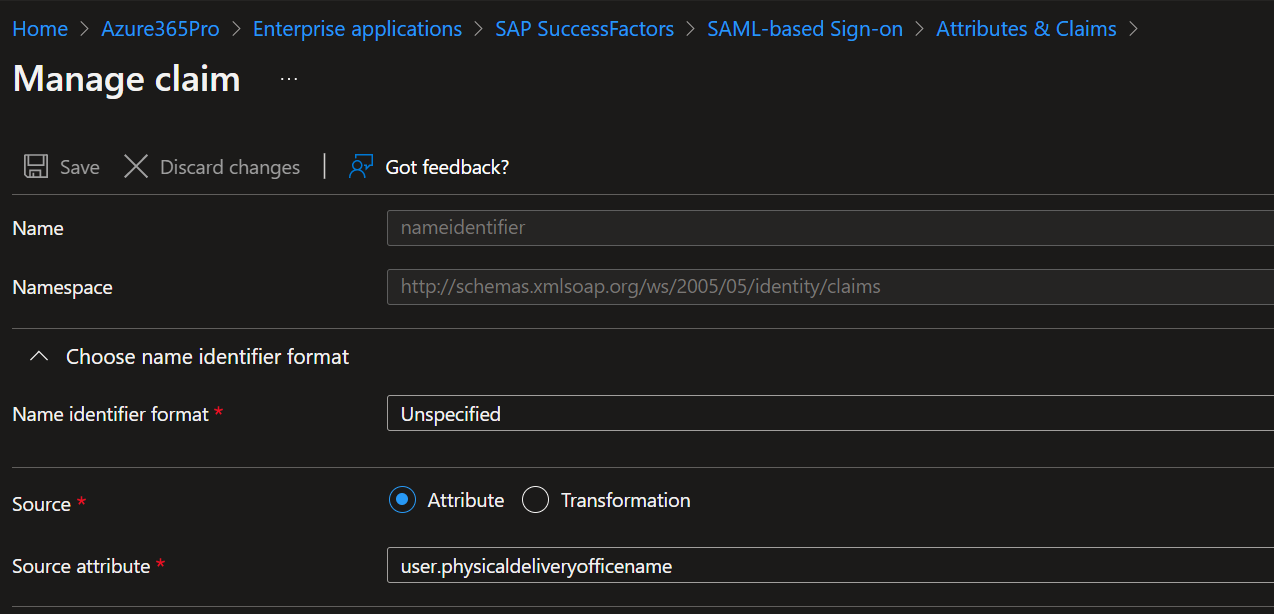
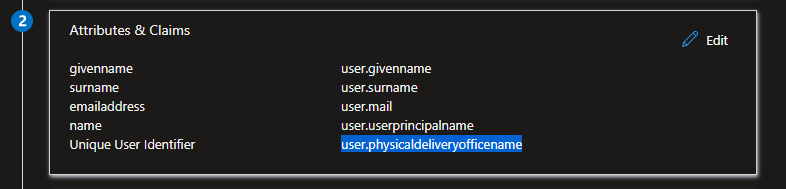
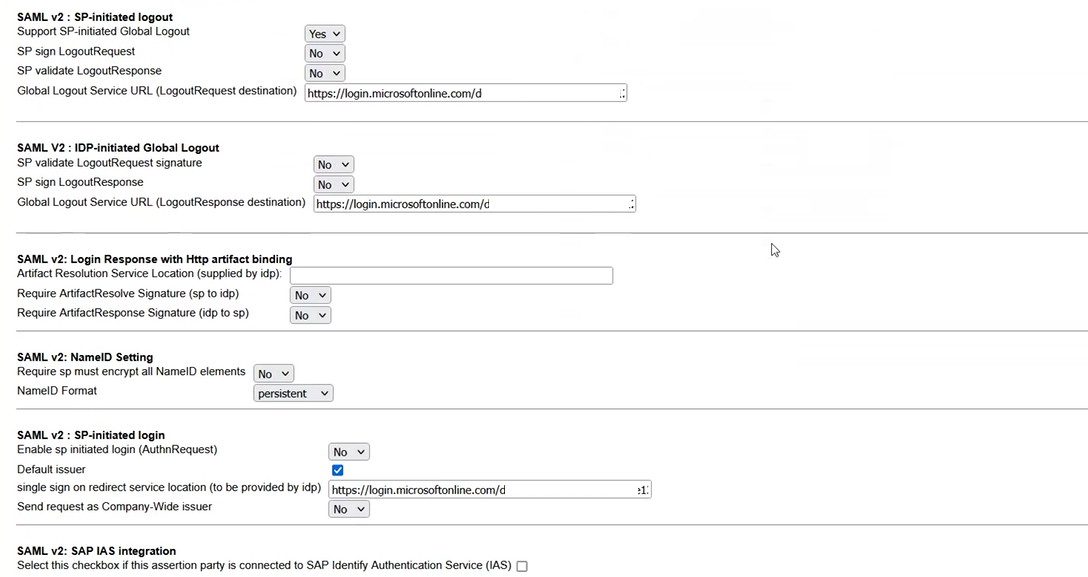
Changed my unique Name Identified to physical delivery office name as employee ID is stored in this particular attribute
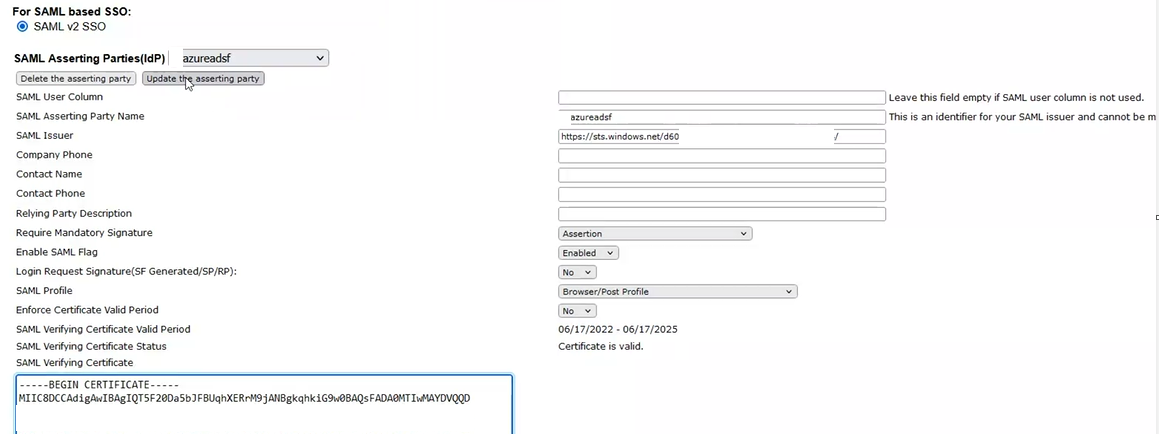
Please note Destination (SAP Success Factore is Configured with Employee ID as username) as you may see most of the SAP Systems are configured with employee ID as user name.
Certificate (Base64) / Login URL / Azure AD Identifier / Logout URL can be used on SAP Success Factor
Configure SAP Success Factor in Provisioning Mode to enable Single Sign-on in your instance.
Expiration of SSO Request
Enable Partial Organization SSO – Until you thoroughly test the Single Sign ON with Azure Active Directory.
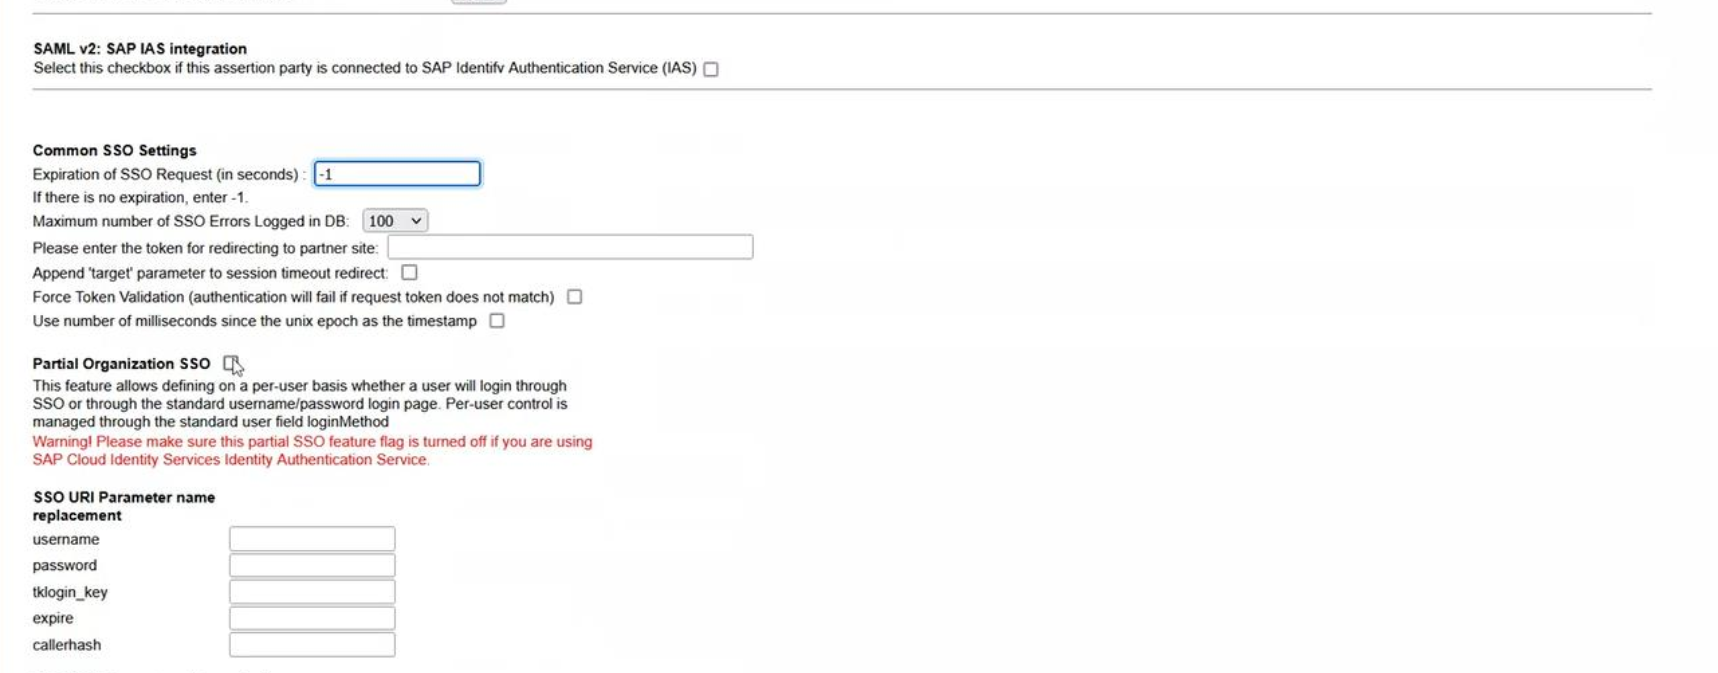
Configure SP-Initiated Logout
Configure IDP-Initiated Global Logout
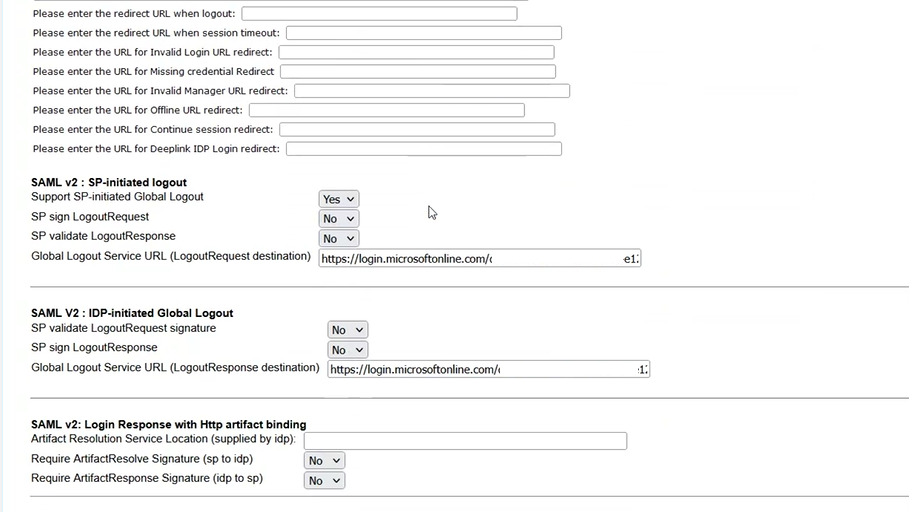
Configure NameID Setting to Persistent
Configure SP-Initiated Login
Once users are assigned to Azure AD Success Factore App – Single Signon started working seamlessly between the systems.

Copy of the object ID of the source group
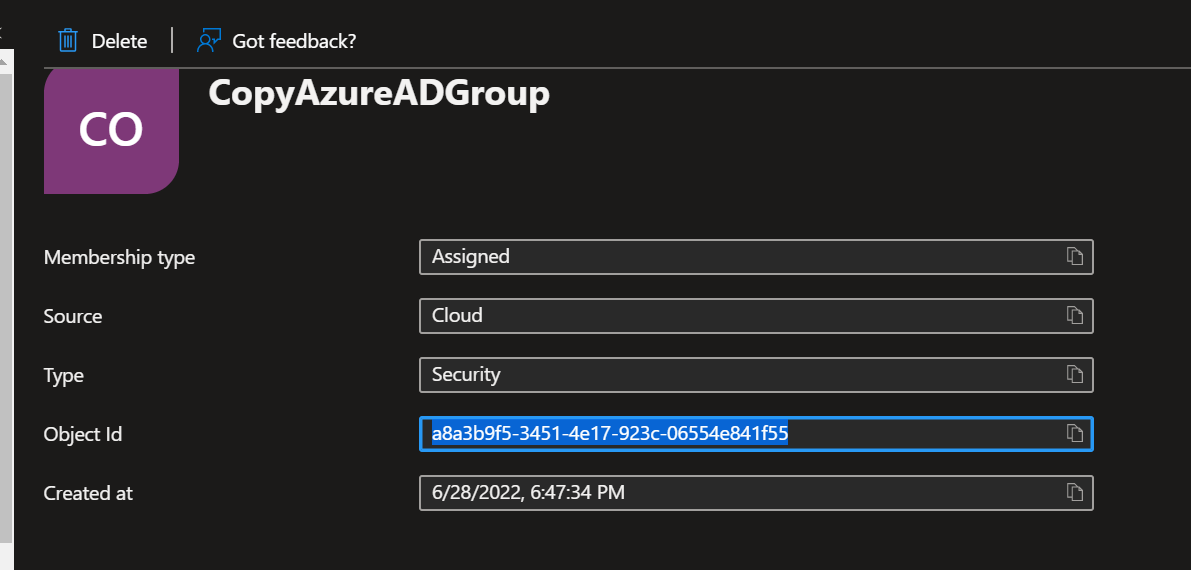
Get the members of the group using object ID to make sure you are on the right group
Get-AzureADGroupMember -ObjectId a8a3b9f5-3451-4e17-923c-06554e841f55 -All $true

Copy the object ID of the target group
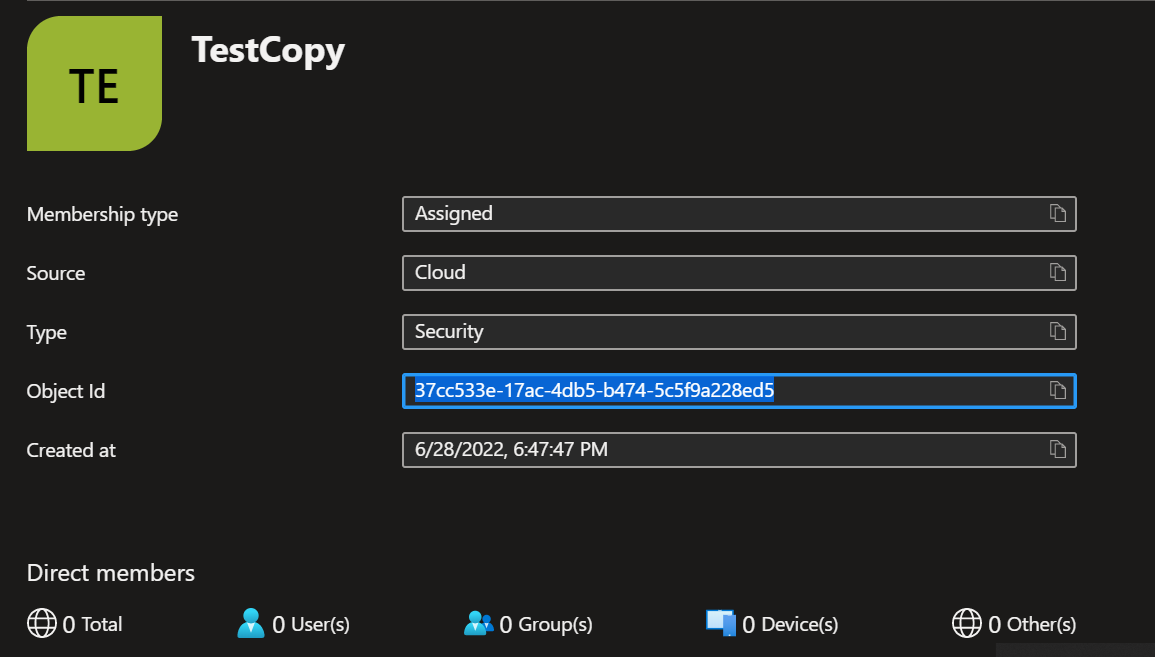
Copy the target group object ID in the second object ID
(Get-AzureADGroupMember -ObjectId a8a3b9f5-3451-4e17-923c-06554e841f55 -All $true) | ForEach-Object {Add-AzureADGroupMember -ObjectId 37cc533e-17ac-4db5-b474-5c5f9a228ed5 -RefObjectId $_.ObjectID}
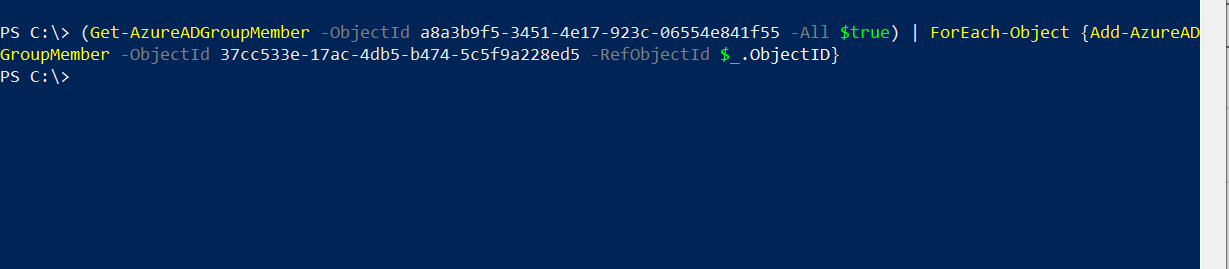
Now the Members have been copied from source to target Azure AD group
(Get-AzureADGroupMember -ObjectId a8a3b9f5-3451-4e17-923c-06554e841f55 -All $true).count
(Get-AzureADGroupMember -ObjectId 37cc533e-17ac-4db5-b474-5c5f9a228ed5 -All $true).count

Satheshwaran Manoharan - Microsoft MVP - Award-winning Technology Leader with a wealth of experience running large teams and diversified industry exposure in cloud computing. From shipping lines to rolling stocks.In-depth expertise in driving cloud adoption strategies and modernizing systems to cloud native. Specialized in Microsoft Cloud, DevOps, and Microsoft 365 Stack and conducted numerous successful projects worldwide. Also, Acting as a Technical Advisor for various start-ups.
Contact : Info@Azure365Pro.com
© Azure365Pro.com