32 C
Dubai
Tuesday, May 6, 2025
Home Blog Page 107

How to Create Managed Custom Folder in Exchange 2010

Good to know ** MRM 1.0 is Used in Exchange 2003 & Exchange 2007

MRM 2.0 is Introduced in Exchange 2010 ,

As MRM 2.0 is lacking in some important features . MRM 1.0 can be still used in Exchange 2010 , But not via GUI , Using Power shell we can Create and Manage MRM 1.0

Today we will learn how to create a Managed Custom Folder in Exchange 2010

As MRM 2.0 doesn’t has that feature of creating Managed Custom Folders , we will use MRM 1.0

Note * Only Users have a Enterprise Client Access License will be able to view Managed Custom Folder in OWA and Outlook

* Managed Custom Folders cannot be deleted by the Client

For Example we will create a Managed Custom Folder where Items inside that will be archived which is older than 30 days

First we will create a Managed Custom Folder –

New-ManagedFolder -Name "Custom Retention Folder - 30 days" -FolderName "Custom Retention – 30 days"

image

Now we got to Find the GUID VALUE to apply Content Settings for the Folder :

Get-ManagedFolder "Custom Retention Folder - 30 days"  | fl Name,Guid 

Name : “Custom Retention Folder – 30 days”

Guid : fb30f2df-b9a7-45fa-9b9e-bae6e18d244c

image

Creating MANAGED CONTENT SETTINGS for the custom Folder using GUID :

New-ManagedContentSettings "Custom Retention Folder - 30 days" -AgeLimitForRetention 30.00:00:00 -MessageClass * -RetentionEnabled $true -RetentionAction DeleteAndAllowRecovery -FolderName 'fb30f2df-b9a7-45fa-9b9e-bae6e18d244c' 


image

Creating MANAGED FOLDER MAILBOX POLICY : (Where this policy can be applied for Users)

New-ManagedFolderMailboxPolicy -Name "Retention Policy for Managed Custom Folder" –ManagedFolderLinks "Custom Retention Folder - 30 days" 

image

APPLY THE POLICY TO MAILBOXES:

Get-Mailbox "UserAlias" | Set-Mailbox -ManagedFolderMailboxPolicy "Retention Policy for Managed Custom Folder"

image

Now To Force the Managed Folder Assistant to run Instantly

Start-ManagedFolderAssistant "UserAlias"

image

Now you can See the Managed Custom Folder in Outlook Web Access And Outlook for the user CEO

image

Now in order to Run it Automatically We got to Schedule the Managed Folder Assistant to run on the Mailbox Server

Set-MailboxServer –Identity "ServerName" -ManagedFolderAssistantSchedule "Monday.11:00 PM-Tuesday.07:00 AM","Tuesday.11:00 PM-Wednesday.07:00 AM","Wednesday.11:00 PM-Thursday.07:00 AM","Thursday.11:00 PM-Friday.07:00 AM","Friday.11:00 PM-Saturday.07:00 AM" 

image

Good to know —

you have 2 more important parameters

The ManagedFolderWorkCycle parameter specifies the time span in which all mailboxes on the specified server will be processed by the Managed Folder Assistant. The Managed Folder Assistant applies retention policies according to theManagedFolderWorkCycleCheckpoint interval

The ManagedFolderWorkCycleCheckpoint parameter specifies the time span at which to refresh the list of mailboxes so that new mailboxes that have been created or moved will be part of the work queue. Also, as mailboxes are prioritized, existing mailboxes that haven’t been successfully processed for a long time will be placed higher in the queue and will have a greater chance of being processed again in the same work cycle.

To Customize the above Parameters –

Set-MailboxServer -Identity Exchange2010 -ManagedFolderWorkCycleCheckpoint 1.00:00:00 -ManagedFolderWorkCycle 1.00:00:00

Great !! now Items which are older than 30 days in the Managed Custom Folder will be deleted Automatically


How to Edit the OWA front page in Exchange 2010

Let us see how to change the Outlook web app(OWA) Logon page in Exchange 2010

Browse into the Exchange Installation location

\V14\Client Access\OWA\<version number>\themes\resources

image

Every .gif file inside this folder serves its own purpose

Am going to customize a little

For Example :

Open : lgntopl.gif

Take a backup of that file

image

Just edited it and replaced the file in the below location

\V14\Client Access\OWA\<version number>\themes\resources.

image

Now Look at my OWA page

image

Quick reference in TechNet on which .gif serves which Purpose

http://technet.microsoft.com/en-us/library/ee633483.aspx


How to Give Send As and Send on Behalf permission on a Distribution Group in Exchange 2010

We will see how to give Send As and Send on Behalf Permission on a Distribution Group

Both as a difference , for doing different purposes

Lets see how to Give Send As Permission for a user on a distribution group

Get-DistributionGroup "Distribution Group Name" | Add-AdPermission –ExtendedRights Send-As –User "UserName" –AccessRights ExtendedRight

For Example –

My Distribution Group Name = NormalDistribution

image

User who needs to have Send As permission on the DistributionGroup = CEO

image

Giving Send-As Permission for “CEO” User on “NormalDistribution” Group

Get-DistributionGroup "NormalDistribution" | Add-AdPermission –ExtendedRights Send-As –User "CEO" –AccessRights ExtendedRight

image

It doesn’t take effect immediately , It takes at least 2 hours of time in the production Environment

Restarting Information Store Service will get this permission to effect immediately

—-

Now Open Outlook – New Email – Options

Click From

Now You got the From above To

Now Choose From , Choose the Distribution Group you want to send As

image

Now Sending an Test Email to a User

image

-Now Lets see how to Give Send on Behalf Permission for a user on a distribution group

Set-DistributionGroup "Distribution Group Name" –GrantSendonBehalfTo "UserAlias"

For Example –

My Distribution Group Name = NormalDistribution

image

User who needs to have Send on Behalf Permission on the DistributionGroup = Chairman

image

Giving Send on Behalf Permission for “Chairman” User on “NormalDistribution” Group

Set-DistributionGroup "NormalDistribution" –GrantSendonBehalfTo "Chairman"

image

It doesn’t take effect immediately , It takes at least 2 hours of time in the production Environment

Restarting Information Store Service will get this permission to effect immediately

—-

Now Open Outlook – New Email – Options

Click From

Now You got the From above To

Now Choose From , Choose the Distribution Group you want to send As

image

Now Sending an Test Email to a User

image

Now Will See who was the Sender.

Great !!

You learnt how to Add Permissions on a Distribution Group


How to create a DAG (Database Availability Group) in Exchange 2010

Well, Creating DAG is much more simpler,

But configuring it properly is the best part to have it efficiently working.

So lets see how to create a 2 node DAG , where most of the Environments are willing to have 2 Dedicated servers for Exchange which has all the roles HUB,CAS,MBX.

NOTE **Am not Describing Client access array in this blog , Windows NLB won’t work if you have all roles installed on the same Server

you should for a 3rd party NLB in this Scenario for Client access Array ,

I will describe my environment now

I have 2 AD sites

image

Exchange Servers = 2 , Every AD site has a Exchange Server

image

========================================================

First we will prepare the Environment for the DAG

You can Skip this Step if you are not going to Have your File Share Witness in the Domain Controller


Am Adding Exchange Trusted Subsystems in Administrators Group as am going to have my File Share Witness in the “Primary-DC”

To get rid of permissions issue. If you are not giving this permission , you may end up with the below error while creating DAG.

Insufficient permissions to access file shares on witness server . Until this problem is corrected, the database availability group may be more vulnerable to failures. You can use the Set-DatabaseAvailabilityGroup cmdlet to try the operation again. Error: Access is denied

Open Administrators Group and add Exchange Trusted Subsystem Group to it.

image

———————————————————————————-

I will have my Primary LAN . Will add a Replication LAN ,for my DAG replication

So that I will come out of an Single point of failure on my LAN

If my replication network fails it can failover to the production network. vice versa.

image

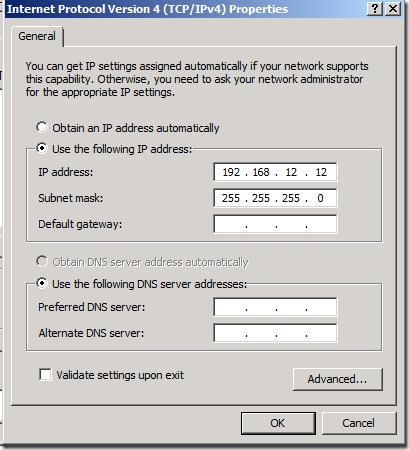
My Replication Network , IP configuration should be defined as below

as one machine cannot have 2 default gateways,

image

Will do the same on both the nodes . will add a route for my Replication IP , so that they can ping each other

==========================================================================

Now we will  Create a DAG ,

image

Specify the DAG name . Witness Server Name , Witness Location

image

“ Always have File Share Witness in the Primary Site “

Now my DAG is Ready

Add members to it.

image

Adding the members

image

image

Great !! Now your DAG is ready !!

Now go to your DAG properties , Assign a Static IP for the DAG

if you have difference subnet or different class of ip on either Sites.

Have Two IP address for the DAG so that DAG resource can be online while failover on either sites

If you have only one Subnet , then you can have only one Ip address for the DAG

image

Now you can see your Database Master Servers are pointing to the DAG

image

Now you can add a Mailbox Database Copy , So that Databases can Failover Each other

image

Choosing a Server to Add a Copy

image

Now your Copy Shows Healthy

image

Now you can Activate a copy on the other server to Test the Failing over a database

image

image

Lossless is 0 logs lost, Good Availability is 3 logs lost, and Best Availability, which is the default, is 6 logs lost

Best Effort – You might have a massive loss of data.

You can choose as per your convenience ,Great !! you did a Database failover now !!

For Disaster Recovery Purpose You got to add Two more steps

Enabling DataCenterActivationMode , This avoids Split Brain Syndrome if the whole Primary Datacenter Fails

Set-DatabaseAvailabilityGroup &quot;DAG1-CareExch&quot; –DataCenterActivationMode DAGOnly

image

Configuring Alternate File Share Witness

Set-DatabaseAvailabilityGroup &quot;DAG1-CareExch&quot; –AlternateWitnessServer &quot;DR-DC&quot; –AlternateWitnessDirectory &quot;C:\File Share Witness&quot;

image

Now you got the Recommended design for DAG !!

Virtual Labs for Exchange – Learners Paradise I would say !!

Good to know —

Microsoft Provides Virtual Labs for Exchange 2003,2007,2010

In one Click it creates the Environment for you. It gives a span of time to use.

Build it , Crash it ..You learn from it !!

Great Right .

Follow the below link to use it.

Microsoft Virtual Labs

image

Run the ActiveX

It Prepares the Test Environment for you

image

Happy Learning !


Managing Microsoft Exchange Services with Windows Powershell in Exchange 2010

We usually need to get the Microsoft Exchange services to disabled one by one in more scenarios like Performance, Setup etc.. .

But its much easier to manage Exchange services in powershell , Saves more time !!

To Get all the MsExchange Services Startup Type to Disabled State

Get-Service | where{$_.Name –Like ‘MSExchange*’} | set-Service –StartupType ‘Disabled’

clip_image002

To Get all the MxExchange Services Startup Type to  Automatic State

Get-Service | where{$_.Name –Like ‘MSExchange*’} | set-Service –StartupType ‘Automatic’

clip_image004

(Starting and Stopping all Service in one Shot differs , scenario to scenario – Please have this Tested in your Lab)

To Stop All the MsExchange Service

Get-Service | where{$_.Name –Like ‘MSExchange*’} | stop-Service –Force

Note ** Am using -Force as MsExchangeADTopology Service as dependancies

clip_image006

To Start All the MsExchange Service

Get-Service | where{$_.Name –Like ‘MSExchange*’} | start-Service

clip_image008

To the Current Status of the Service

Get-Service | where{$_.Name –Like ‘MSExchange*’}

image

Happy Learning !!


× How can I help you?