34 C
Dubai
Thursday, May 1, 2025
Home Blog Page 40

Installing .net 3.5 on Windows Server 2016

Choose Server Manager – Add Roles and Features

image

Choose .NET Framework 3.5 features

image

Choose Next

Attach Window Server 2016 ISO and Click on “Specify and alternate source path” add alternate source path

image

Click ok

And Choose Install.


Most Common Applications requires .NET 3.5

  • Password Sync of Active Directory Sync (ZohoOneSync)

Windows 10 Engaged Restart Group Policy

Engaged Restart is a good feature . Where user desktop will not be force rebooted. As it will request the user to

  • Restart
  • Pick a time
  • Snooze

image

Now we can make sure how many times he can snooze and place a dead line if he ignores it.So that the machine will reboot . if user keeps snoozing it.

image

I have placed like below. So that it will allow him only one snooze and period of 4 days deadline (pending restart).

  • Specify the timing before transitioning from Auto-restart to Engaged restart (pending user schedule): Transition (days):  2
  • Specify snooze for Engaged restart reminder notifications: Snooze (days):  1
  • Specify the deadline before a pending restart will automatically be executed outside of active hours: Deadline (days):  4

Computer Configuration
Policies
Administrative Templates
Windows Components/Windows Update

image

image

Computer Configuration (Enabled)
Policies
Administrative Templates
Windows Components/Windows Update
Policy Setting
Allow Automatic Updates immediate installation Enabled
Configure Automatic Updates Enabled
Configure automatic updating: 4 – Auto download and schedule the install
The following settings are only required and applicable if 4 is selected.
Install during automatic maintenance
Scheduled install day: 4 – Every Wednesday
Scheduled install time: 13:00
If you have selected “4 – Auto download and schedule the install” for your scheduled install day and specified a schedule, you also have the option to limit updating to a weekly, bi-weekly or monthly occurrence, using the options below:
Every week
First week of the month
Second week of the month
Third week of the month
Fourth week of the month

Install updates for other Microsoft products

Policy Setting
Enable client-side targeting Enabled
Target group name for this computer Desktops

Policy Setting
Reschedule Automatic Updates scheduled installations Enabled
Wait after system
startup (minutes): 10

Policy Setting
Specify Engaged restart transition and notification schedule for updates Enabled
Specify the timing before transitioning from Auto-restart to Engaged restart (pending user schedule): Transition (days): 2
Specify snooze for Engaged restart reminder notifications: Snooze (days): 1
Specify the deadline before a pending restart will automatically be executed outside of active hours: Deadline (days): 4

Policy Setting
Specify intranet Microsoft update service location Enabled
Set the intranet update service for detecting updates: http://wsus.azure365pro.com
Set the intranet statistics server: http://wsus.azure365pro.com
Set the alternate download server:
(example: http://IntranetUpd01)
Download files with no Url in the metadata if alternate download server is set.


Enable Below _ if you wish to stop users getting feature update via Microsoft Update directly.

Do not connect to any Windows Update Internet locations Enabled


Using Office 2016 Customization Tool SCCM

image

Enter the Organization Name

image

  • Use KMS Client Key
  • Display Level Basic

Automates the Office Activation

image

image

Disable _ First Things First.

image

image

Pre Create Outlook Profile using SMTP Address.

image

Enter profile Name

image

Removing in my requirement. Make sure you click on run all from my computer.

  • OneDrive for Business
  • Publisher
  • Skype for business

image

Use the msp file while installation on SCCM . so that the customization gets applied.

setup.exe /adminfile Office2016.MSP

image

Windows 10 SCCM – Zero Touch Implementation

lets see how to implement Windows 10 with WSUS server updates with System Center Configuration Manager Task Sequence.

Have tried the below with Windows 10 1809 . Worked without any issues.

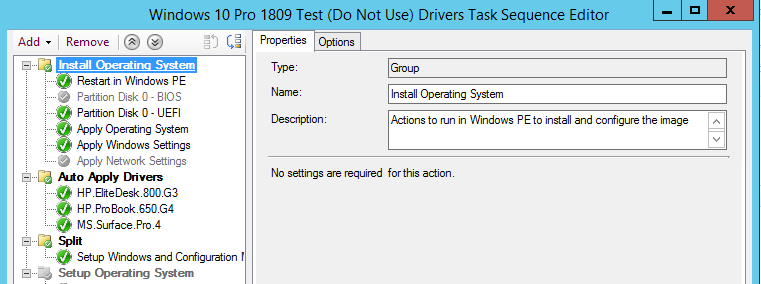
First Restart in WinPE.

image

Apply GPT Disk – Very important if your using Bit locker. As you may face issues with Bit locker on MBR disks. if bit locker has to work well in your environment. make sure its Partitioned based on UEFI.

image

Add the Operating System Image from Volume Licensing. We have zero customization on Wim. So that we can use different versions of windows easily.

image

Now lets see how to Apply Operating System.

  • Choose the Image Package we uploaded.
  • Choose the image index. in our Case its Windows 10 Enterprise.

image

Create a Package for storing unattended.xml or Download from GitHub (Have Uploaded all the required files)

<HideEULAPage>true</HideEULAPage>
<HideOEMRegistrationScreen>true</HideOEMRegistrationScreen>
<HideOnlineAccountScreens>true</HideOnlineAccountScreens>
<HideWirelessSetupInOOBE>true</HideWirelessSetupInOOBE>
<HideLocalAccountScreen>true</HideLocalAccountScreen>
<NetworkLocation>Work</NetworkLocation>
<SkipMachineOOBE>true</SkipMachineOOBE>
<SkipUserOOBE>true</SkipUserOOBE>
</OOBE>

So that you can skip OOBE Screen details while imaging

image


image

Now you can apply the operating system.

image

  • Choose the Organization Name,
  • If your using KMS , use the KMS Client Key or use the MAK Key
  • Enter the local administrator password after installation.
  • Choose the time zone required.

image

Now apply network settings.

  • Join a domain
  • Choose the Organizational Unit which needs to be placed
  • Choose the account with domain join permissions

image

Now Auto Apply Drivers for for each model separately to make the imaging more faster.

image

In Options make sure you apply Drivers only for the model.

SELECT * FROM Win32_ComputerSystem WHERE Model LIKE “%HP ProBook 650 G4%”

image

Setup Windows and Configuration Manager

DISABLESITEOPT=True

If set to TRUE, this property disables the ability of administrative users from changing the assigned site in the Configuration Manager control panel.

image

Now install all Required Applications.

  • Installing Office
  • Installing Agents
  • Installing adobe

image

Now Apply Start Layout Download from Technet (Have Uploaded all the required files)

image


image

Now Remove unwanted apps like default mail client. xbox games. Download from GitHub (Have Uploaded all the required files)

  • Microsoft.XboxApp
  • Microsoft.MicrosoftSolitaireCollection
  • Microsoft.SkypeApp
  • microsoft.windowscommunicationsapps

image

Create This PC Shortcut.  Download from GitHub (Have Uploaded all the required files)

image

image

Restart Computer.

image

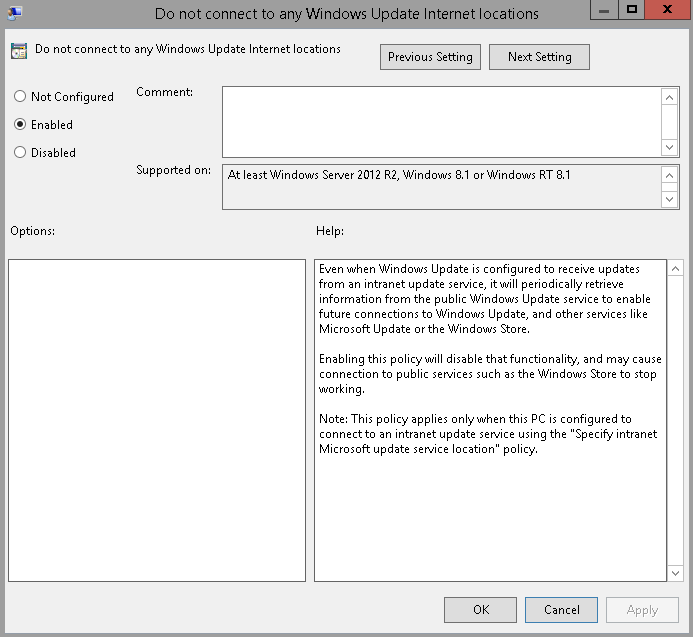
In my case am not using Software update point and point to WSUS server. Download from GitHub (Have Uploaded all the required files)

  • Set Task Sequence Variable

image

Now wsus server will be picked up by the script will be specified above.

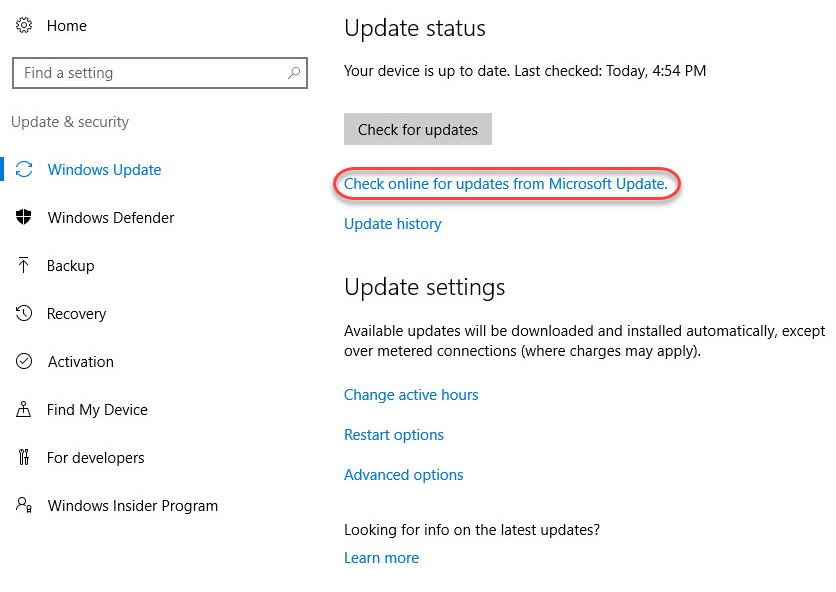
cscript.exe ZTIWindowsUpdate.wsf

image

Scripts can be downloaded from Technet Download from GitHub (Have Uploaded all the required files)

image

Now restarting the computer and set task variable again and run wsus script again so that it will patch completely.

image

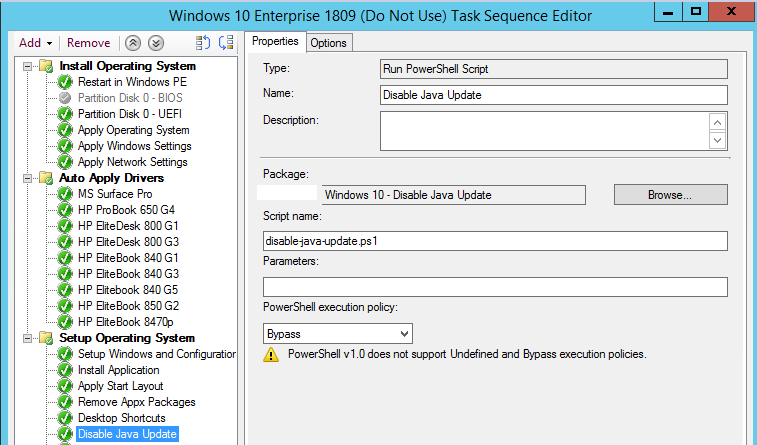
Note if your installing Java Run time to support any Oracle Products and if you wish to Disable UAC Prompt Caused by Java update.You can use a simple script to add a registry value to disable java update. Download from GitHub (Have Uploaded all the required files)

if you wish to test the drivers installation  alone. Lets see the minimal Tasks required without joining the machine to the domain.

Exchange 2010 to Exchange 2016 Migration Check List

Exchange 2010 to Exchange 2016 High level migration Check List for Specialists.


– SSL Certificate Planning (Wild Card or SAN Certificate is in use make sure all primary domain have auto discover entries in the the new Exchange 2016 Servers.)

– Exchange 2016 Sizing as per Microsoft Recommendations.

– Usage of Load Balancer. (one arm / two arm configurations) Set expectations on visibility of email / client source IP. X-Forwarder.

– Usage of a WAF / Reverse proxy solution . (For Better Security )

– Check Proxy Settings like use of PAC file or ISA or Zscaler. See Outlook Connectivity with test DNS. As host file will not take effect to test client connectivity in the time of client access cutover.

– Check MX Record on where its pointing and check how it can moved properly to Exchange 2016 Servers via Anti-spam solutions.

– Remove Public Folder Database Attribute . if you don’t wish to use public folders . As outlook connectivity will break for exchange 2016 when outlook tries to connect to Exchange 2016 and another request will try to connect exchange 2010 public folders. breaking the outlook connectivity.

– While moving mailboxes . Make sure auto discover recycle pool is recycled frequently once the move completes. So that outlook will reconnect quickly.

– Once you Install new exchange servers make sure autodiscoverinternaluri is changed via set-clientclientaccessserver so that outlook in the environment will not get any surprise cert error prompts.

– Make sure additional softwares are implemented properly like signature software’s / Email Archiving / Backup.

– Make sure email relaying connectors or copies to the new servers using Power Shell.

– Make sure anti virus exclusions are set properly on the new servers.

– Make sure send connectors are updated properly before you shutdown and uninstall Exchange 2010 servers.

– Make sure ambiguous urls doesn’t exist . Like Outlook anywhere FQDN and cas array name is same.

Please feel free to add in comments. I can update the same.

Active Directory Database Corruption

repadmin /syncall /AePdq

Error issuing replication : 8451 (0x2103)

The replication operation encountered a database error.

image

Press F8 on Boot.  (If its on VMware enter bios menu . Then exit and press F8)

image

Check if Database is corrupted. if its corrupted . please proceed with next steps.


C:\Windows\NTDS>

C:\Windows\NTDS>ESENTUTL /g C:\windows\NTDS\ntds.dit /!10240 /8 /o

Initiating INTEGRITY mode...

Database: C:\windows\NTDS\ntds.dit

Temp. Database: .\TEMPINTEG4820.EDB

Checking database integrity.

The database is not up-to-date. This operation may find that

this database is corrupt because data from the log files has

yet to be placed in the database.

To ensure the database is up-to-date please use the 'Recovery' operation.

Scanning Status (% complete)

0    10   20   30   40   50   60   70   80   90  100

|----|----|----|----|----|----|----|----|----|----|

...................................................

Integrity check completed.

Database is CORRUPTED, the last full backup of this database was on 04/20/2019 1

2:31:03

Operation terminated with error -1206 (JET_errDatabaseCorrupted, Non database fi

le or corrupted db) after 7.93 seconds.

C:\Windows\NTDS>NTDSUTIL

NTDSUTIL: active instance ntds

Error parsing Input - Invalid Syntax.

NTDSUTIL: activate instance ntds

Active instance set to "ntds".

NTDSUTIL: files

file maintenance: info

Drive Information:

C:\ NTFS (Fixed Drive  ) free(40.5 Gb) total(59.6 Gb)

DS Path Information:

Database   : C:\Windows\NTDS\ntds.dit - 314.1 Mb

Backup dir : C:\Windows\NTDS\dsadata.bak

Working dir: C:\Windows\NTDS

Log dir    : C:\Windows\NTDS - 80.0 Mb total

edbtmp.log - 10.0 Mb

edbres00002.jrs - 10.0 Mb

edbres00001.jrs - 10.0 Mb

edb07737.log - 10.0 Mb

edb07736.log - 10.0 Mb

edb07735.log - 10.0 Mb

edb07734.log - 10.0 Mb

edb.log - 10.0 Mb

file maintenance: Recover

Initiating RECOVERY mode...

Log files: C:\Windows\NTDS.

System files: C:\Windows\NTDS.

Performing soft recovery...

Database recovery is successful.

It is recommended you run semantic database analysis

to ensure semantic database consistency as well.

file maintenance: quit

NTDSUTIL: ESENTUTL /ml c:\windows\ntds\edb

C:\Windows\NTDS>

C:\Windows\NTDS>ESENTUTL /ml c:\windows\ntds\edb

Extensible Storage Engine Utilities for Microsoft(R) Windows(R)

Version 6.3

Copyright (C) Microsoft Corporation. All Rights Reserved.

Initiating FILE DUMP mode...

Verifying log files...

Base name: edb

Log file: c:\windows\ntds\edb07734.log - OK

Log file: c:\windows\ntds\edb07735.log - OK

Log file: c:\windows\ntds\edb07736.log - OK

Log file: c:\windows\ntds\edb07737.log - OK

Log file: c:\windows\ntds\edb.log - OK

No damaged log files were found.

Operation completed successfully in 0.453 seconds.

C:\Windows\NTDS>ESENTUTL /g C:\windows\NTDS\ntds.dit /!10240 /8 /o

Initiating INTEGRITY mode...

Database: C:\windows\NTDS\ntds.dit

Temp. Database: .\TEMPINTEG3496.EDB

Checking database integrity.

Scanning Status (% complete)

0    10   20   30   40   50   60   70   80   90  100

|----|----|----|----|----|----|----|----|----|----|

...................................................

Integrity check successful.

Operation completed successfully in 20.156 seconds.

C:\Windows\NTDS>ntdsutil

ntdsutil: activate instance ntds

Active instance set to "ntds".

ntdsutil: semantic database analysis

semantic checker: go

Fixup mode is turned off

......Done.

Writing summary into log file dsdit.dmp.0

SDs scanned:           3475

Records scanned:      27034

Processing records..Done. Elapsed time 7 seconds.

semantic checker: quit

ntdsutil: quit

C:\Windows\NTDS>

if semantic database find any errors. you can use go fix.

× How can I help you?