Managing Microsoft 365 licenses effectively is crucial for organizations to ensure compliance and avoid unnecessary costs. PowerShell provides a straightforward way to identify licensed and unlicensed users within your tenant. With just a few commands, you can gain insights into your license usage, streamline administration, and make informed decisions about license allocation. This guide will help you get started with PowerShell to manage your Microsoft 365 licensing efficiently.
STEP 1:
Open Windows Powershell
Open Windows Powershell As Administrator.
STEP 2:
Microsoft Graph Powershell
To Install Microsoft Graph Powershell, Put The Command. [Install-Module -Name Microsoft.Graph]
To Check Microsoft Graph Version. [ Get-InstalledModule Microsoft.Graph]
STEP 3:
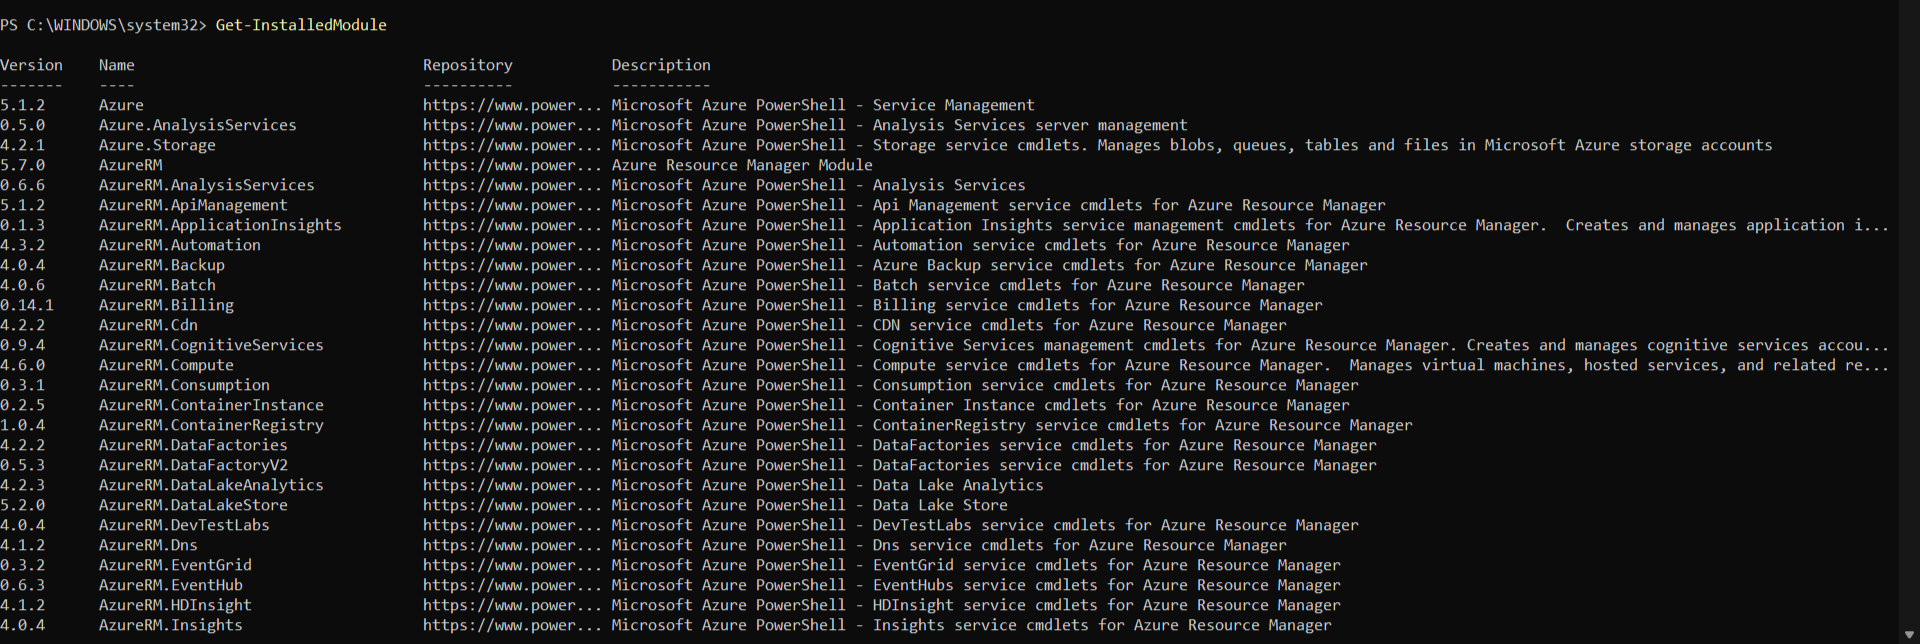
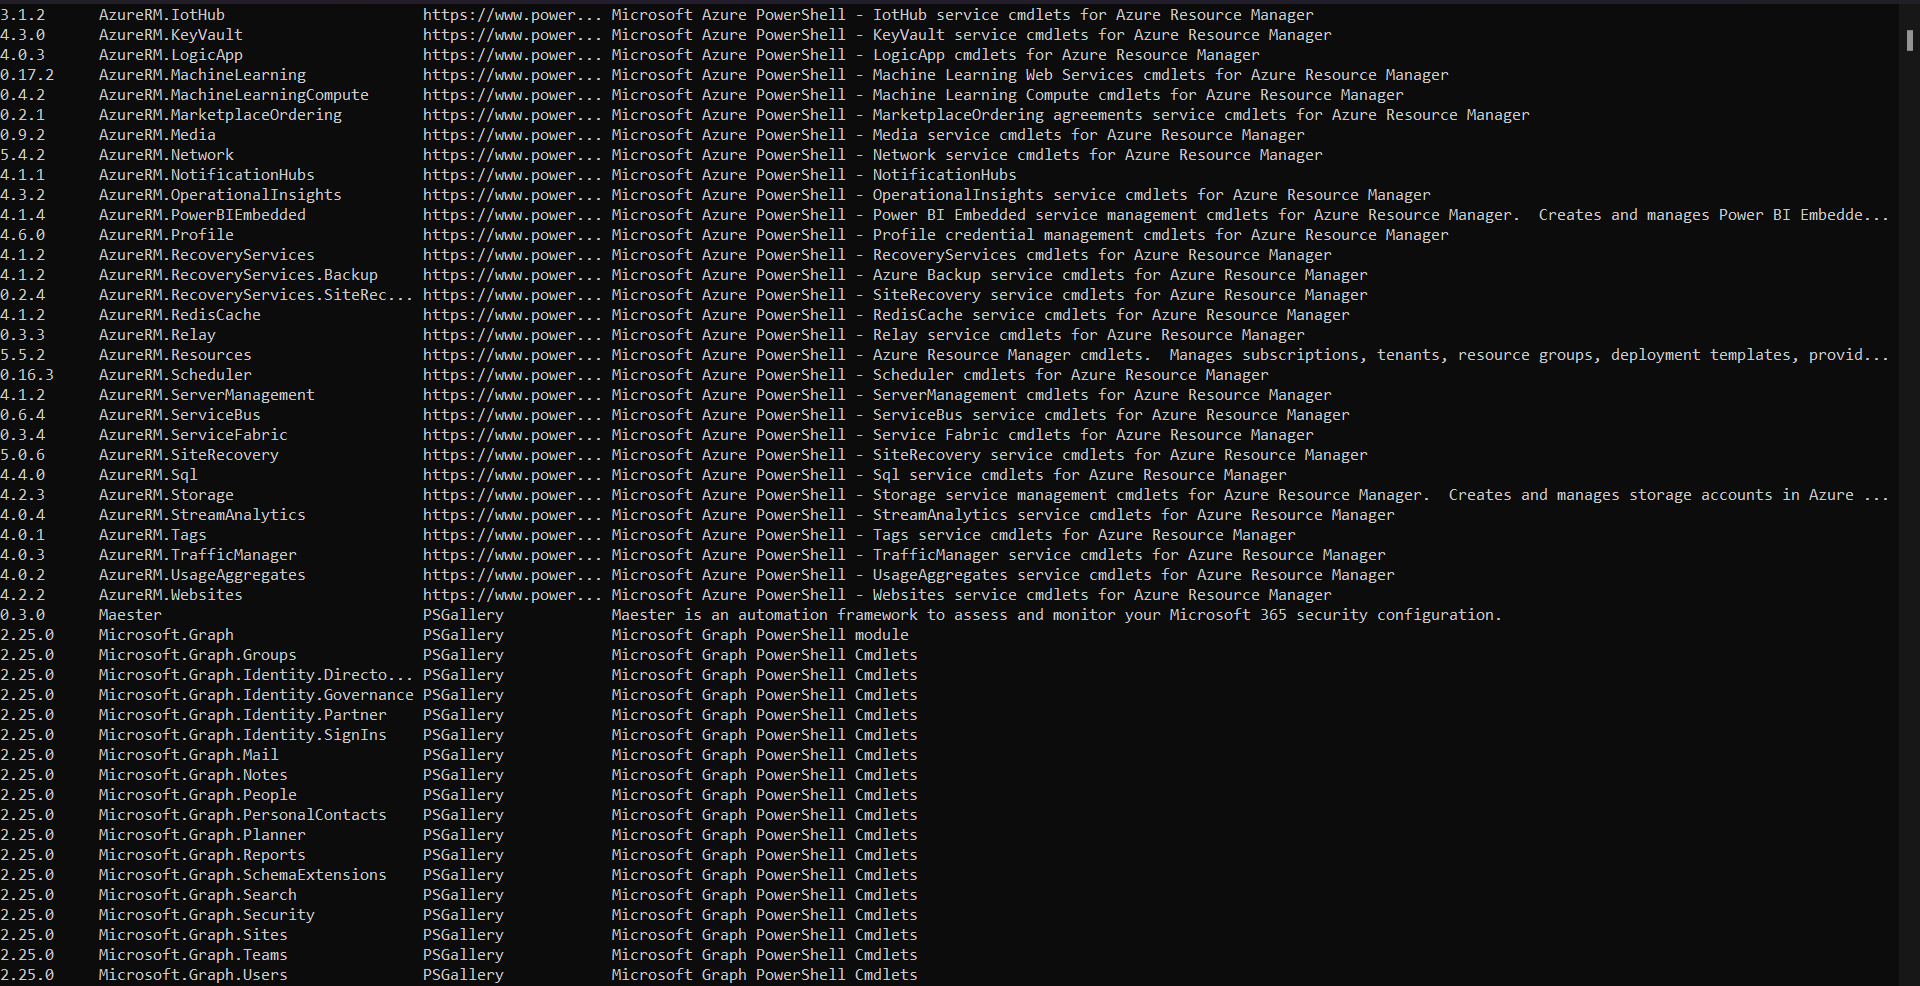
To View What Modules Are Installed, Put The Command. [Get-InstalledModule]
STEP 4:
Microsoft Graph
Connect The Microsoft Graph, Put The Command. [Connect-Graph -Scopes User.Read.All, Organization.Read.All]
STEP 5:
Find Licensed User
To Find Licensed User, Put The Command. [ Get-MgUser -Filter ‘assignedLicenses/$count ne 0’ -ConsistencyLevel eventual -CountVariable licensedUserCount -All -Select UserPrincipalName,DisplayName,AssignedLicenses | Format-Table -Property UserPrincipalName,DisplayName,AssignedLicenses]
To Find Number Of Licensed Users, Use This Command. [ Write-Host “Found $licensedUserCount licensed users.” ]
STEP 6:
Find UnLicensed User
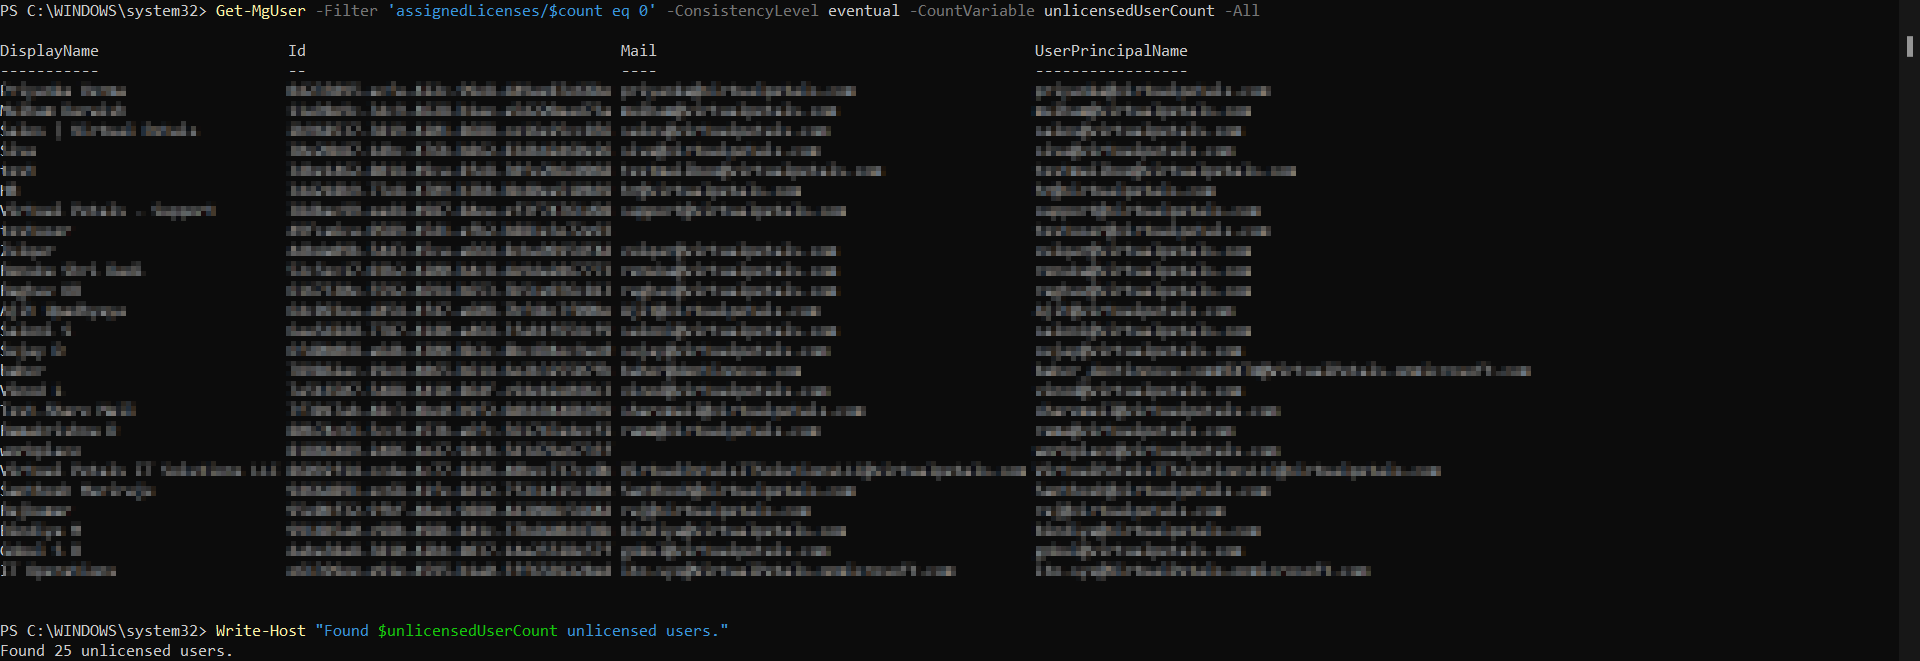
To Find UnLicensed User, Put The Command. [ Get-MgUser -Filter ‘assignedLicenses/$count eq 0’ -ConsistencyLevel eventual -CountVariable unlicensedUserCount -All]
To Find Number Of UnLicensed Users, Use This Command. [ Write-Host “Found $unlicensedUserCount unlicensed users.”]
STEP 7:
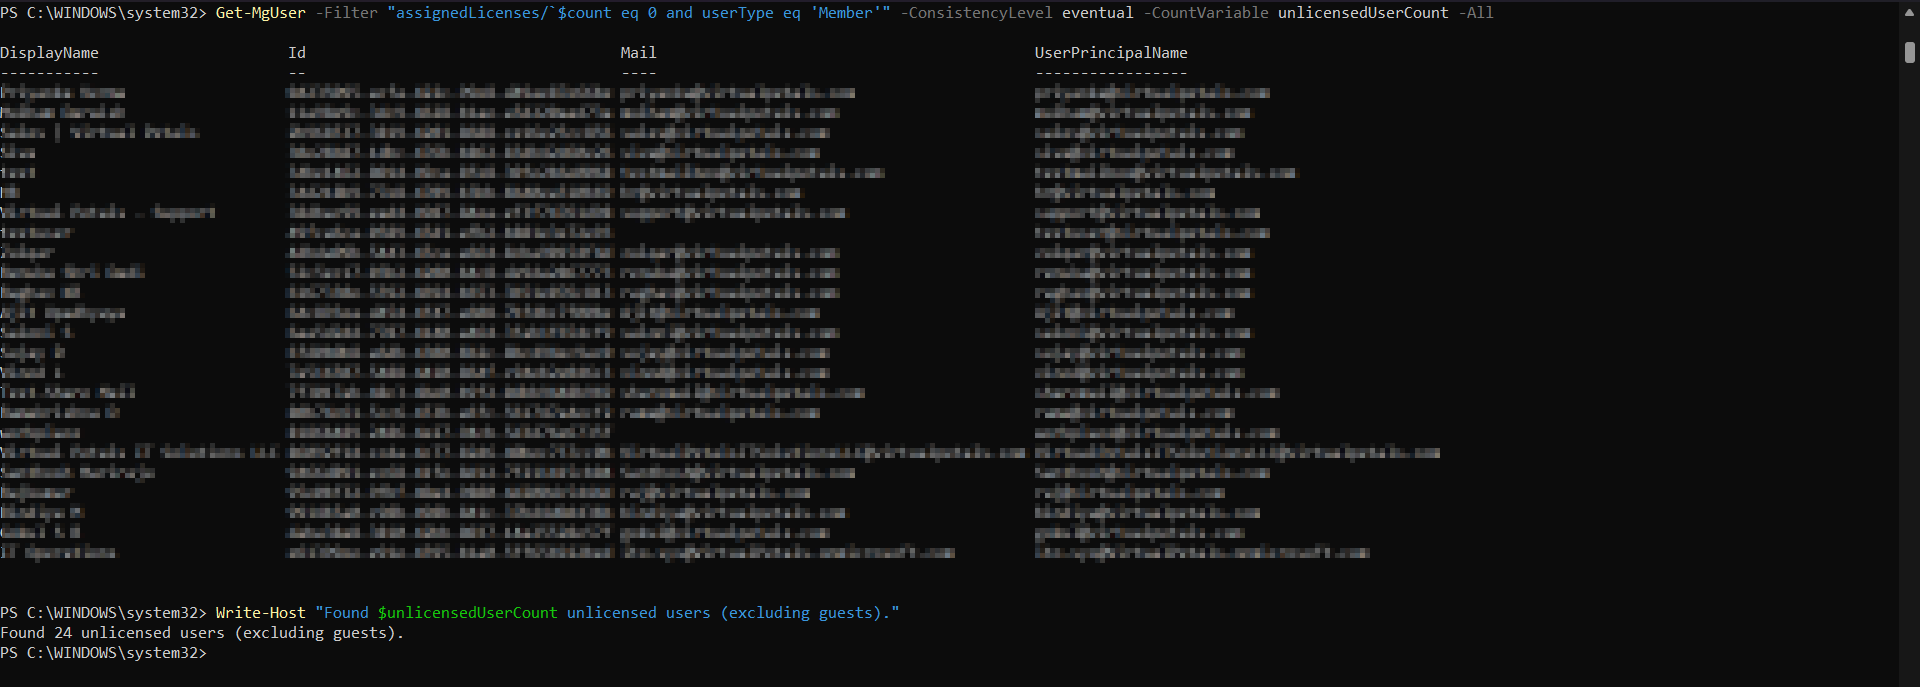
Find Without An Assigned License Excluding Guests
To Find Without An Assigned License Excluding Guests. [ Get-MgUser -Filter “assignedLicenses/`$count eq 0 and userType eq ‘Member'” -ConsistencyLevel eventual -CountVariable unlicensedUserCount -All]
To Find Number Of UnLicensed Users (Excluding Guests), Use This Command. [ Write-Host “Found $unlicensedUserCount unlicensed users (excluding guests).”]
CONCLUSION:
Identifying licensed and unlicensed users in Microsoft 365 using PowerShell is a powerful way to manage your organization’s resources effectively. By automating the process, you can ensure compliance, optimize license usage, and reduce costs. Regular audits using these scripts will help maintain an organized and efficient Microsoft 365 environment.
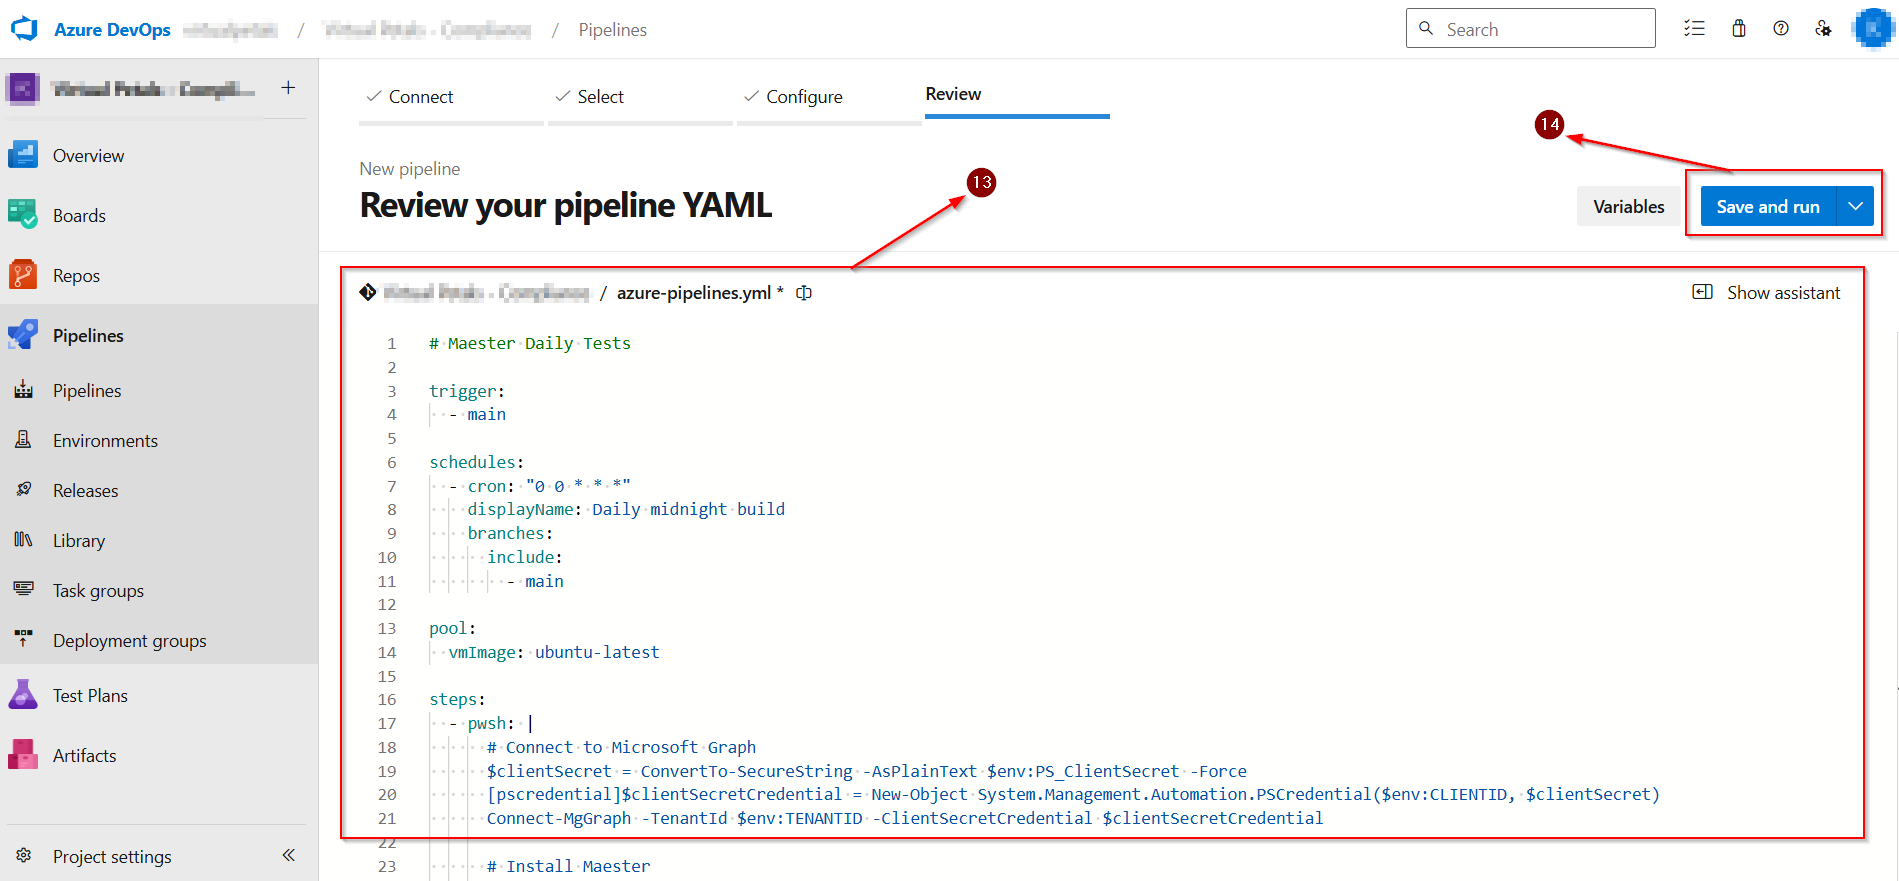
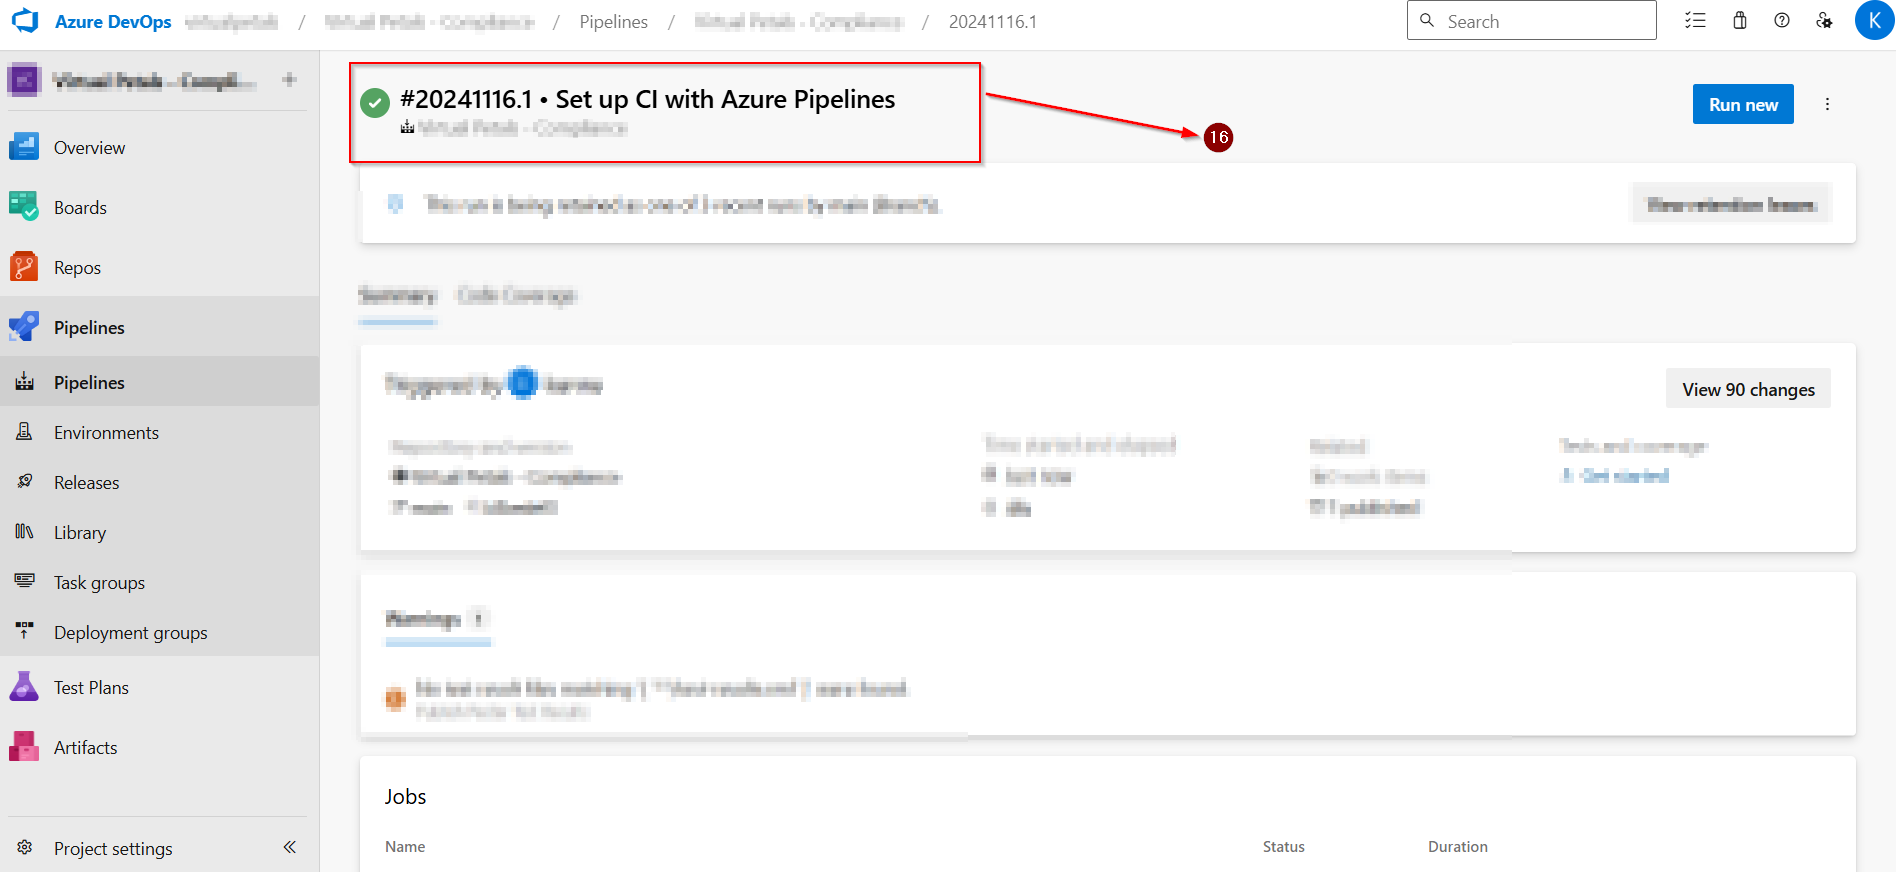
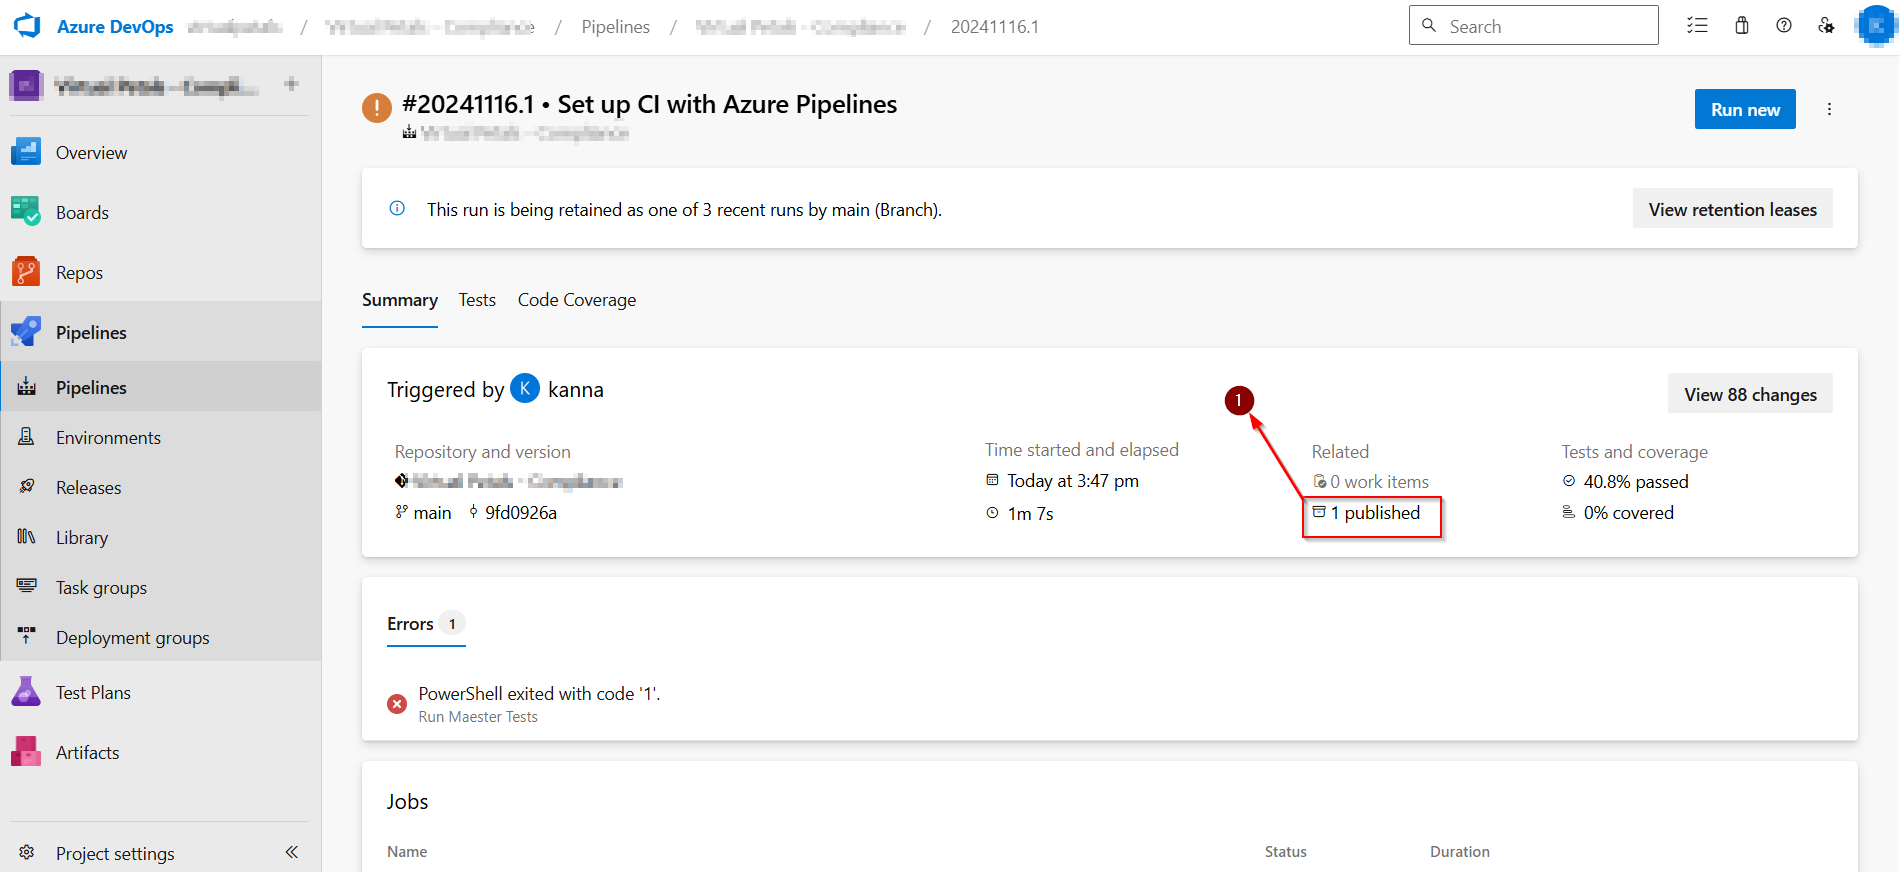
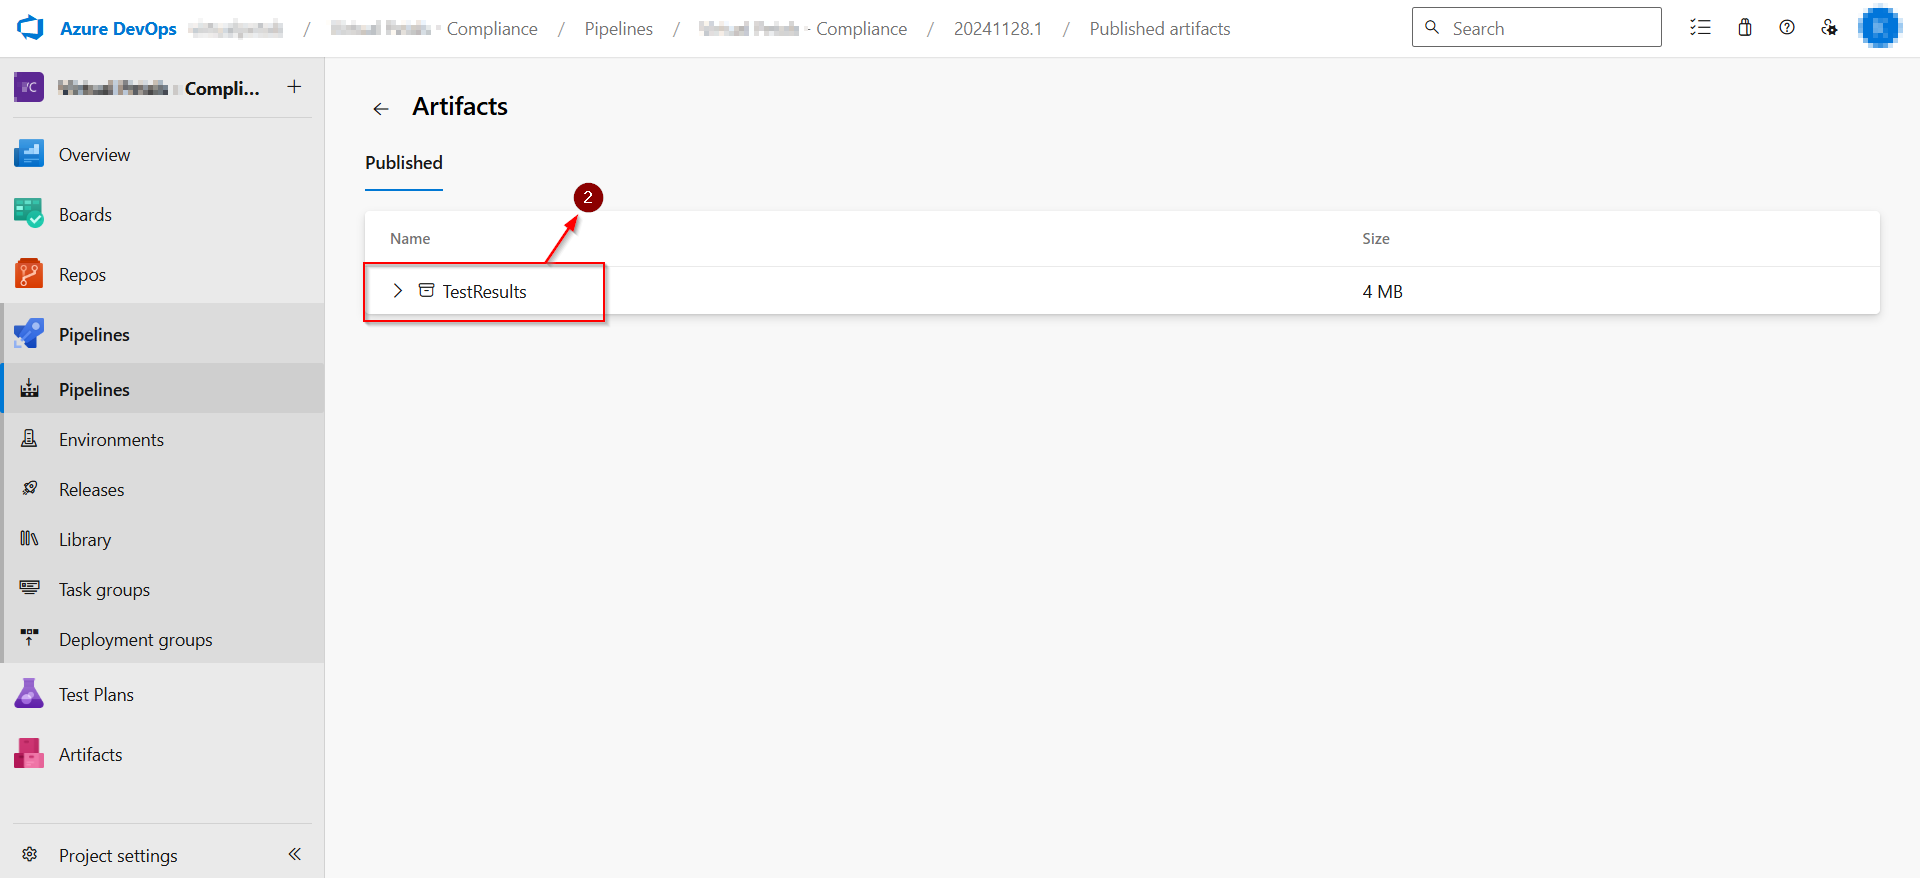
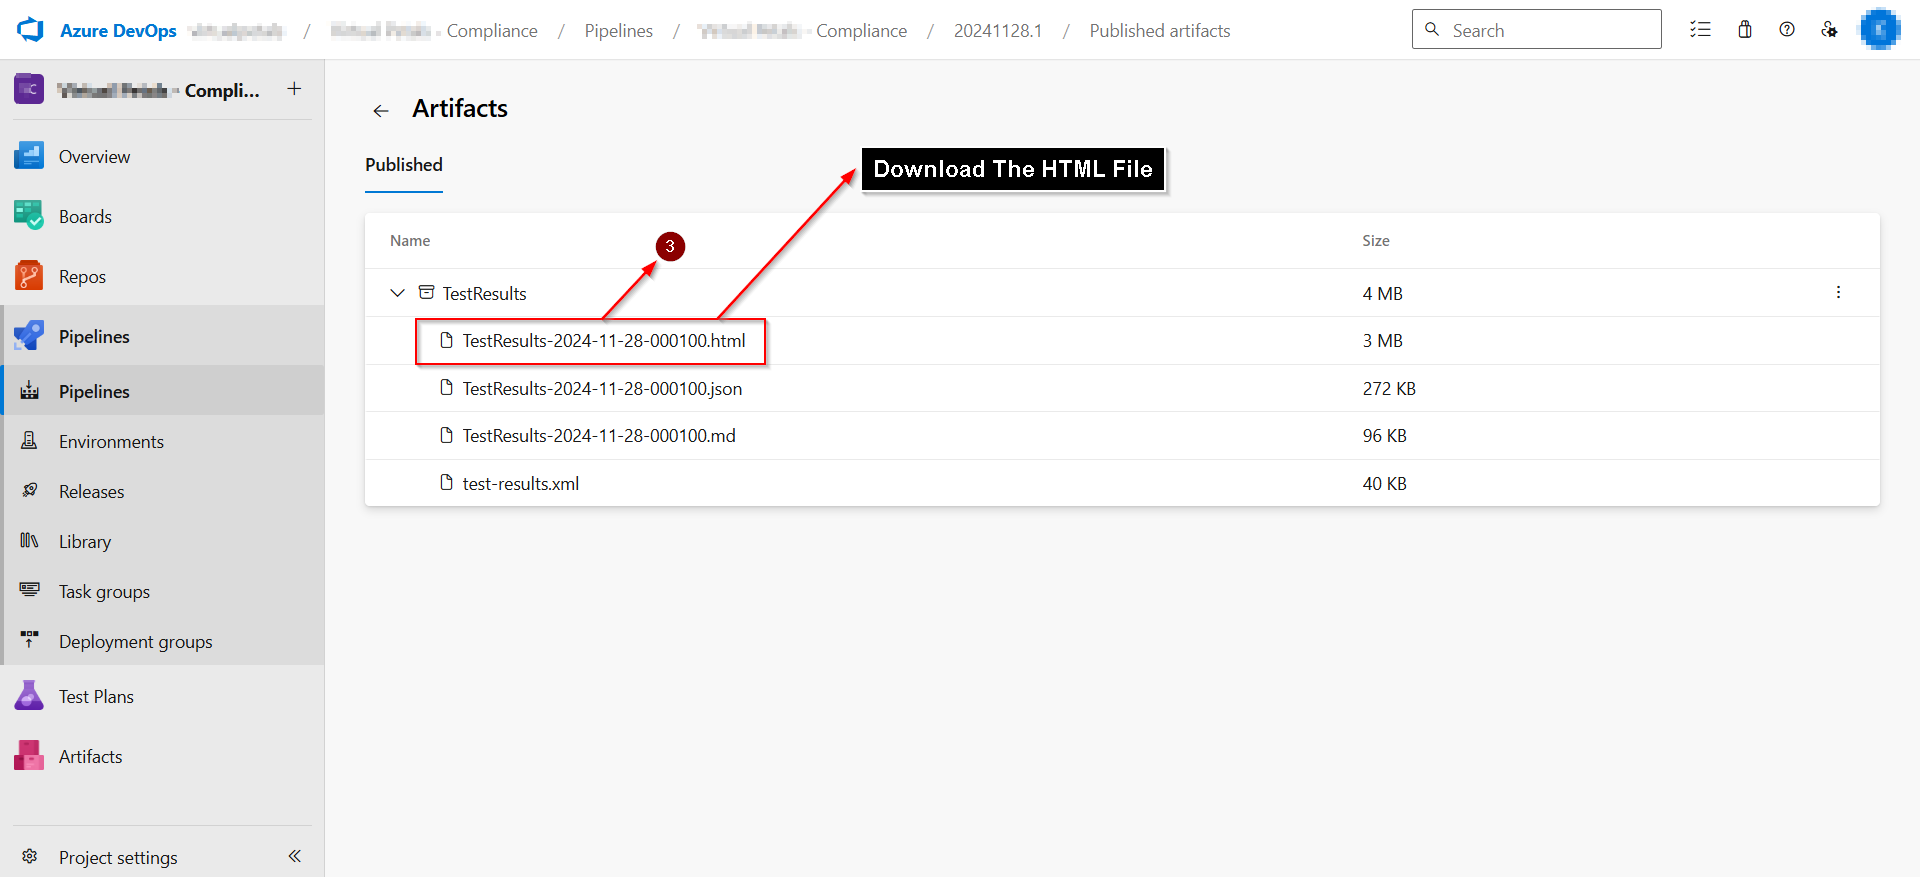
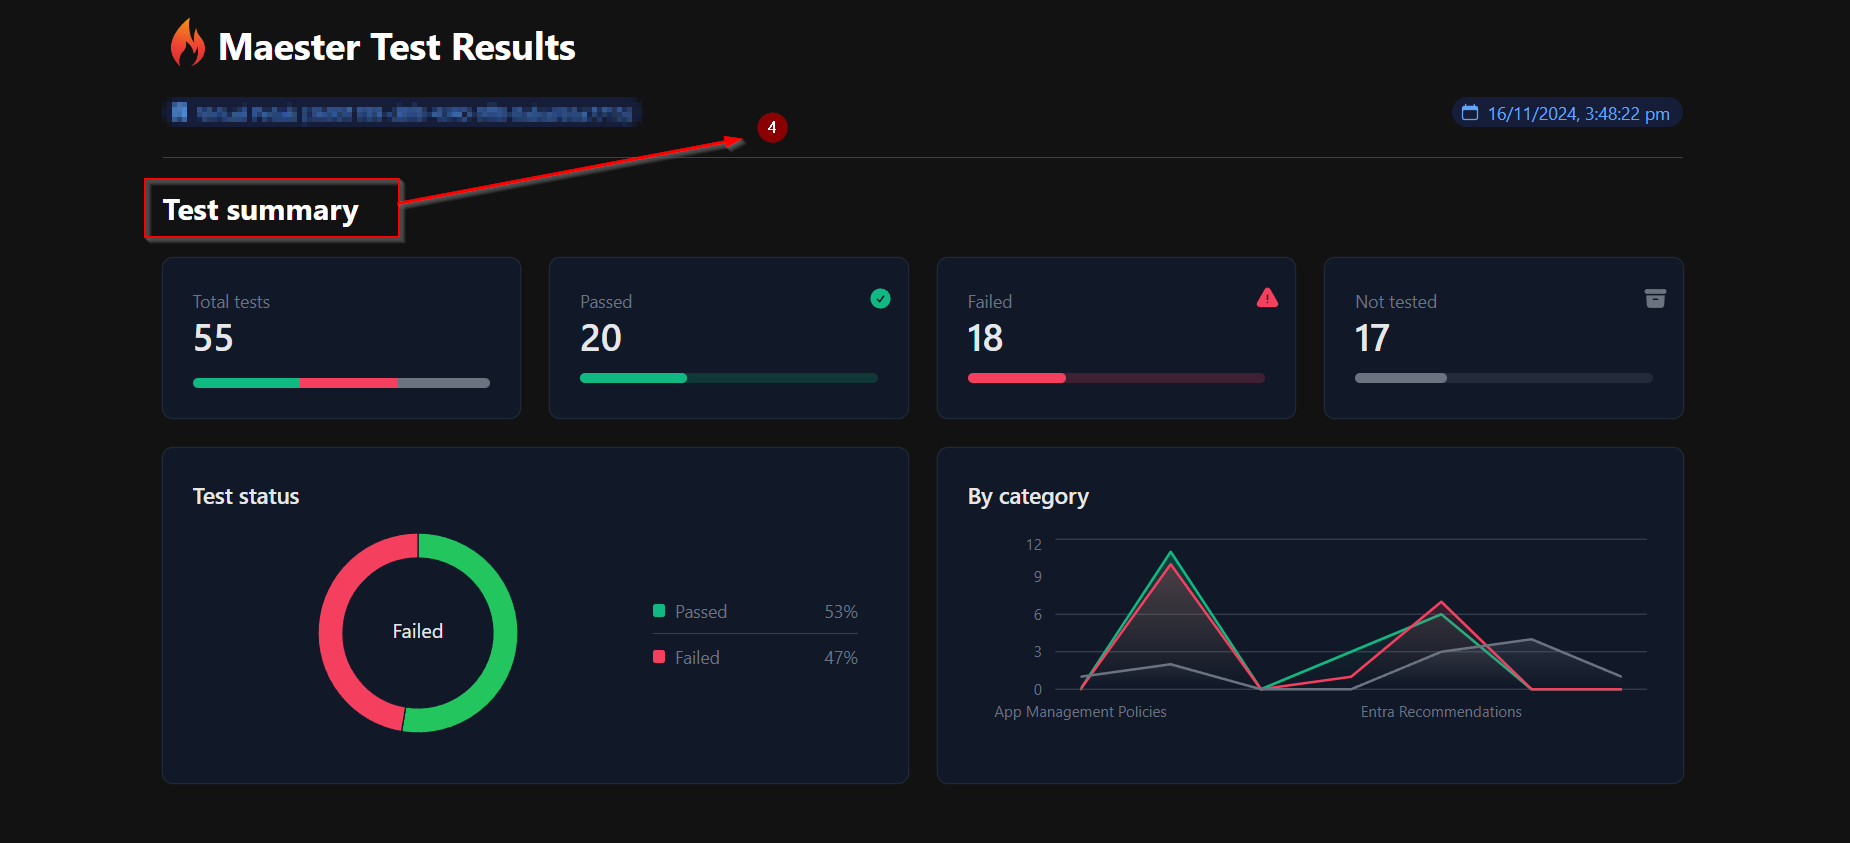
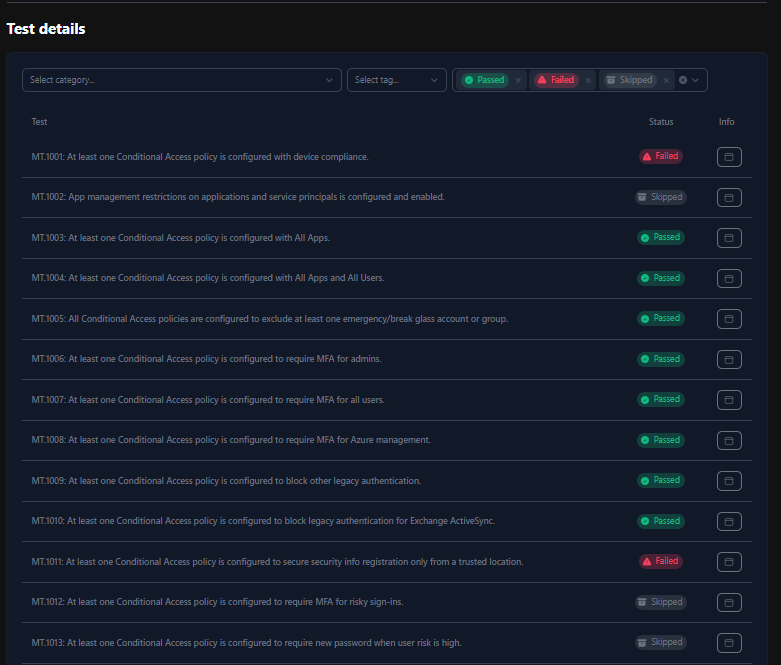
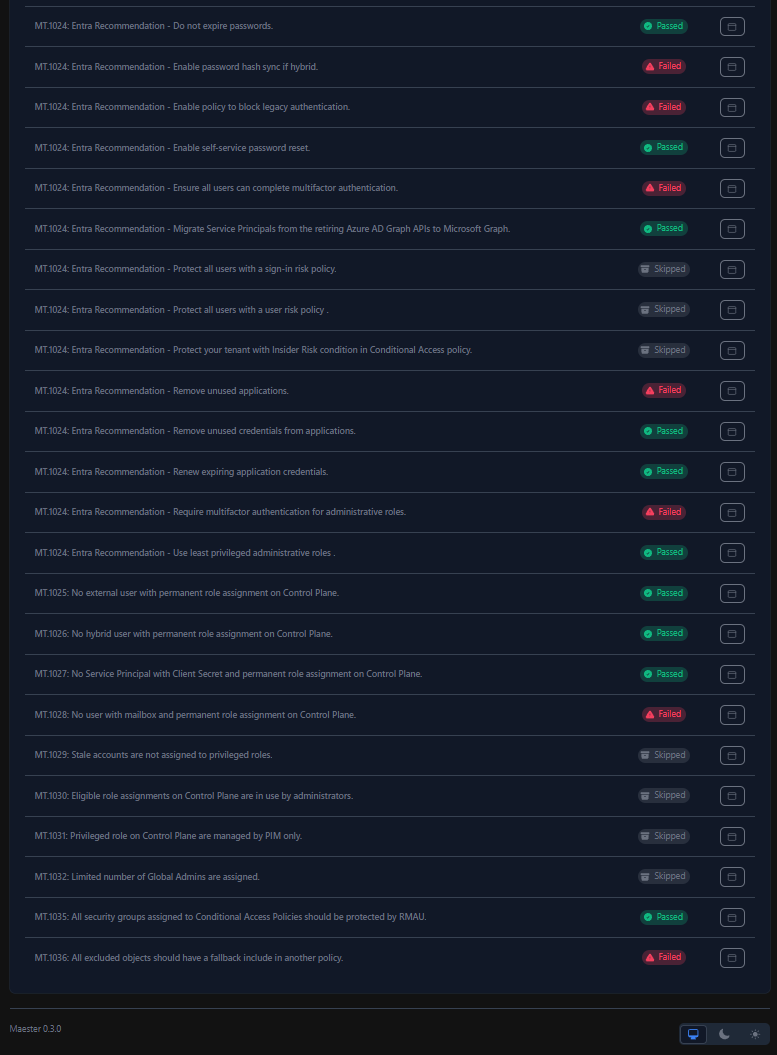
Maester, within the context of Azure, is a background service used in Microsoft Azure Machine Learning to manage and control compute resources effectively. Its main role is to ensure that compute instances, clusters, and jobs are monitored, and it handles the orchestration and scheduling of compute resources across various Azure Machine Learning workloads.
Set up Maester in Azure DevOps
Azure DevOps is a great way to automate the daily running of Maester tests to monitor your tenant. You can use Azure DevOps to run Maester tests on a schedule, such as daily, and view the results in the Azure DevOps interface.
Azure DevOps comes with a free tier that includes 1,800 minutes of Maester test runs per month (unlimited hours if you use a self-hosted agent).
Azure DevOps has native integration with Microsoft Entra including single sign on, user and group management as well as support for conditional access policies.
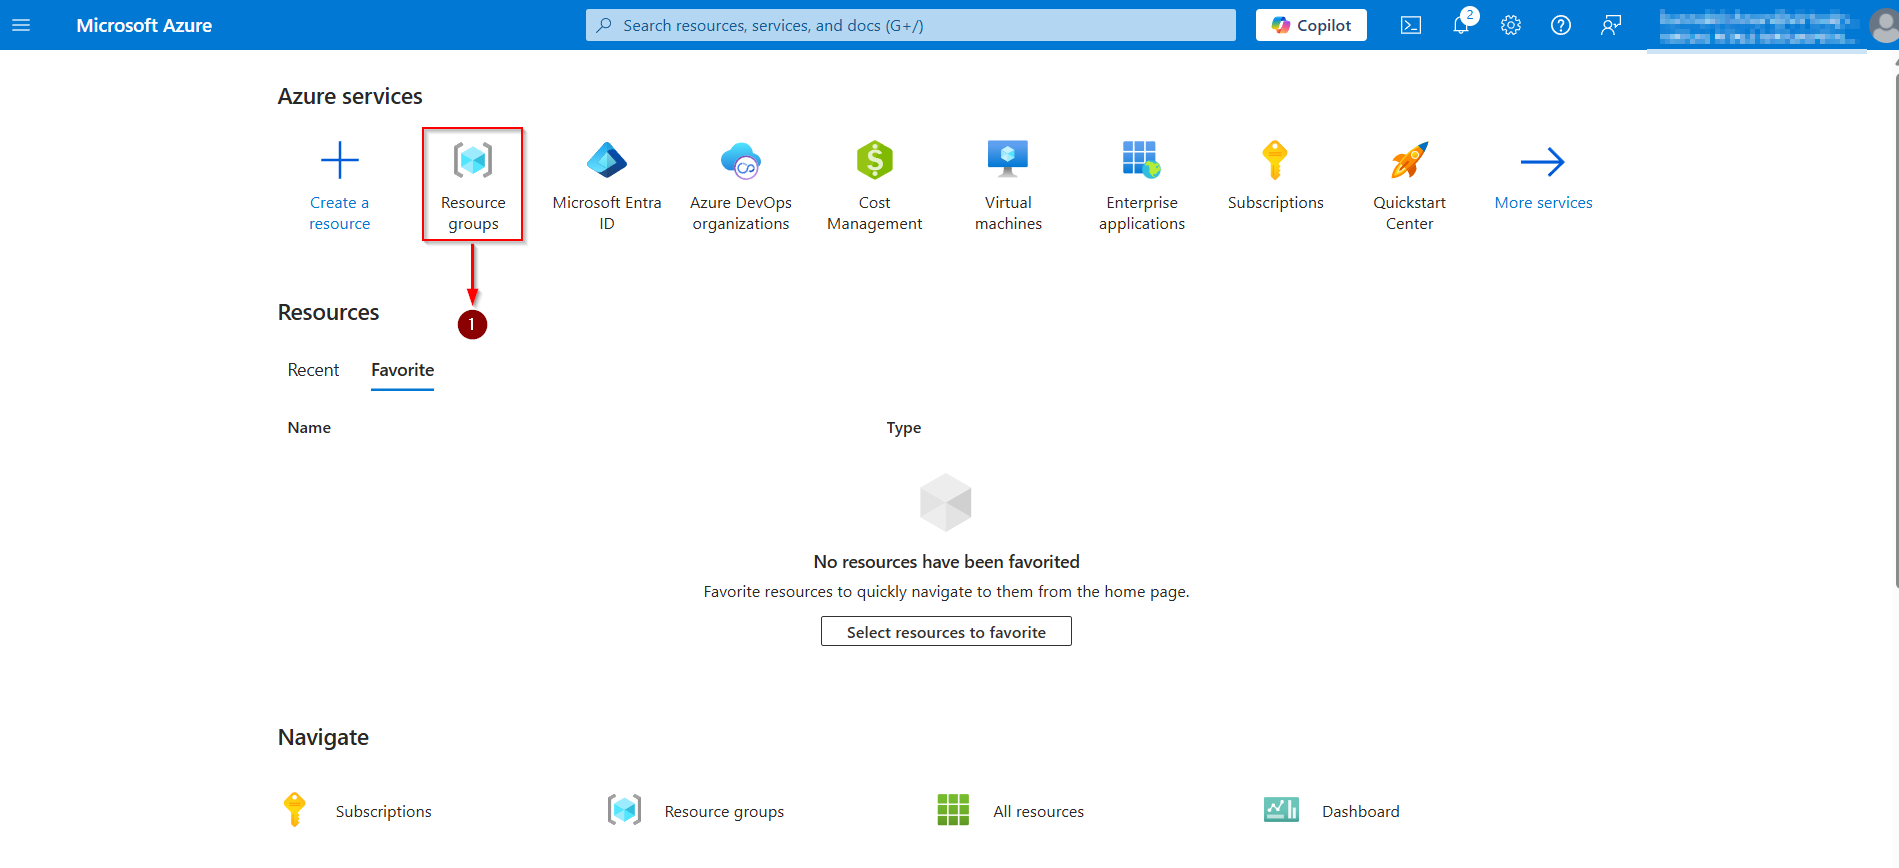
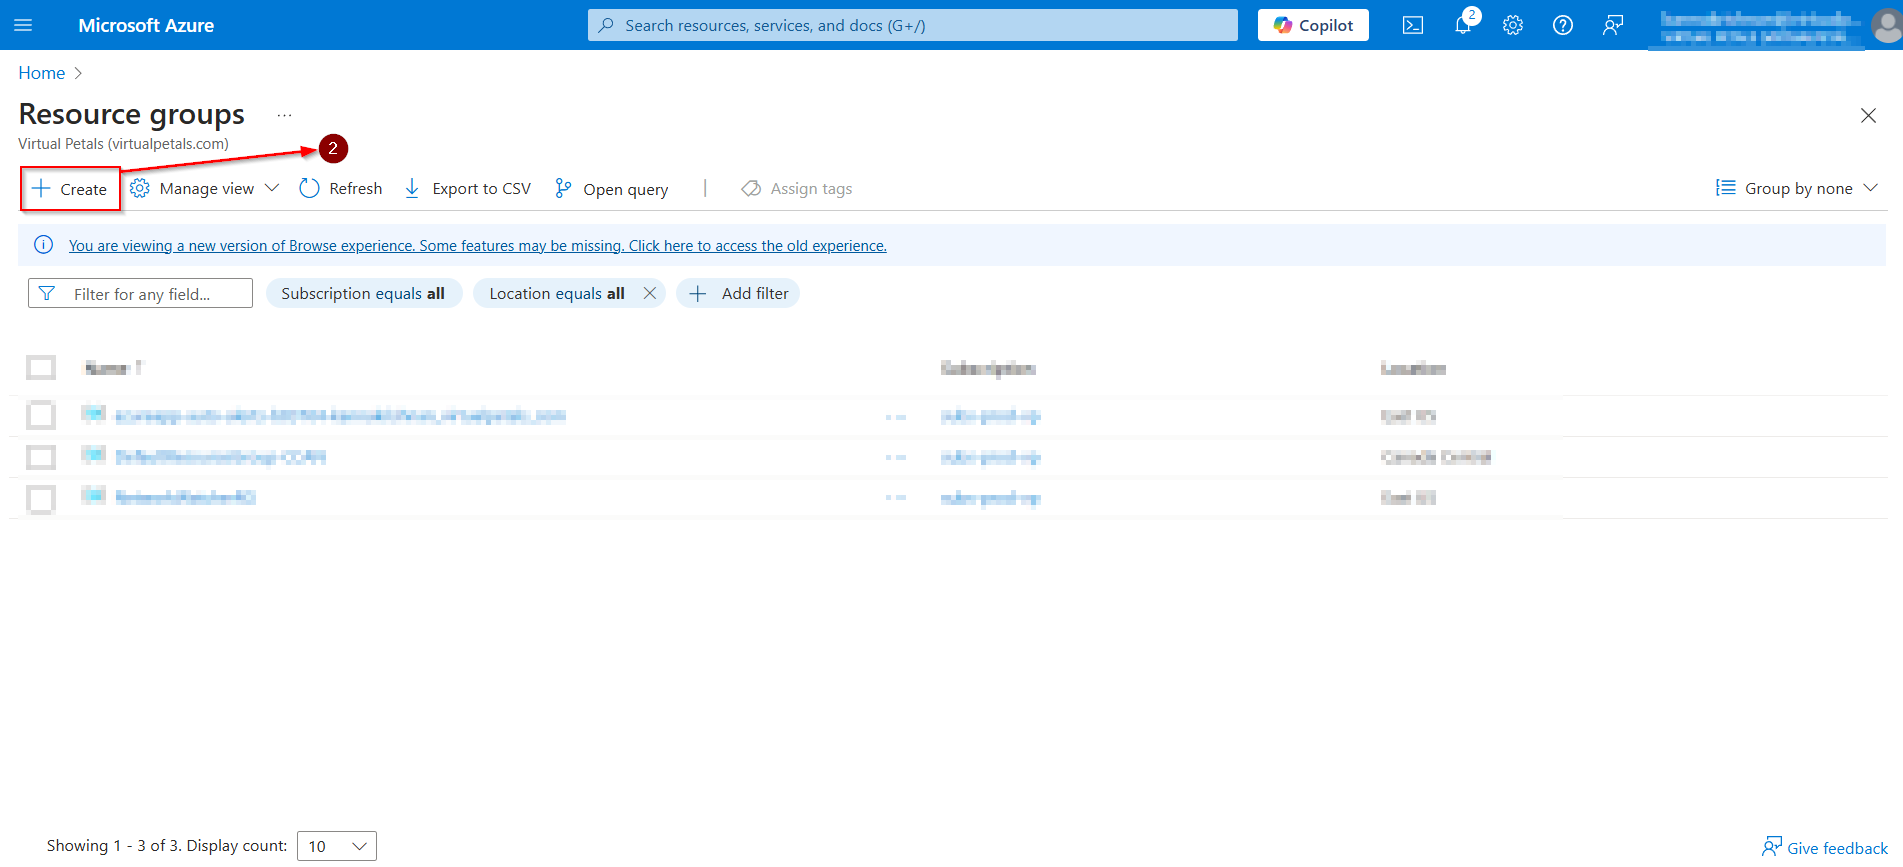
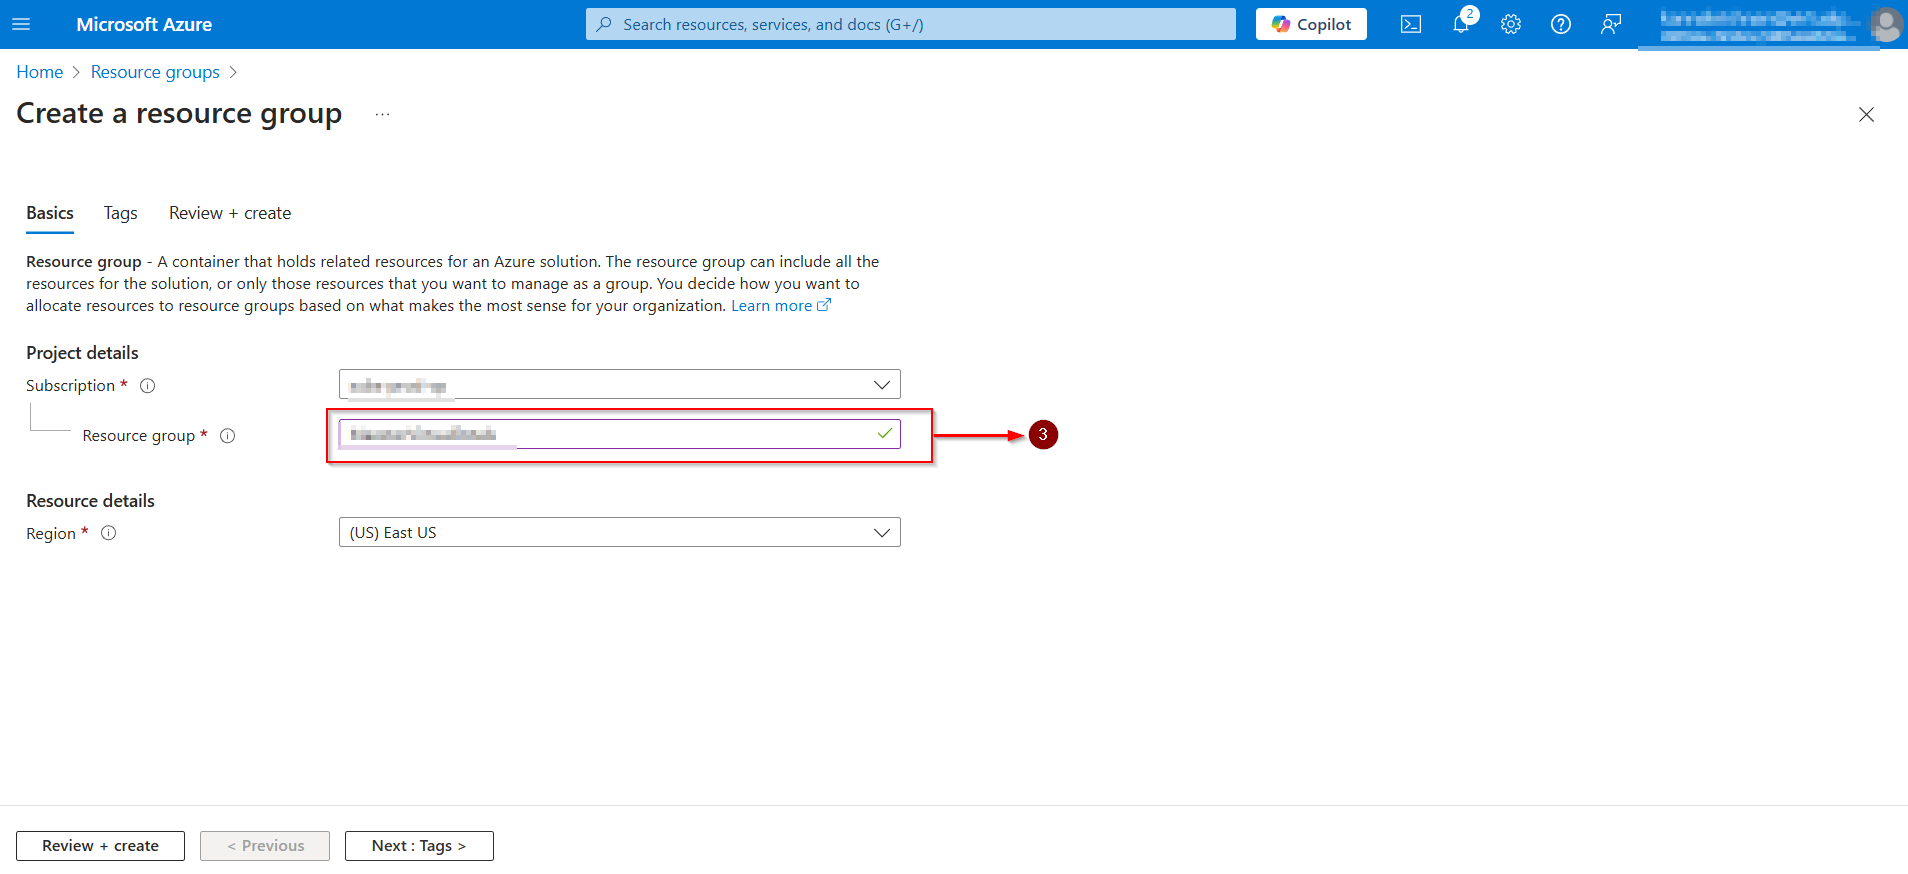
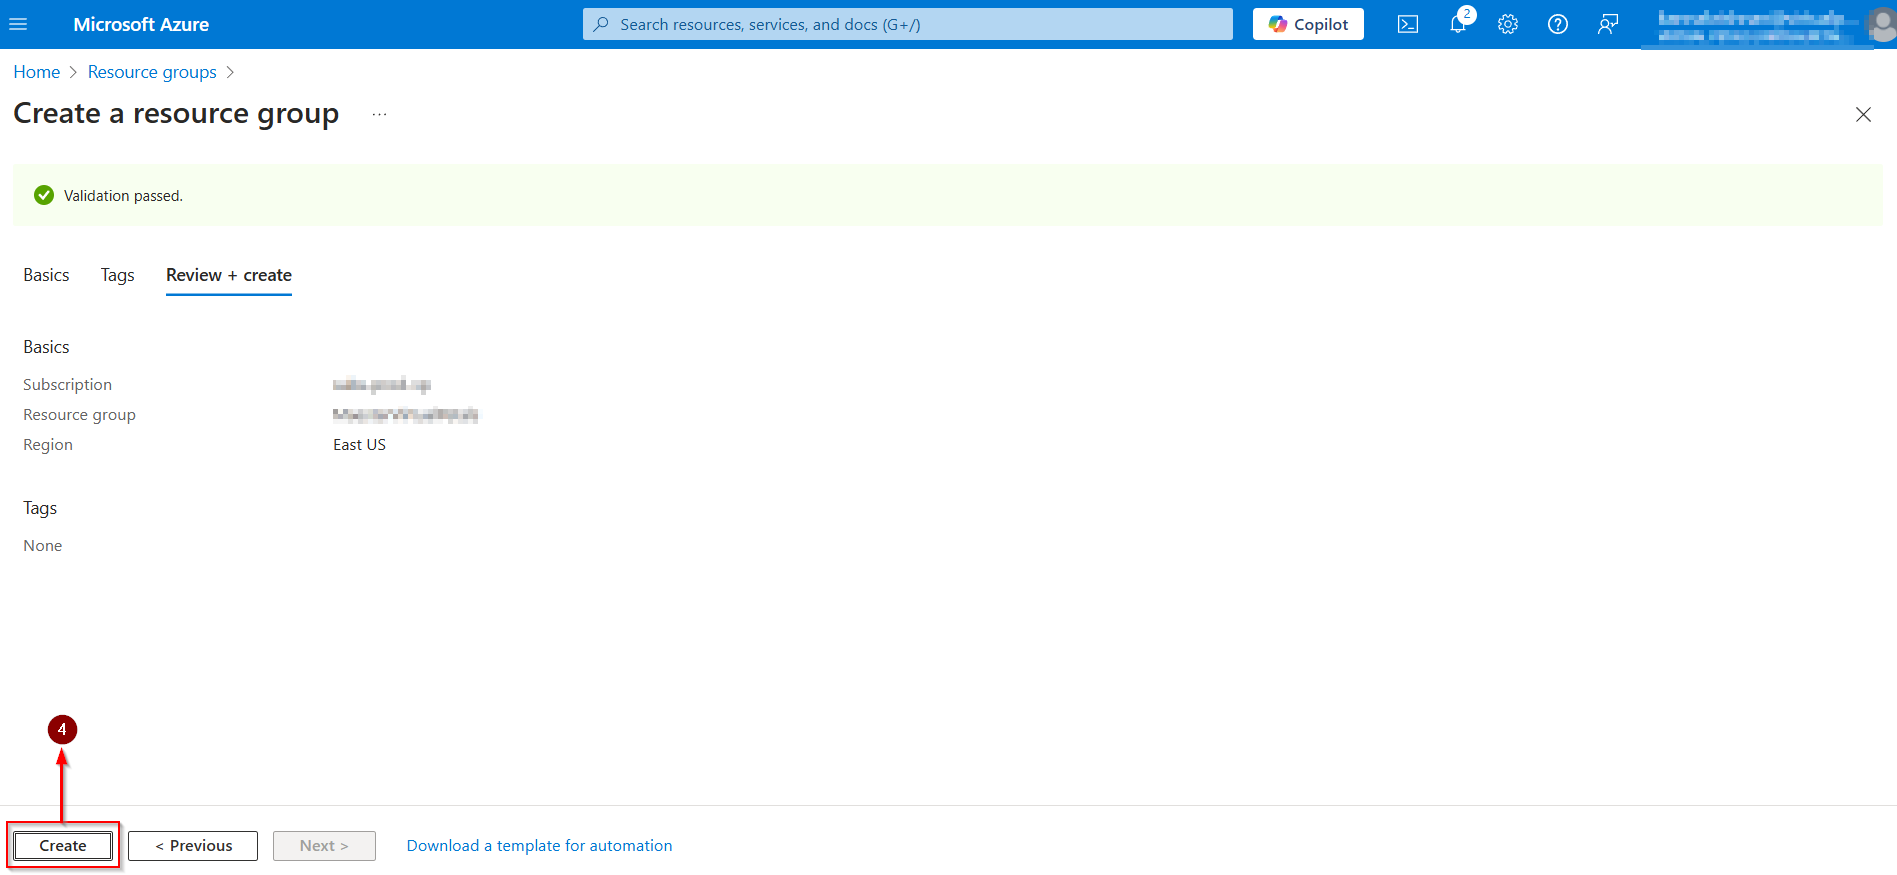
STEP-1: CREATE A RESOURCE GROUP
Browse to the Azure portal and open the Resource group.
Enter a name for the resource group (e.g. Maester-Resource-Group).
Select any region.
Select Review + create > Create.
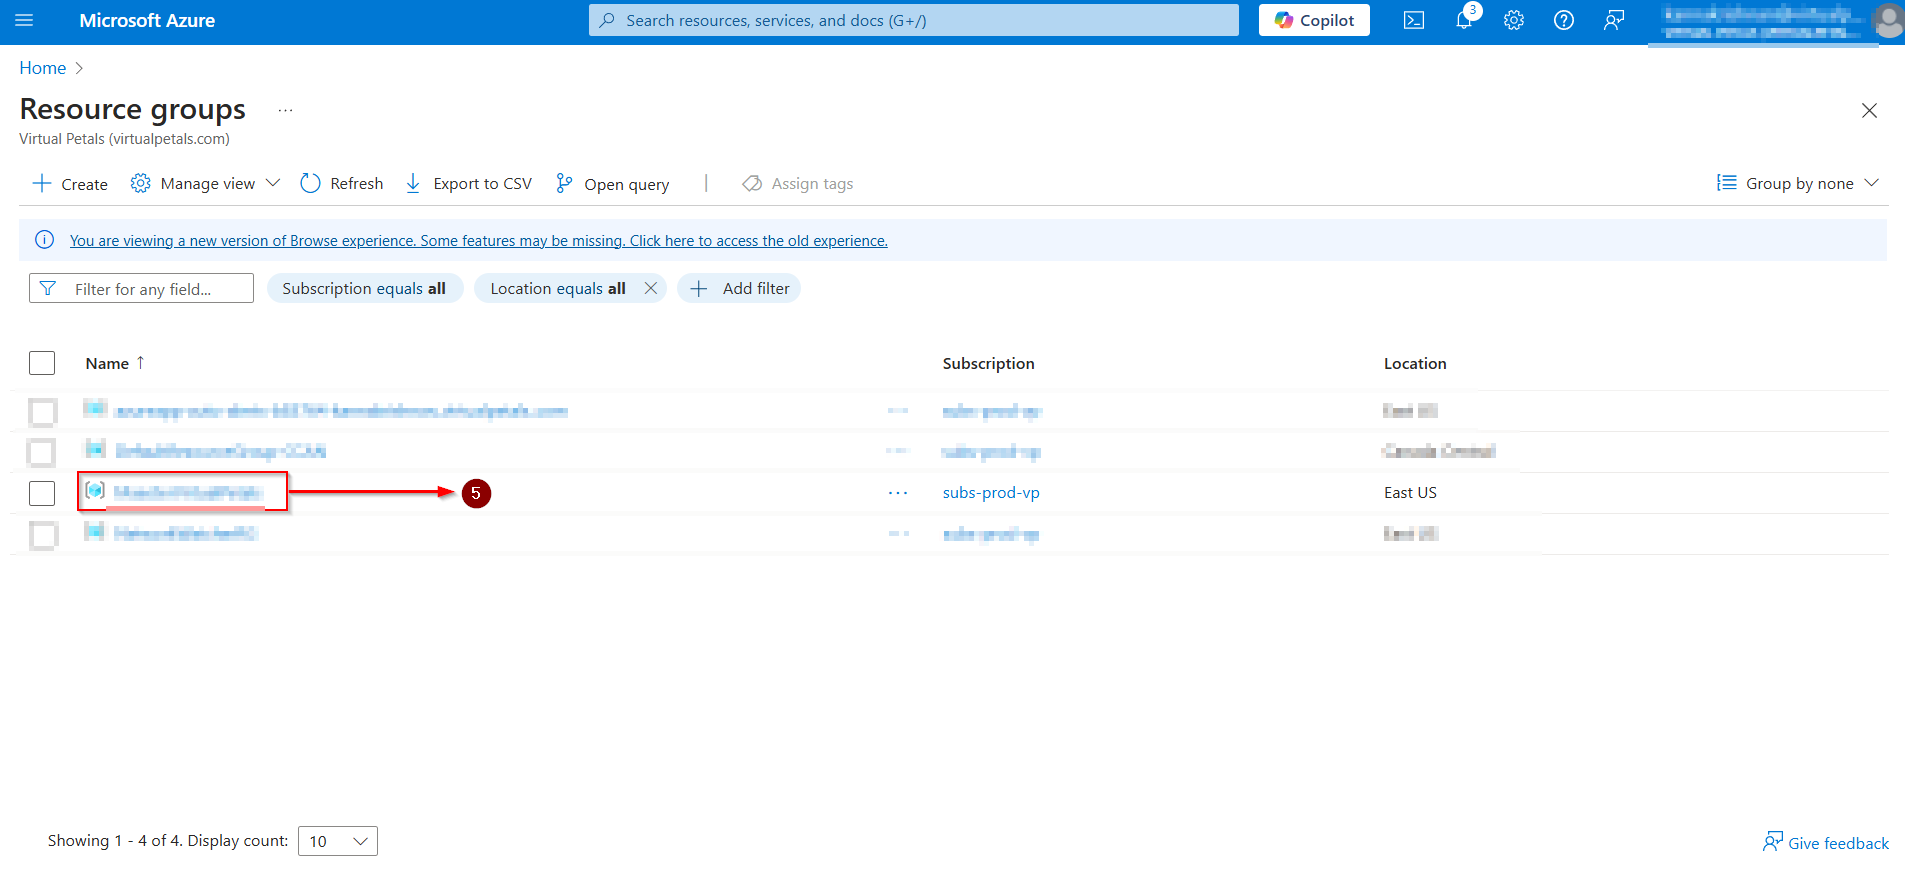
Resource group create successfully.
Browse to the Azure portal and open the Resource group.
Enter a name for the resource group (e.g. Maester-Resource-Group).
Select Region.
Select Review + Create > Create.
Resource group create successfully.
STEP-2: CREATE A ORGANIZATION IN AZURE DEVOPS
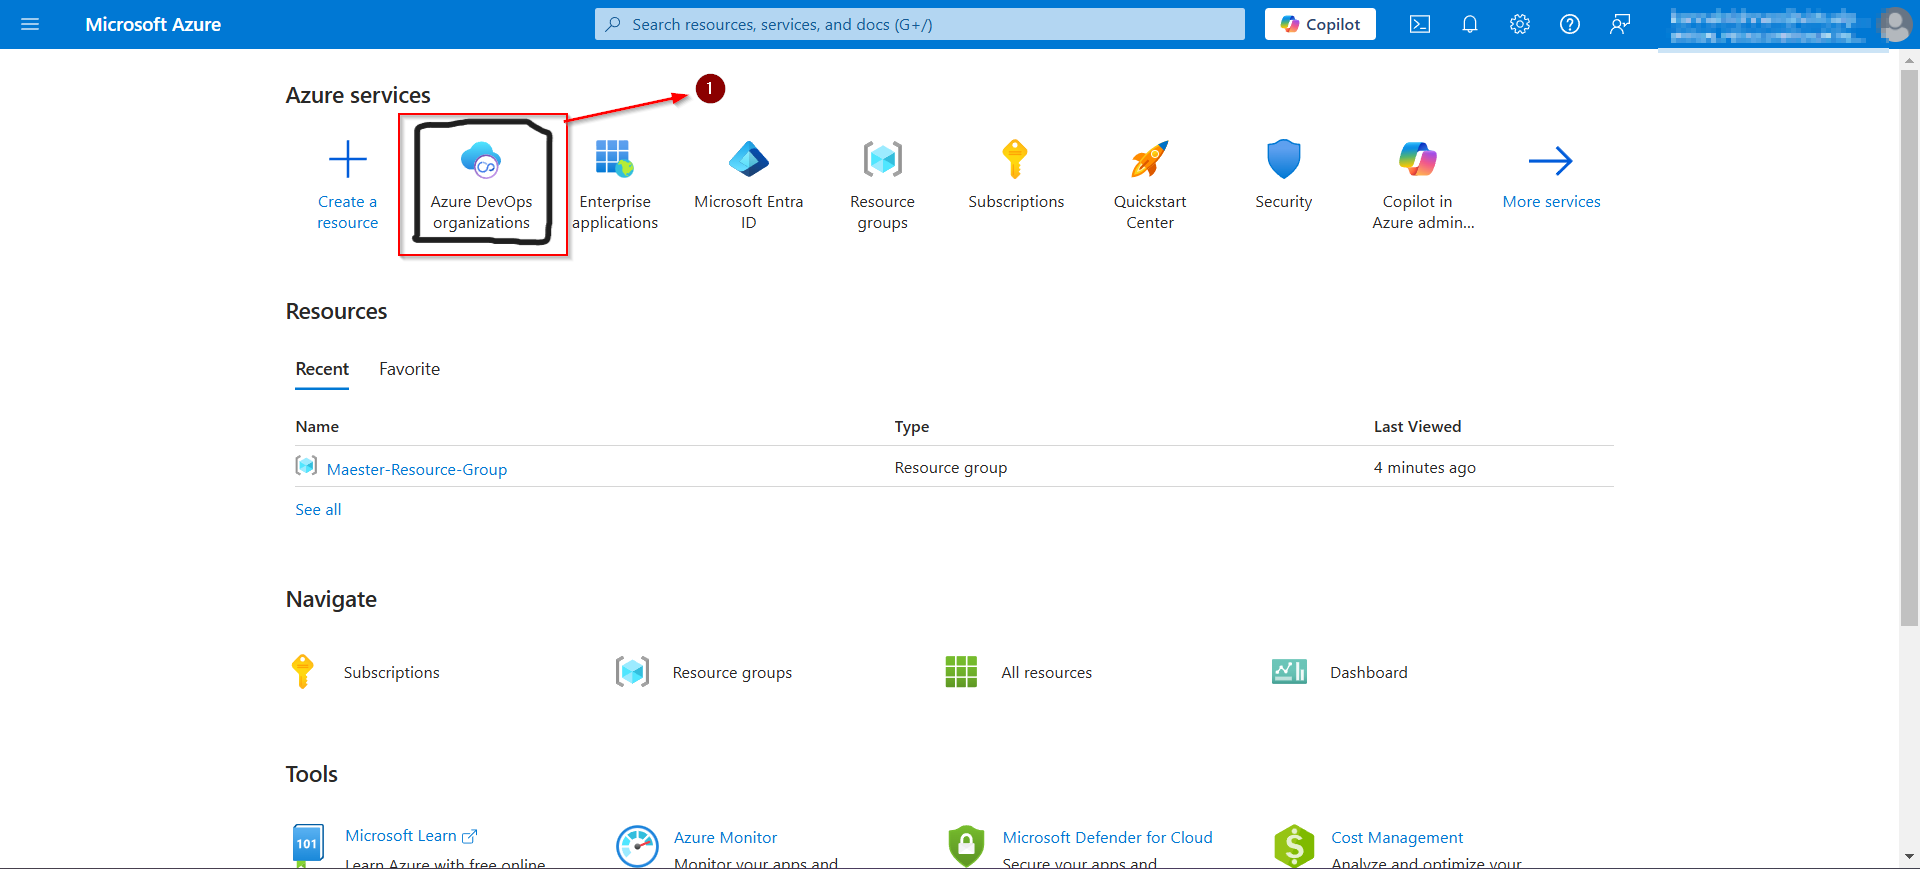
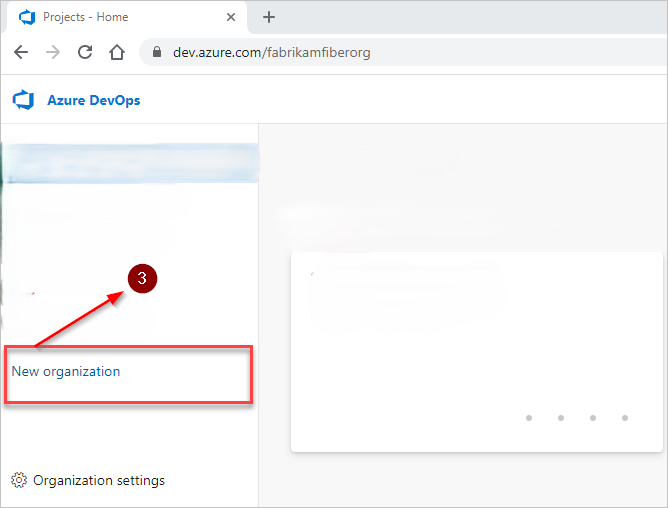
In azure portal, Search Azure DevOps organization.
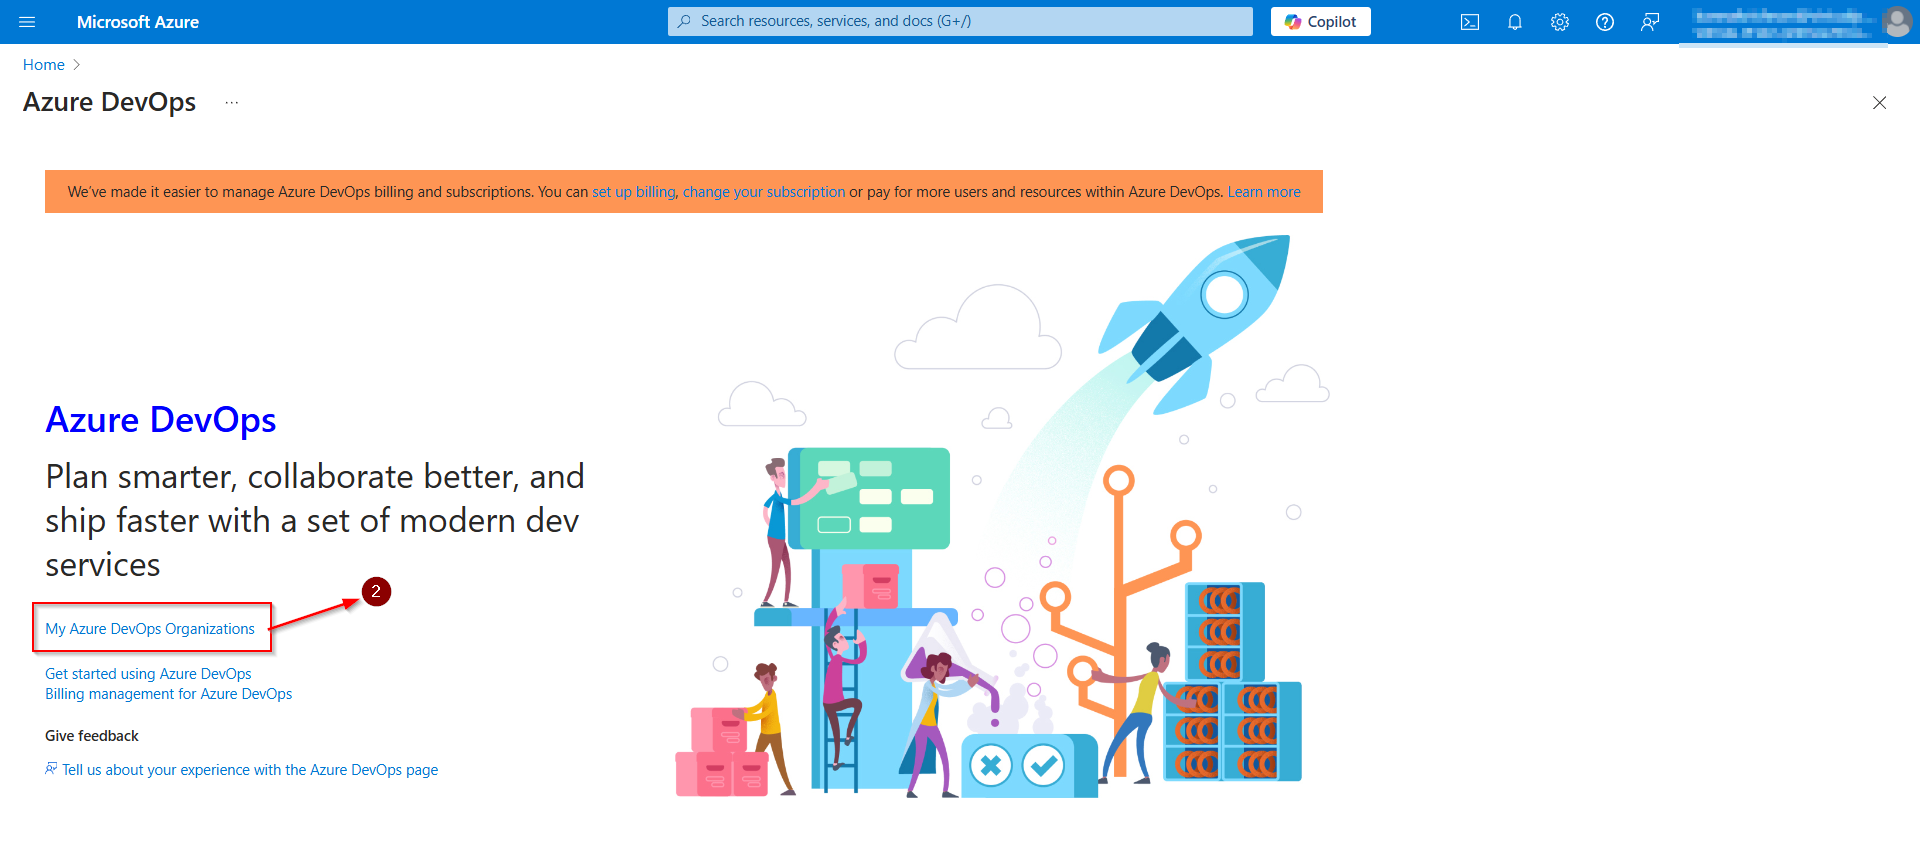
Sign in to Azure DevOps.
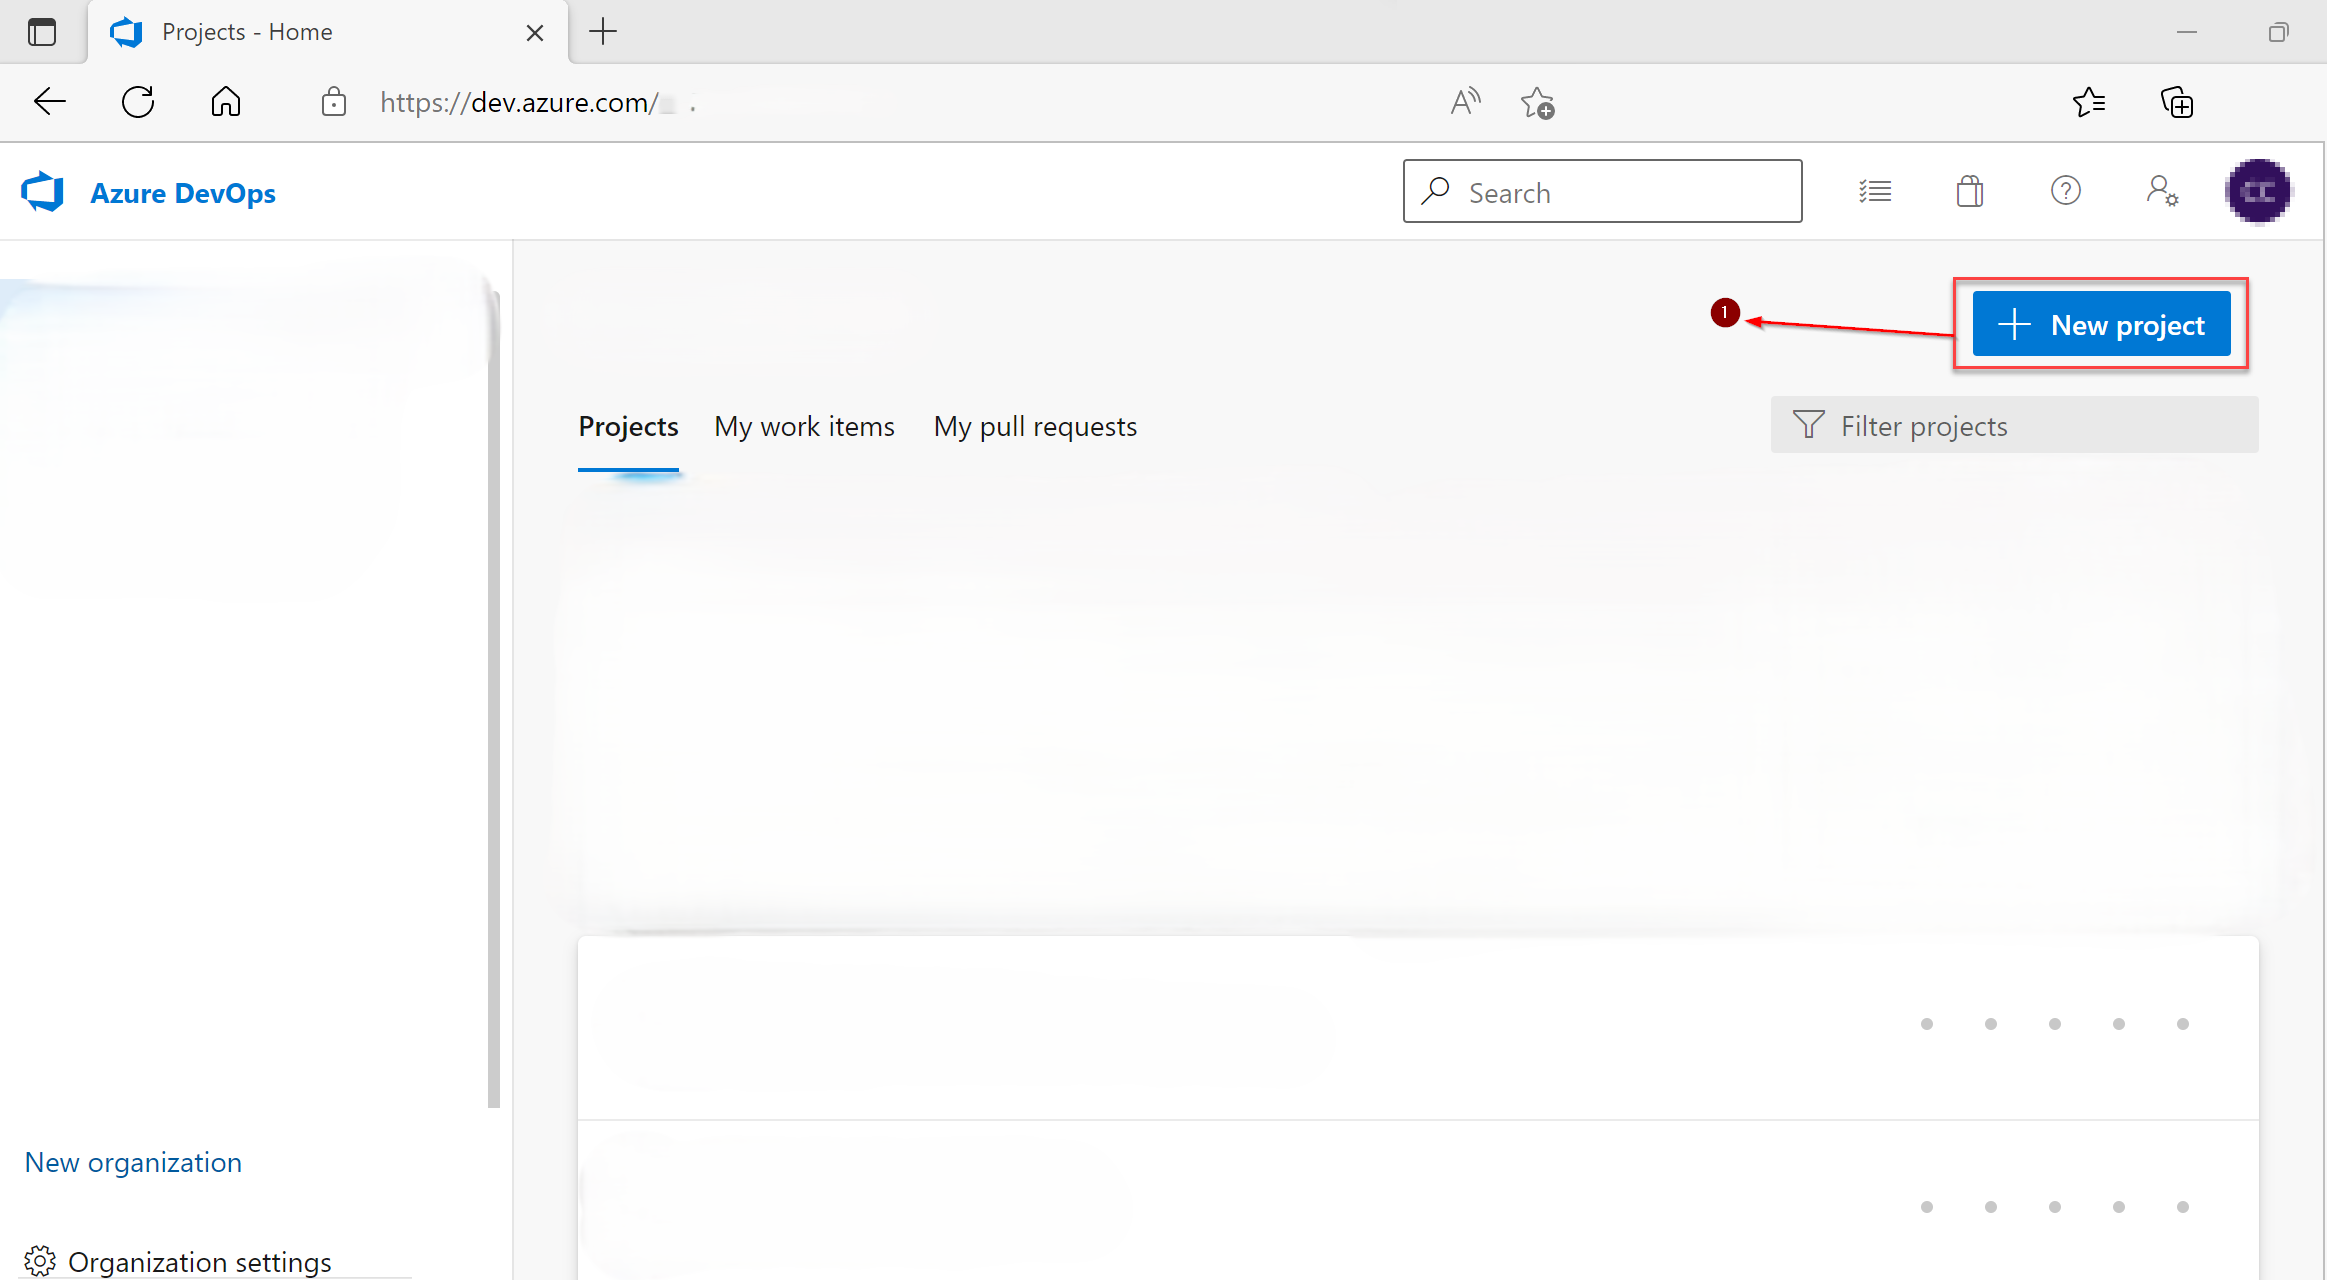
Select New organization.
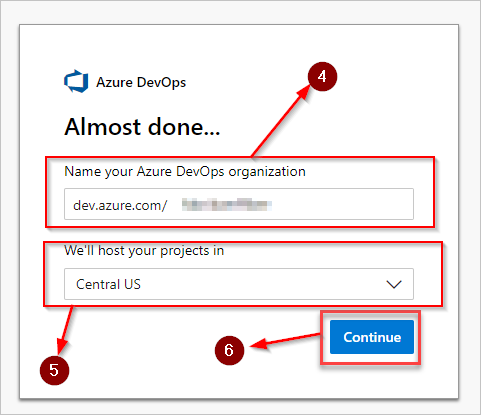
Enter the name for your organization, select its hosting geography, and then select Continue.
Create organization successfully.
Sign in to your organization at any time, https://dev.azure.com/{yourorganization}.
In azure portal, Search Azure DevOps organization.
Sign in to Azure DevOps.
Select New organization.
Enter the name for your organization, select its hosting geography, and then select Continue.
Create organization successfully.
Sign in to your organization at any time, https://dev.azure.com/{yourorganization}.
STEP-3: CREATE A PROJECT ON AZURE DEVOPS
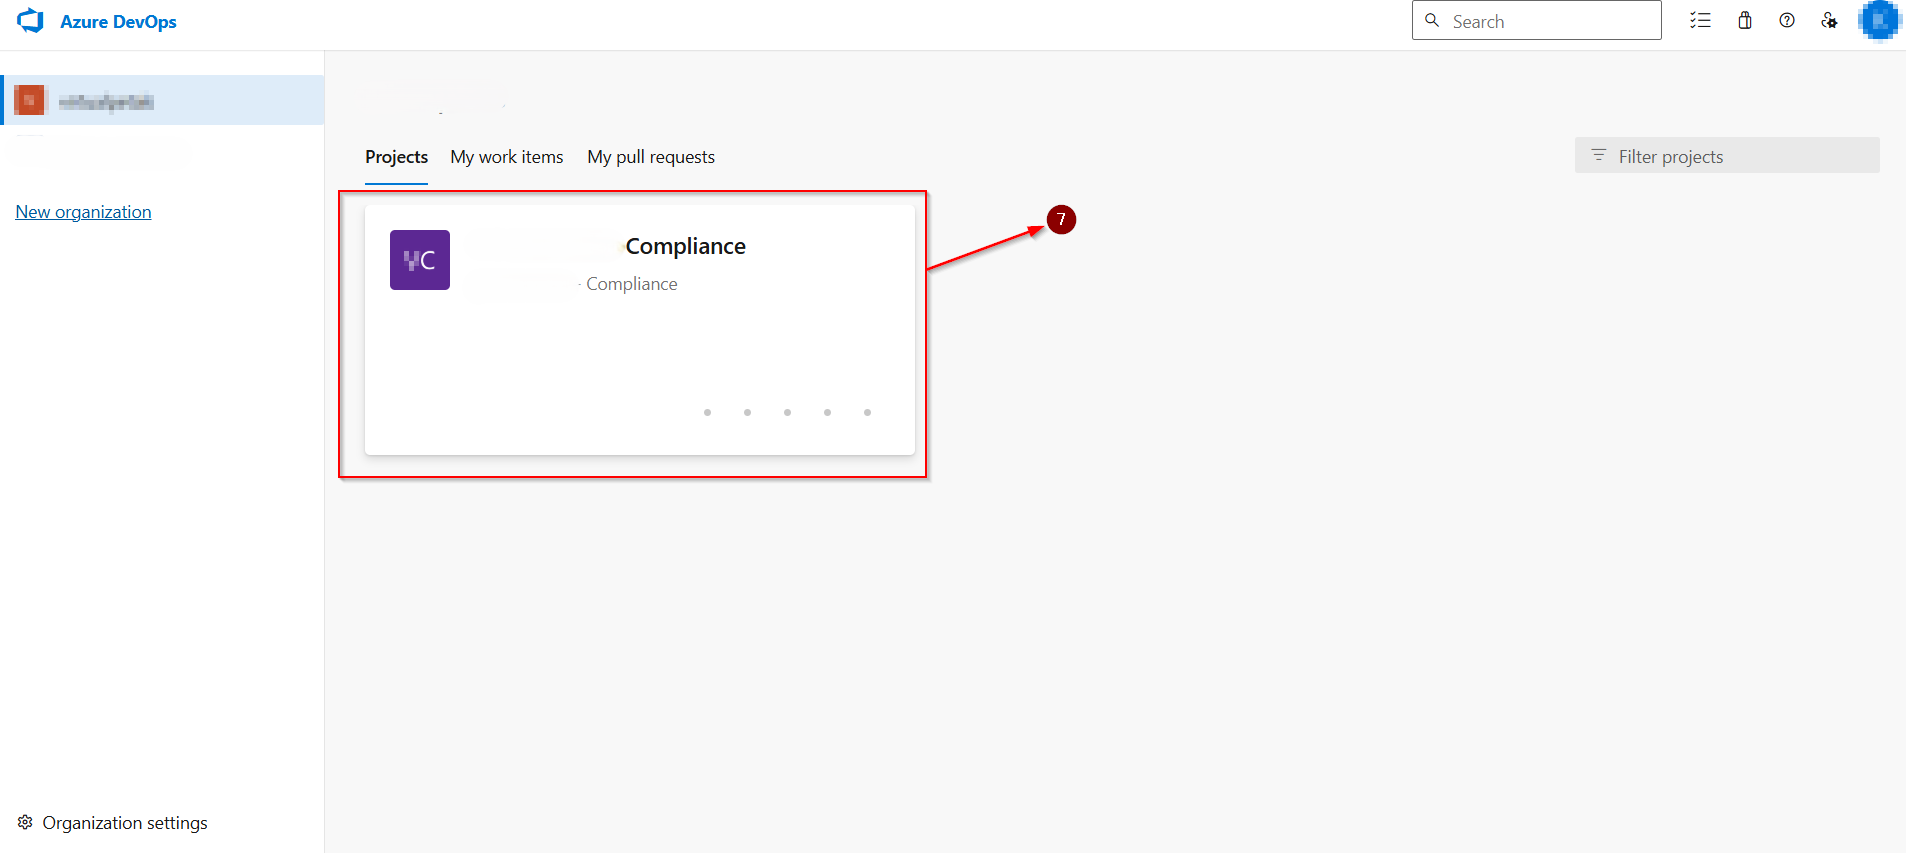
Sign in to your organization (https://dev.azure.com/{Your_Organization})
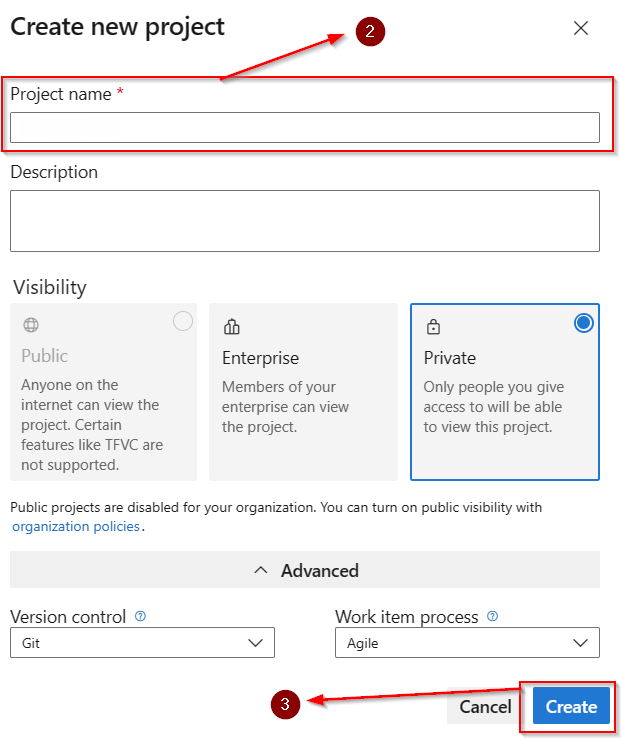
Select New project.
Enter information into the form provided & Select create.
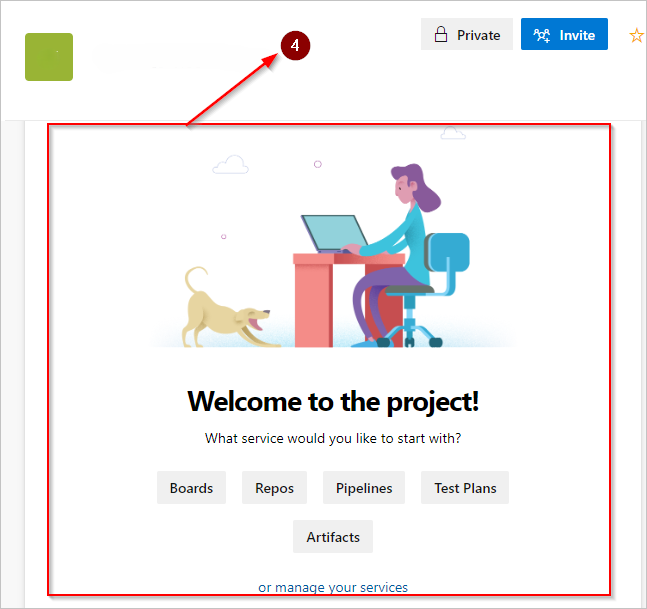
Azure DevOps displays the project welcome page.
Sign in to your organization (https://dev.azure.com/{Your_Organization})
Select New project. Enter information into the form provided & Select create.
Azure DevOps displays the project welcome page.
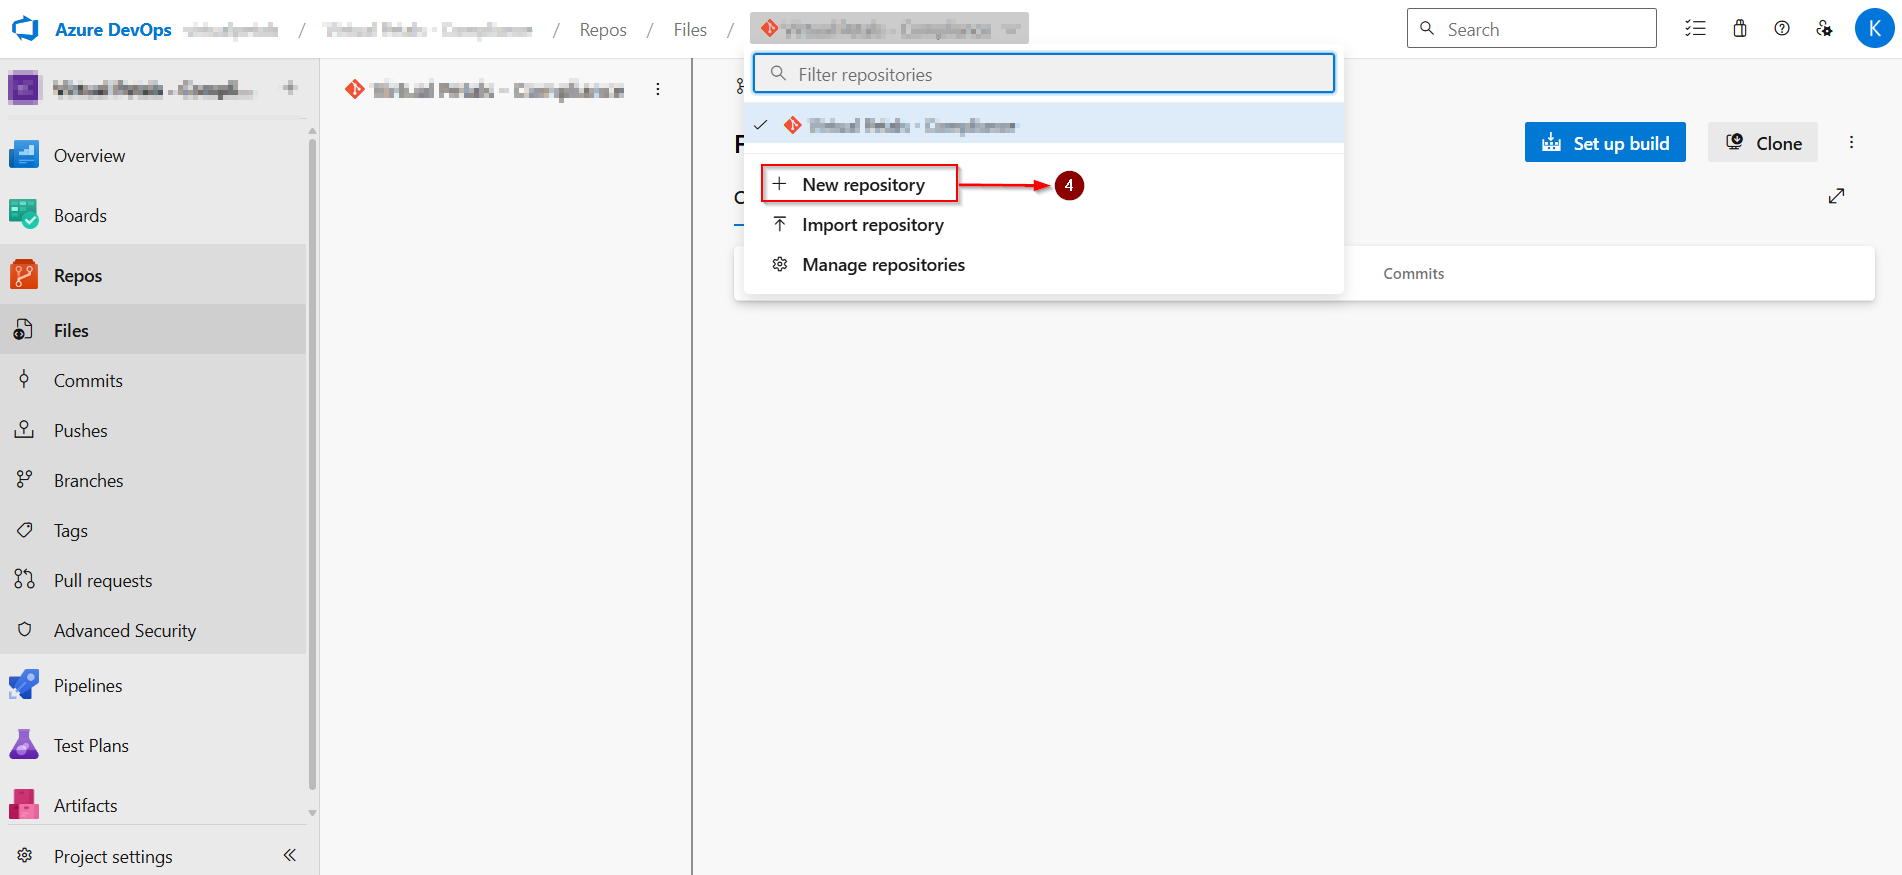
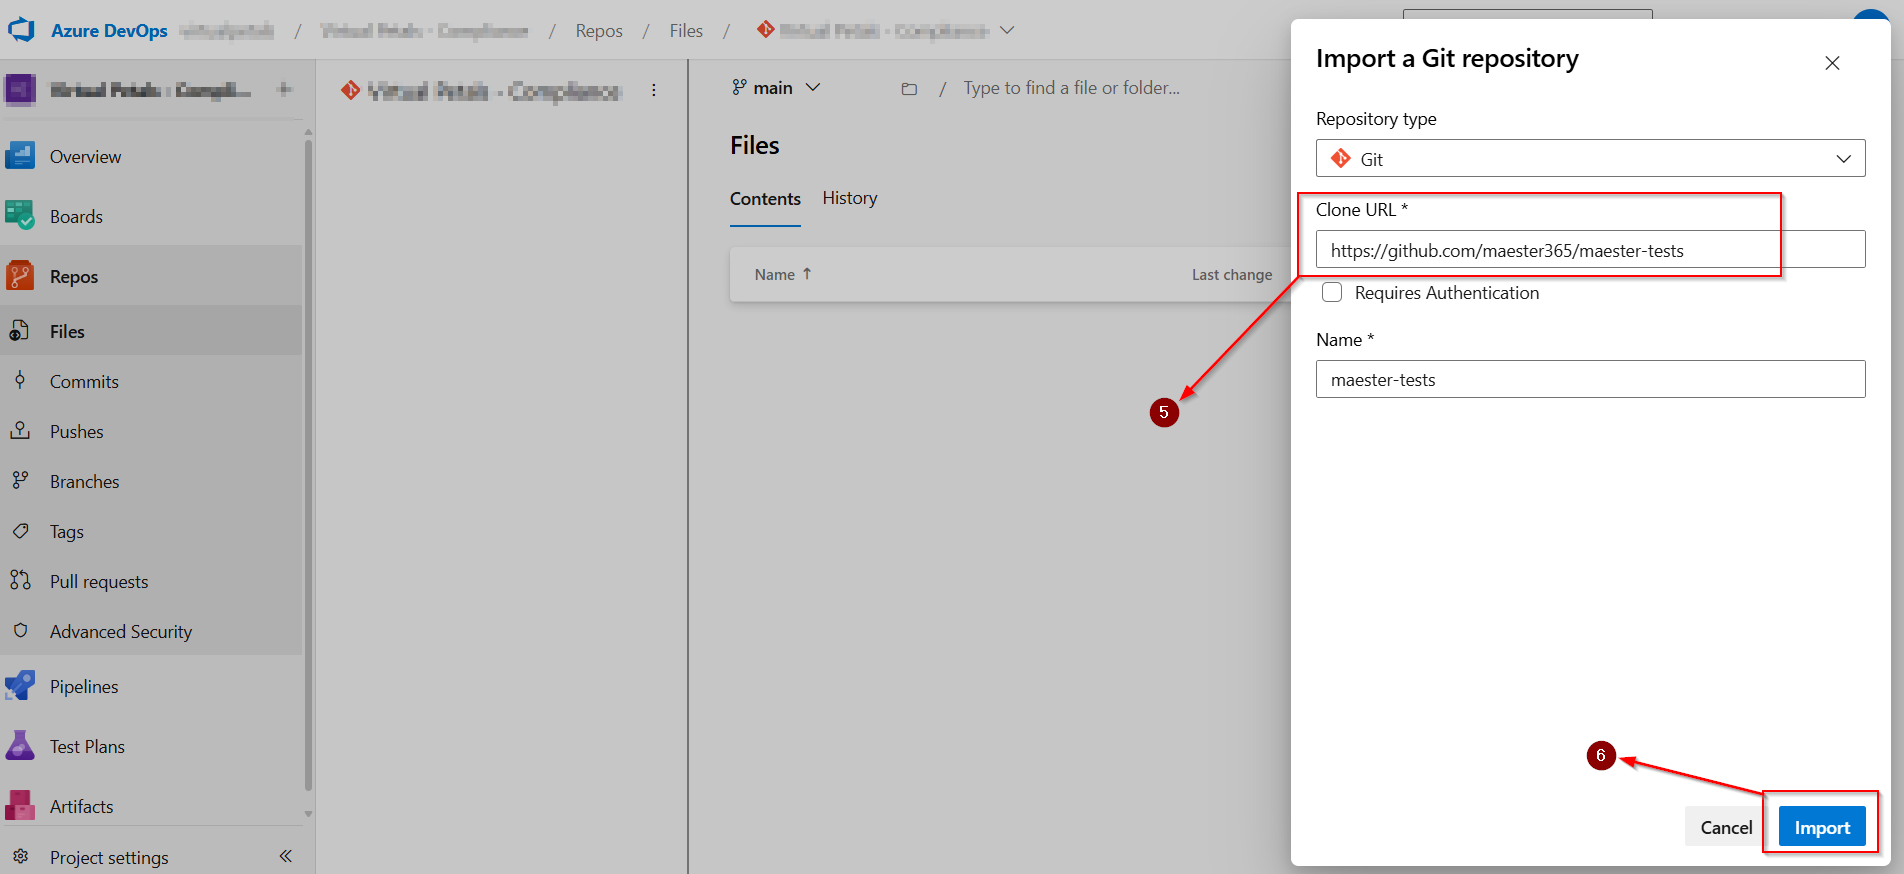
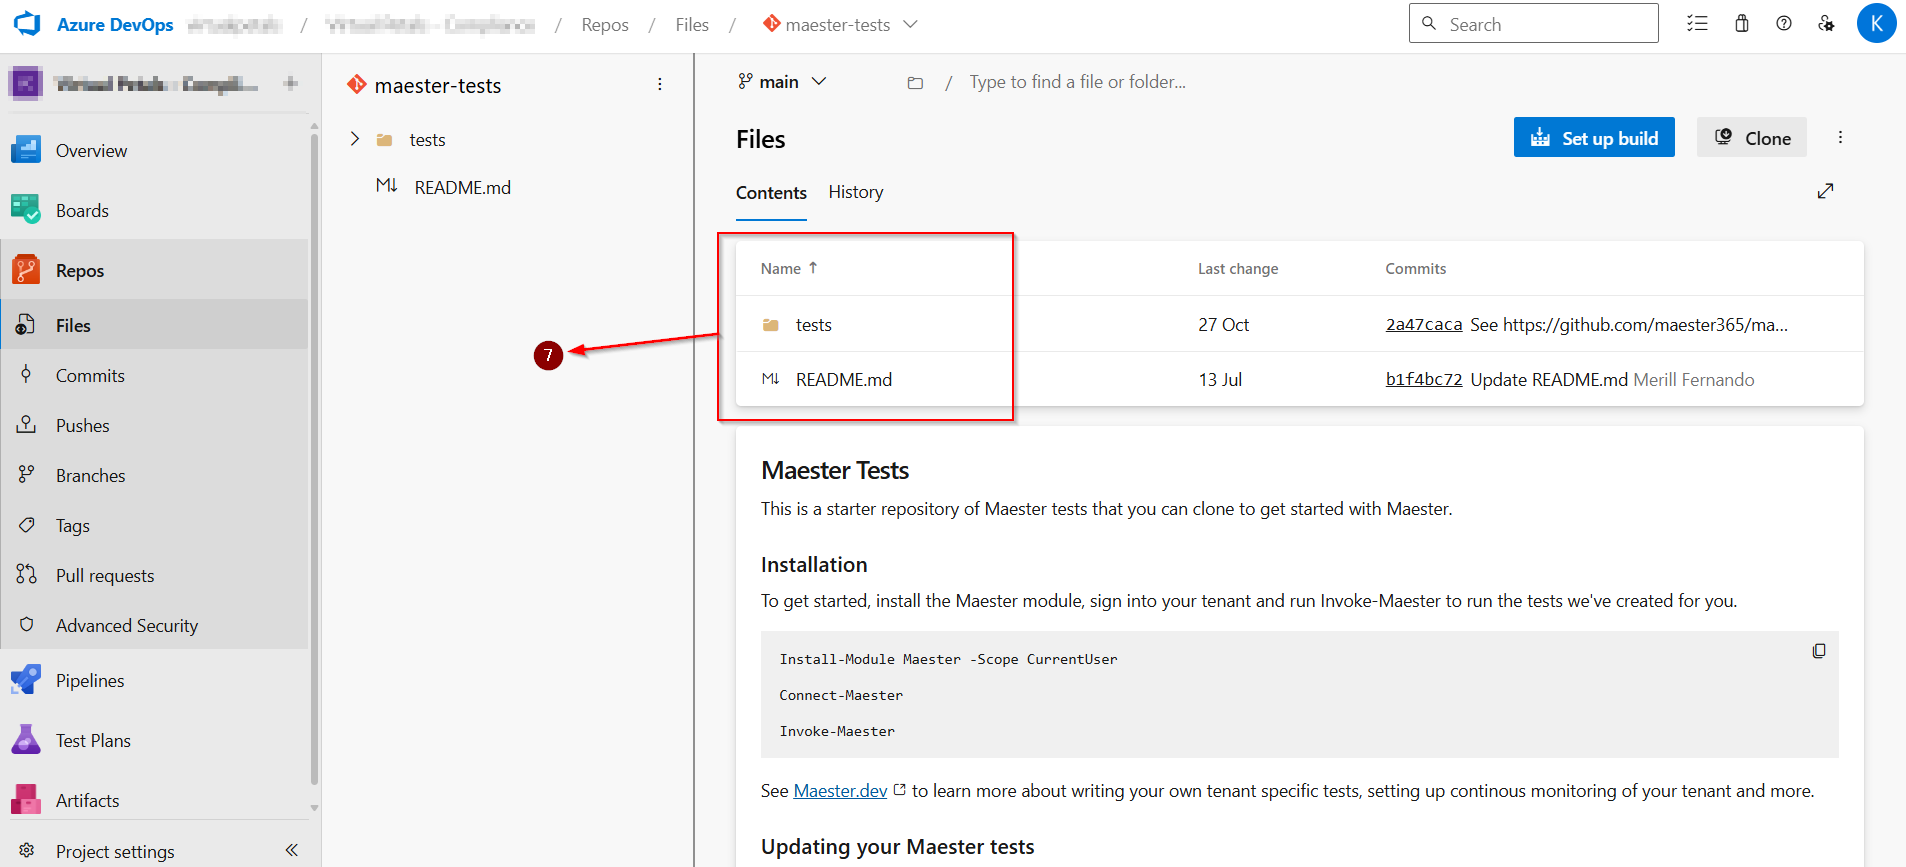
STEP-4: IMPORT THE MAESTER TESTS REPOSITORY
Click The Created Project
Select Repos from the left-hand menu.
Select the Import button in the Import a repository section.
Enter the URL of the Maester repository.
Select Import to import the repository into your Azure DevOps project.
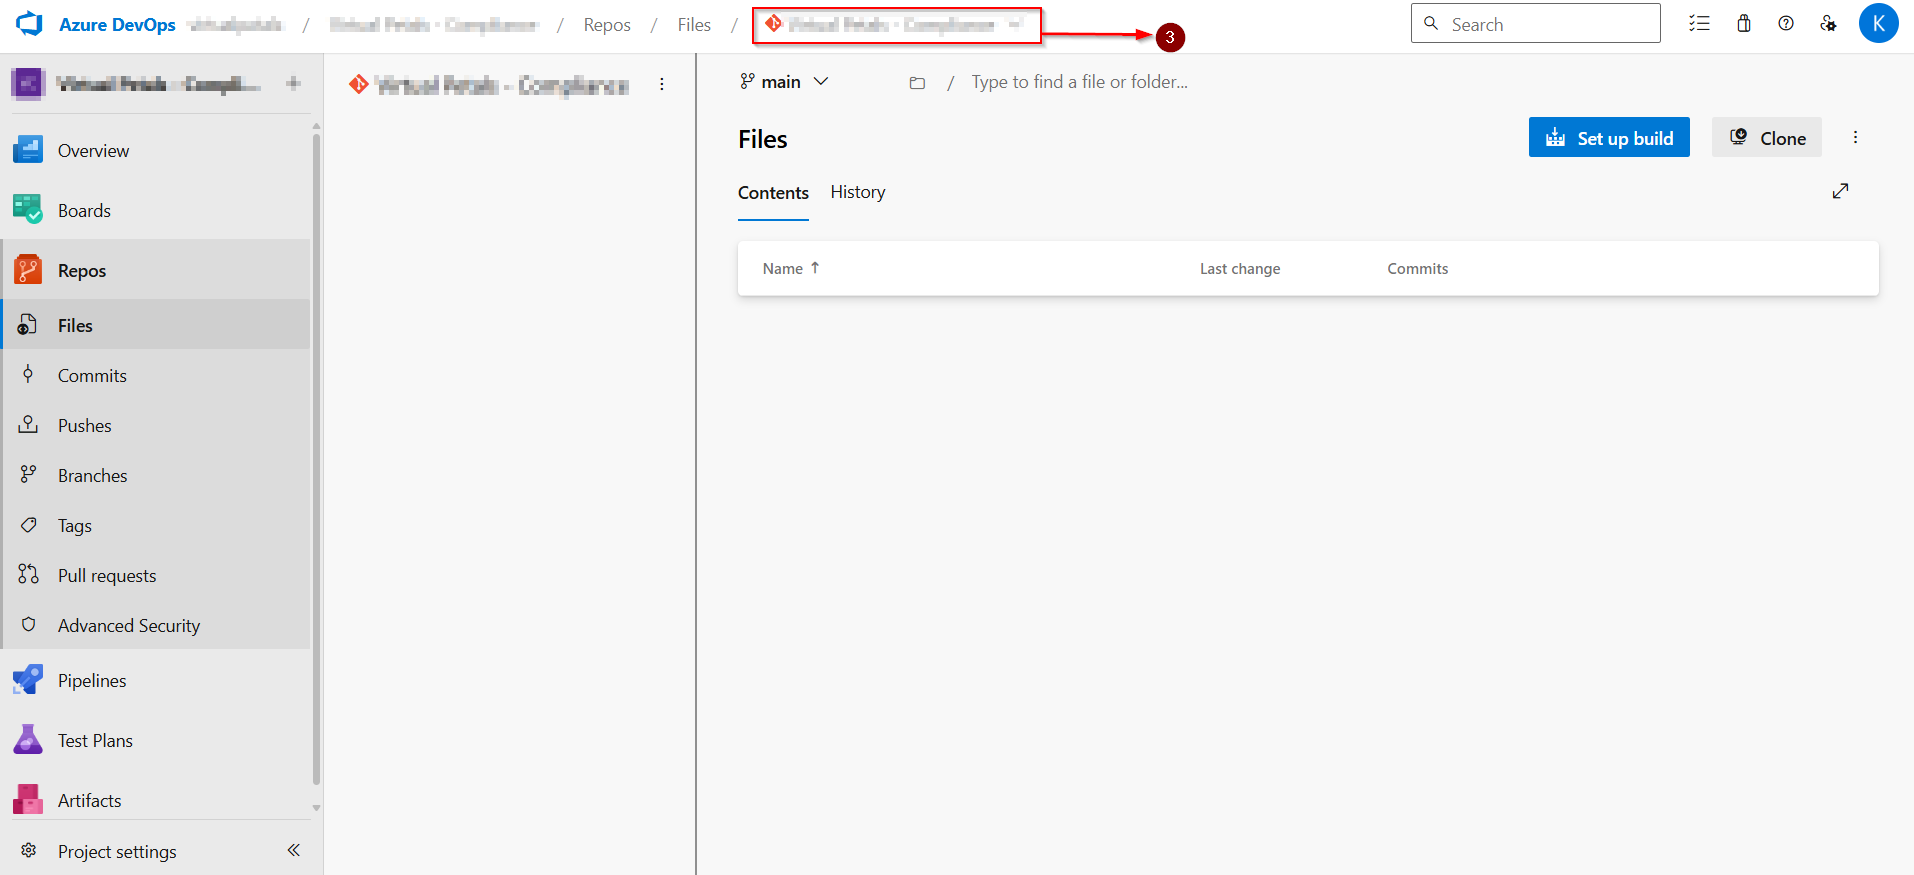
Click The Created Project
Select Repos from the left-hand menu.
Select The Project Name.
Select the Import button in the Import arepository section
Enter the URL of the Maester repository https://github.com/maester365/maester-tests
Select Import to import the repository into your Azure DevOps project.
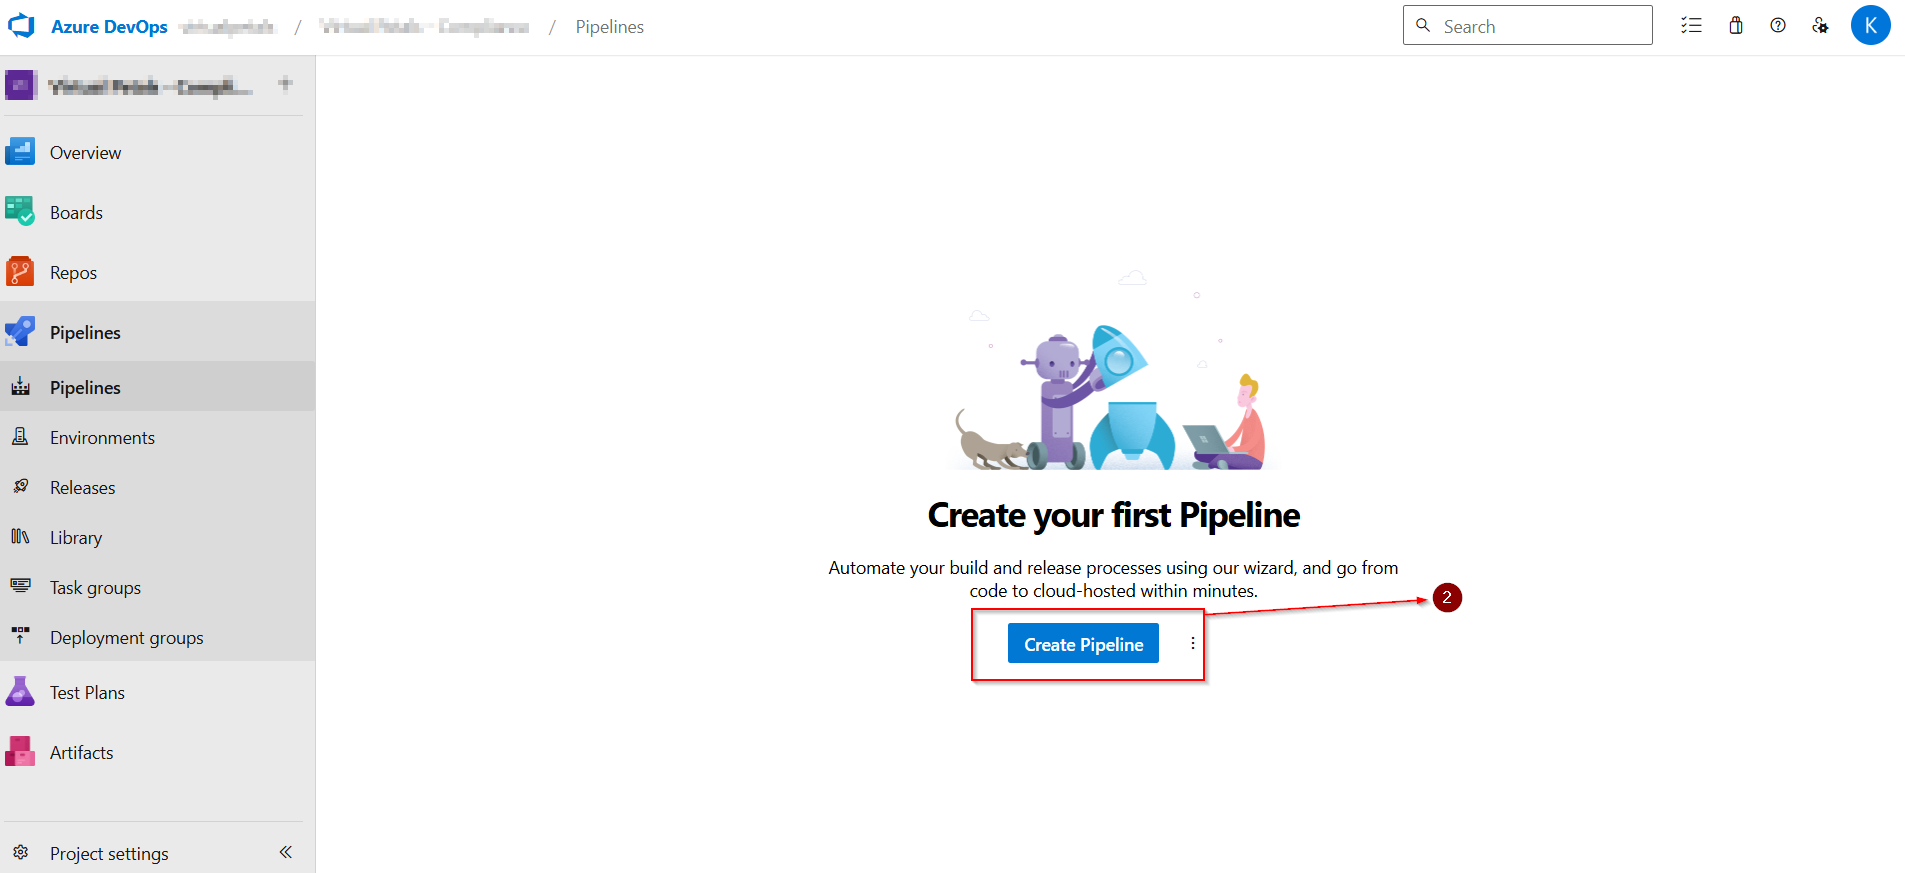
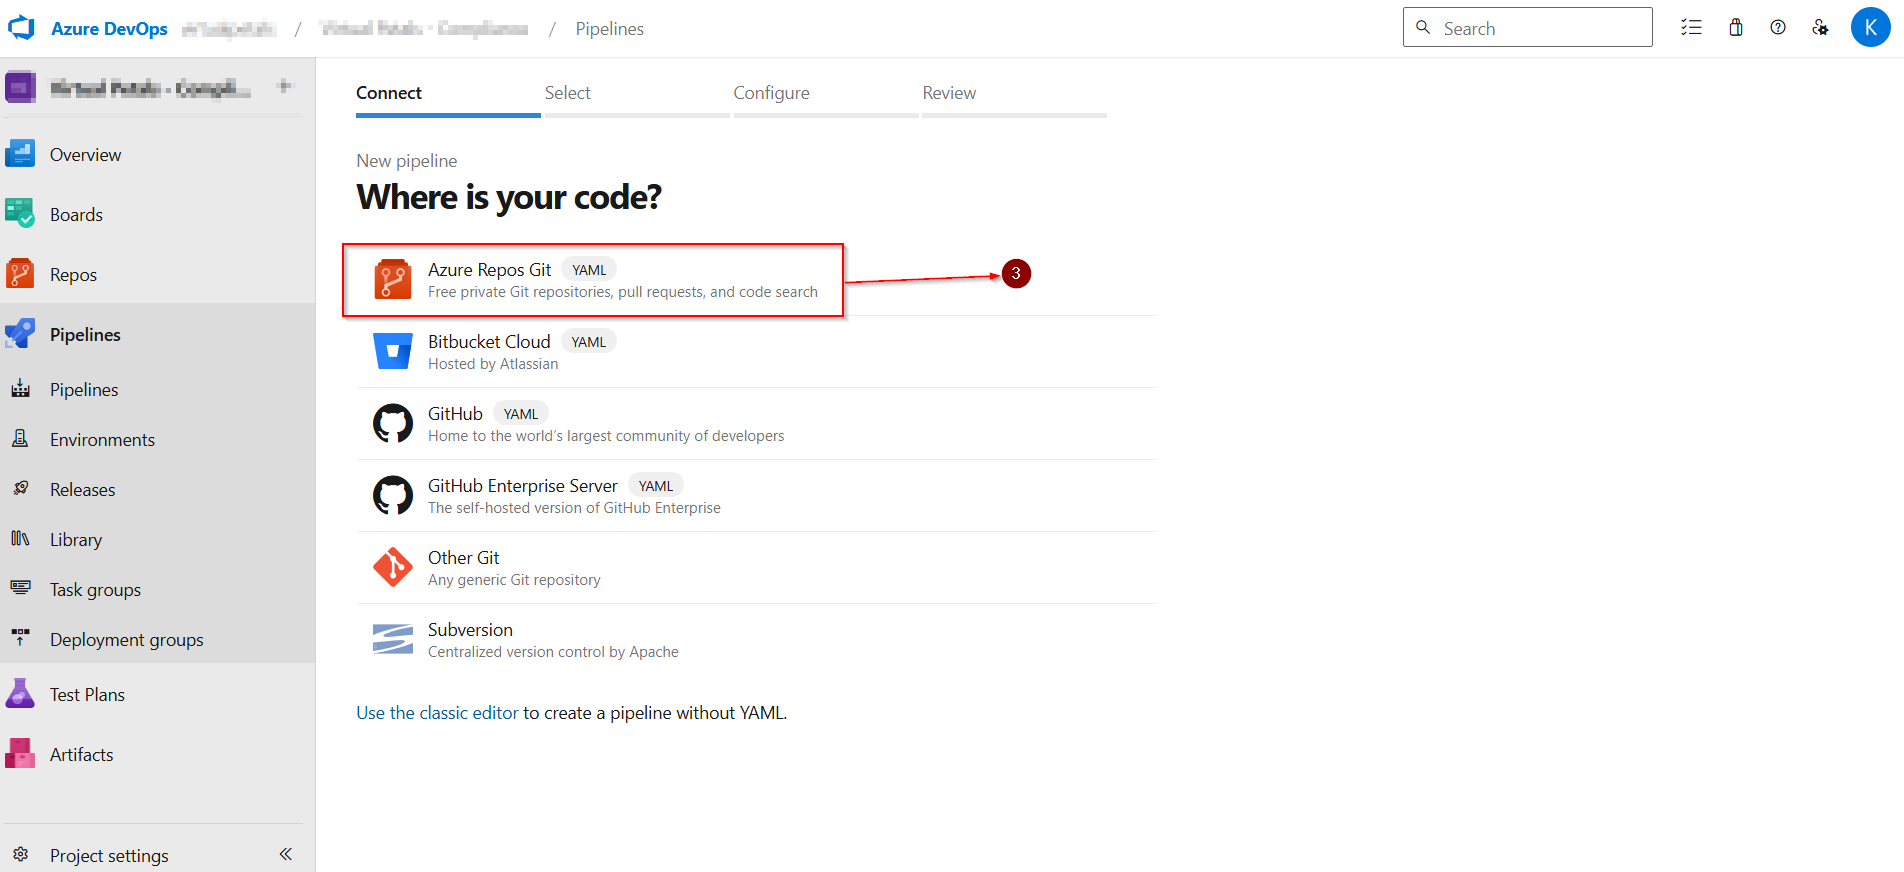
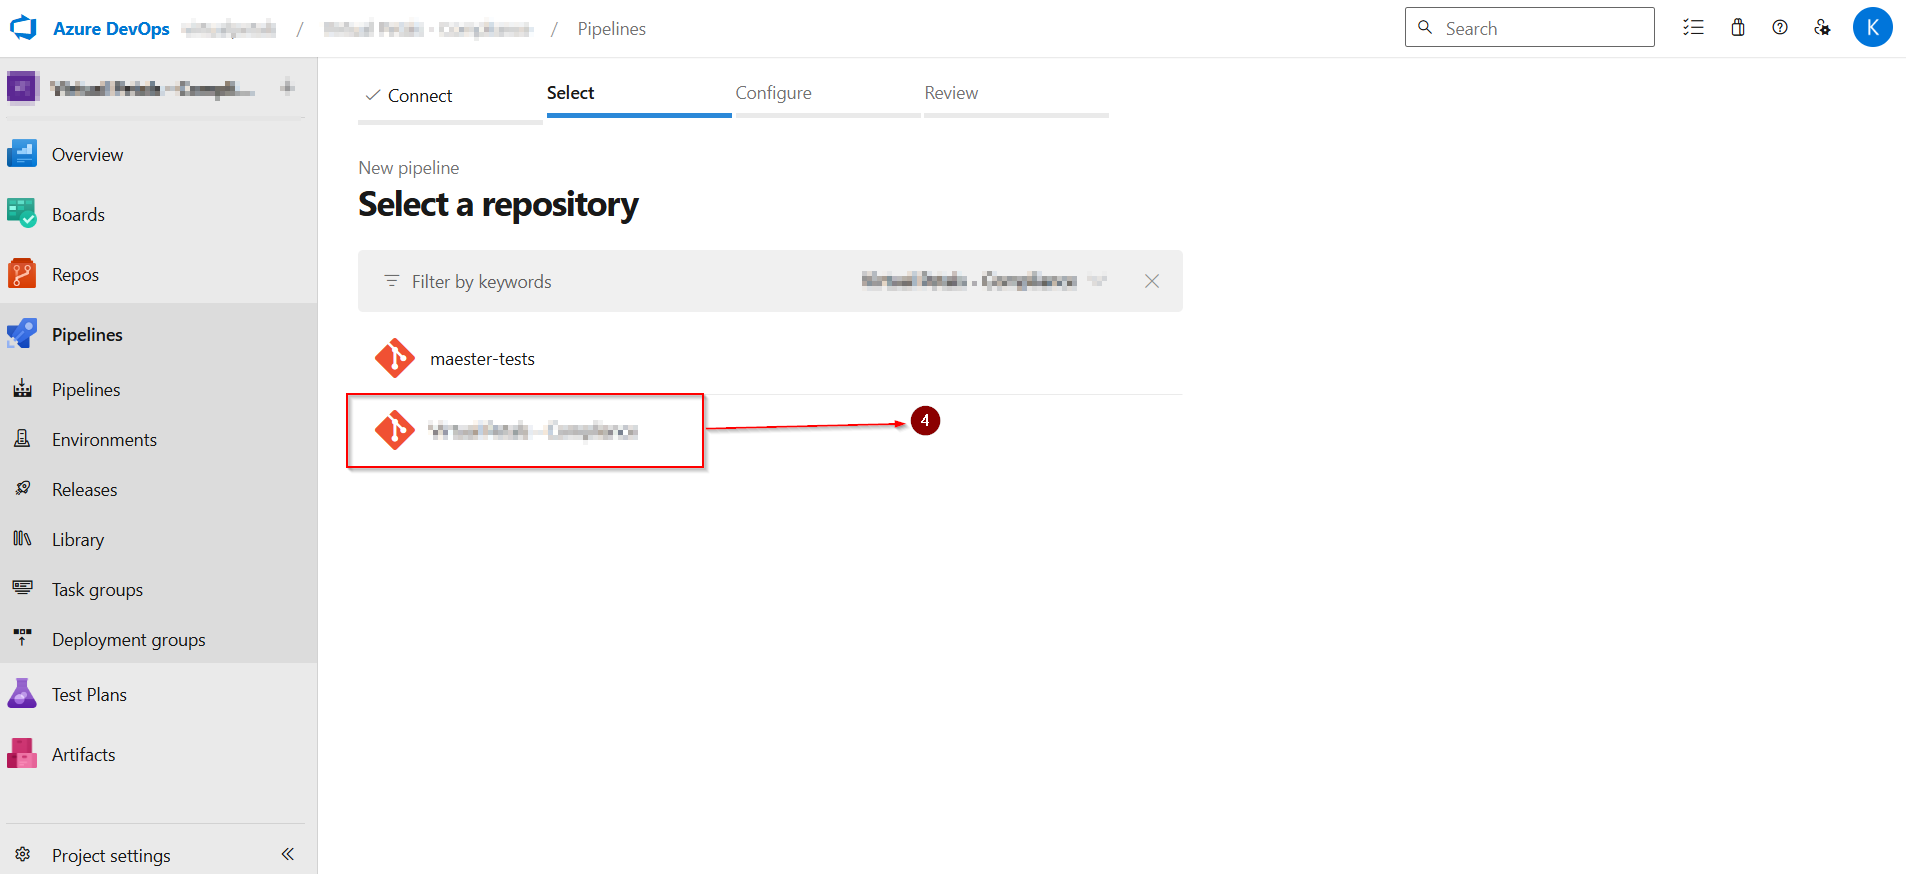
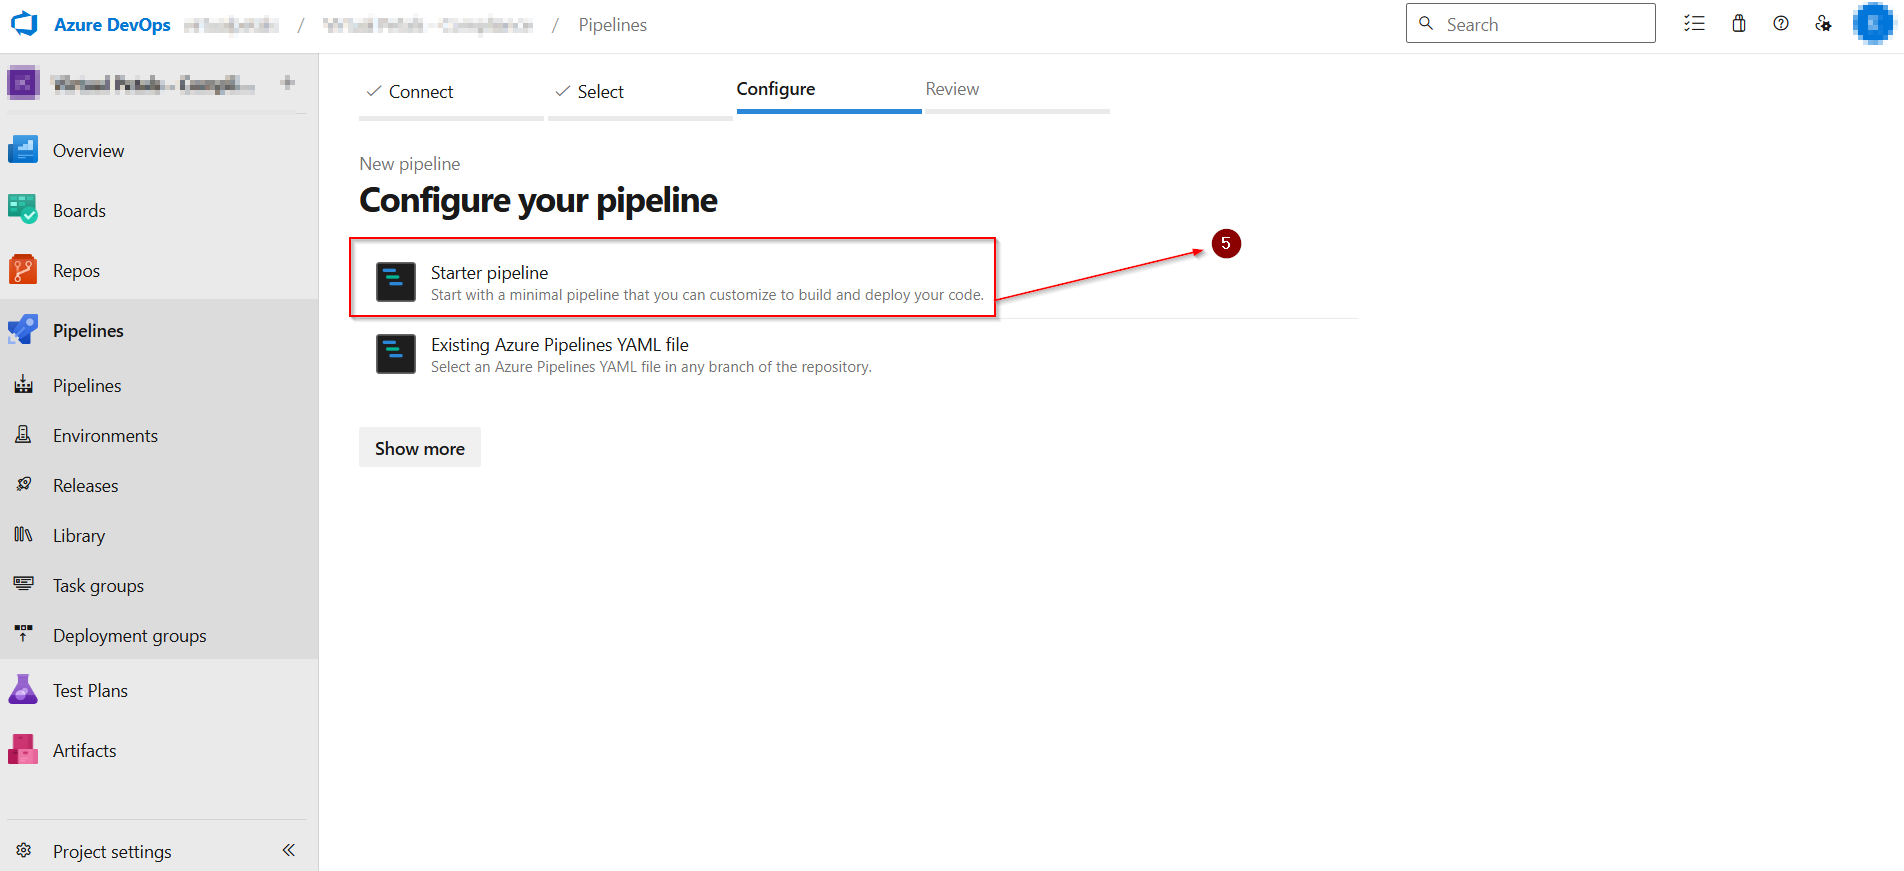
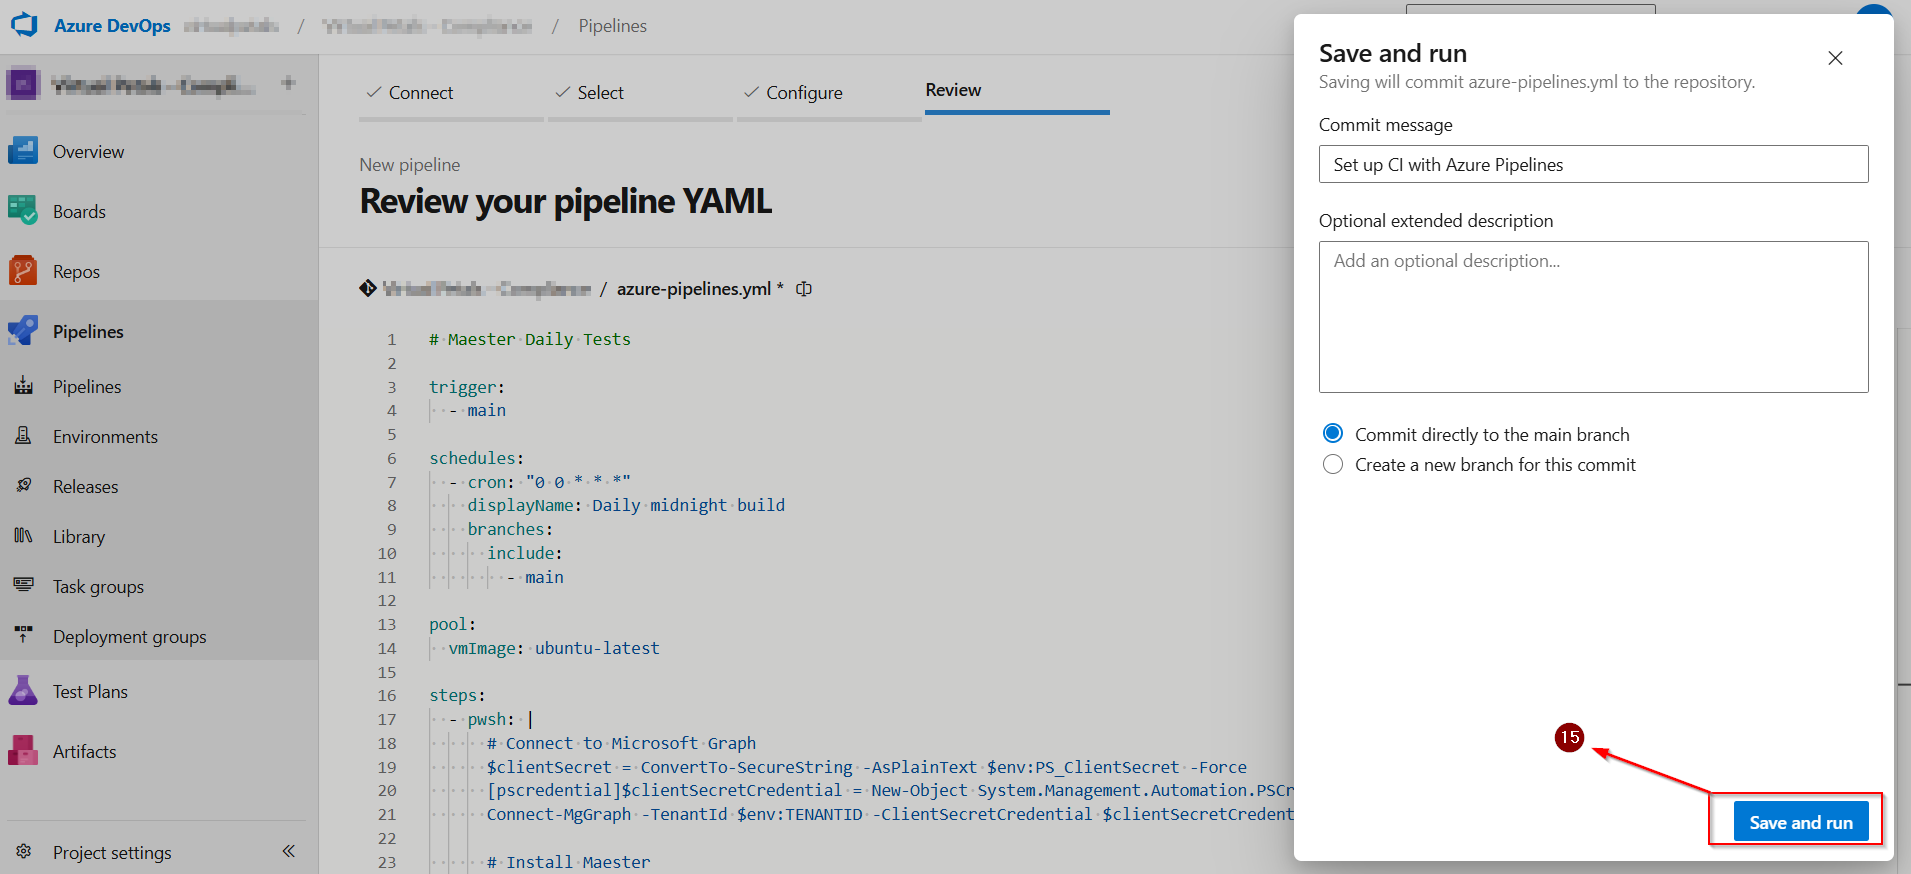
Set up the Azure Pipeline
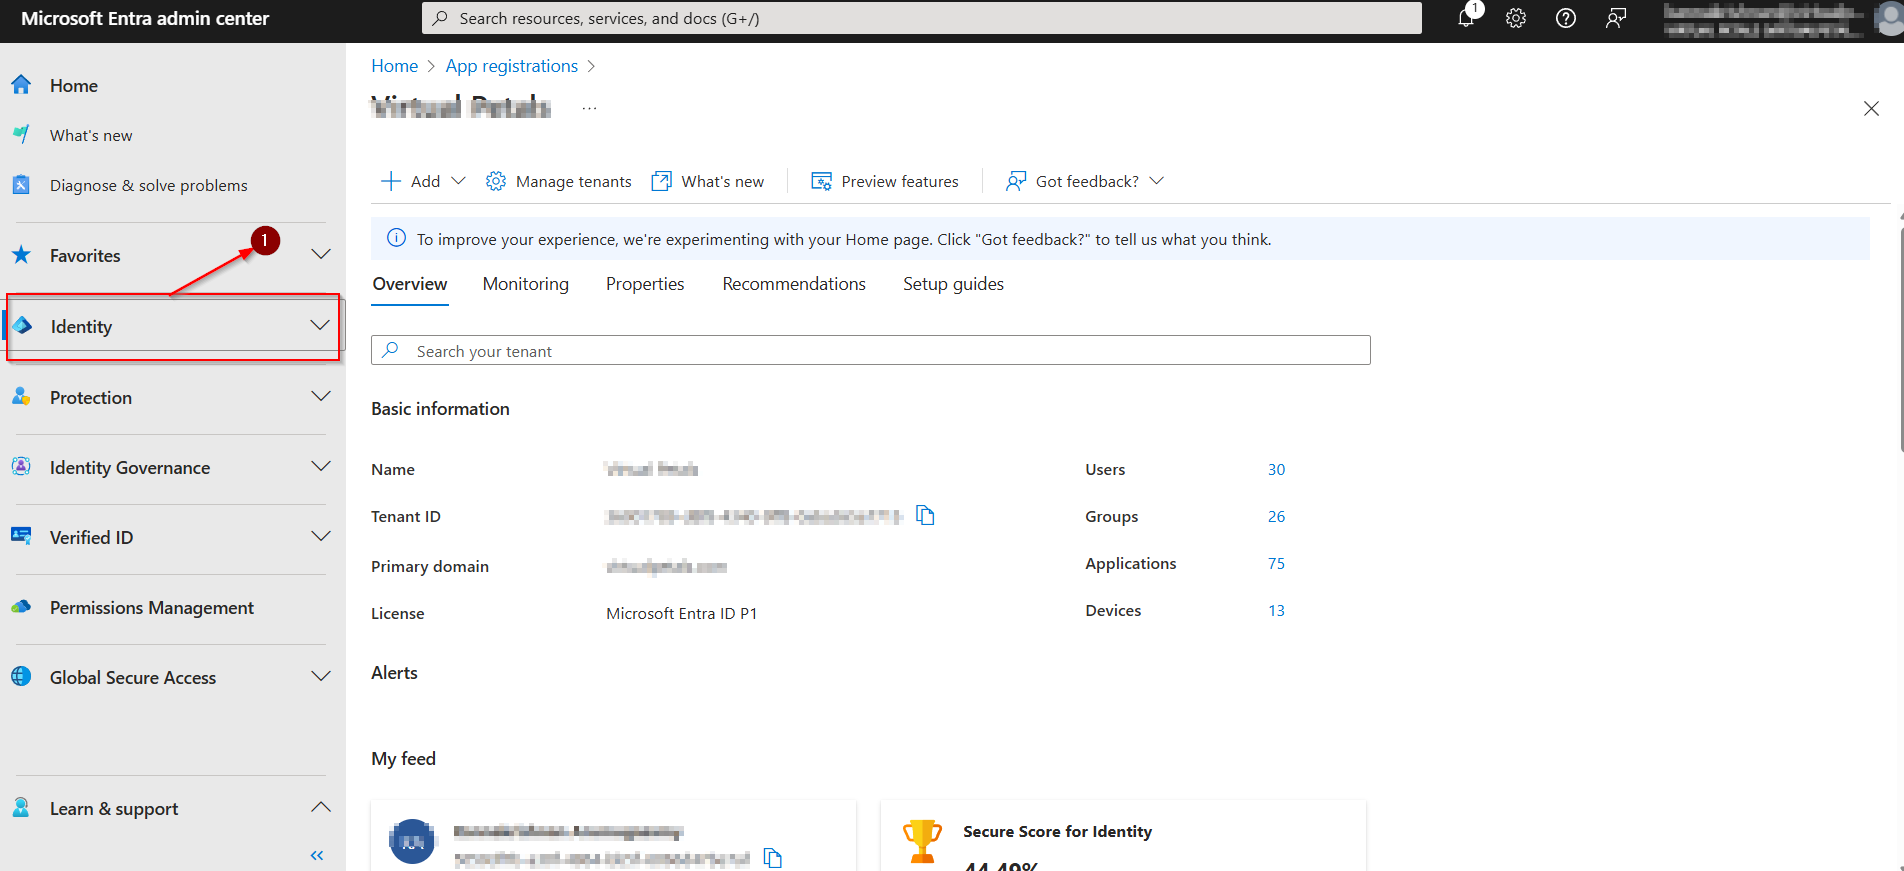
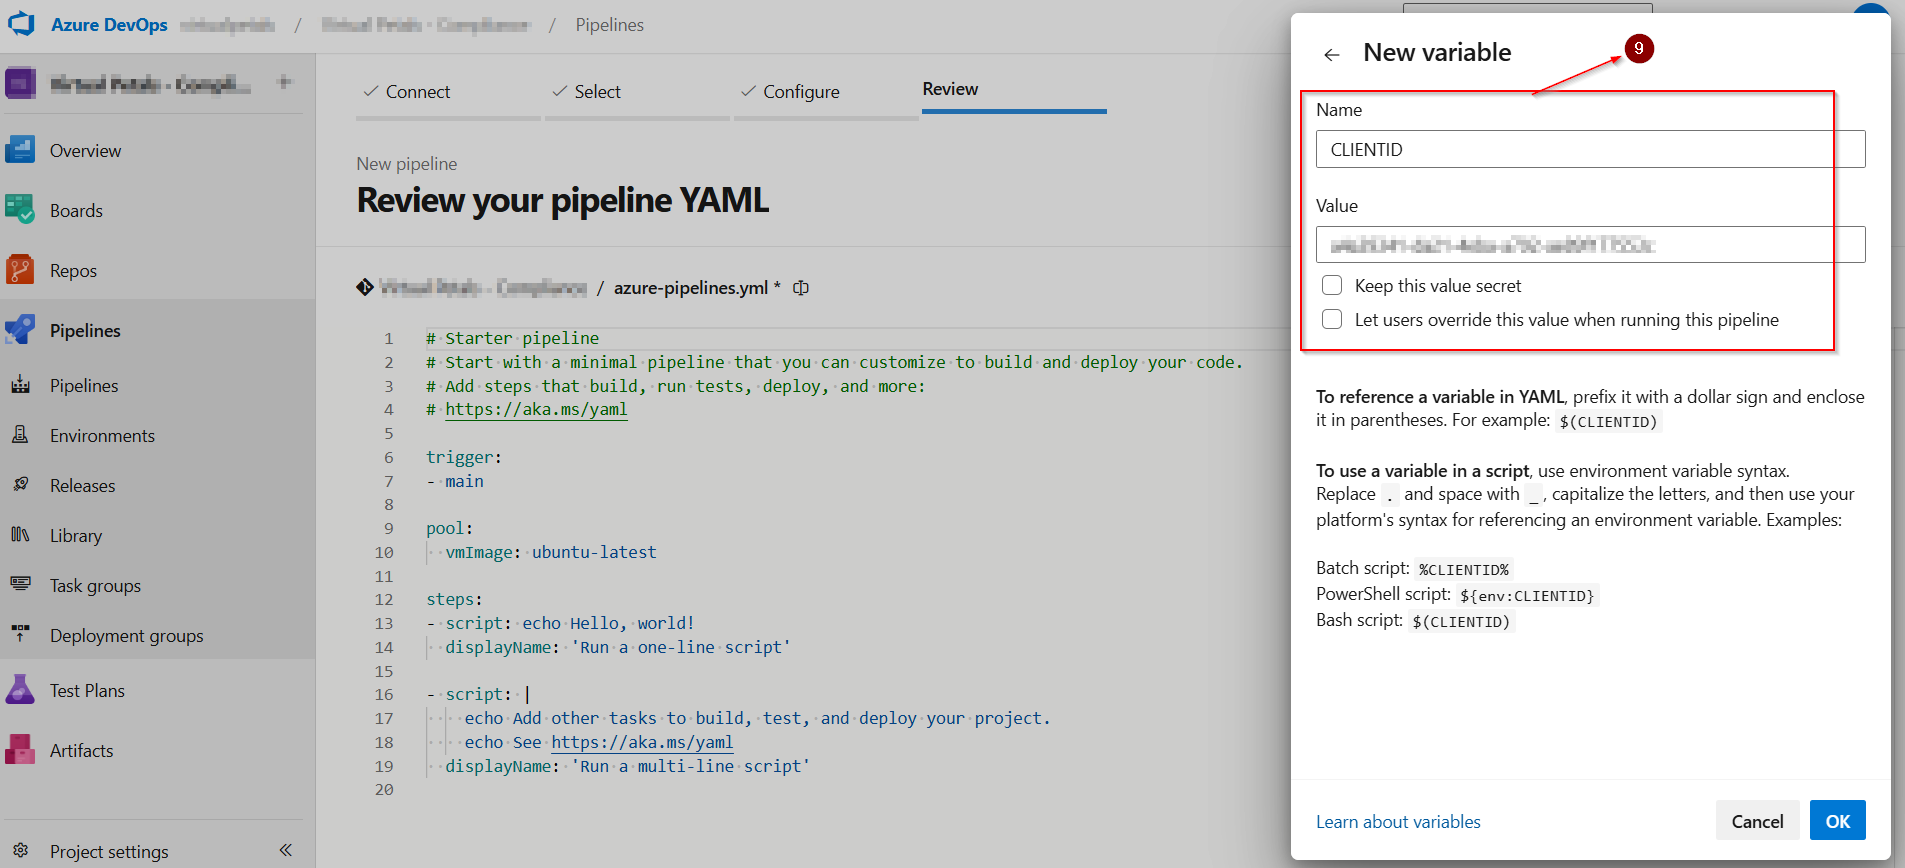
STEP-5: CREATE AN ENTRA APPLICATION
Open Microsoft entra admin center.
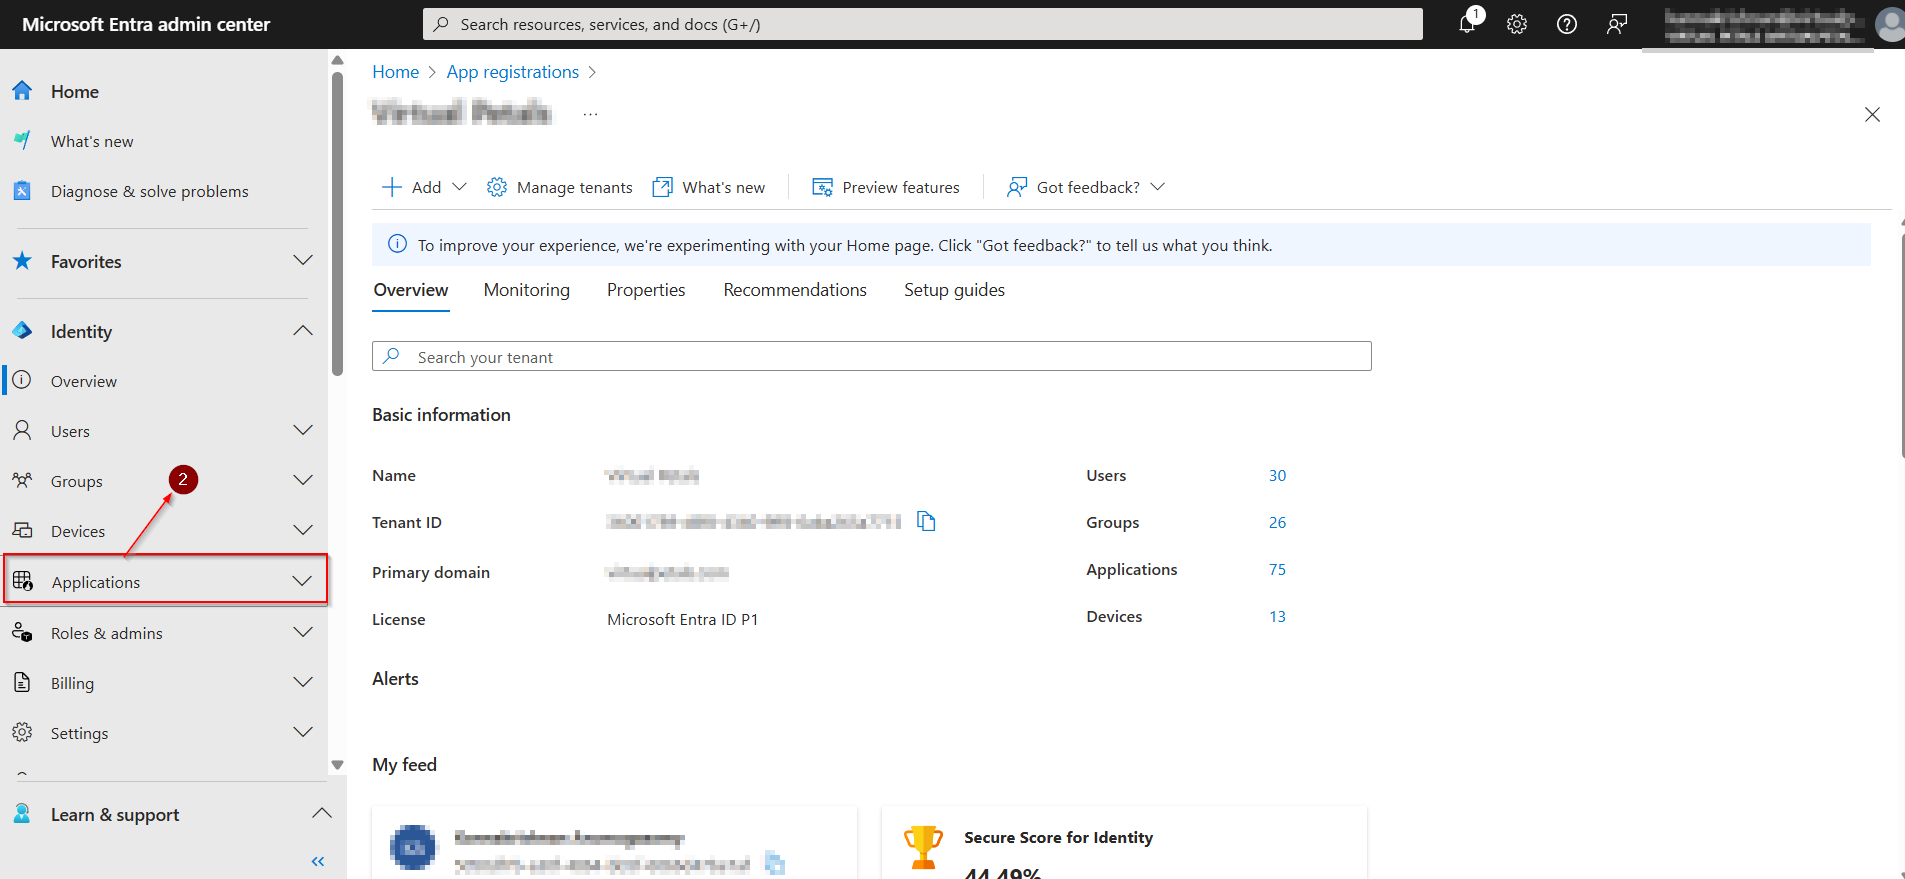
Select Identity from the left-hand menu.
In Identity section, Select Applications > App registration.
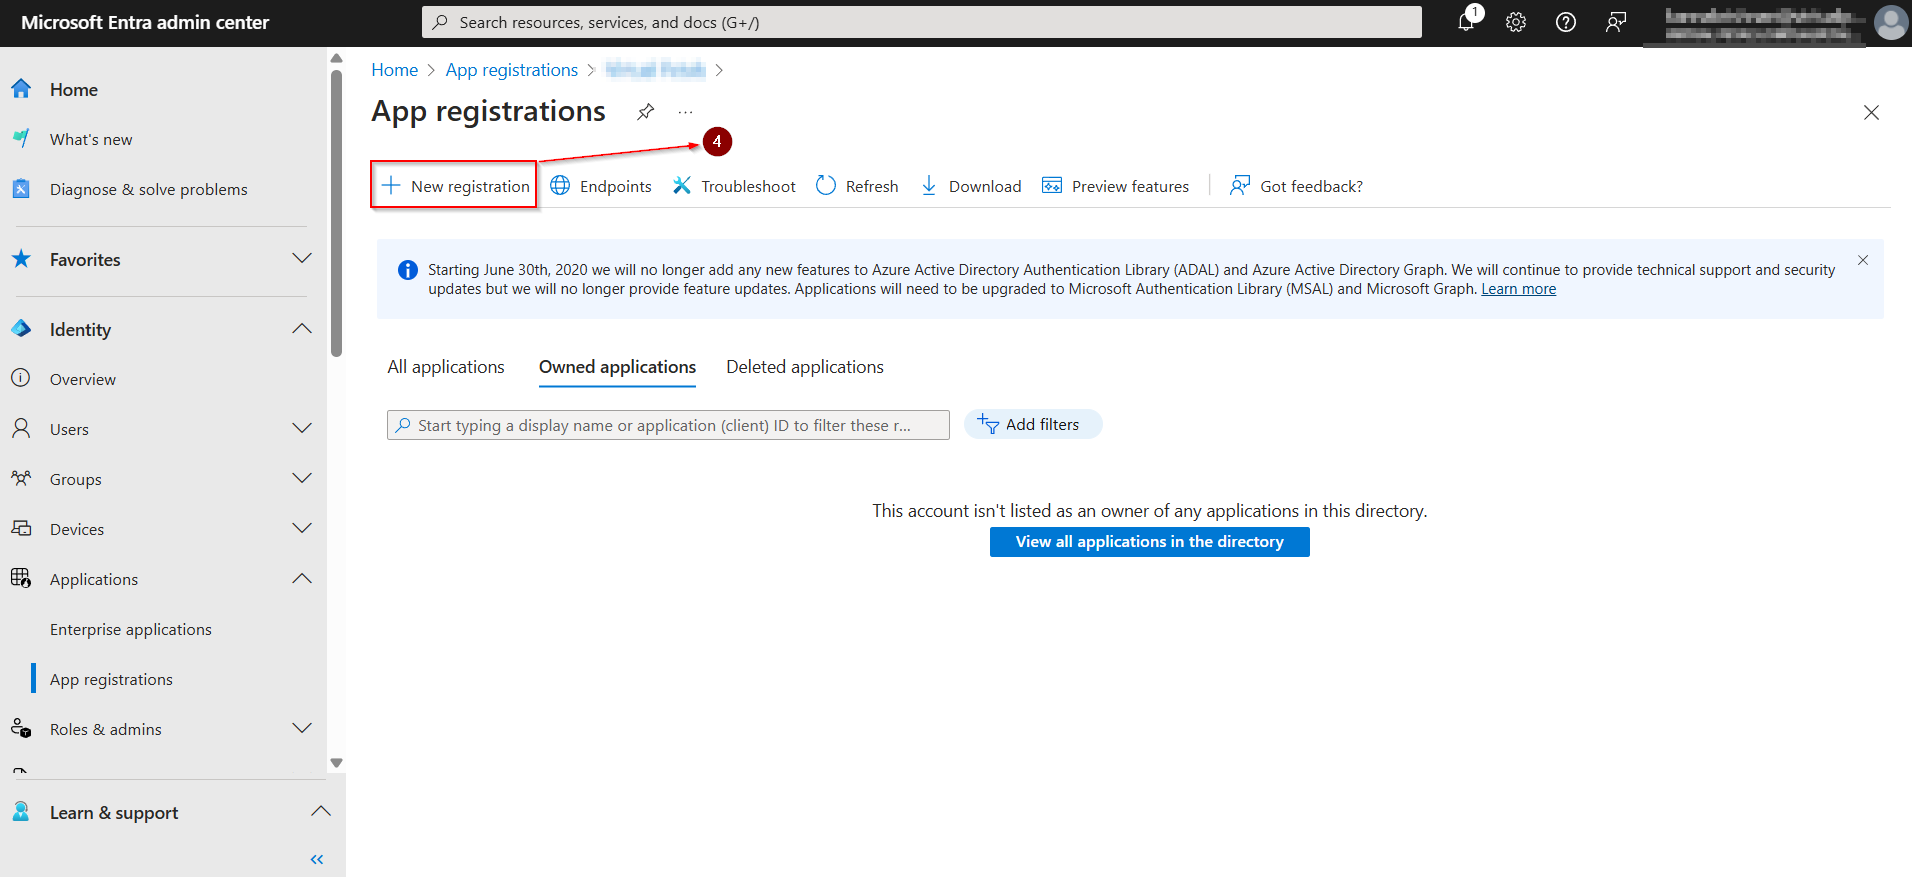
Select New registration.
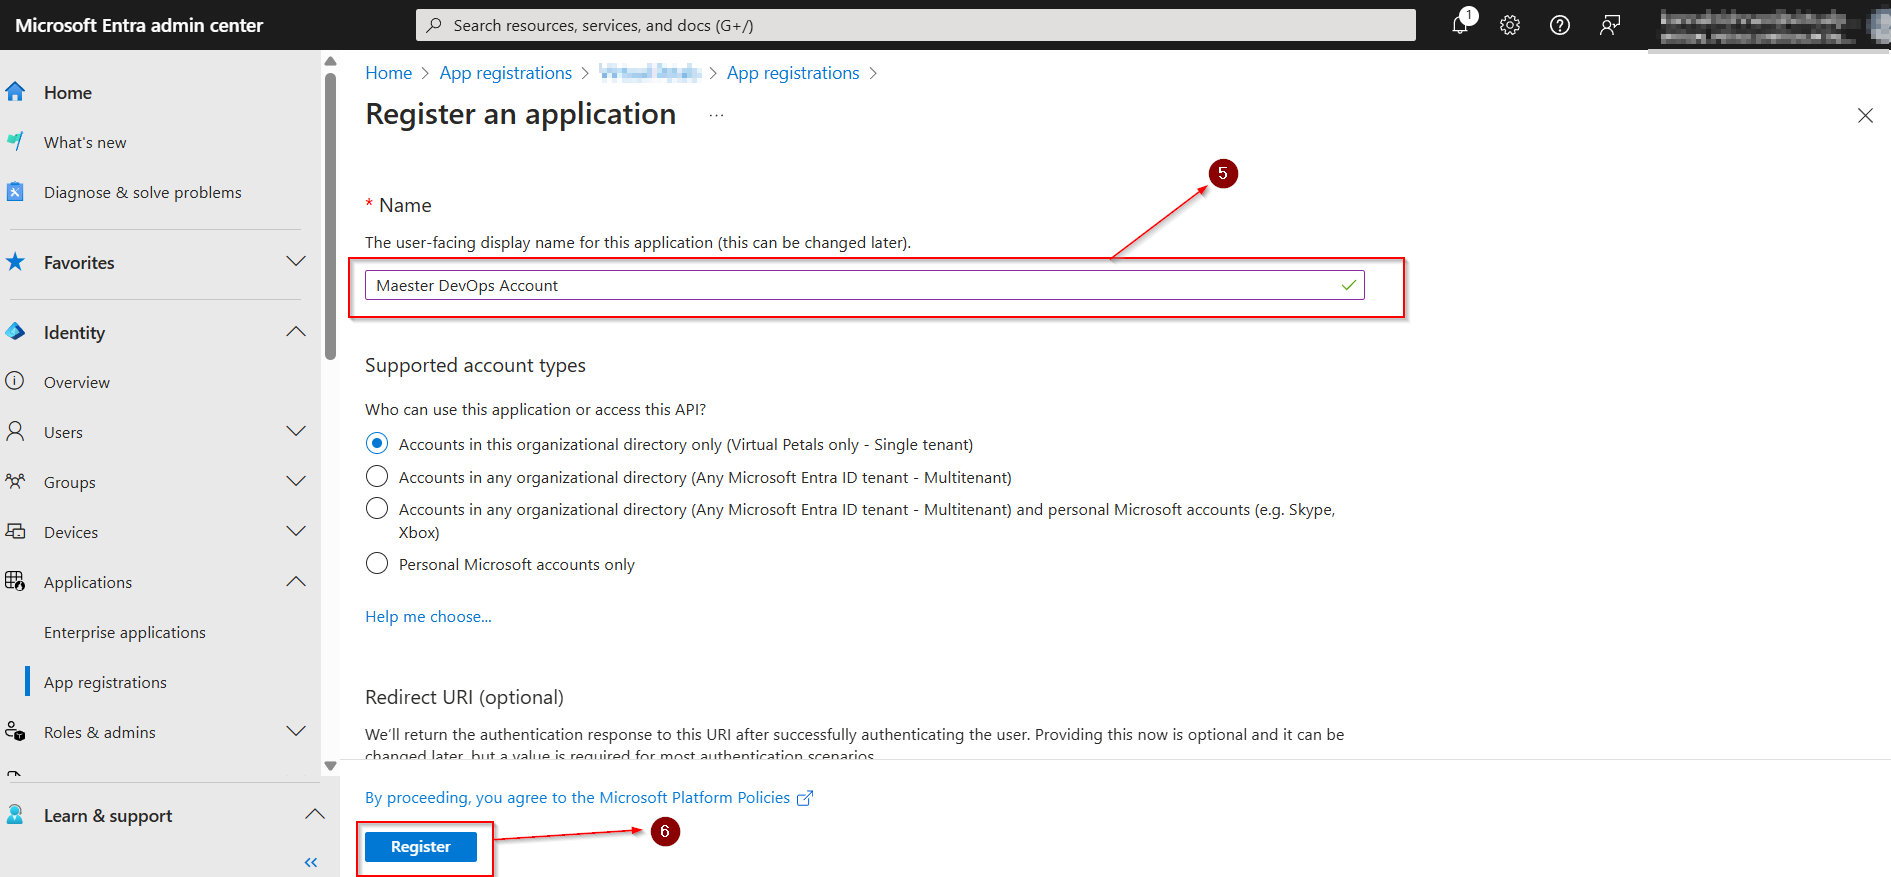
Enter a name for the application (e.g. Maester DevOps Account).
Select Register.
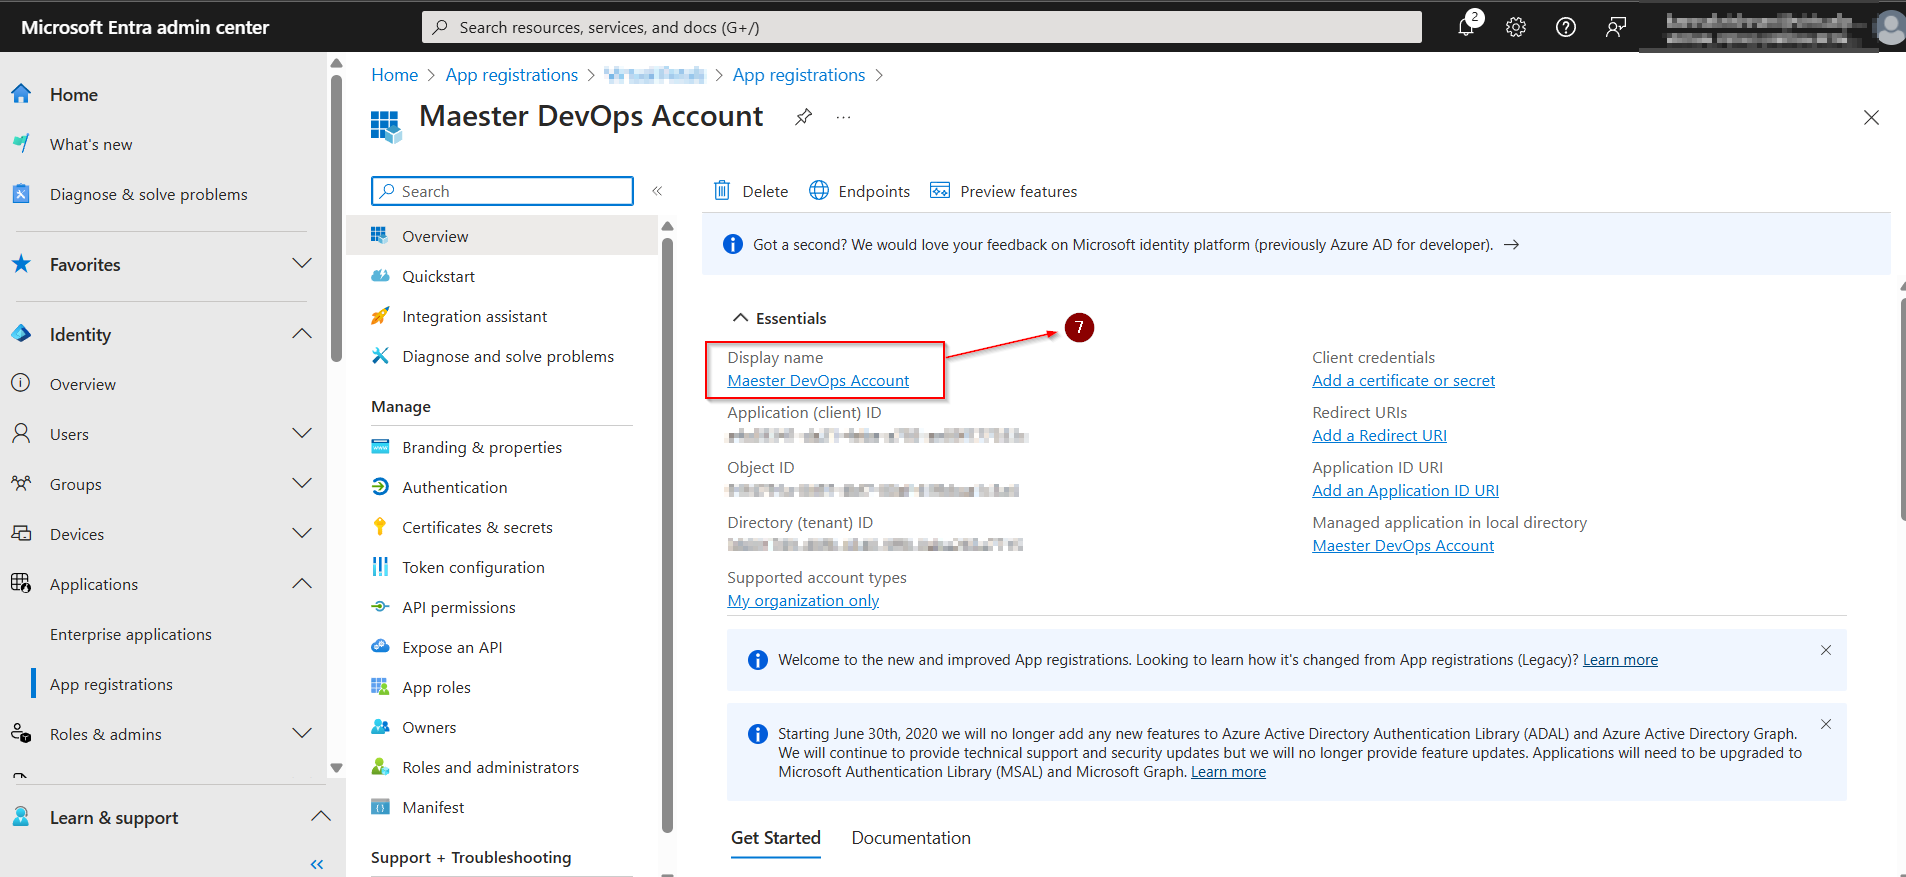
App Registration dashboard.
Open Microsoft entra admin center. Select Identity from the left-hand menu.
In Identity section, Select Applications.
Click App registration.
Select New registration.
Enter a name for the application (e.g. Maester DevOps Account). Select Register.
App Registration dashboard.
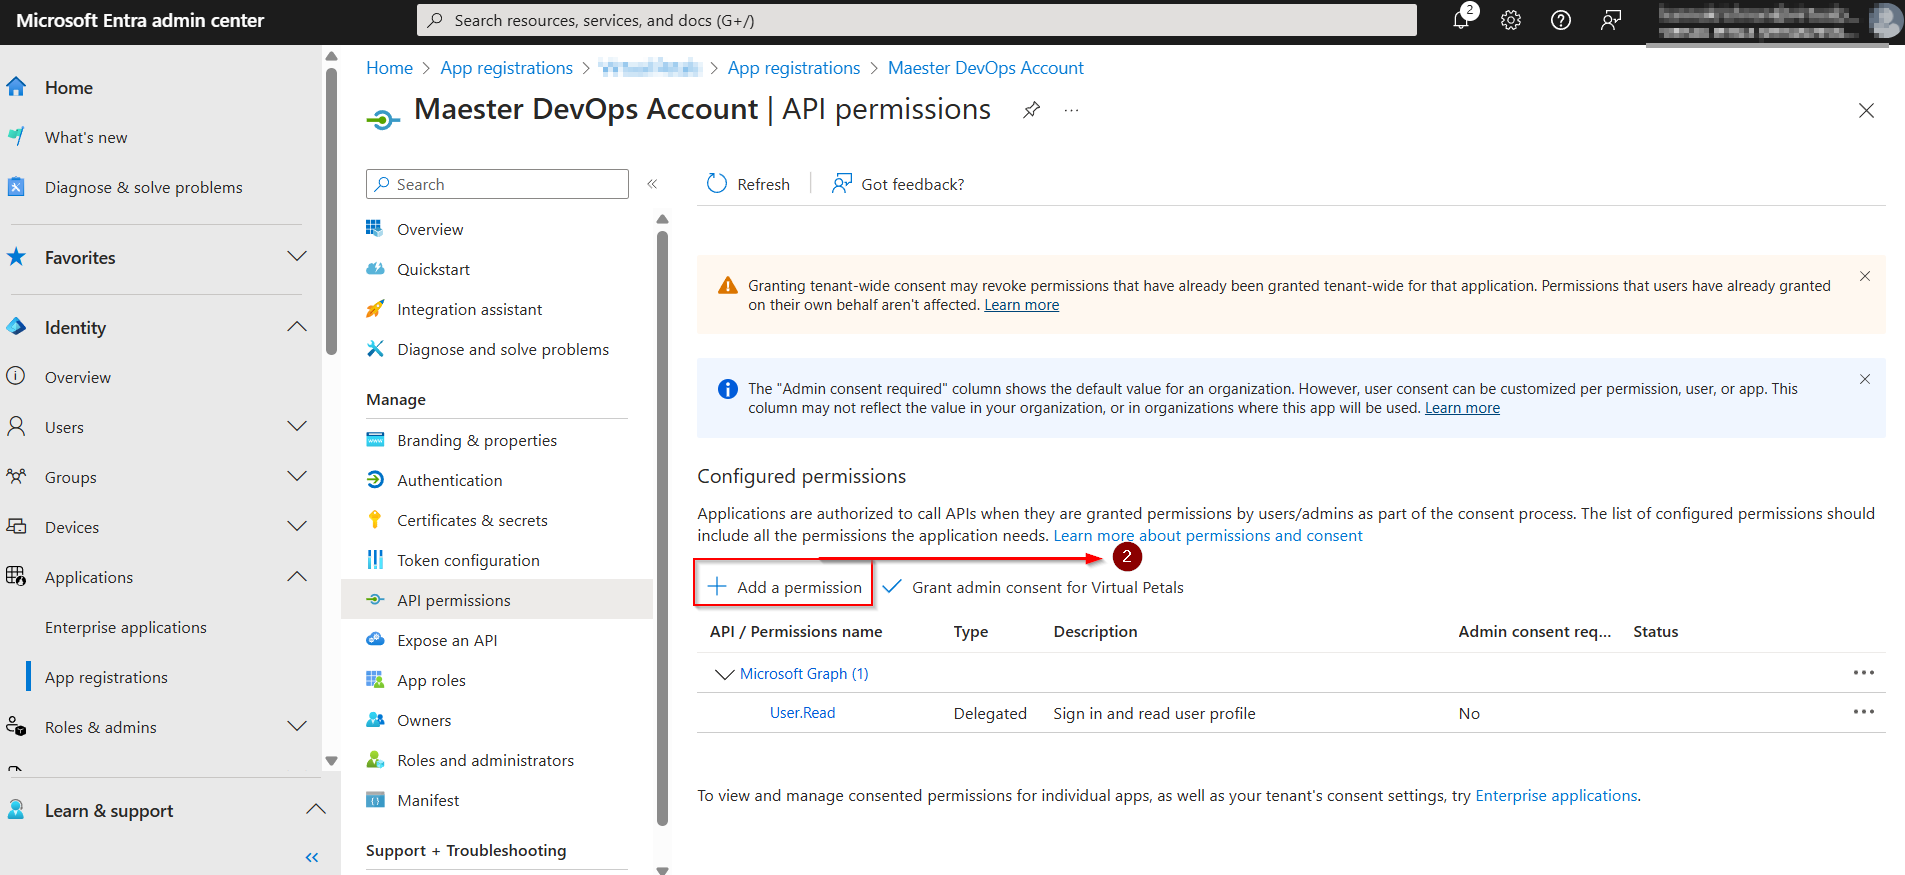
STEP-6: GRANT PERMISSIONS TO MICROSOFT GRAPH
Open the application you created in the previous step.
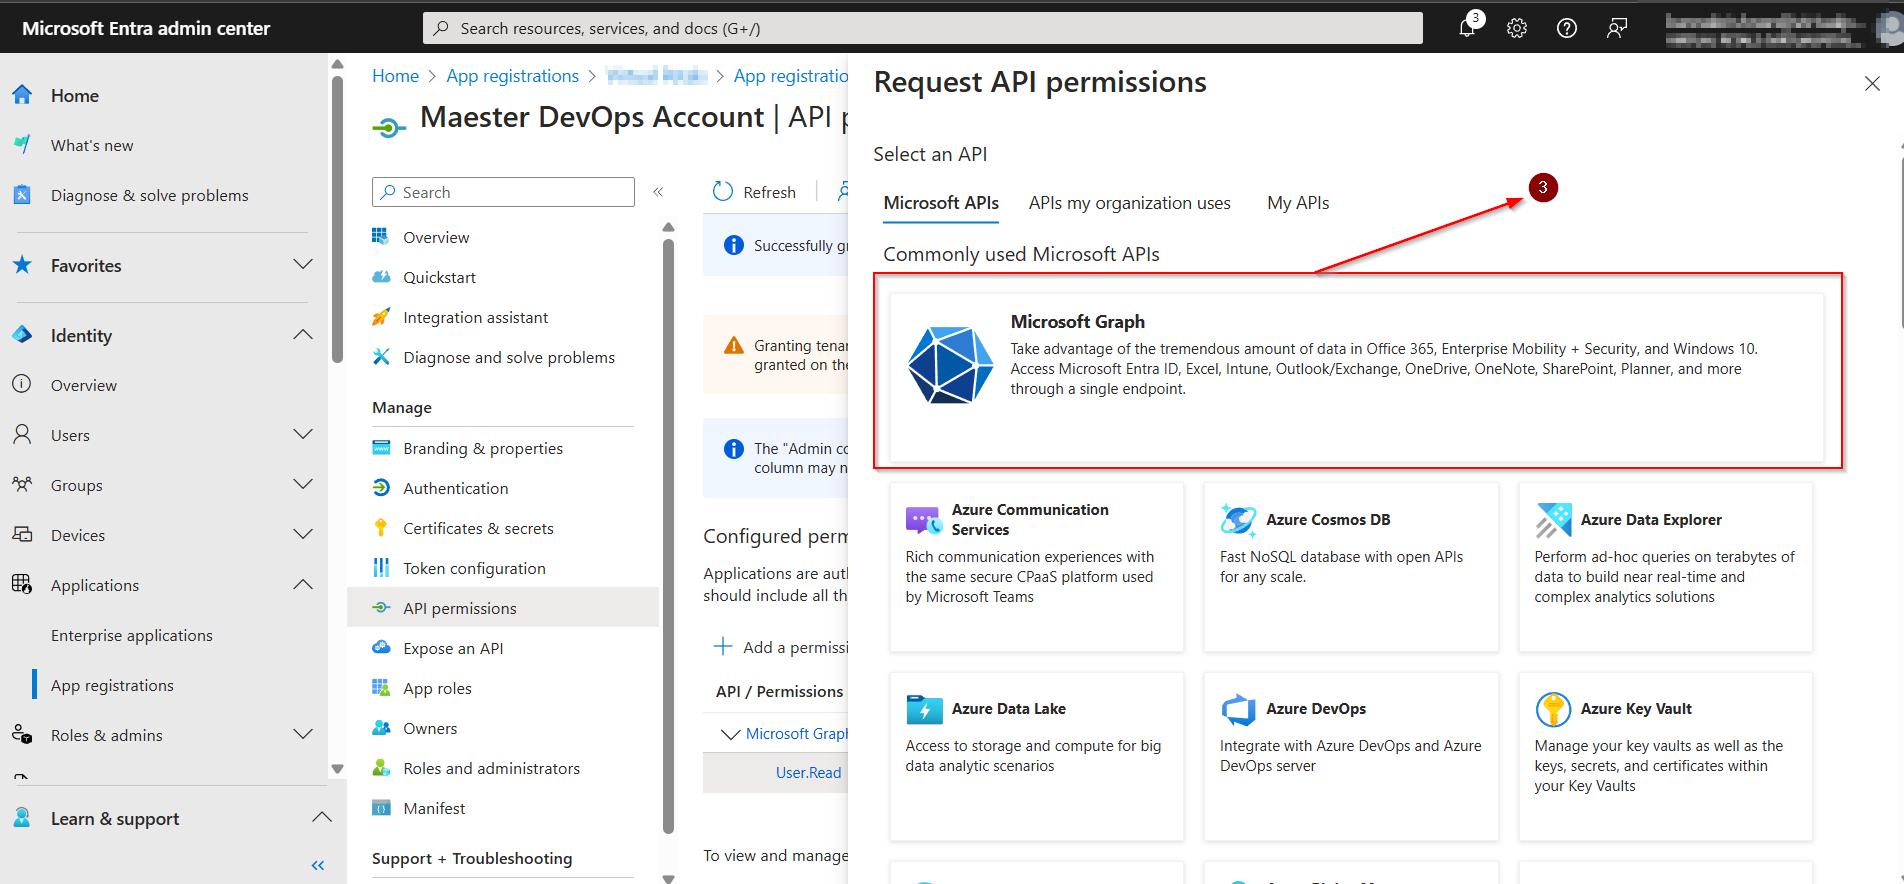
Select API permissions > Add a permission.
Select Microsoft Graph.
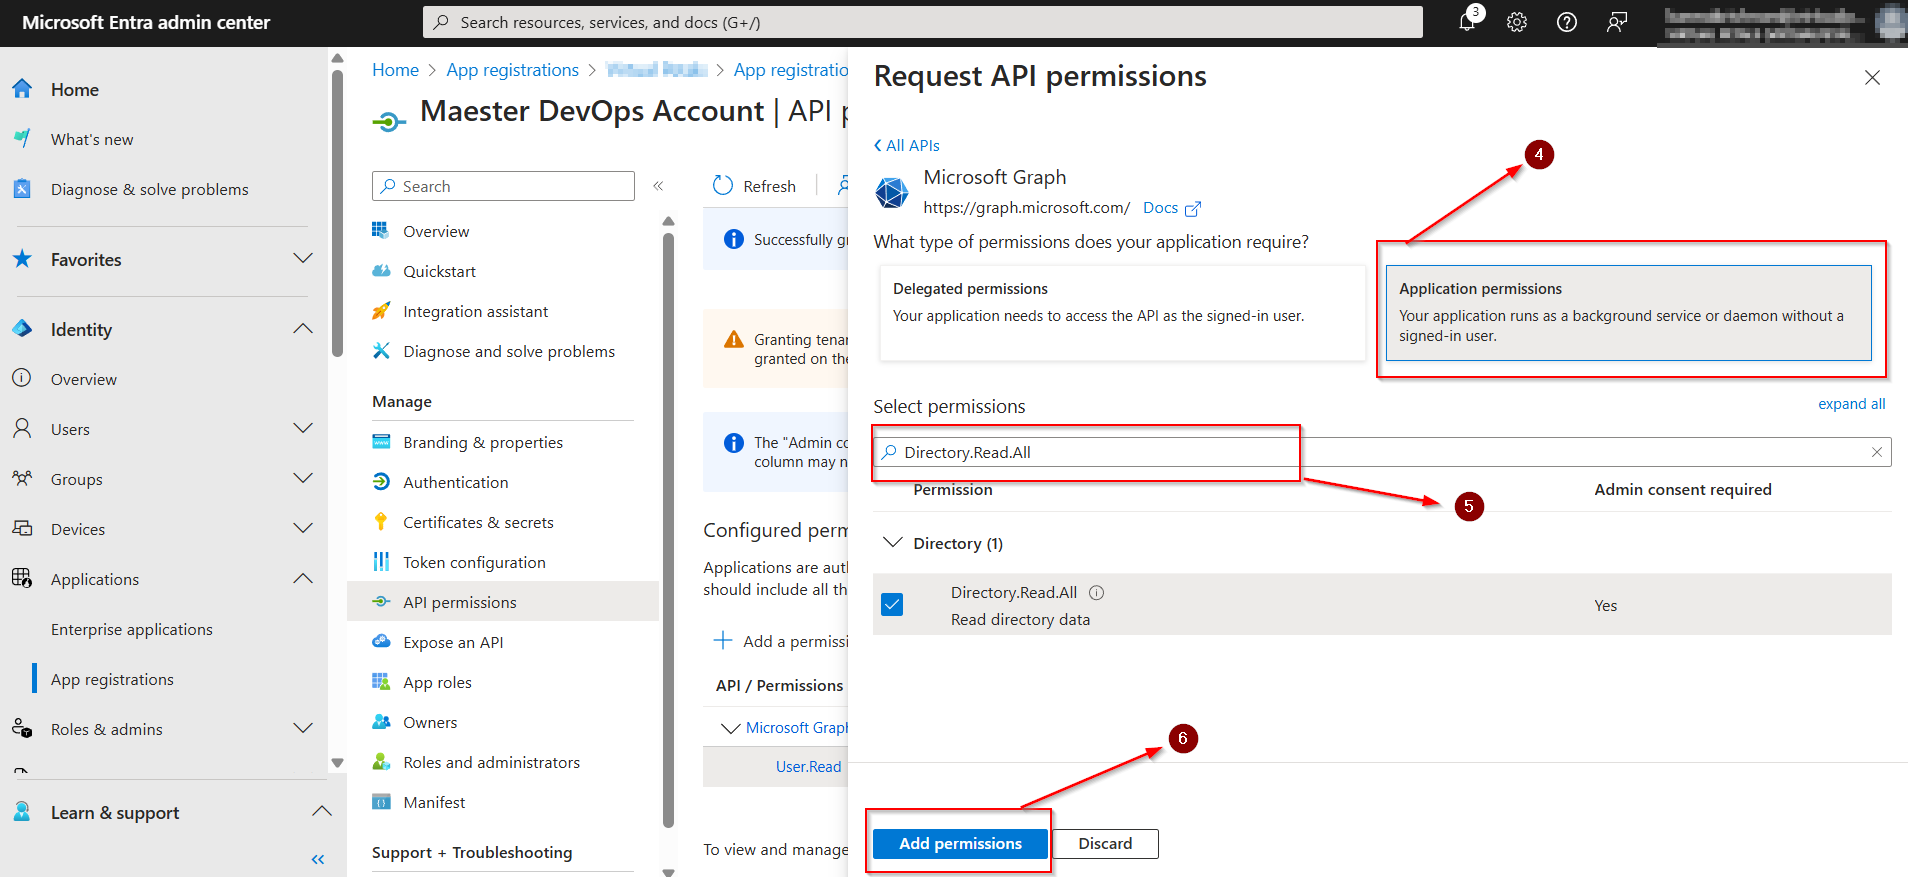
Click Application permissions.
Search for each of the permissions and check the box next to each permission.
Select Add permissions.
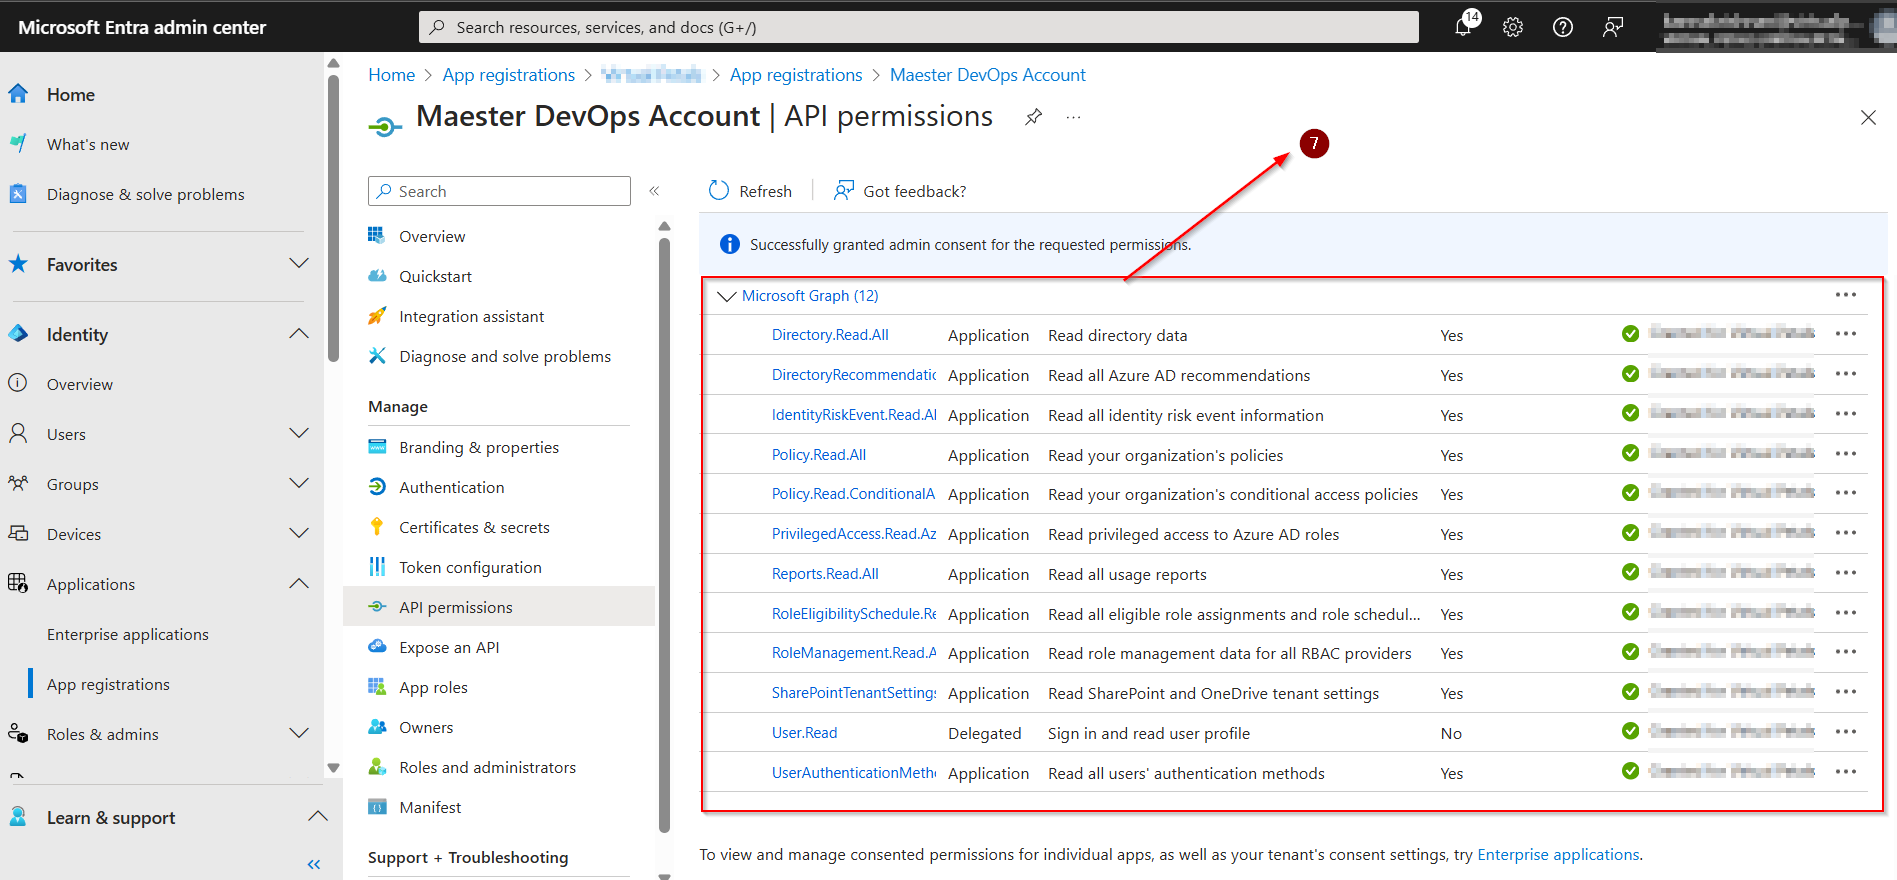
Select Grant admin consent for [your organization].
Select Yes to confirm.
Open the application you created in the previous step. Select API permissions > Add a permission.
Select Add permissions.
Select Microsoft Graph.
Click Application permissions. Search for each of the permissions and check the box next to each permission. Select Add permissions.
Directory.Read.All
DirectoryRecommendations.Read.All
IdentityRiskEvent.Read.All
Policy.Read.All
Policy.Read.ConditionalAccess
PrivilegedAccess.Read.AzureAD
Reports.Read.All
RoleEligibilitySchedule.Read.Directory
RoleManagement.Read.All
SharePointTenantSettings.Read.All
UserAuthenticationMethod.Read.All
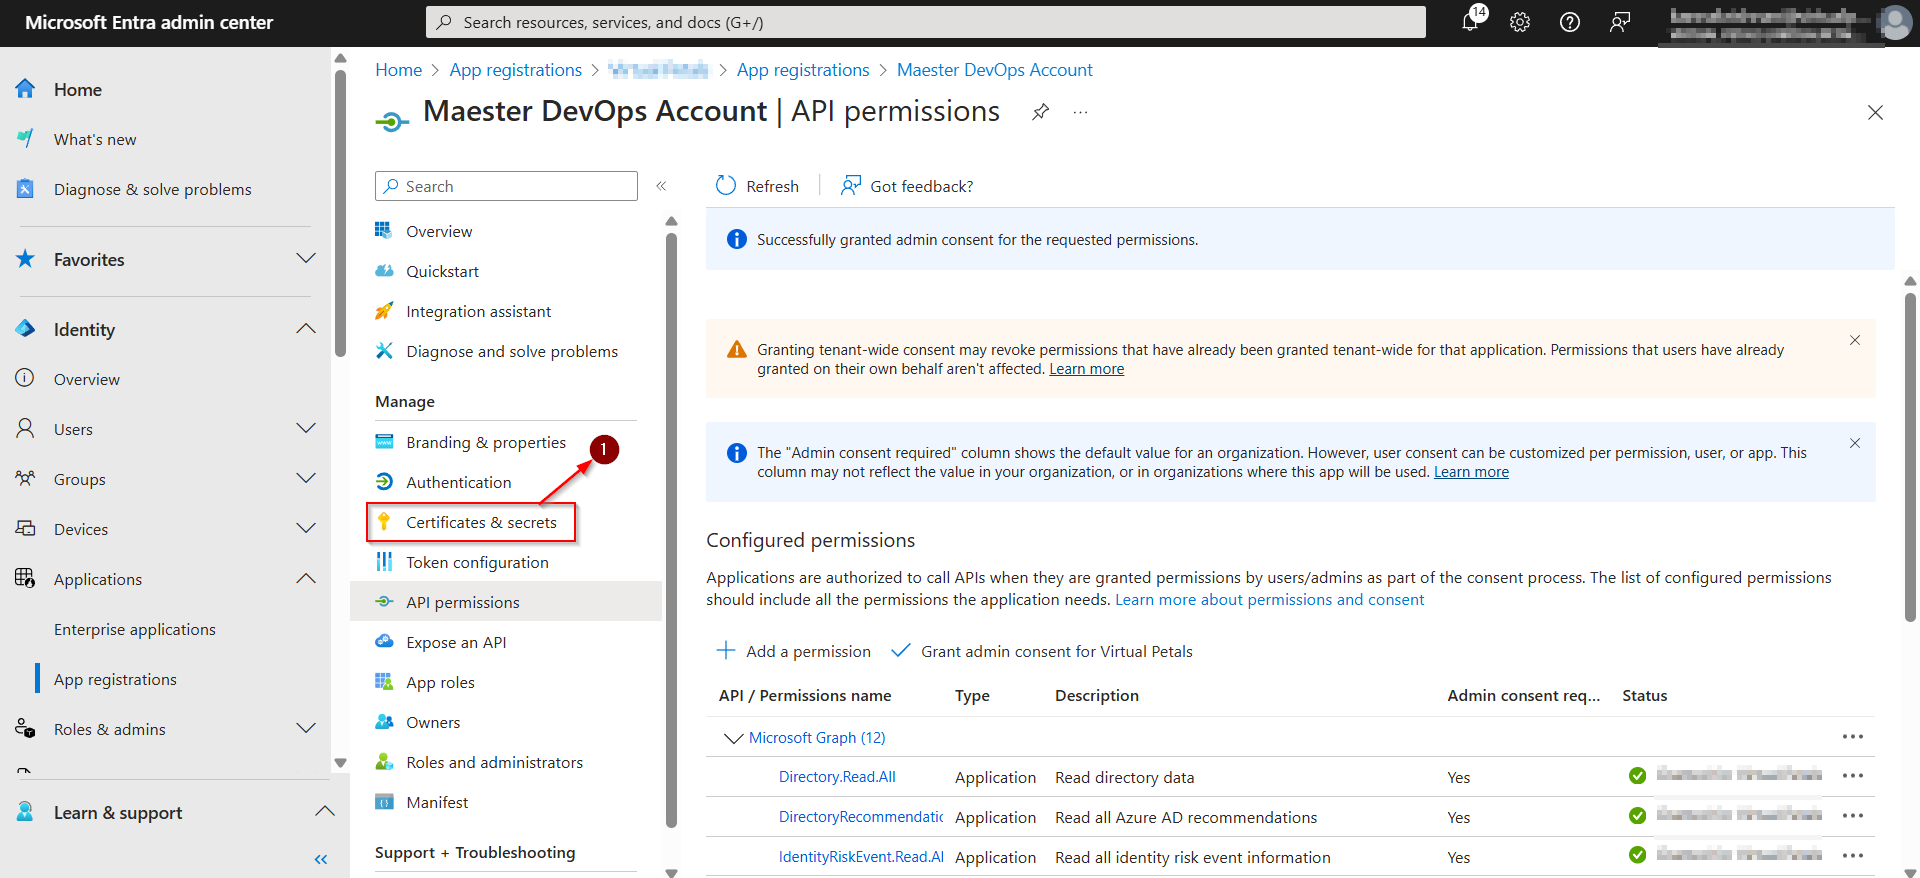
Select Grant admin consent for [your organization]. Select Yes to confirm. This Is the Dashboard Of API Permission
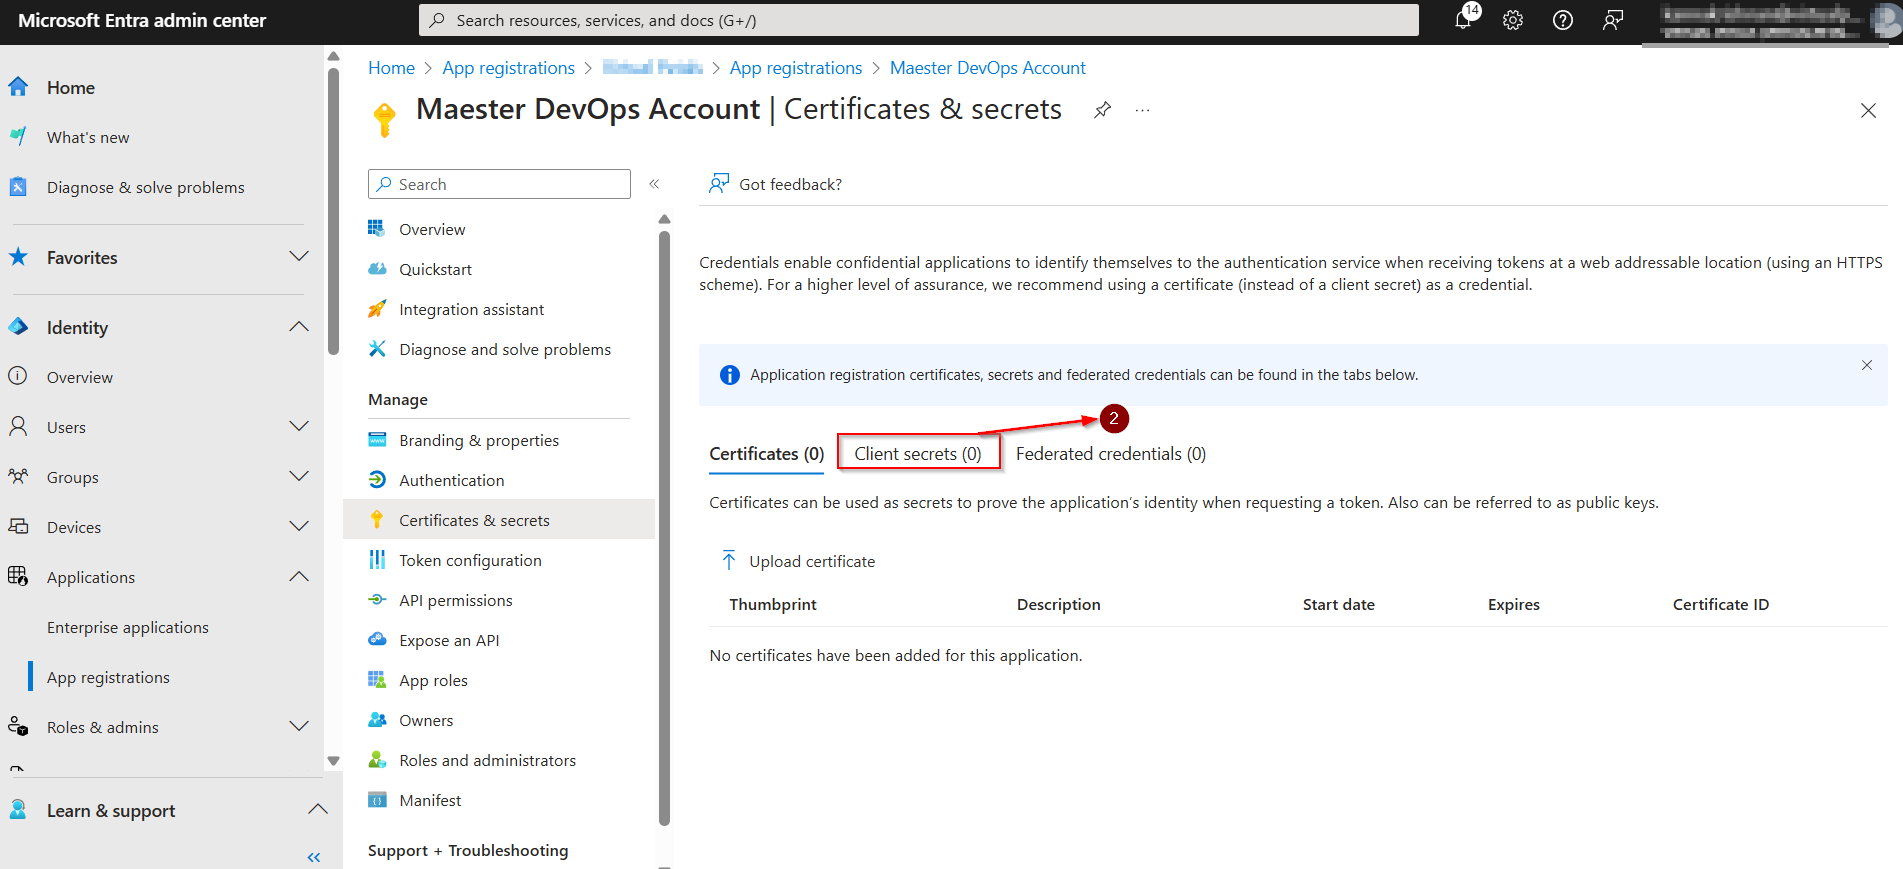
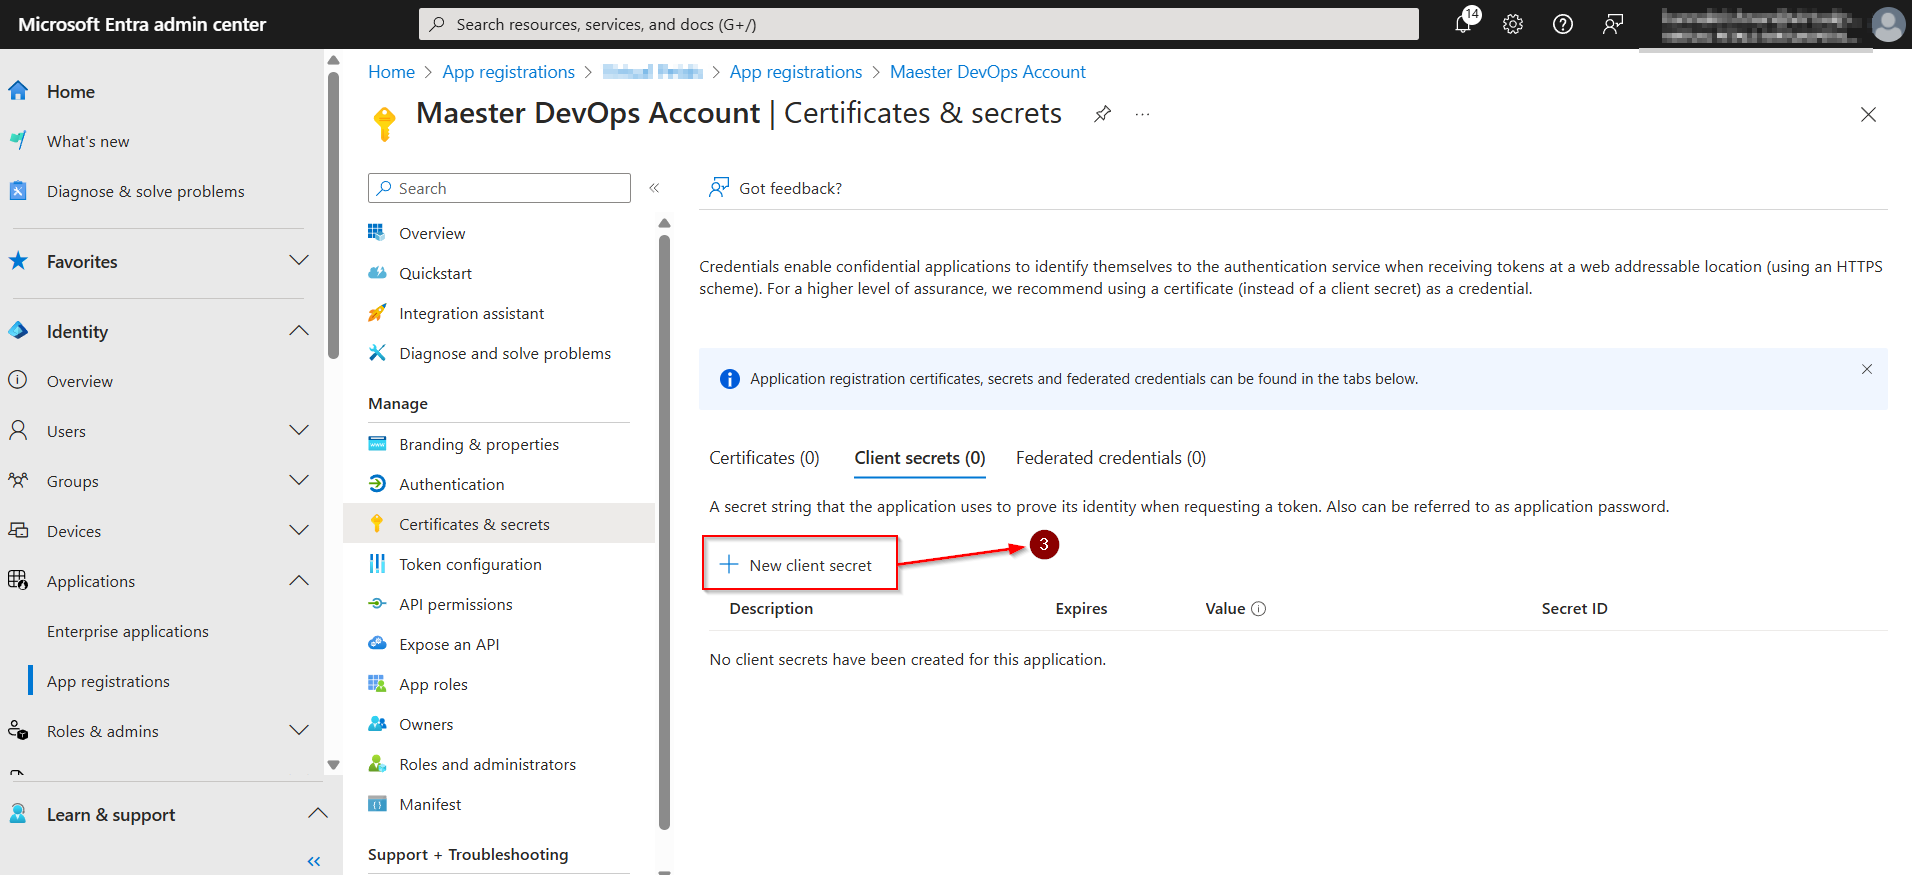
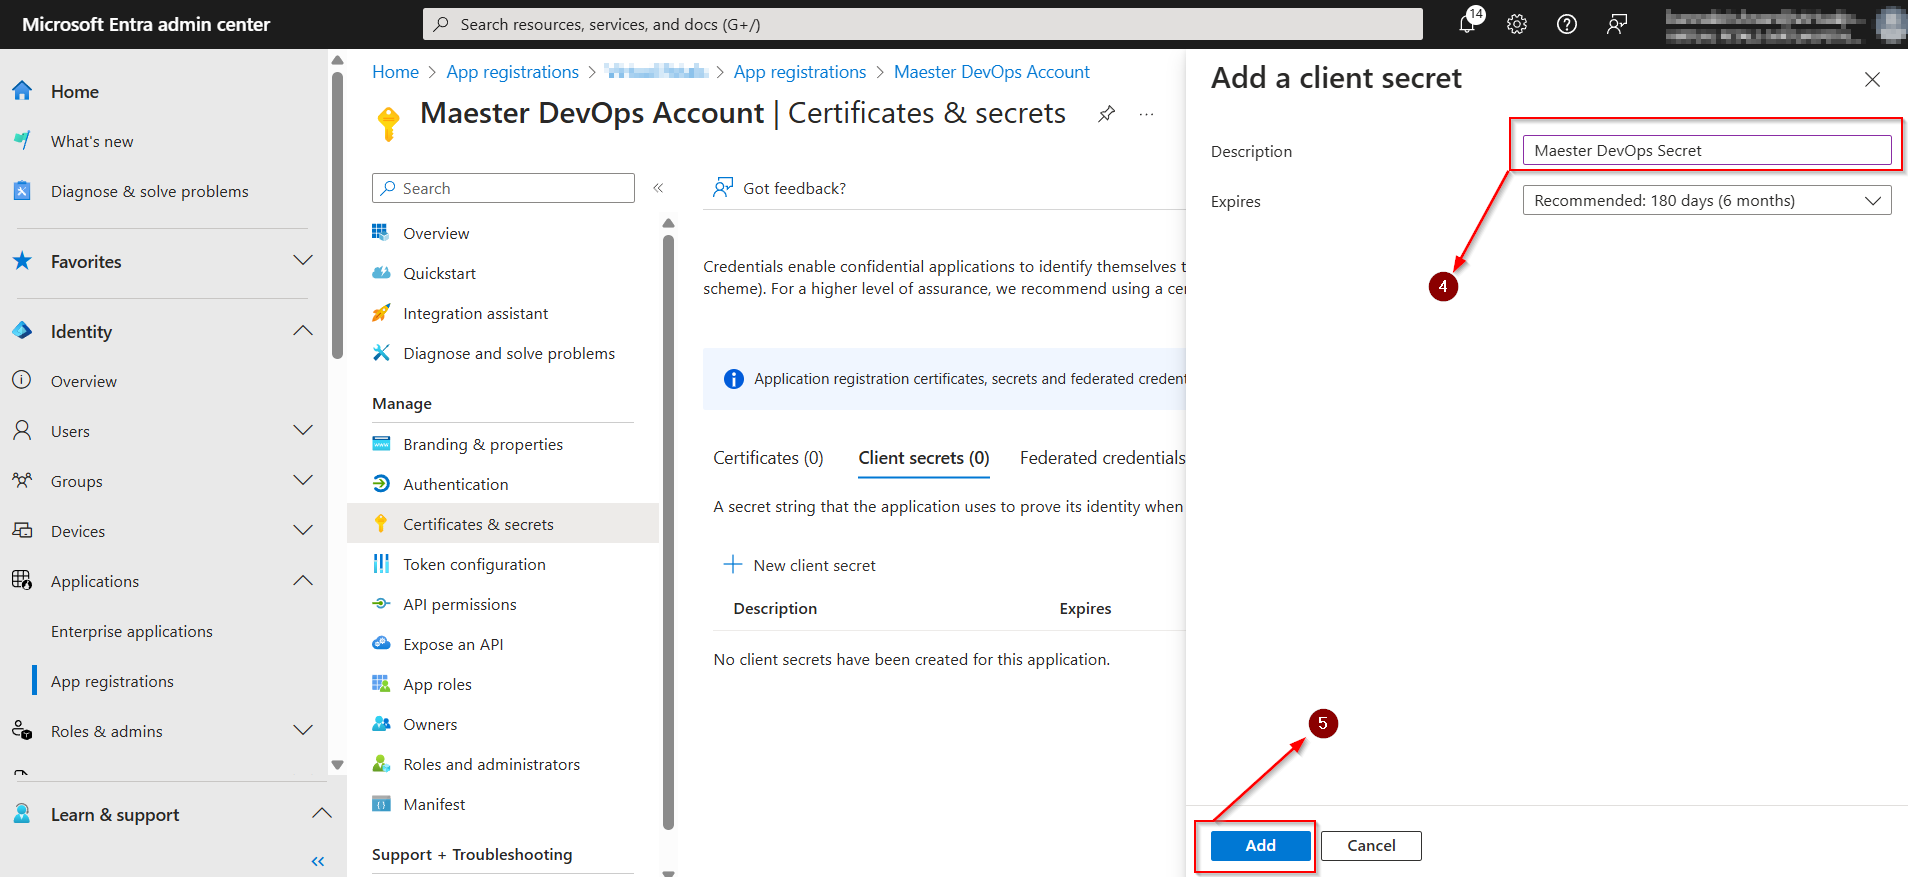
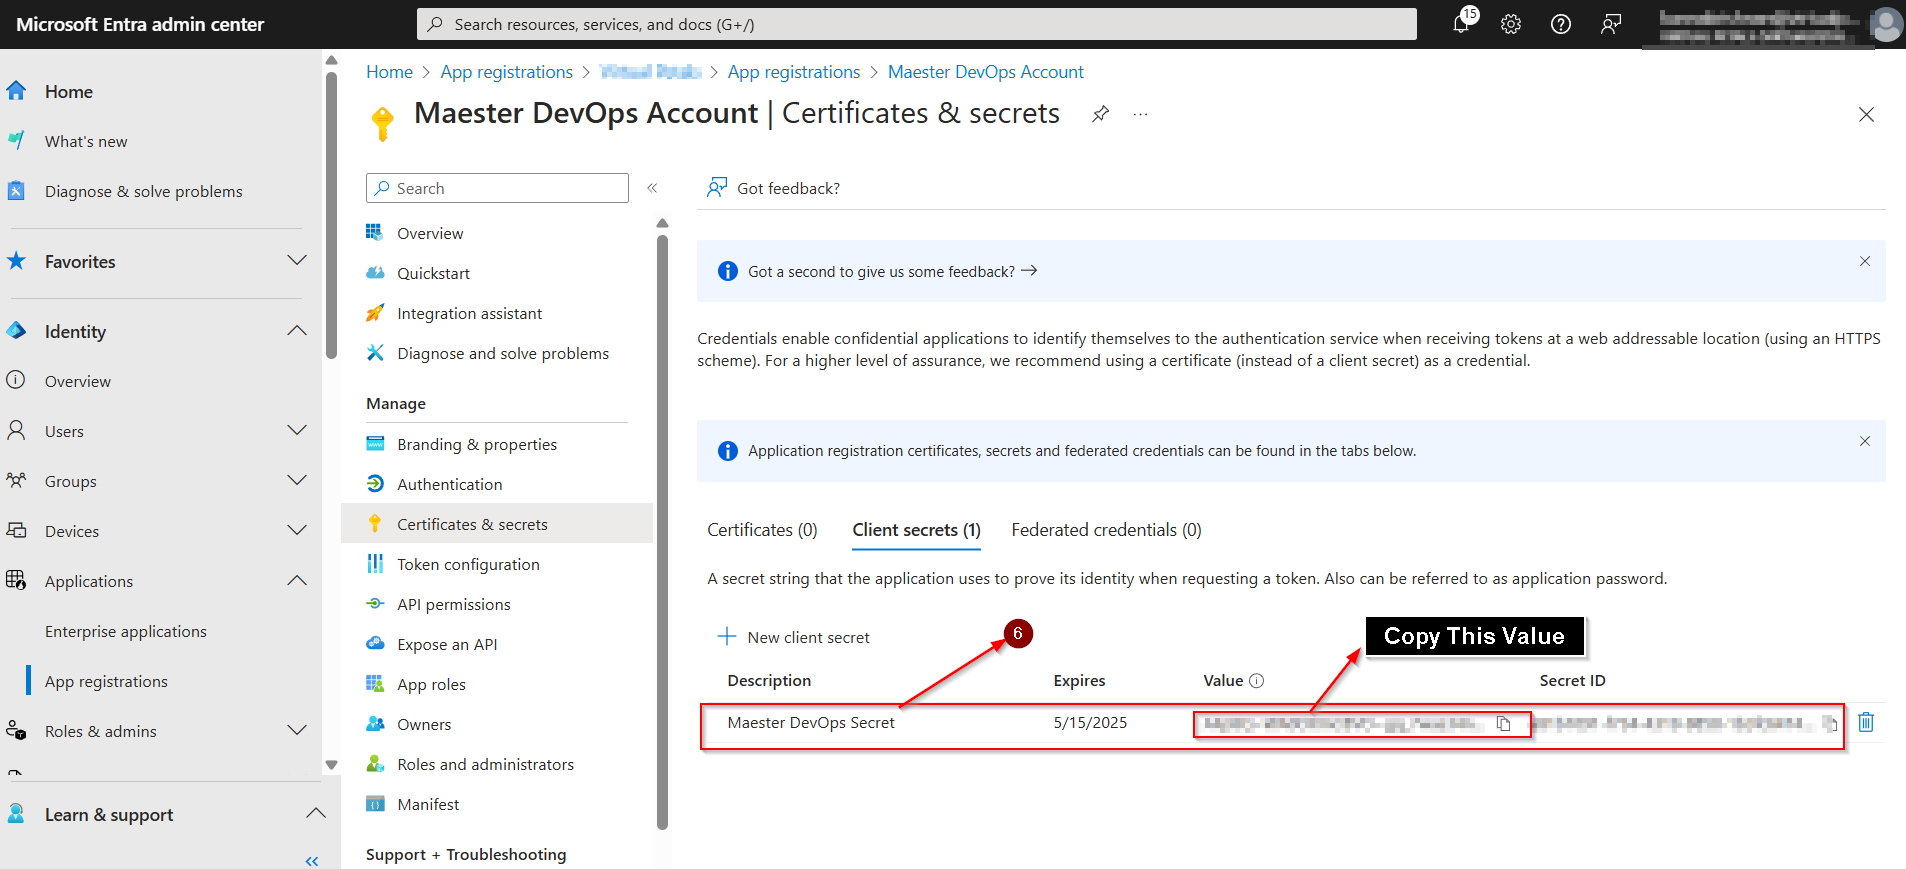
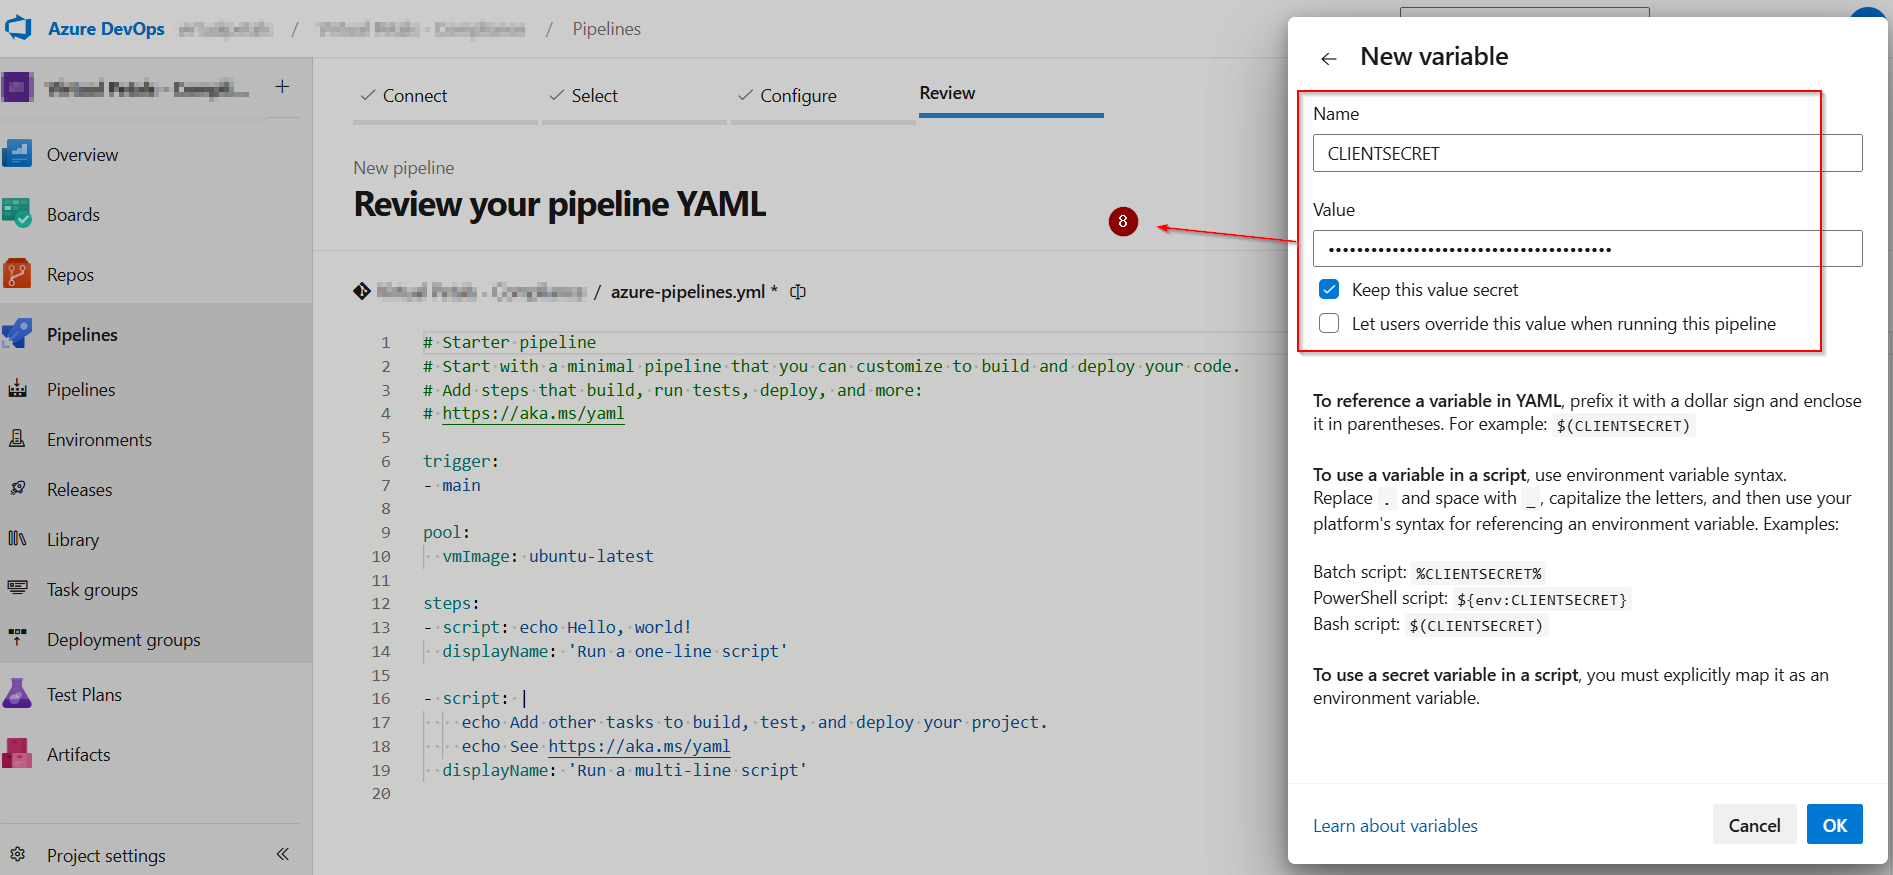
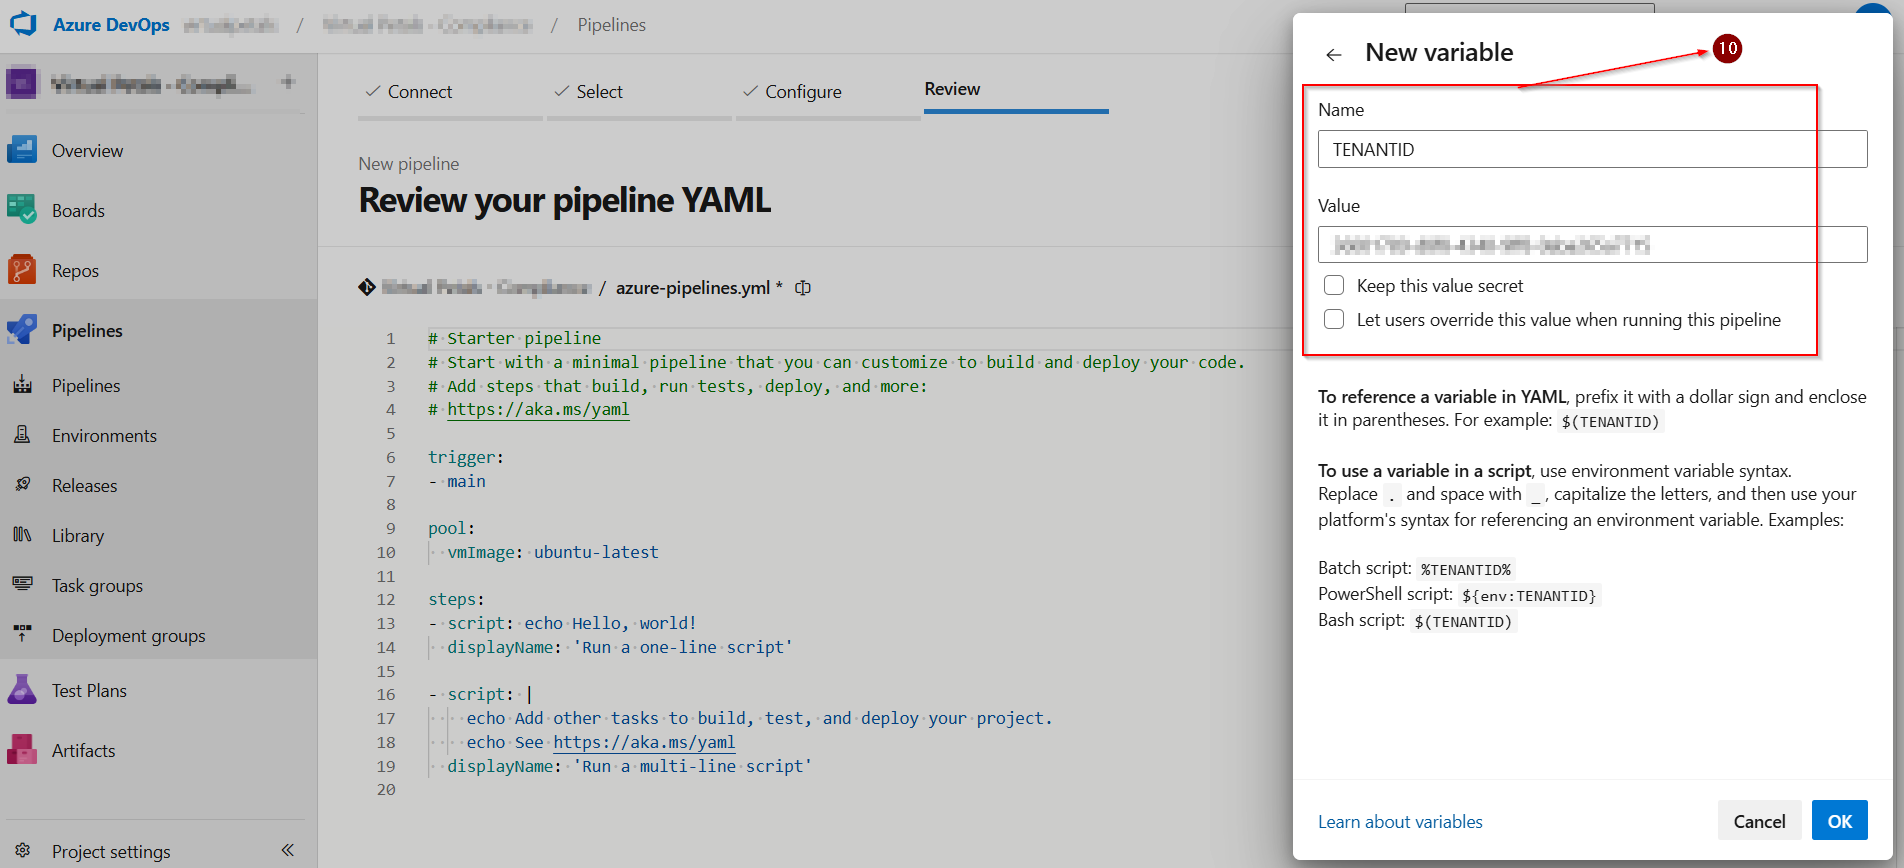
STEP-7: CREATE A CLIENT SECRET
Select Certificates & secrets.
Select Client secrets & Click New client secret.
Enter a description for the secret (e.g. Maester DevOps Secret) & Select Add.
Copy the value of the secret, we will use this value in the Azure Pipeline.
Select Certificates & secrets.
Select Client secrets.
Click New client secret.
Enter a description for the secret (e.g. Maester DevOps Secret) & Select Add.
Copy the value of the secret, we will use this value in the Azure Pipeline.
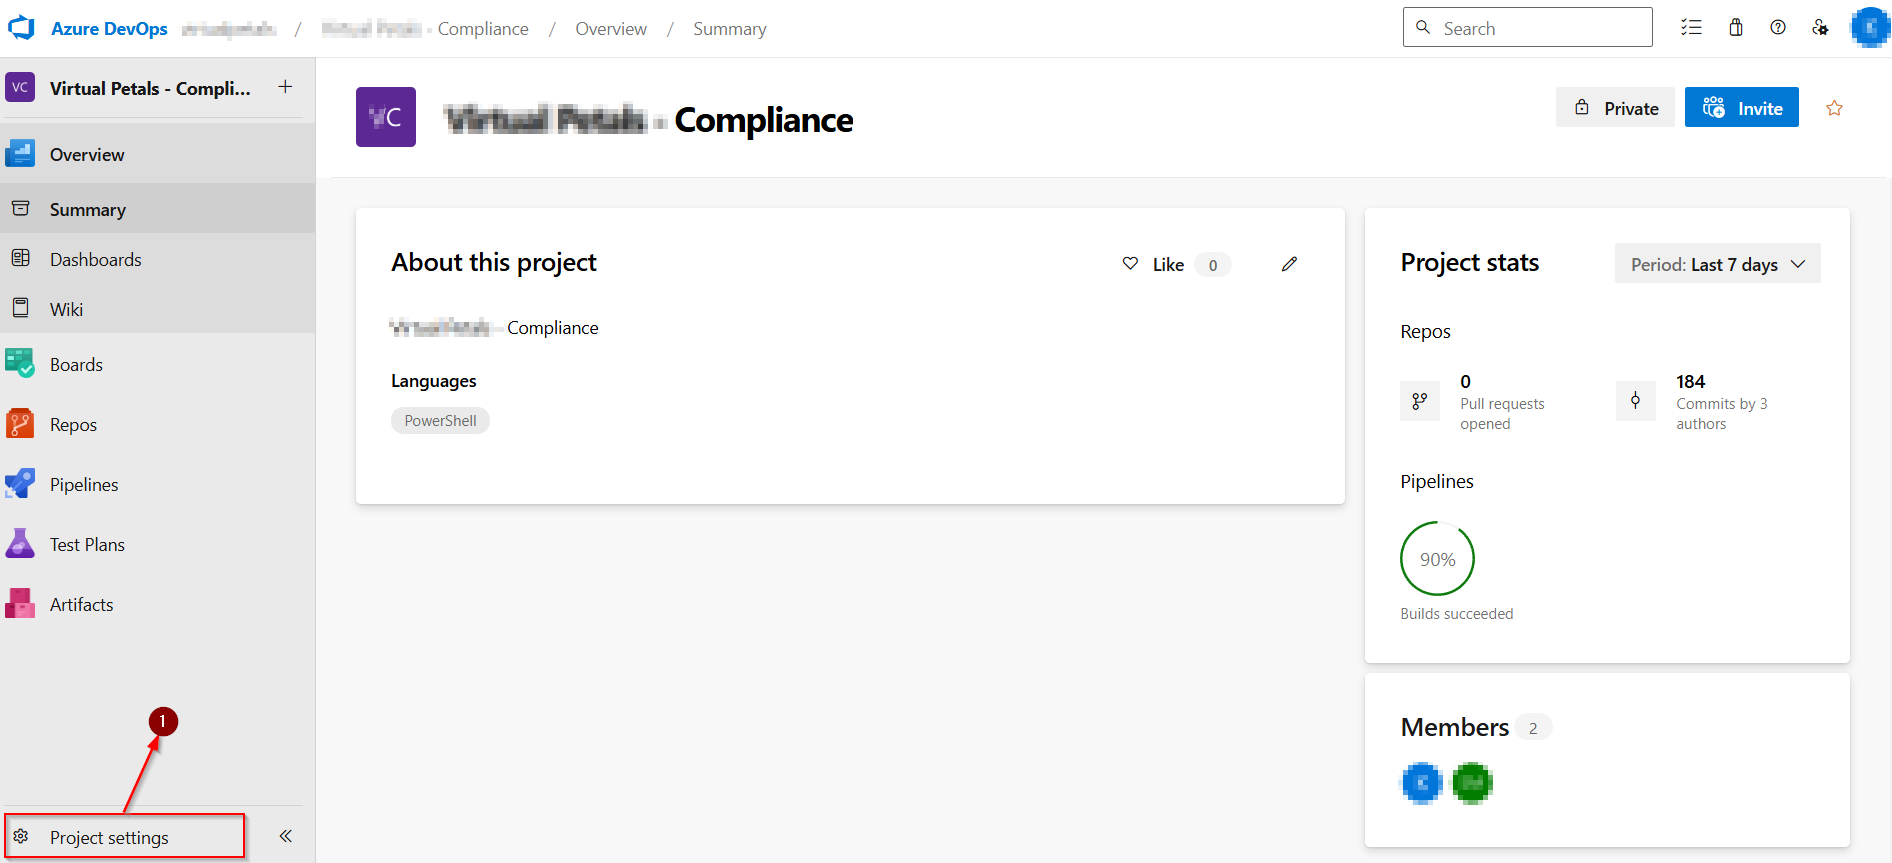
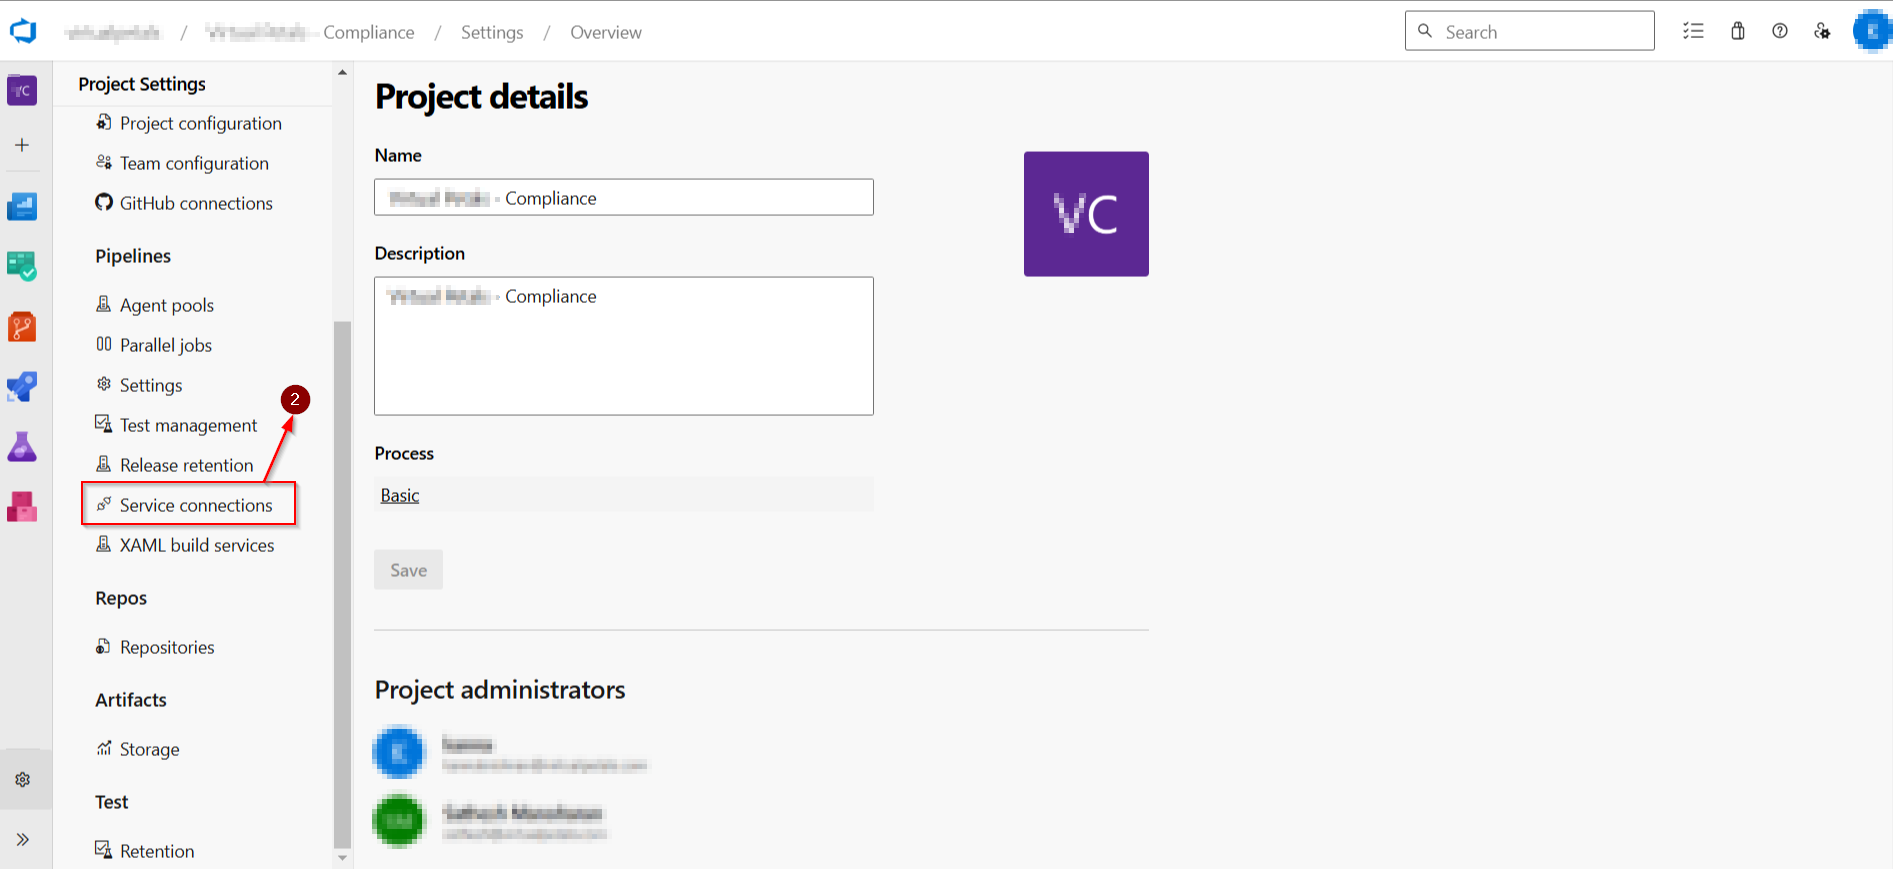
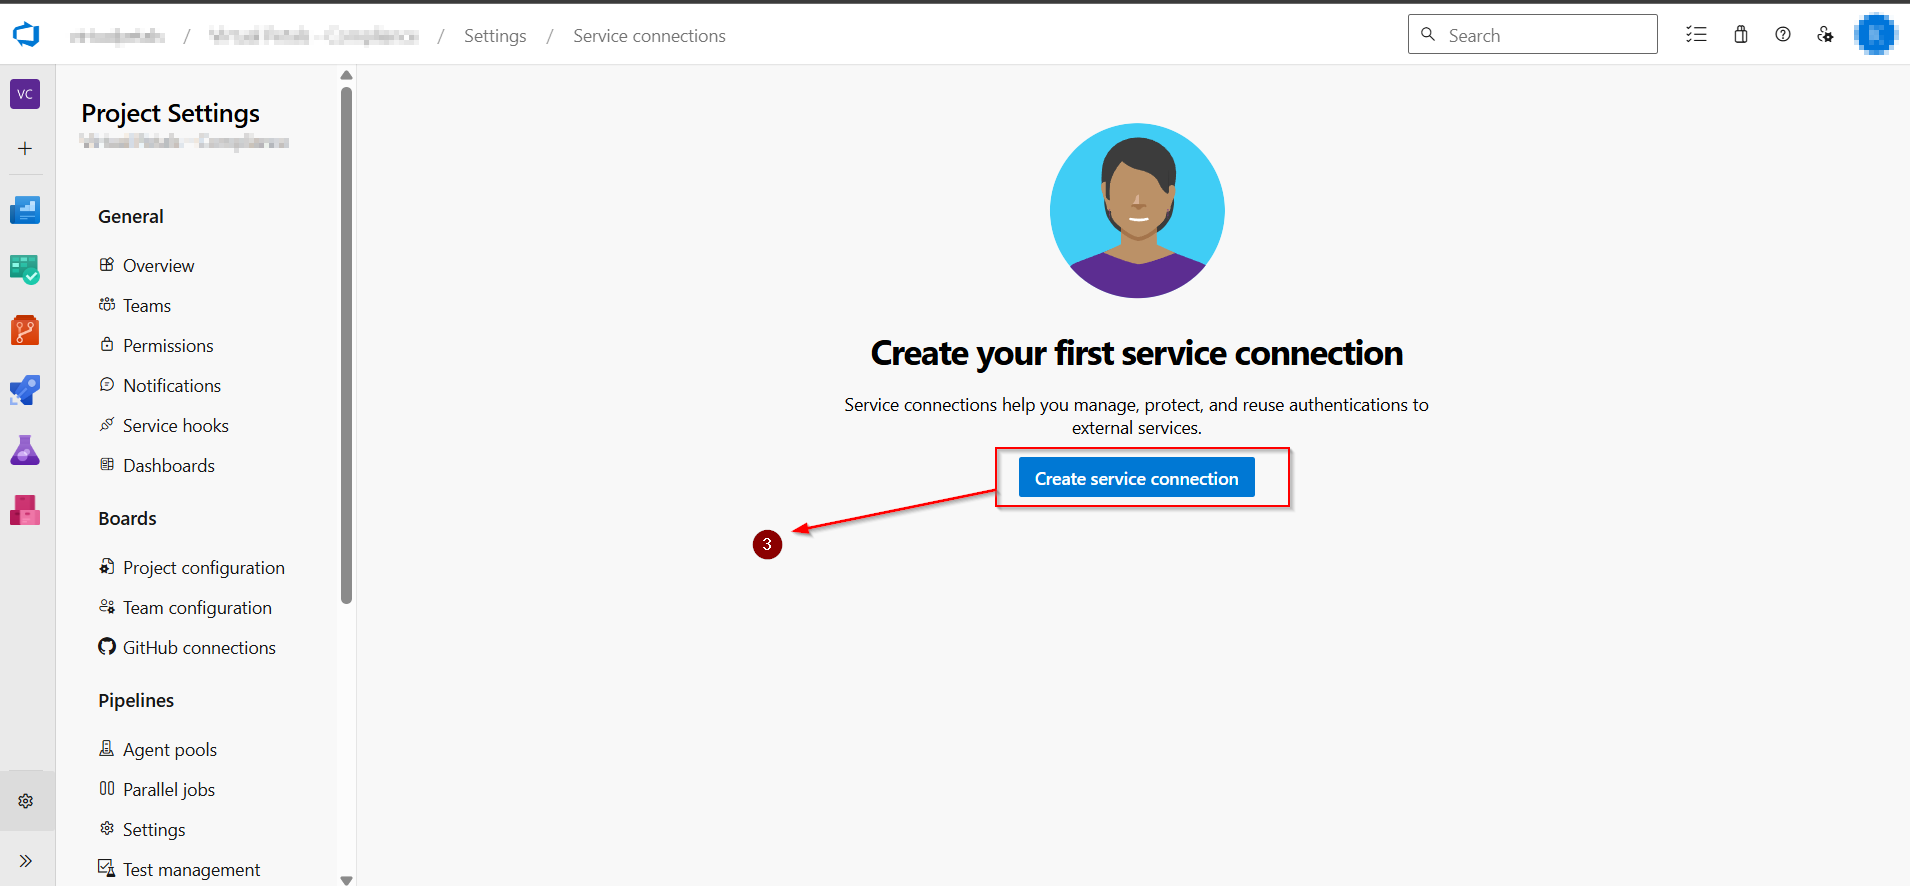
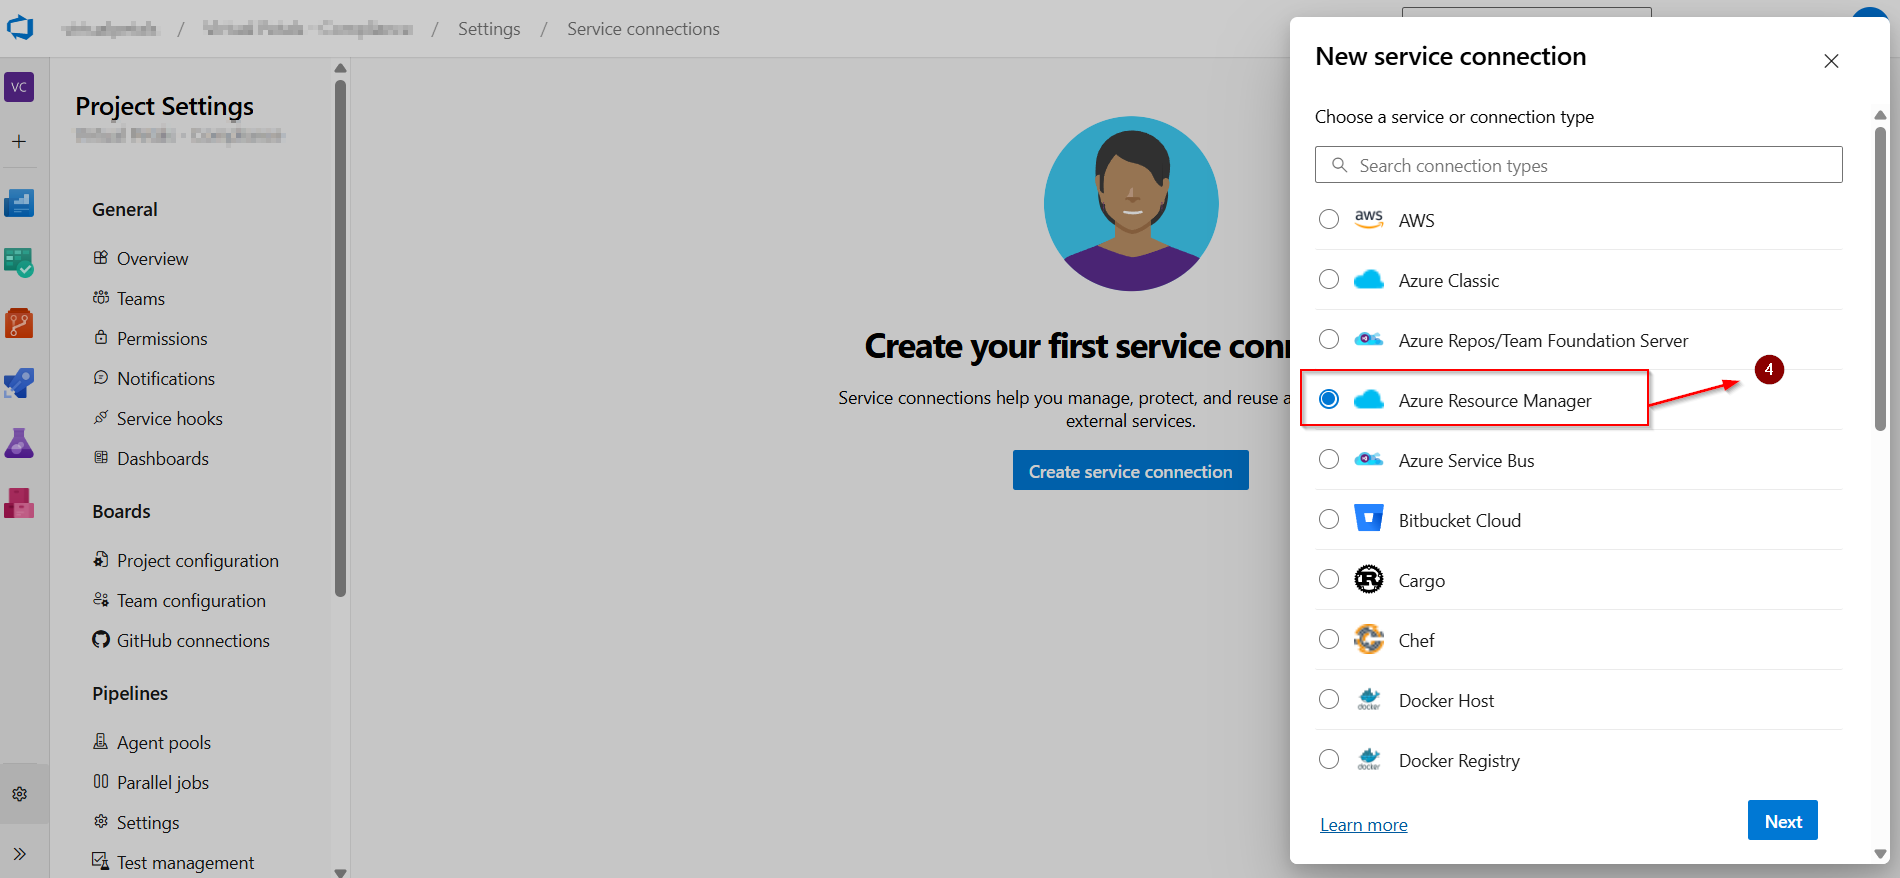
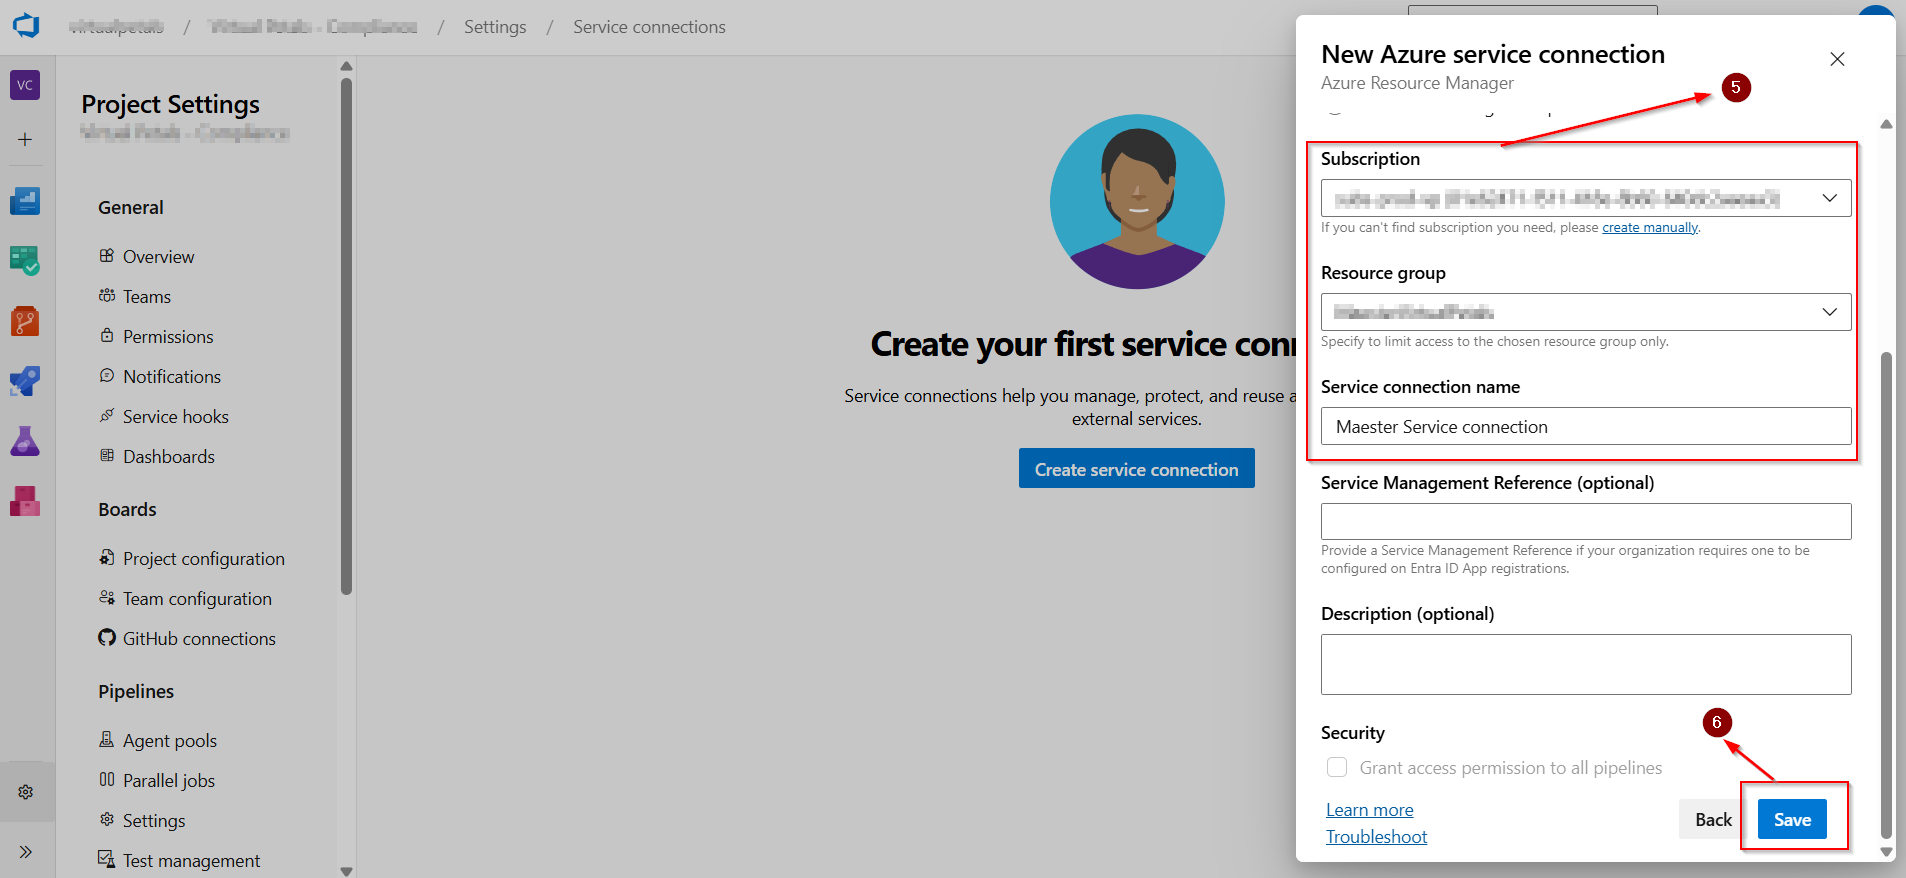
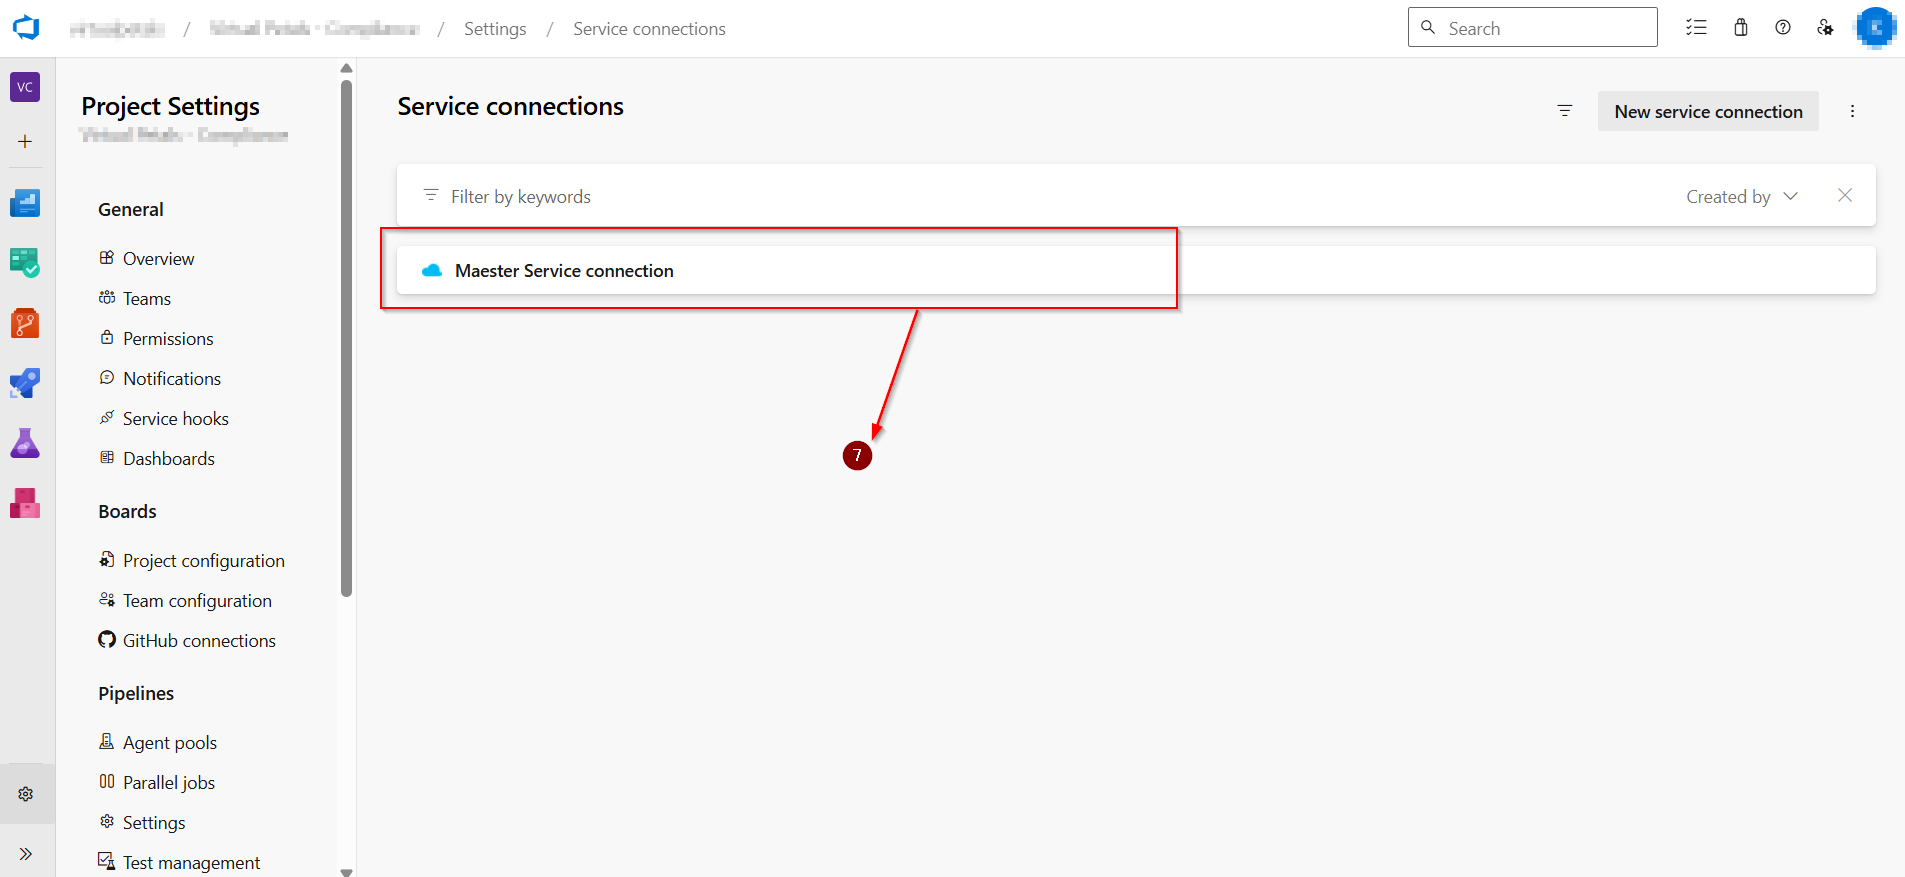
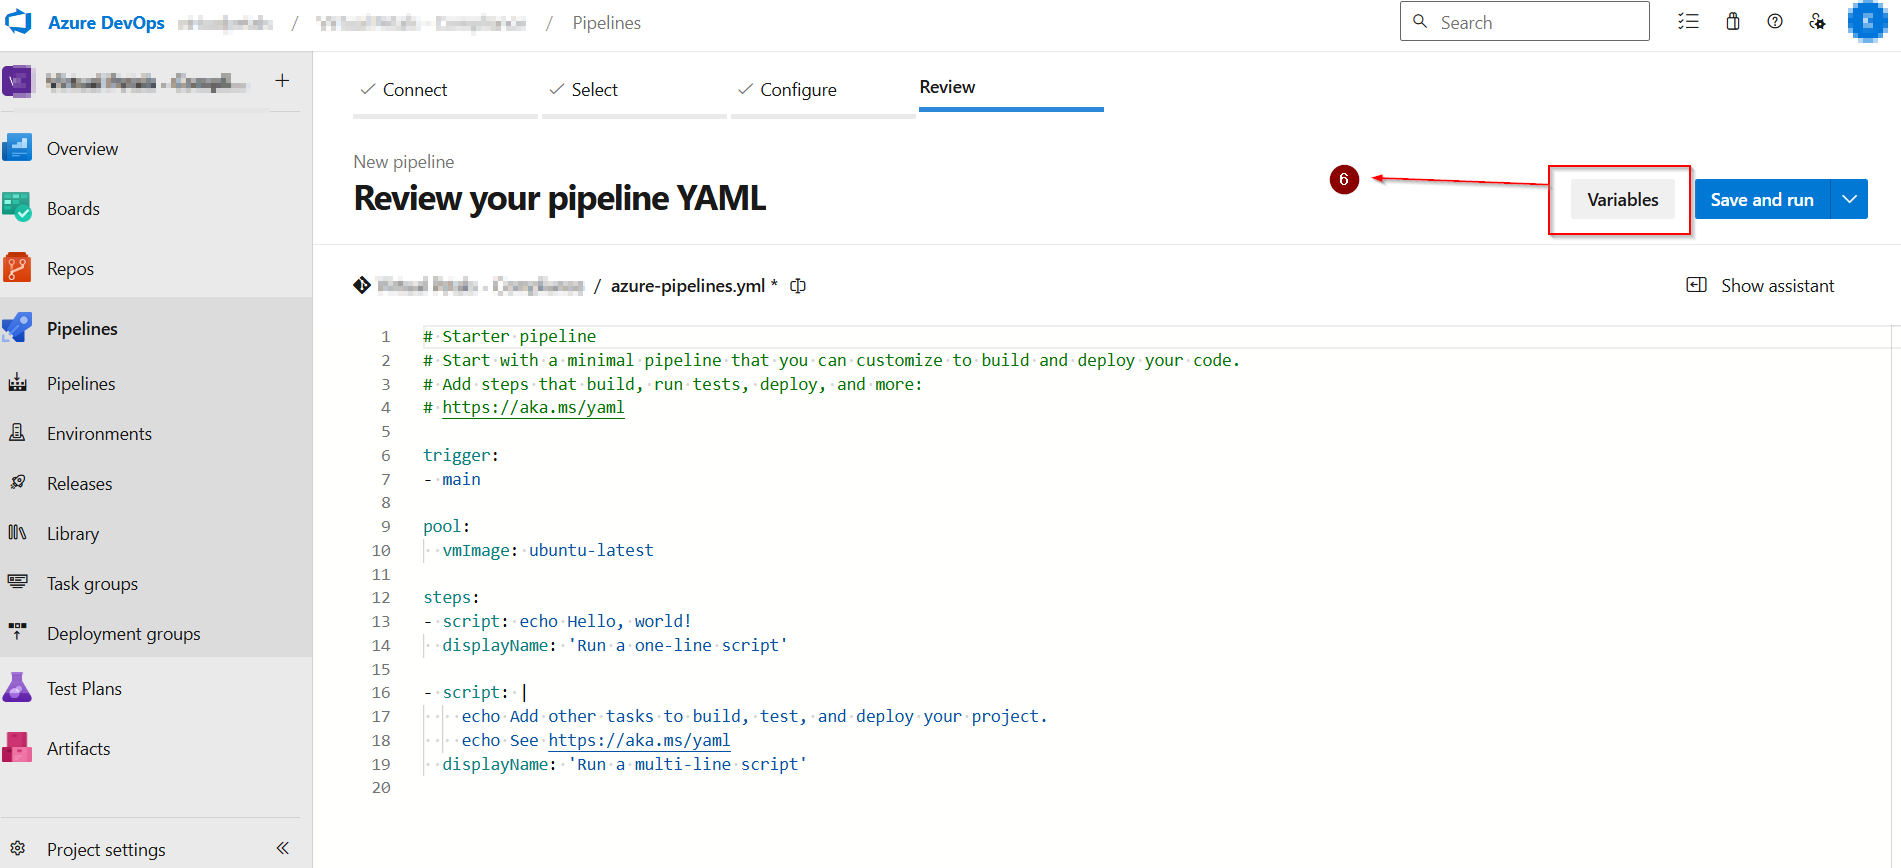
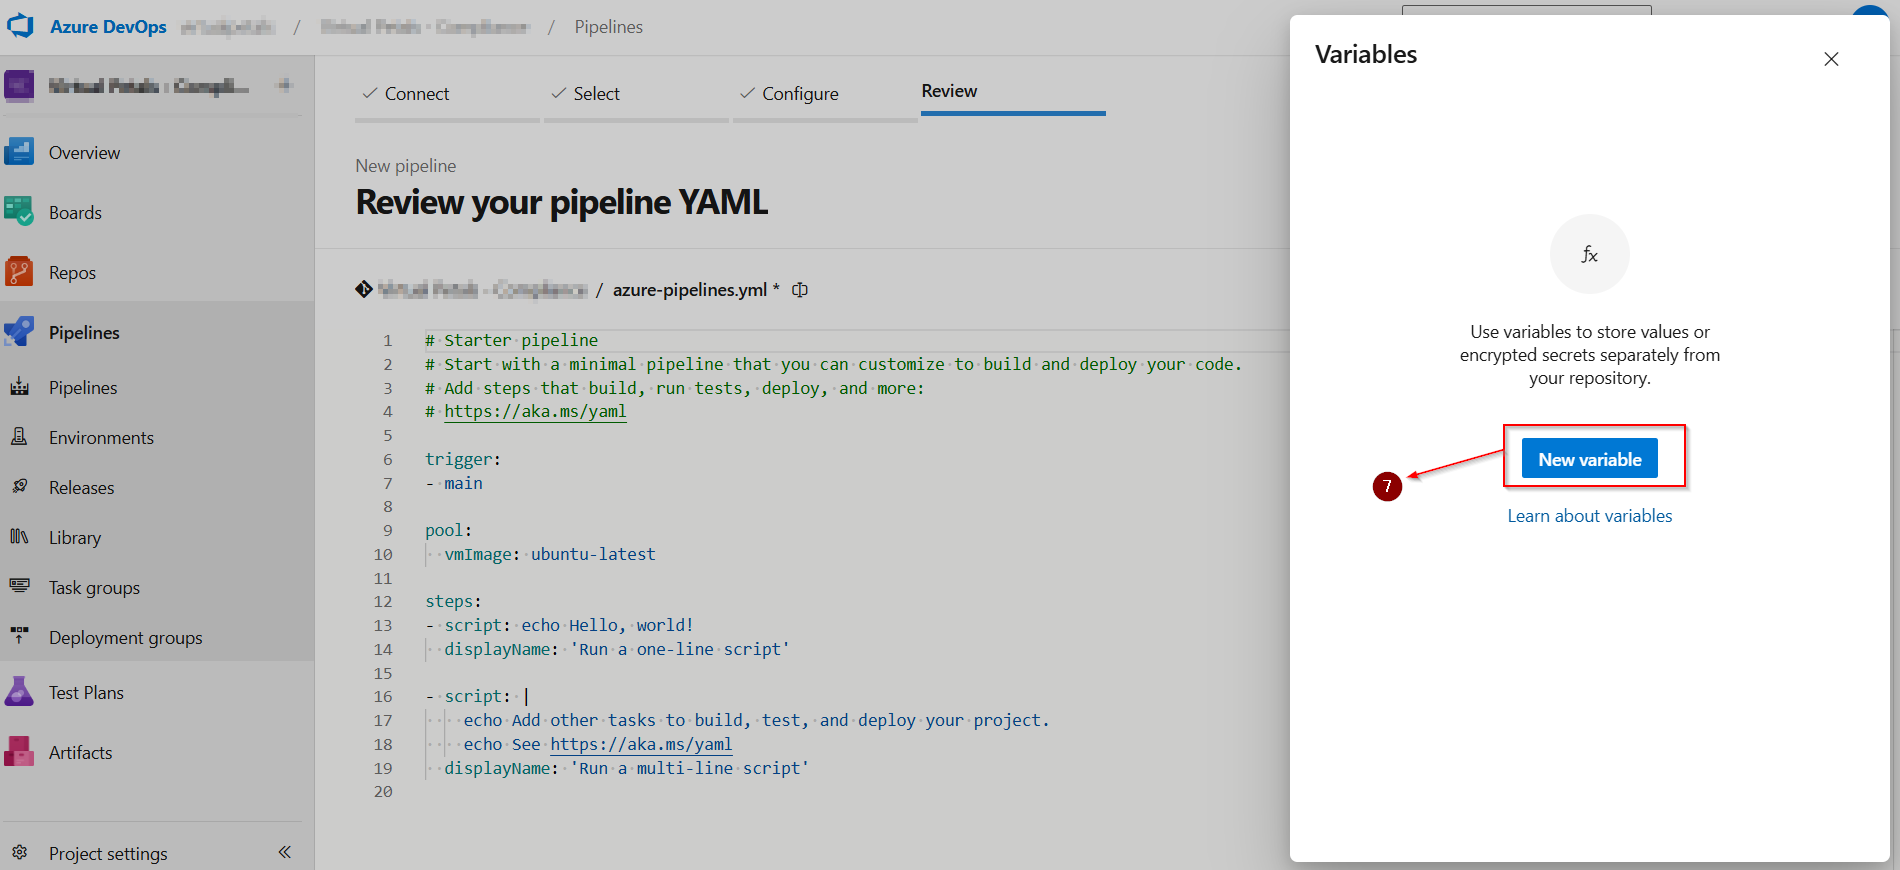
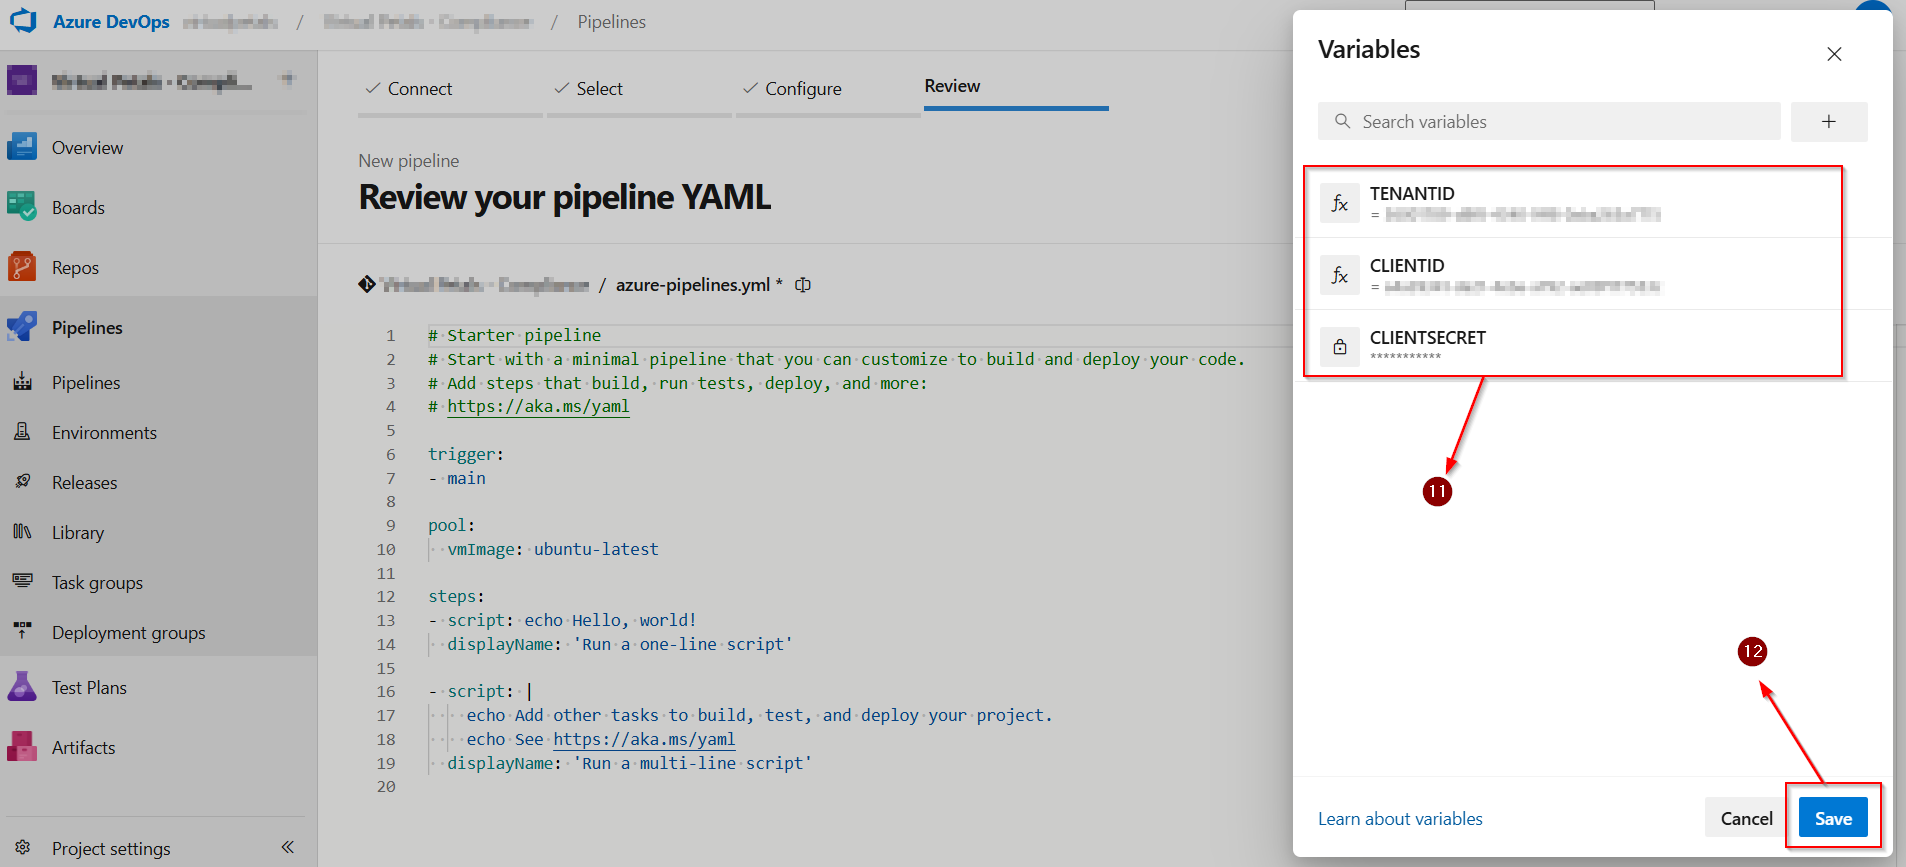
STEP-8: CREATE SERVICE CONNECTIION ON AZURE DEVOPS
In Azure DevOps, Select Project Settings from the left-hand menu.
Project Settings > Select Service Connections from the left-hand menu.
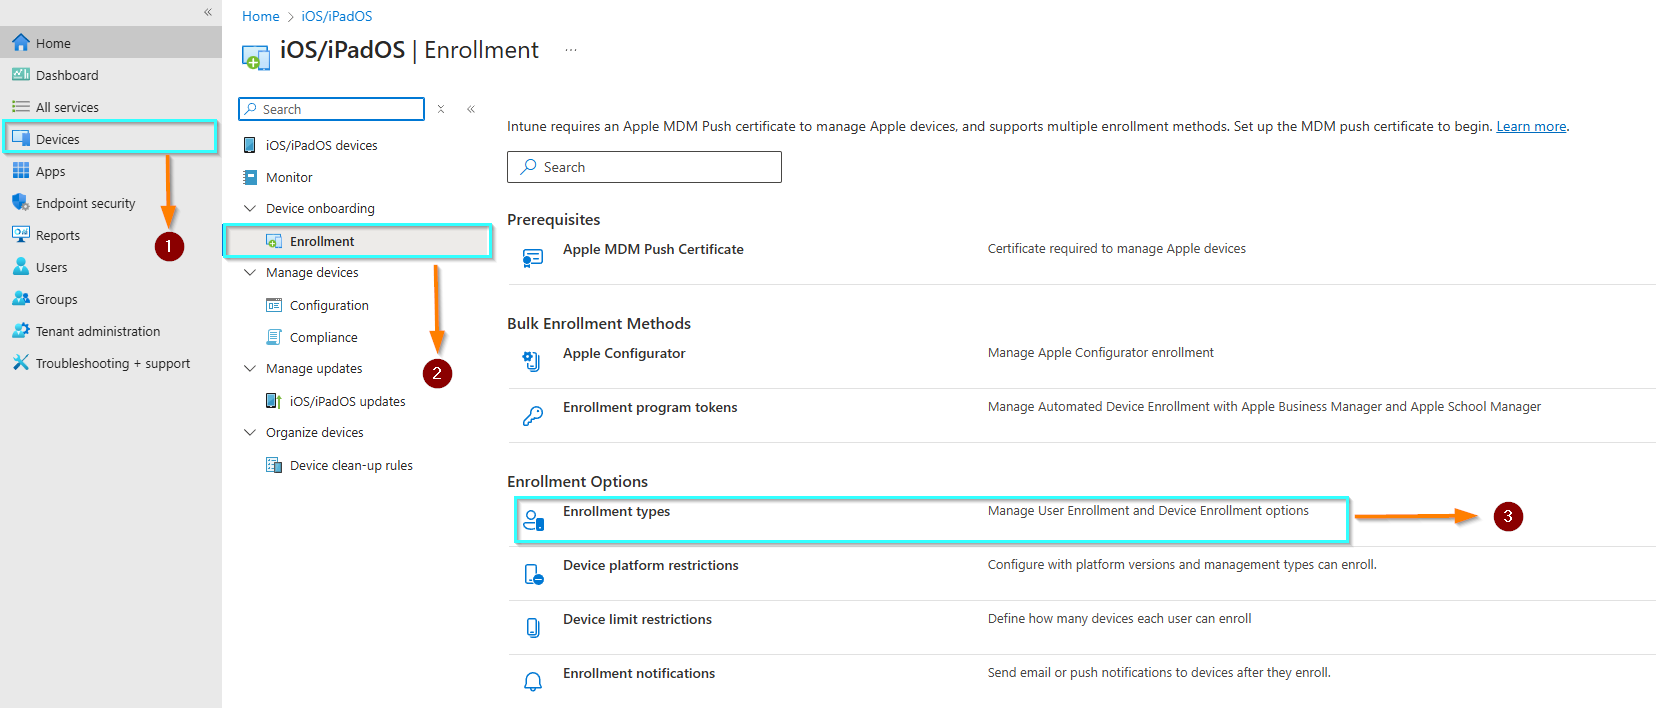
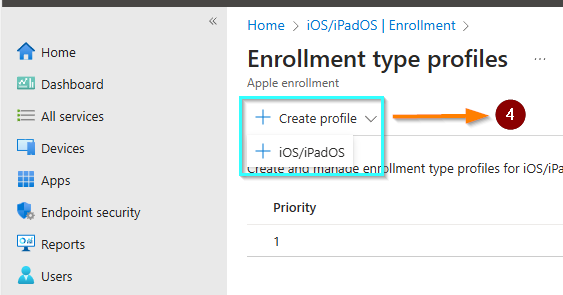
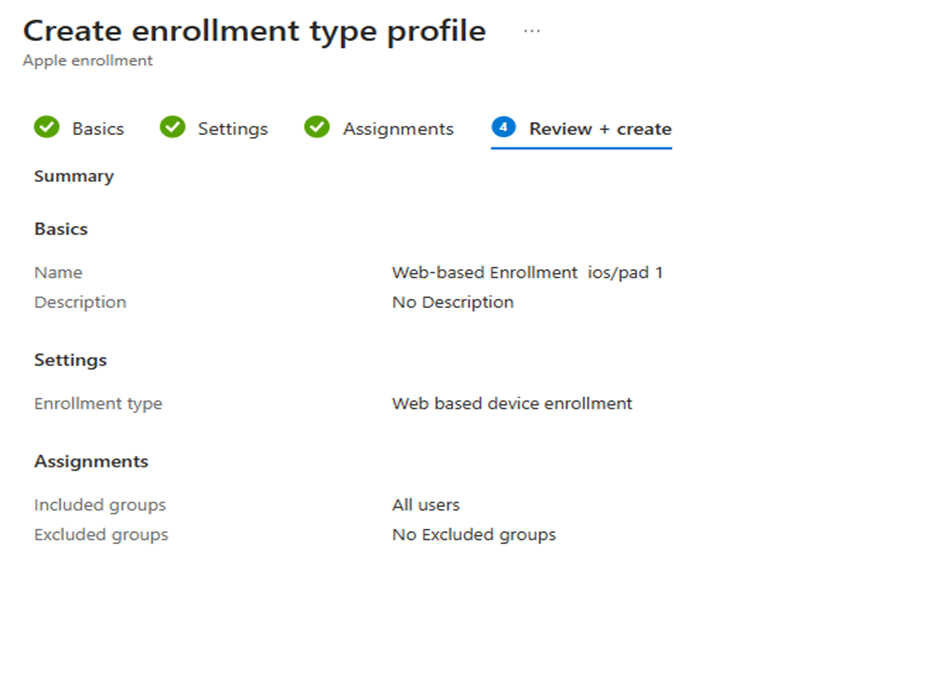
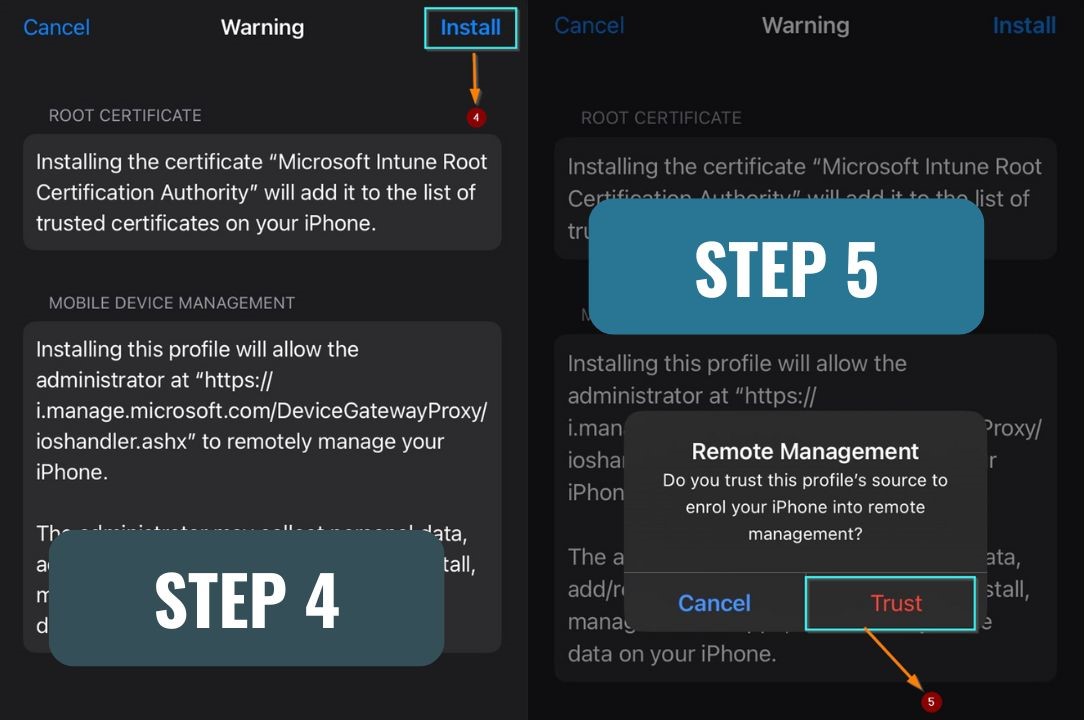
Step 1: Create Web-based device enrollment profile for iOS in Intune
In the Intune admin center, browse to Devices/Enrollment/Apple and select Enrollment types
Step 2:
Select Create Profile/iOS/iPadOS
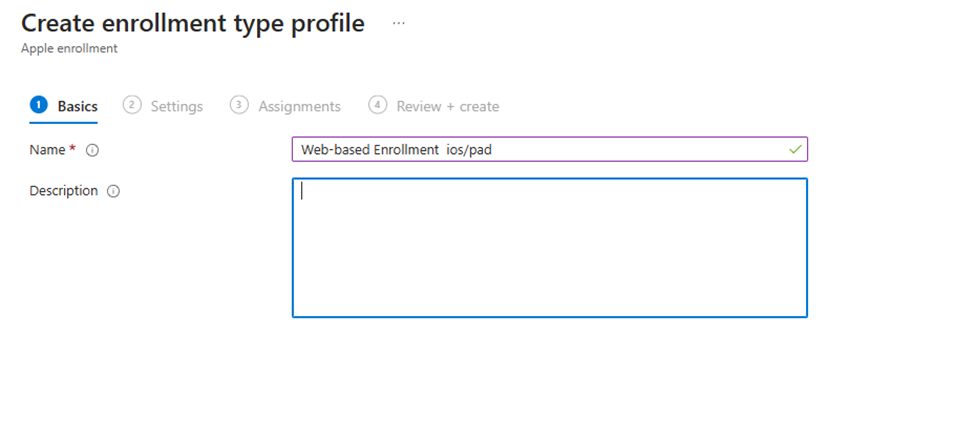
Step 3:
Provide a name of the enrollment profile
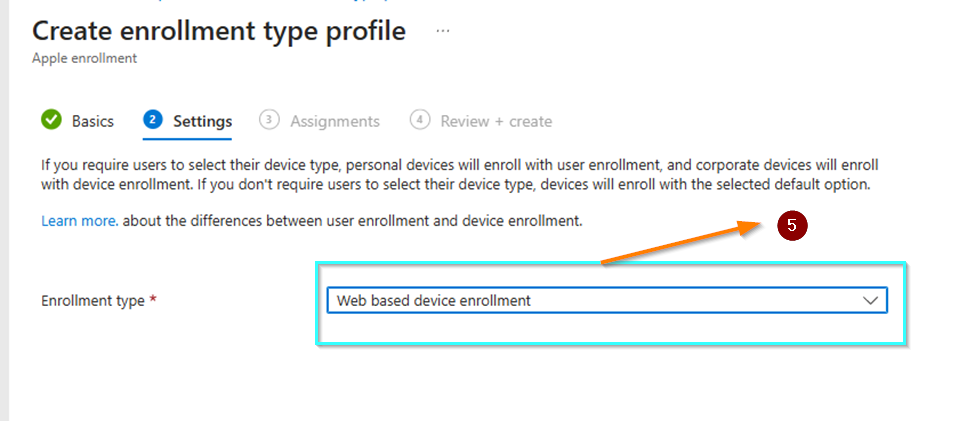
Step 4:
Select Web-based device enrollment
Step 5:
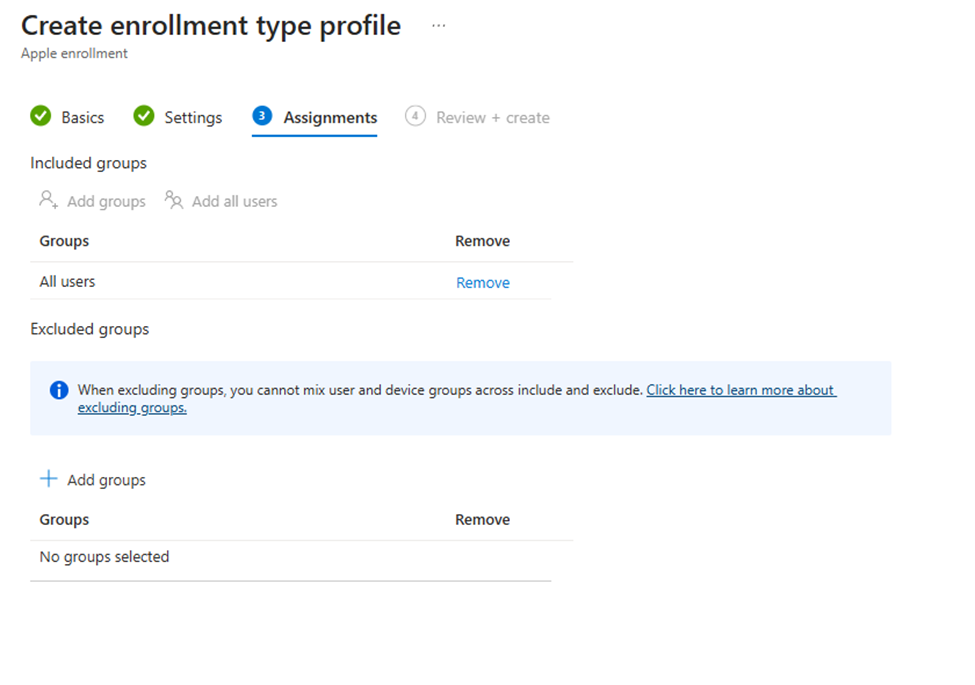
Like other enrollment profiles, select a target group of users allowed to use it
Step 5:
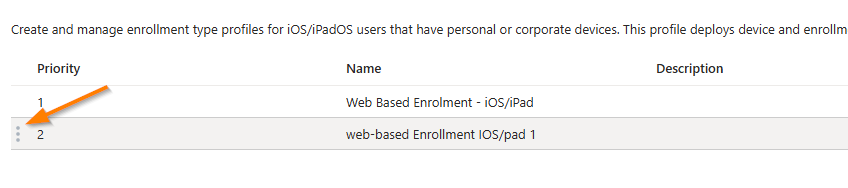
Note : Use the left section to change the priority order of the various profiles in case the user is targeted by multiple enrollment profiles.
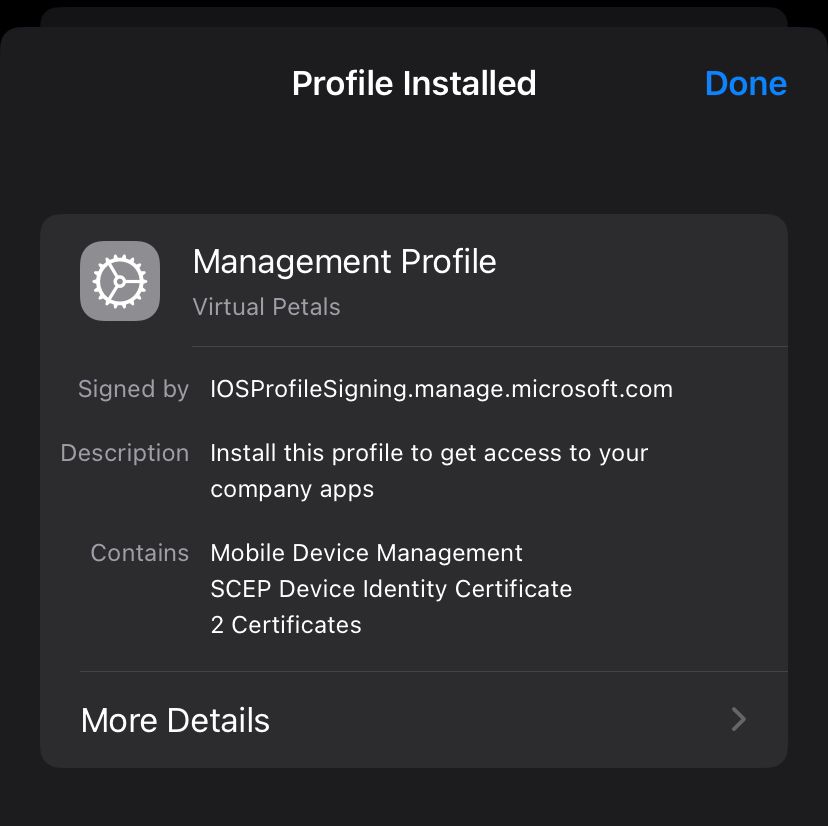
Create a Just-in-time registration device configuration profile
Why JIT configuration?
Just-in-time registration is required to use the Apple Single sign-on(SSO) extension to complete the Microsoft Entra registration of the device. Just in time will limit the number of authentication prompts by establishing the SSO across the whole device for Microsoft products
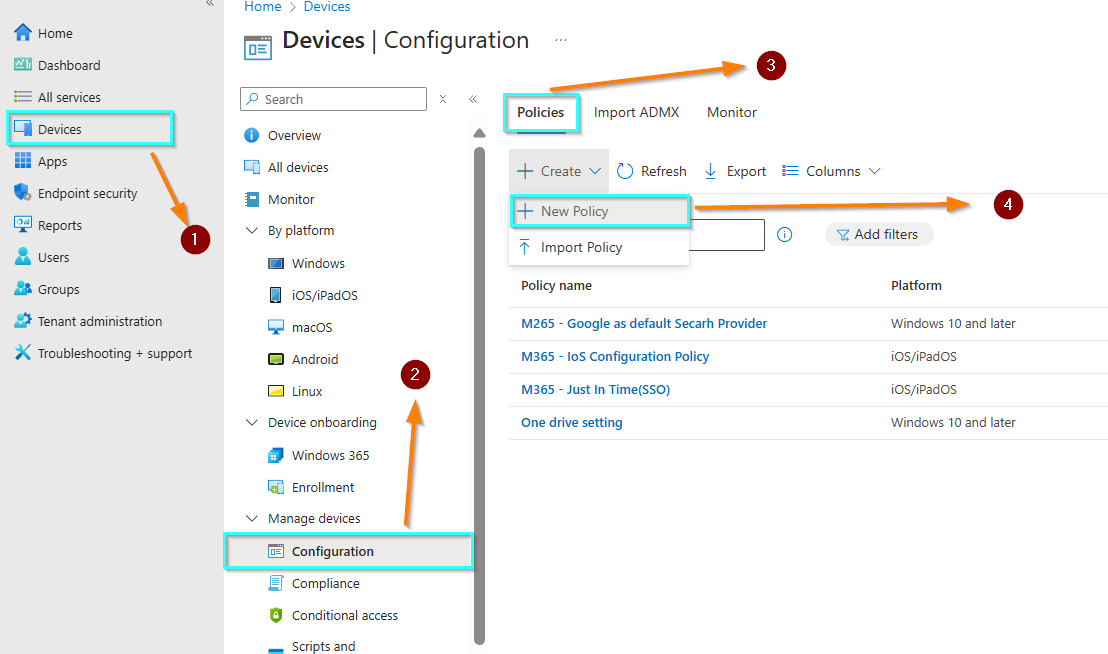
Step 1 :
In theIntune admin center, browse to Devices/Configuration and create a new policy
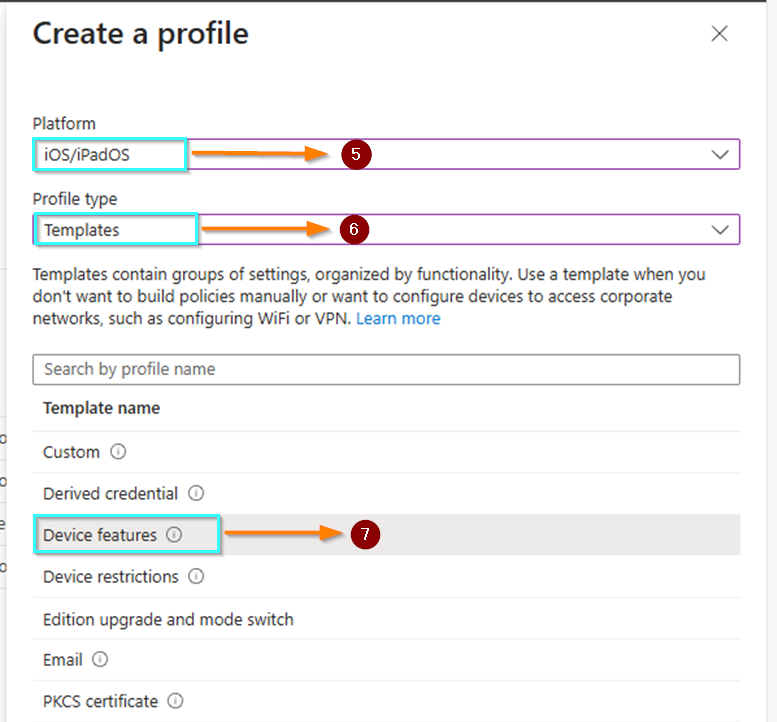
Step 2:
Select iOS, Templates and Device Features. Click Create
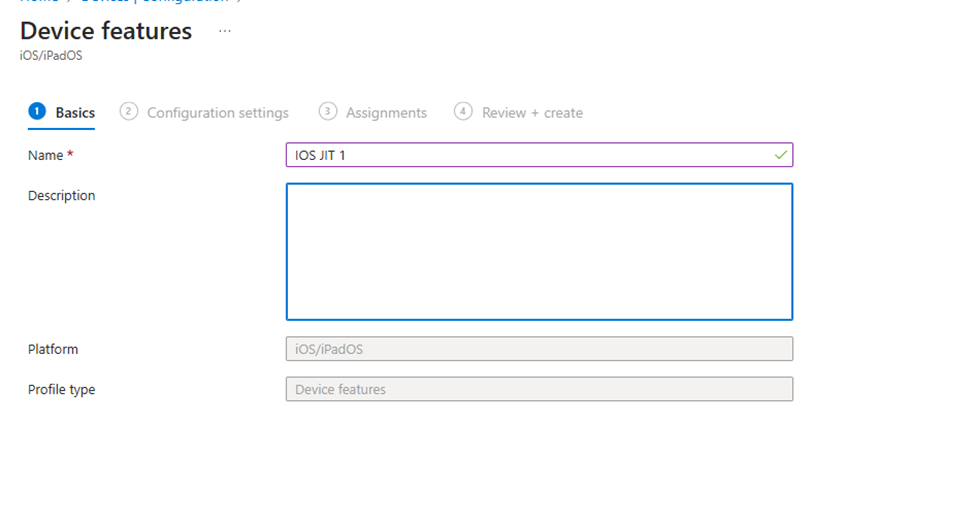
Step 3 :
Provide the name
Step 4:
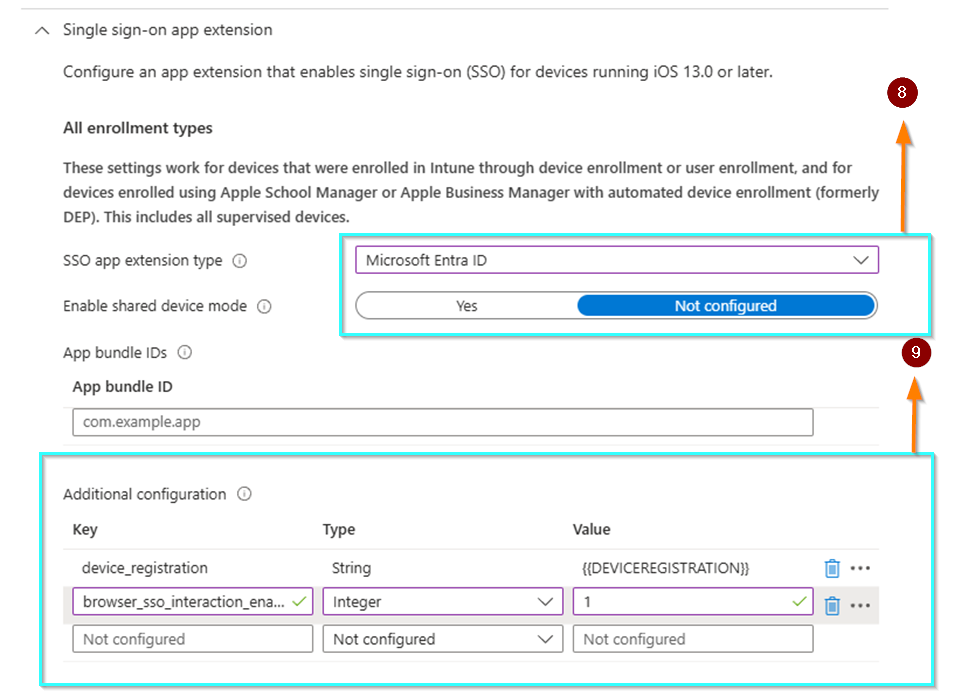
Under Single sign-on app extension, select Microsoft EntraID
Additional configurations are needed.
App Bundle ID isn’t required for our current need.
2 keys are needed
Key: device_registration
Type: String
Value: {{DEVICEREGISTRATION}}
Key: browser_sso_interaction_enabled
Type: Integer
Value: 1
Note : Avoid additional space before/after those values, otherwise Just-in-Time won’t work!!
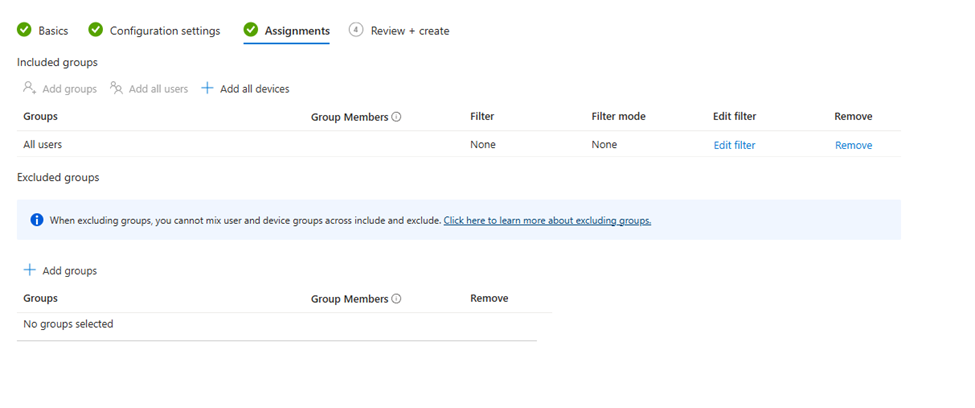
Step 5:
Assign the device configuration to the same group as the Enrollment profile for convenience.
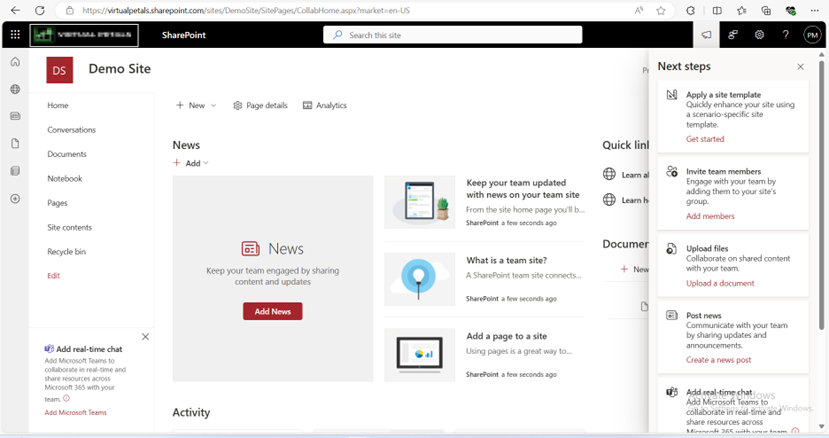
Sign in with your Microsoft 365 account credentials (if not already signed in).
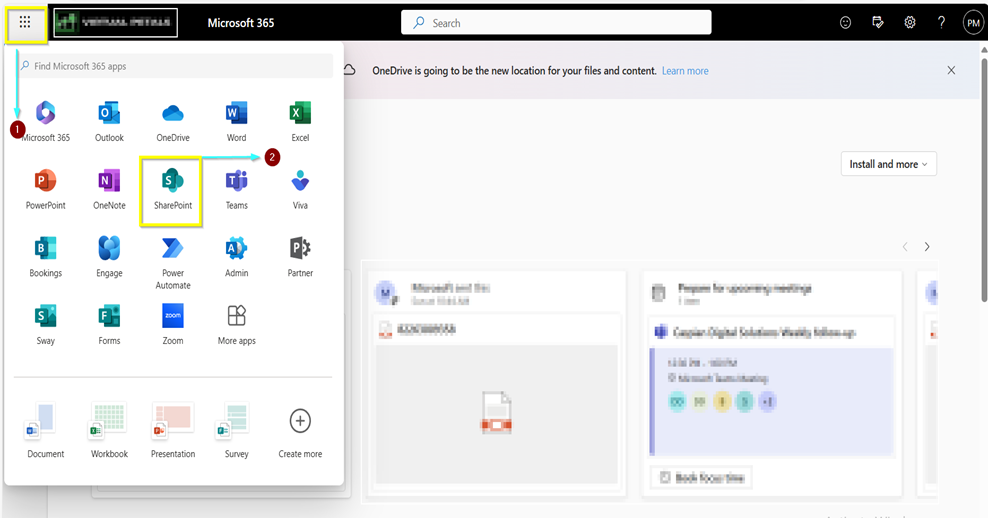
Step 2: Navigate to SharePoint Home
Click on the “App launcher” (waffle icon) in the top left corner of the Microsoft 365 portal.
In the app launcher, click on “SharePoint” to access SharePoint Home.
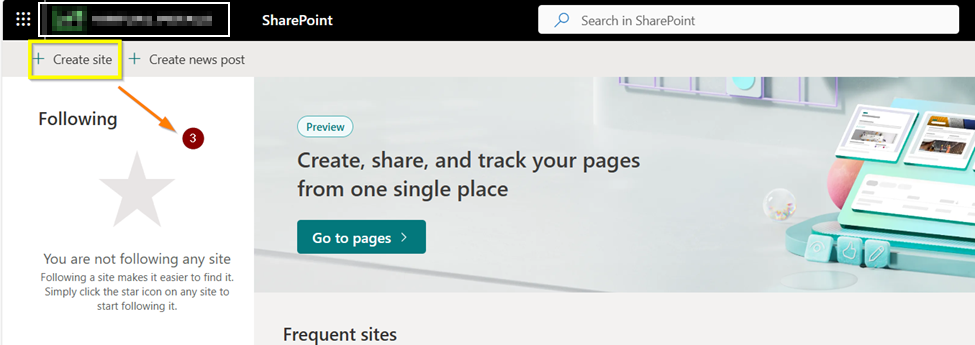
Step 3: Create a New SharePoint Site
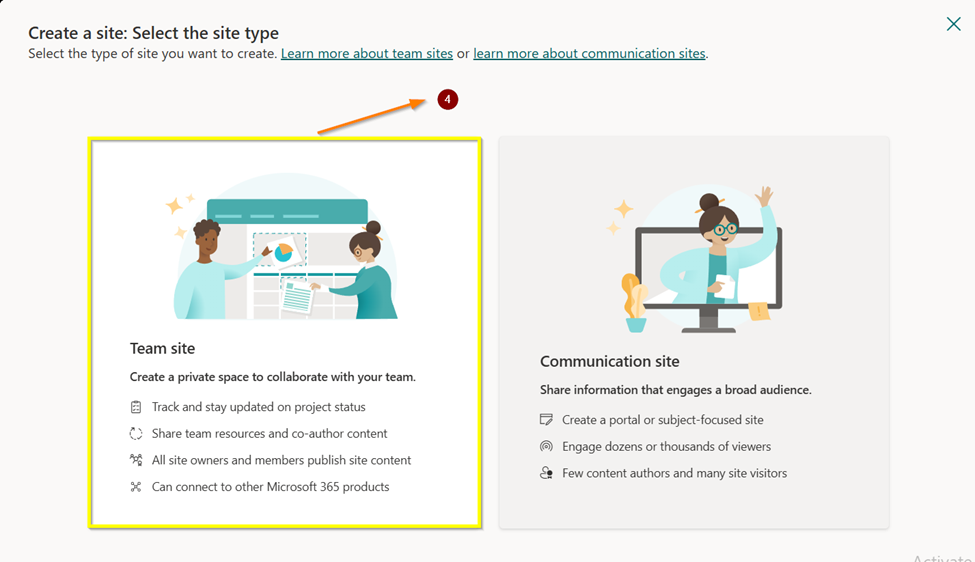
In SharePoint Home, you will see a list of your frequently visited sites and recent activities. To create a new site, click on the “+ Create site” button
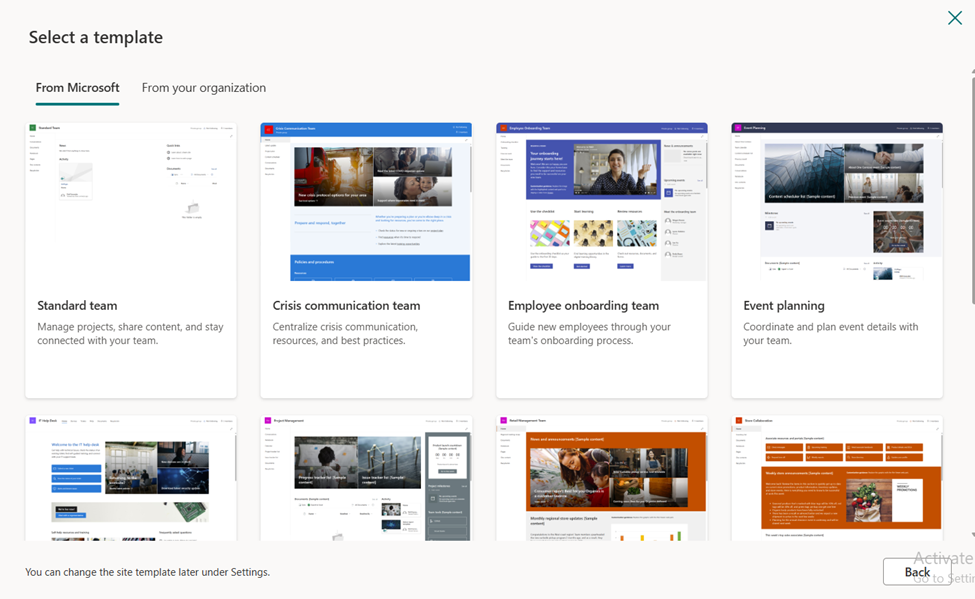
You will be presented with a choice of site templates. Common options include Team site, Communication site, or others depending on your needs
Choose the appropriate template for your site’s purpose
After choosing the appropriate template. A Preview of the chosen template will be seen
Then “Click” on Use template
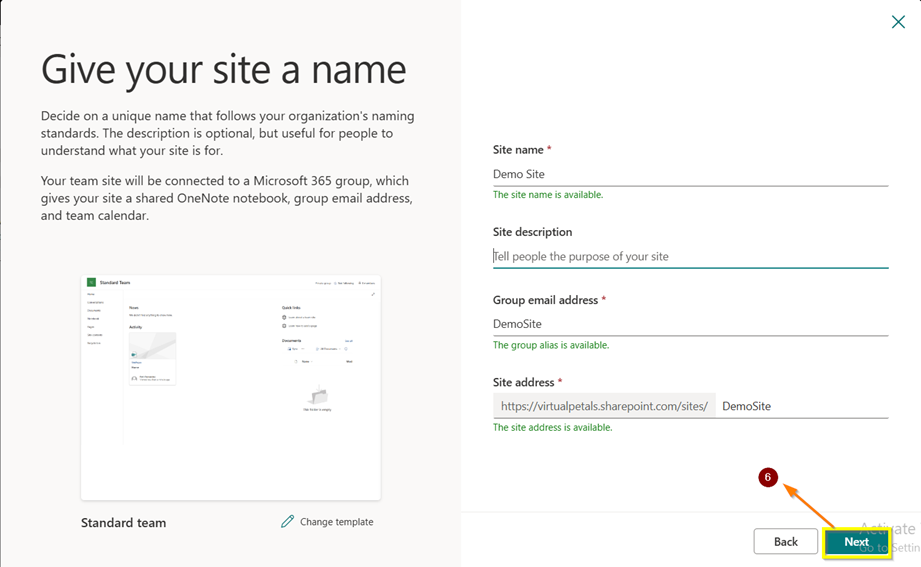
Step 4: Fill in the required information for your site
Site name: Give your site a descriptive name.
Site description: Provide a brief description of the site’s purpose.
Click “Next” to continue
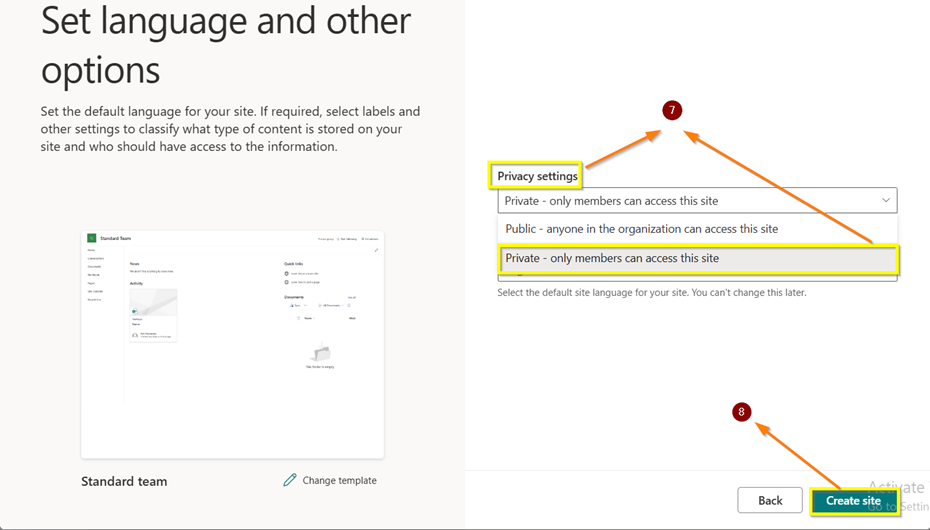
Privacy settings: Choose whether your site should be public (everyone can access) or private (restricted access).
Click “Create” to continue.
Step 5: Configure Site Settings
Depending on the template you selected, you may have additional options to configure site settings. These can include choosing a site owner, setting permissions, and selecting navigation options. Fill in these details as needed.
Click “Finish” or “Create” to create your SharePoint site
Step 6: Access and Customize Your Site
Your new SharePoint site is now created. You can access it by clicking on its name in SharePoint Home.
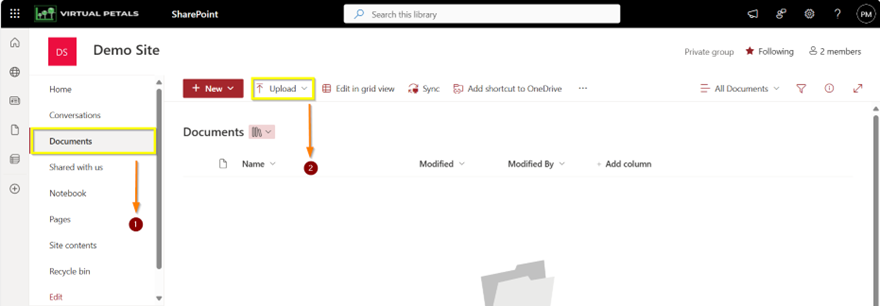
Once on your site, you can customize it further by adding document libraries, lists, pages, and other SharePoint components based on your requirements
In the Add a document dialog box, select Choose Files to upload an individual file. Depending on the version of SharePoint that you’re using, you may also be able to upload multiple files by holding down either the Ctrl or Shift key and selecting more than one file.
When you’ve selected the file or files to upload, select OK
Deploying Microsoft Store Apps through the Microsoft Endpoint Admin Center can be a straightforward process, but it often comes with its own set of challenges. Over the course of my work in IT operations for SteelHaven, I have encountered several errors while deploying these applications. This blog post will highlight some of the most common issues and provide solutions to help streamline the deployment process.
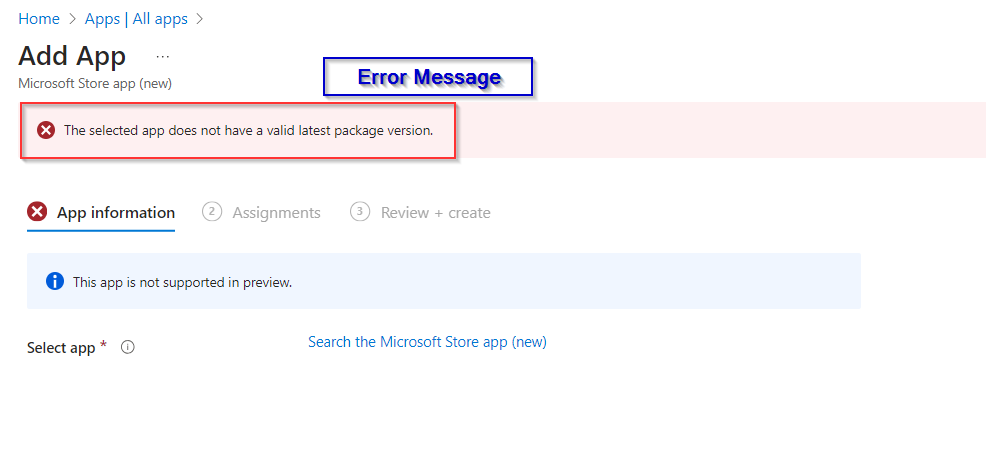
Common Error: Invalid Latest Package Version
One of the errors I frequently encountered when selecting an app in Microsoft Store Apps (new) was the message: “The selected app does not have a valid latest package version.” This error indicates that the app package being referenced does not have a valid version in the Microsoft Store, which can hinder the deployment process.
Screenshot of the Error
Here is a screenshot of one of the errors I encountered during the deployment process.
Now if I try to add a Application it fails.
.
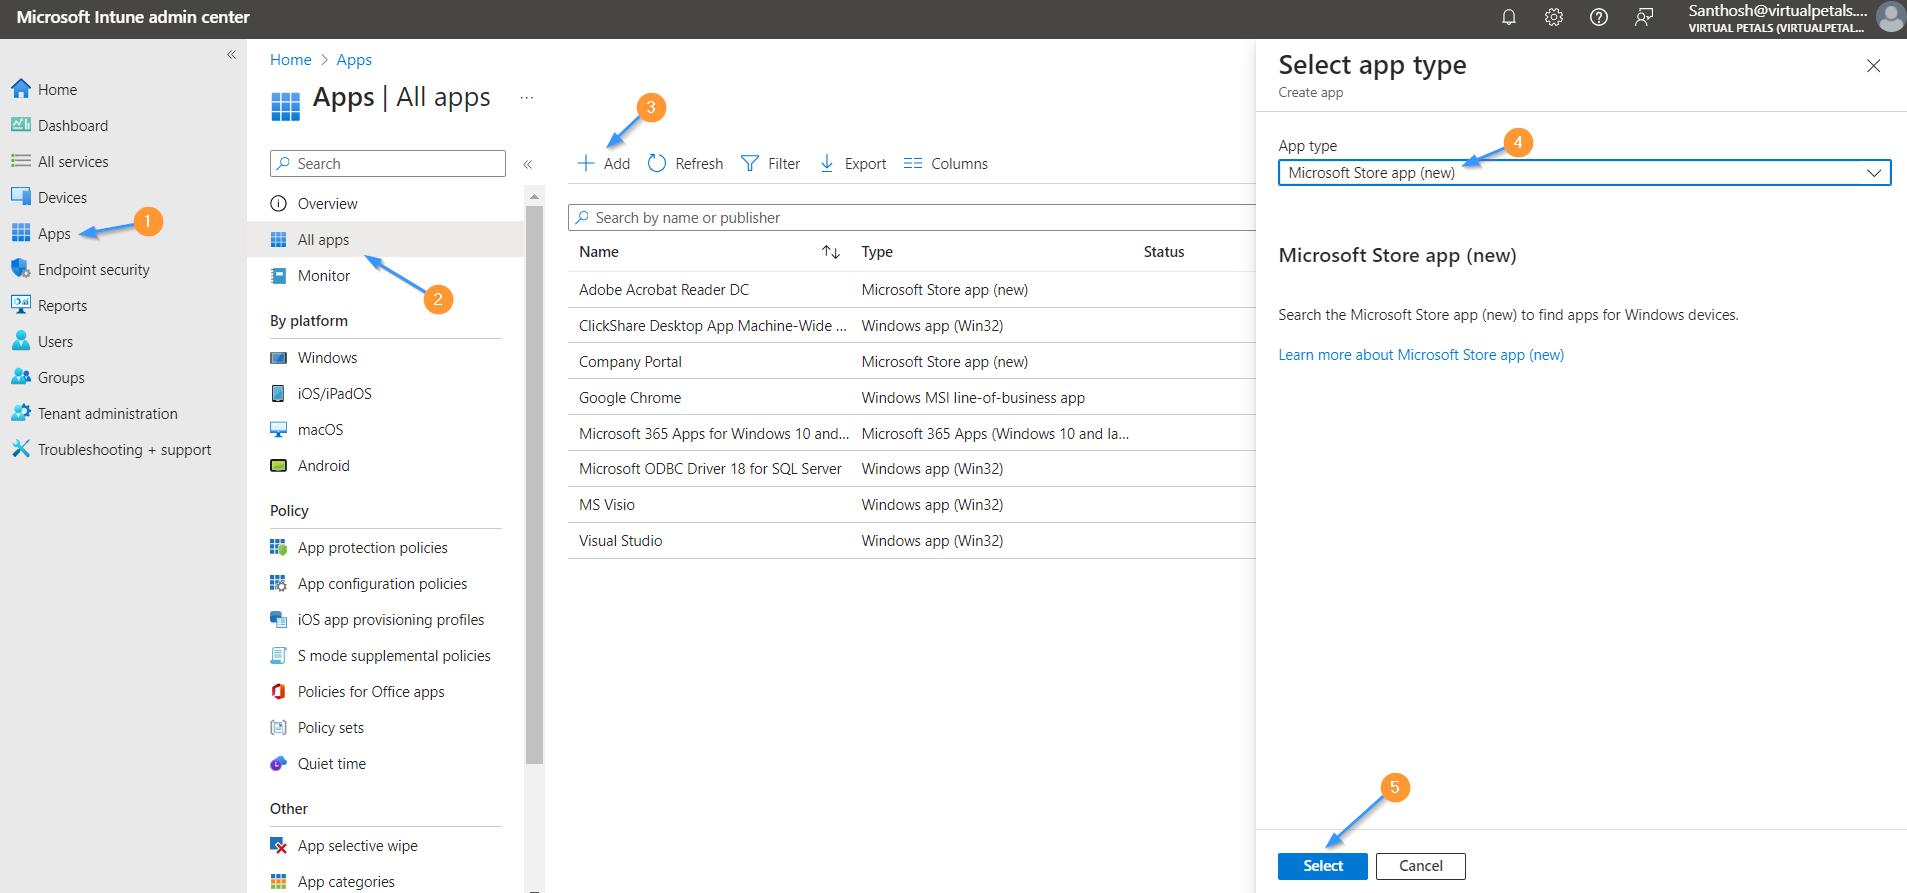
Using Microsoft Graph to Deploy Apps in Microsoft Endpoint Admin Center
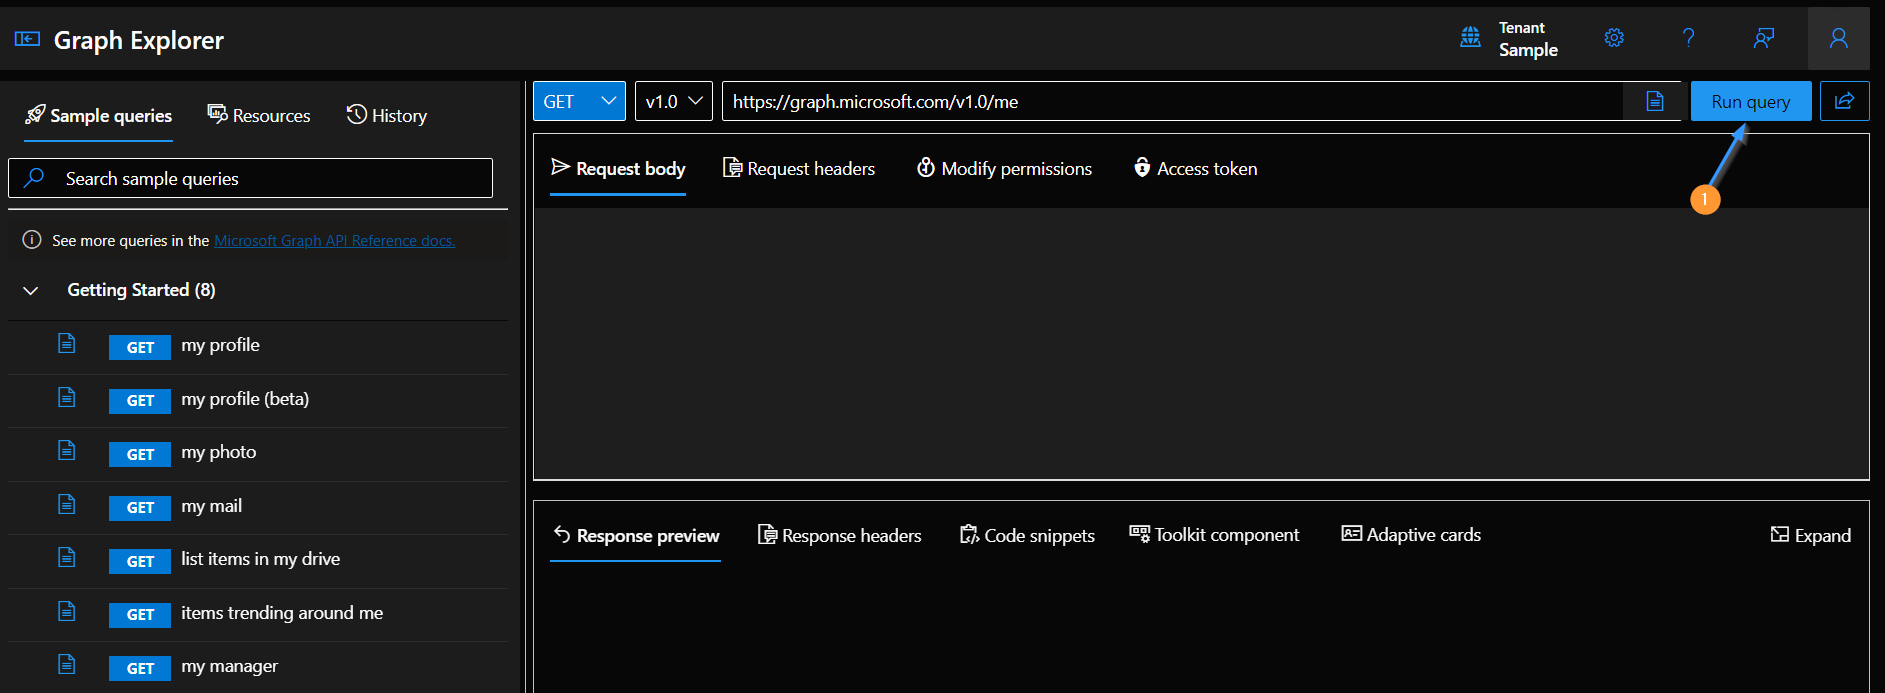
Step 1: To solve this error, we will push the desired application from Microsoft Graph to Microsoft Endpoint Admin Center. This approach allows us to directly manage and deploy the application, bypassing the issue with the invalid latest package version.
Search for Microsoft Explorer and click on the first link.
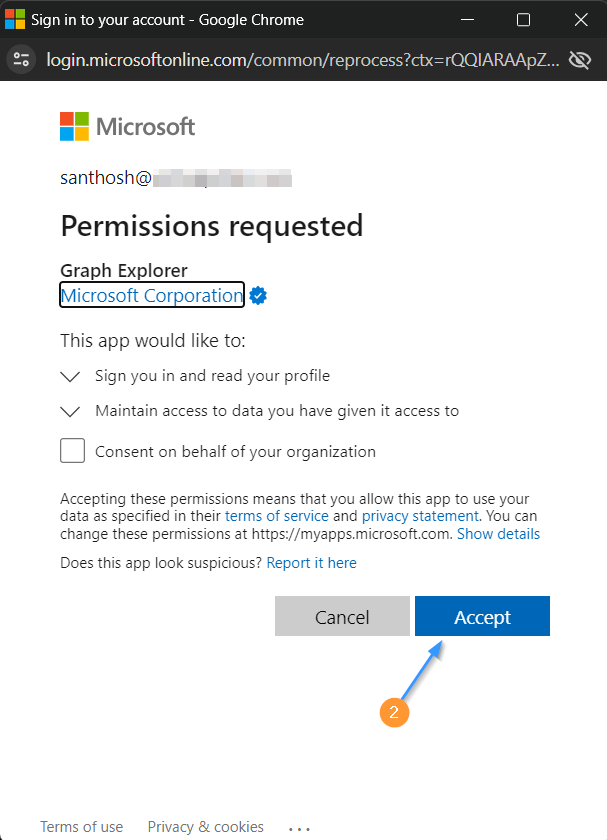
Step 2: Once we open the Microsoft Graph Portal, we log in using our credentials and accept the required permissions to access Microsoft Graph API. This step is crucial as it grants our application the necessary permissions to interact with Intune and Microsoft Endpoint Manager resources effectively. By accepting these permissions, we ensure that our deployment process can proceed smoothly, allowing us to push applications and manage settings within the Microsoft Endpoint Admin Center with confidence.
.
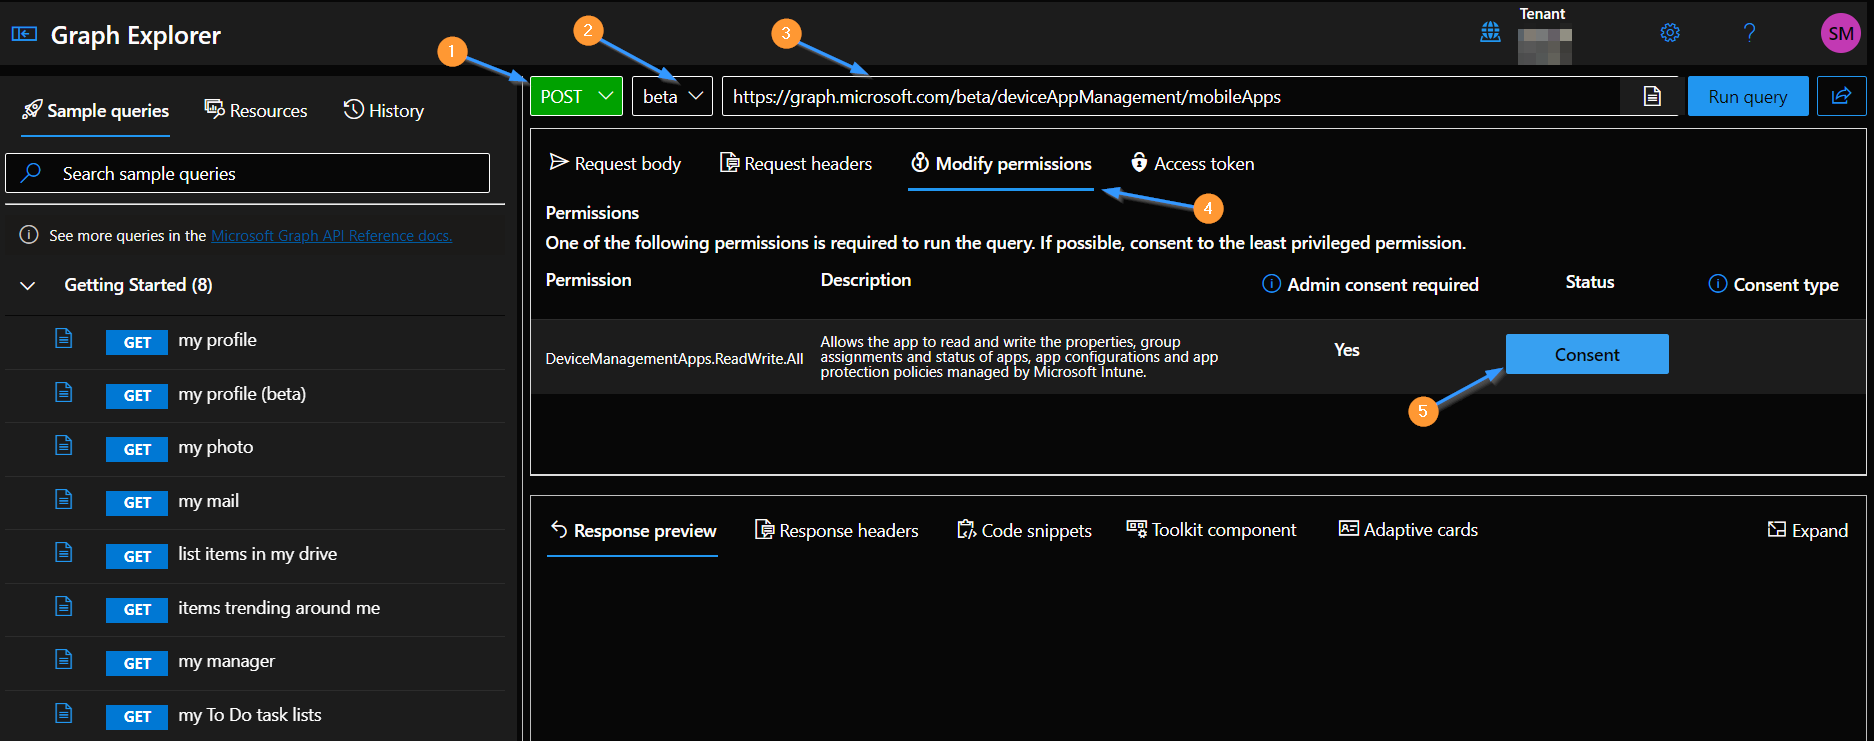
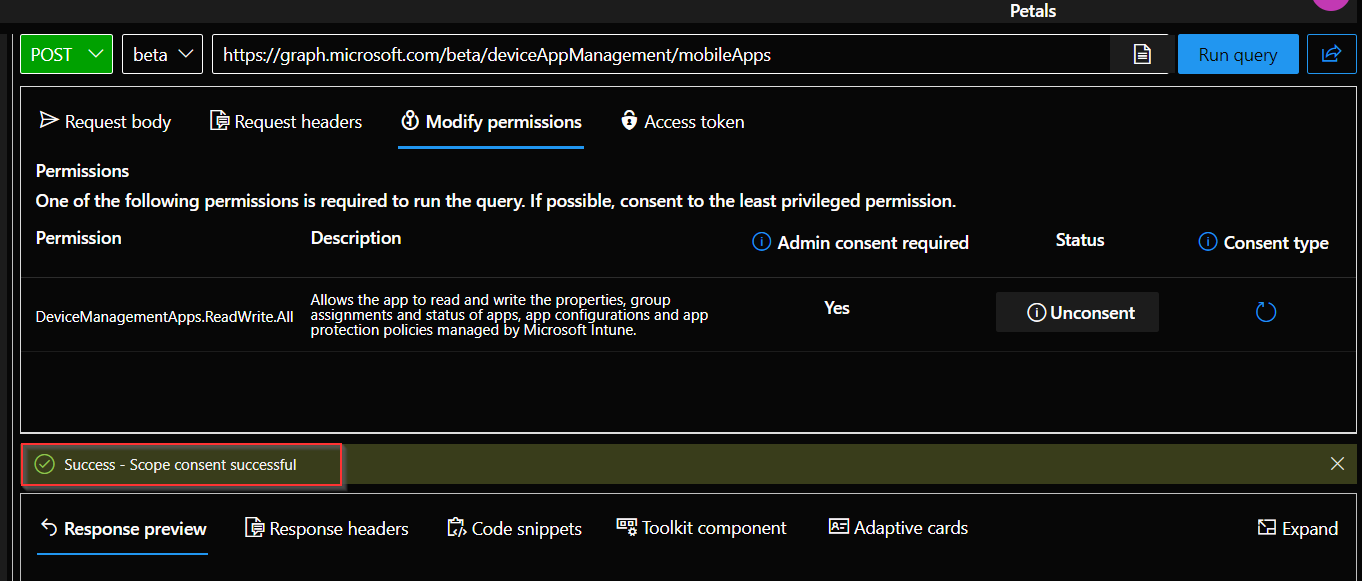
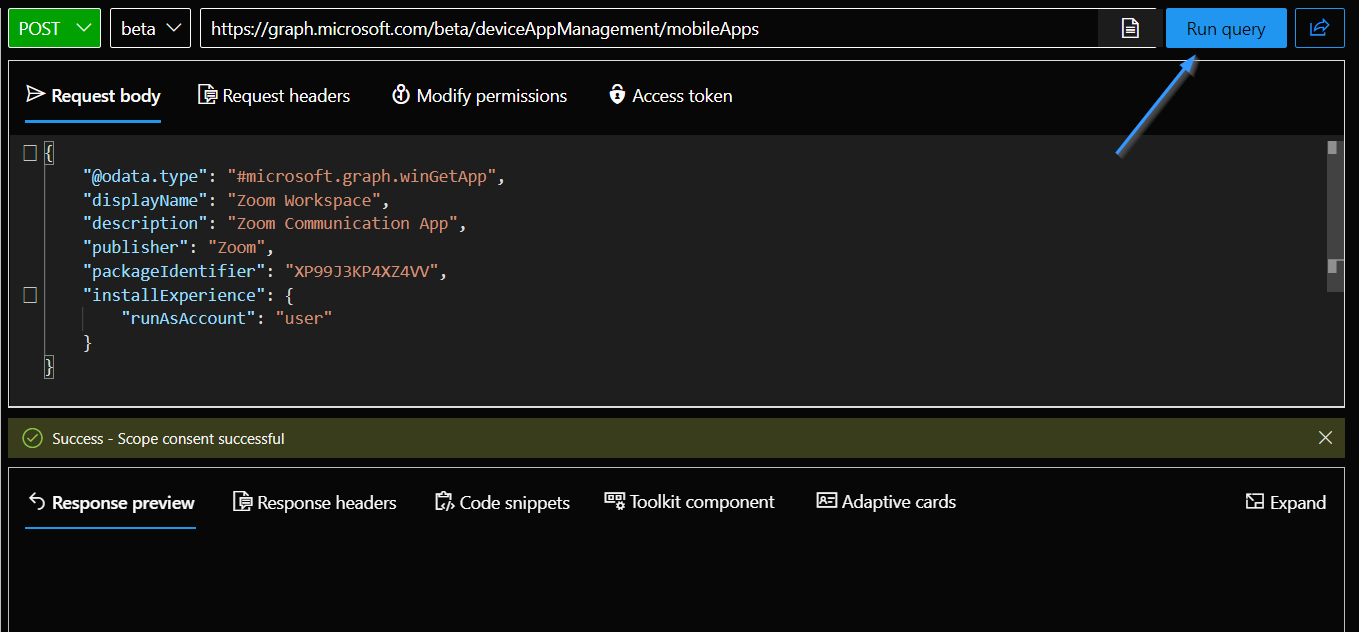
Step 3: Now, let’s configure a few settings. Select POST,Peta, and add this URL: https://graph.microsoft.com/beta/deviceAppManagement/mobileApps. After adding the URL, click on “Modify Permissions” and proceed to click on “Consent“. This action grants the necessary permissions to connect to the Microsoft Endpoint Admin Portal, enabling seamless interaction and management of mobile apps through Microsoft Graph.
.
Creating .json script to Deploy the Application
Step 4: Now, let’s begin creating the JSON script to deploy the application. This script will include essential details such as the app’s package information, deployment settings, and any specific configurations required for deployment via Microsoft Graph. Crafting this script accurately ensures that the application deployment process is configured correctly and aligns with our organizational requirements.
This is the required script to deploy the application:
To complete this script, you need to fill in the following required fields:
displayName: Provide the display name of the application.
description: Enter a brief description of the application.
publisher: Specify the name of the publisher or developer of the application.
packageIdentifier: Include the unique package identifier (e.g., app ID or package name) of the application.
Ensure that these fields are accurately filled out to ensure proper deployment and configuration of the application via Microsoft Graph.
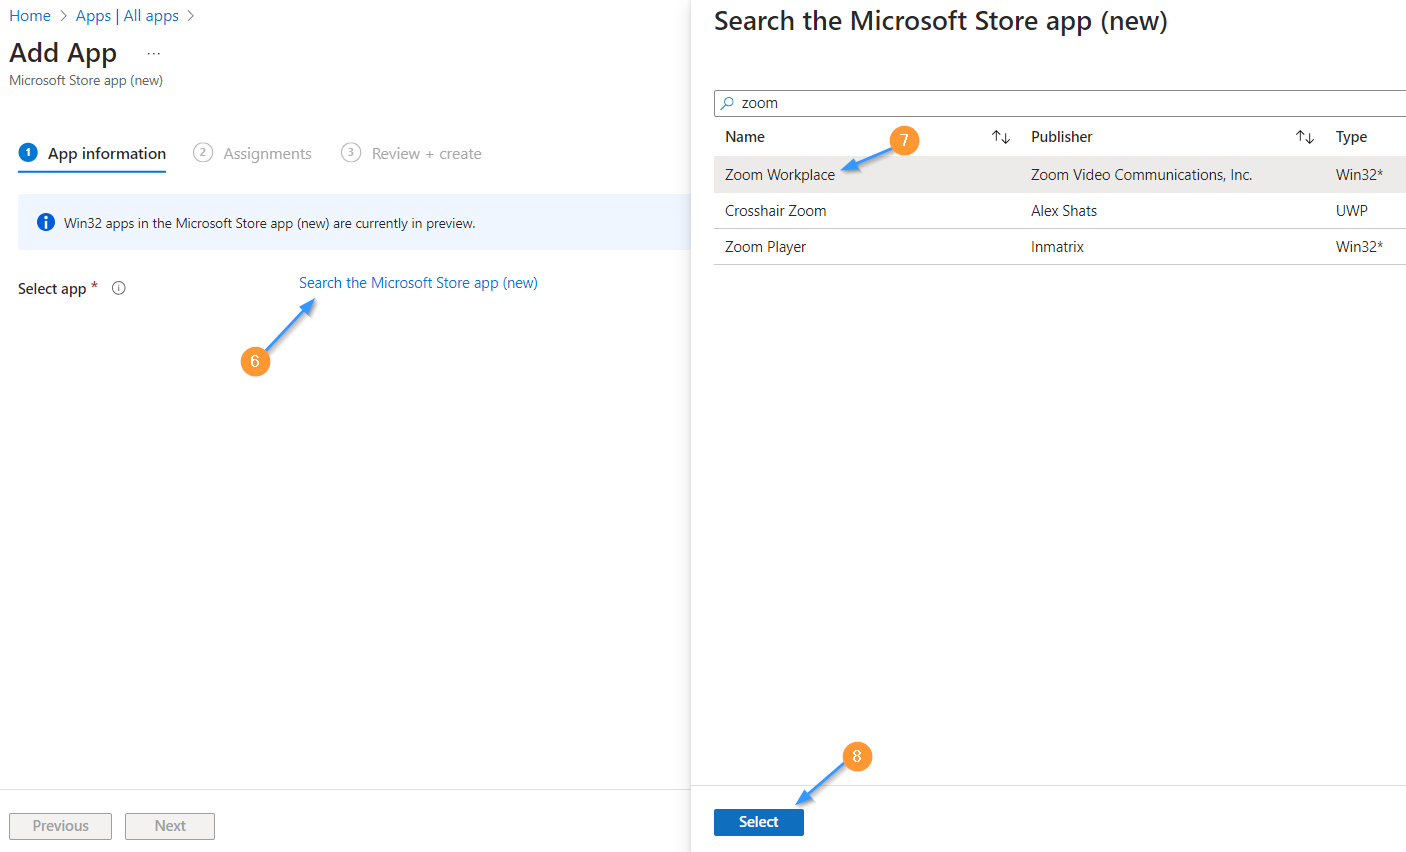
Finding the Package Identifier of the App
Step 5: Follow the following steps to get he Package Identifiers Value.
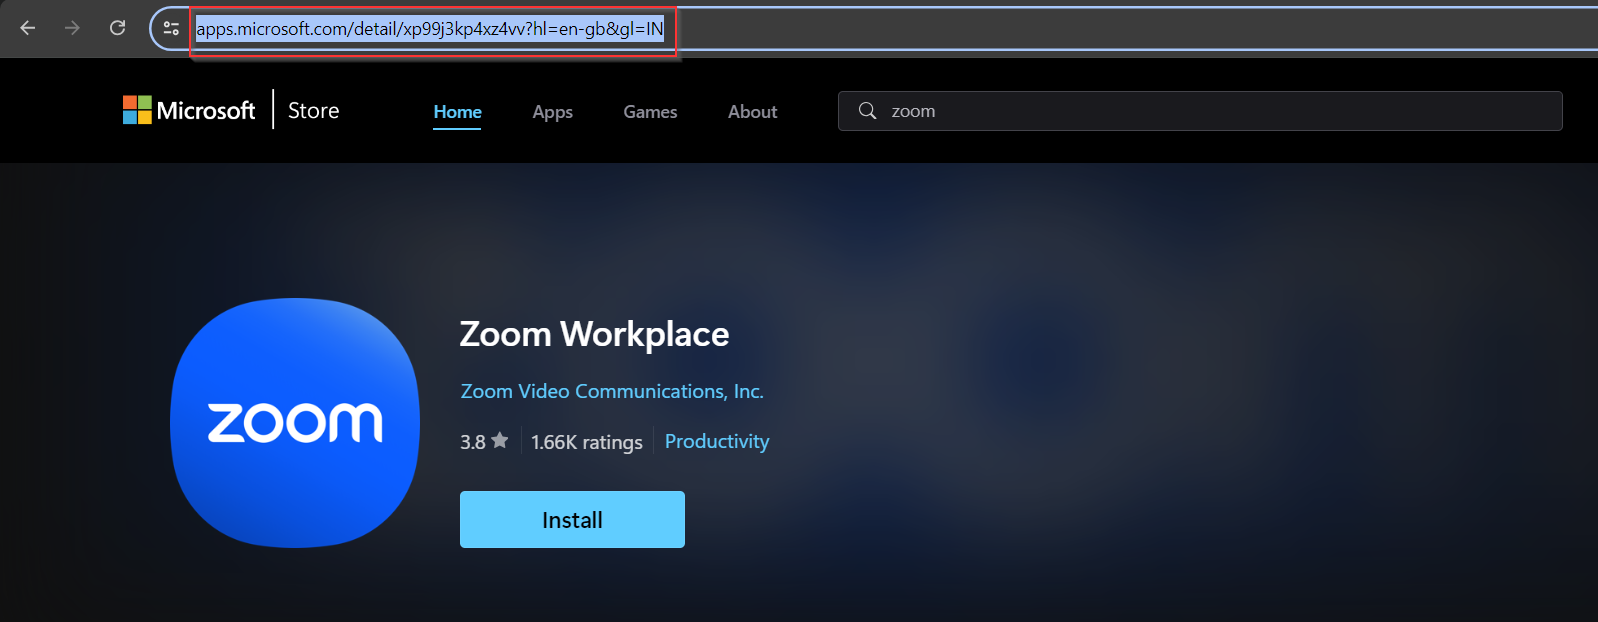
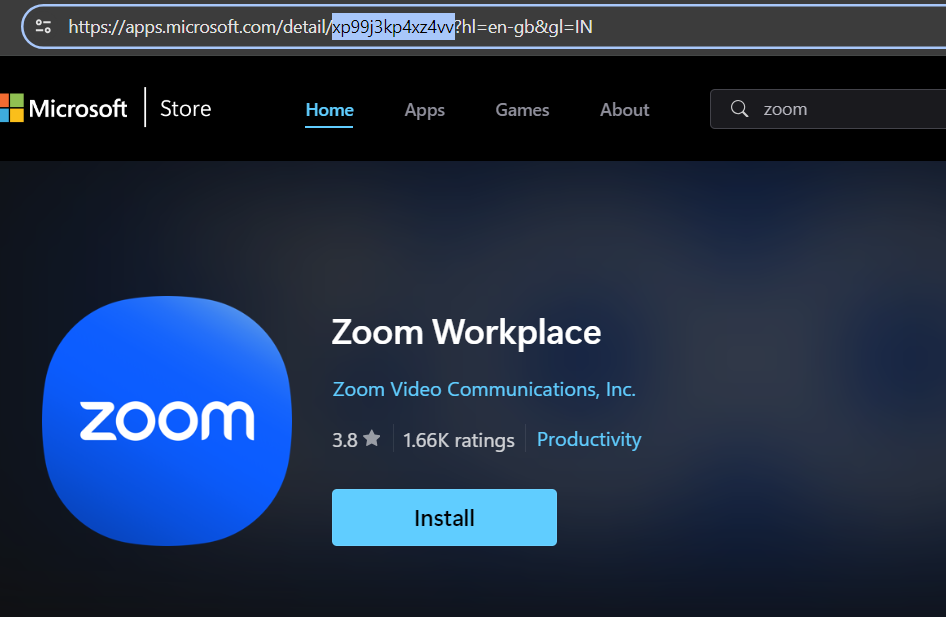
1.Visit apps.microsoft.com: Open your web browser and go to apps.microsoft.com.
2.Search for the Application: Use the search functionality on the website to find the application for which you need the Package Identifier.
3.Inspect the URL: Look at the URL of the application’s details page. The Package Identifier is often part of the URL structure.
4.Identify the Package Identifier: Within the URL, locate the segment that contains the Package Identifier. It may appear as a series of characters or numbers that uniquely identifies the application.
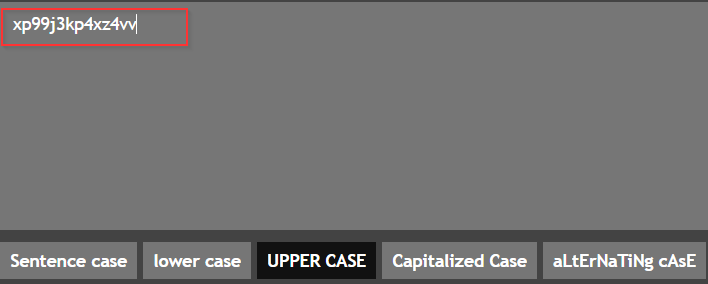
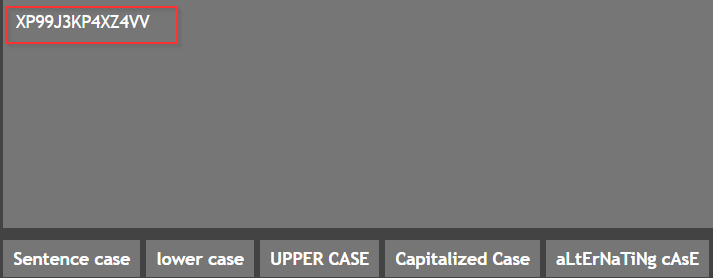
5.Convert Package Identifier to Uppercase: Note down the Package Identifier from the URL and convert it to uppercase, if required. This identifier is case-sensitive in some deployment scenarios.
.
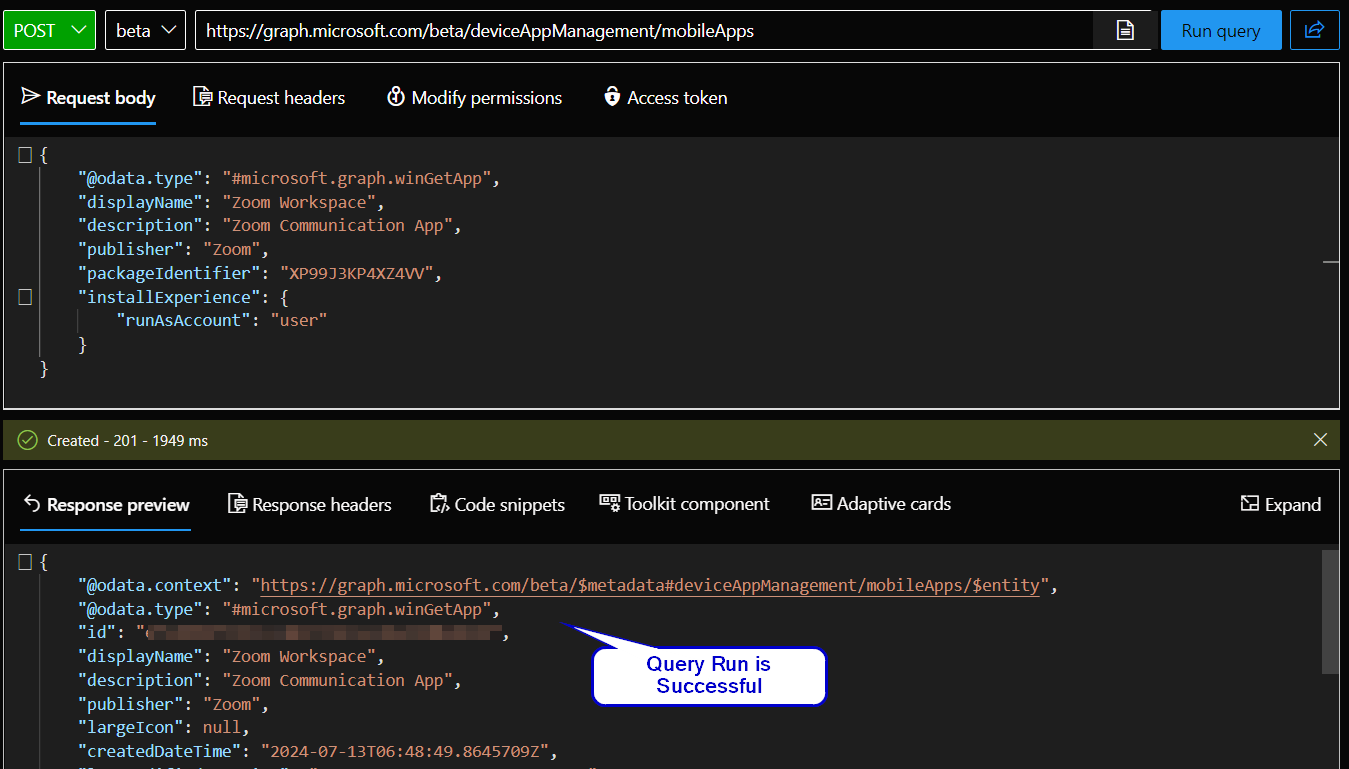
Step 7: Once your script is ready, click on “Run Query” to execute it. This action sends the deployment request to Microsoft Graph. Then, check the Intune portal to verify whether the application has been successfully created. Ensure that all the app details are correctly listed and that the application is available for installation on target devices.
.
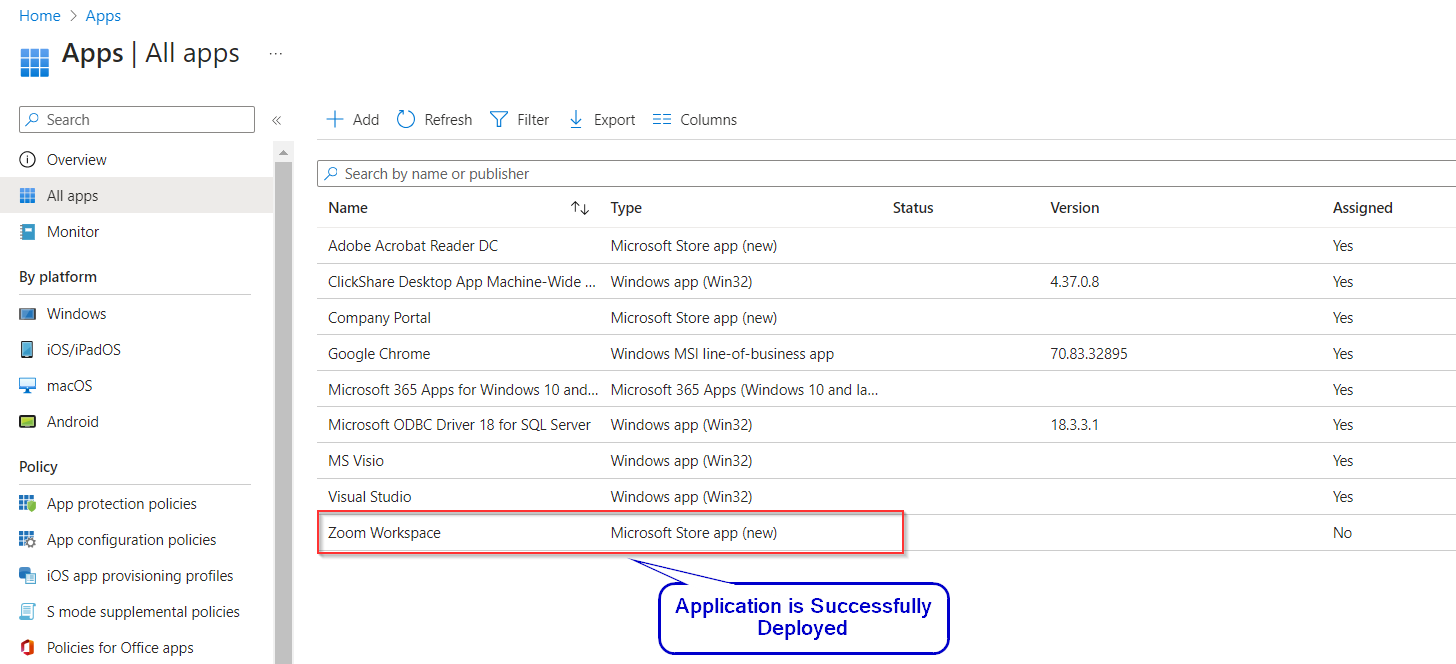
Now lets check in the Endpoint Admin Portal
Step 7: Assign the App to a group that contains Intune Enrolled Device and check the installation from the Company Portal of the device.
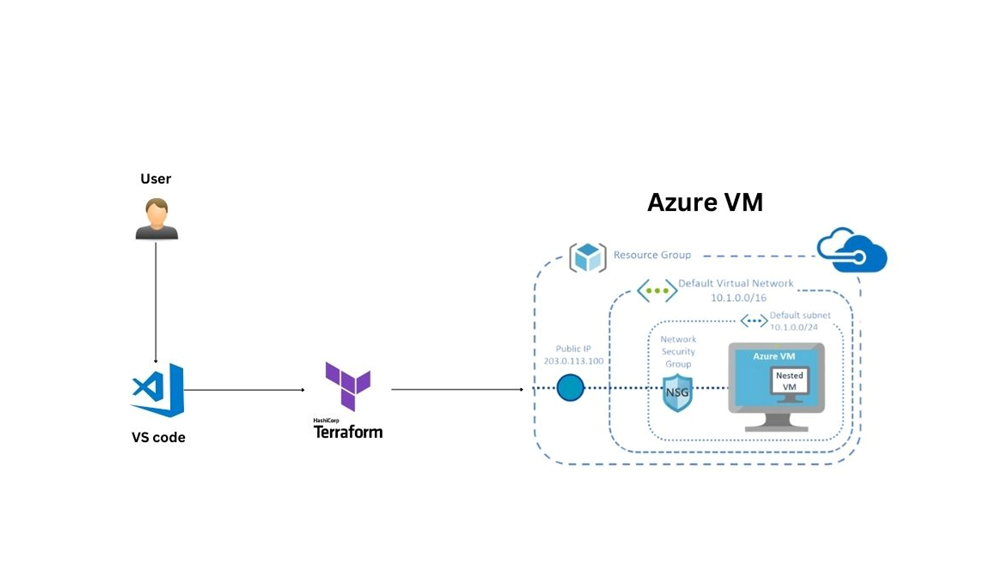
This article will guide you through deploying a Windows virtual machine on Azure using Terraform for infrastructure as code. You will learn how to set up your Azure account, configure your Terraform environment, write Terraform code to define your VM and associated resources, and deploy your VM to Azure using Terraform
Prerequisites
Azure subscription
Install and configure Terraform
Visual Studio Code
Solution Diagram:
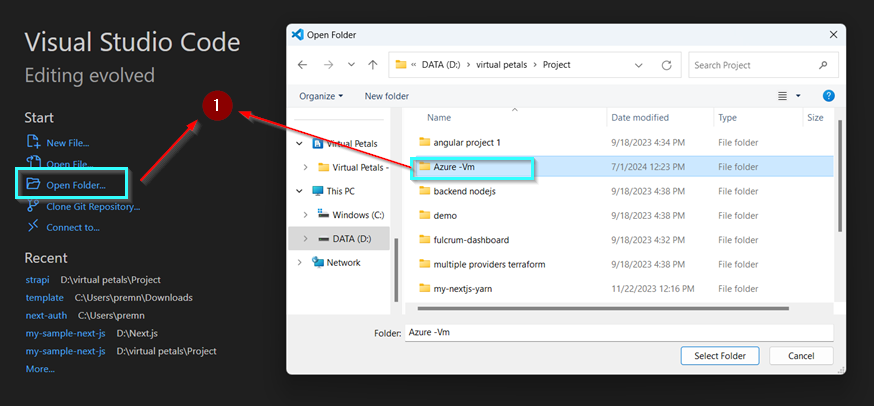
Step 1:
Create a file directory in your local location
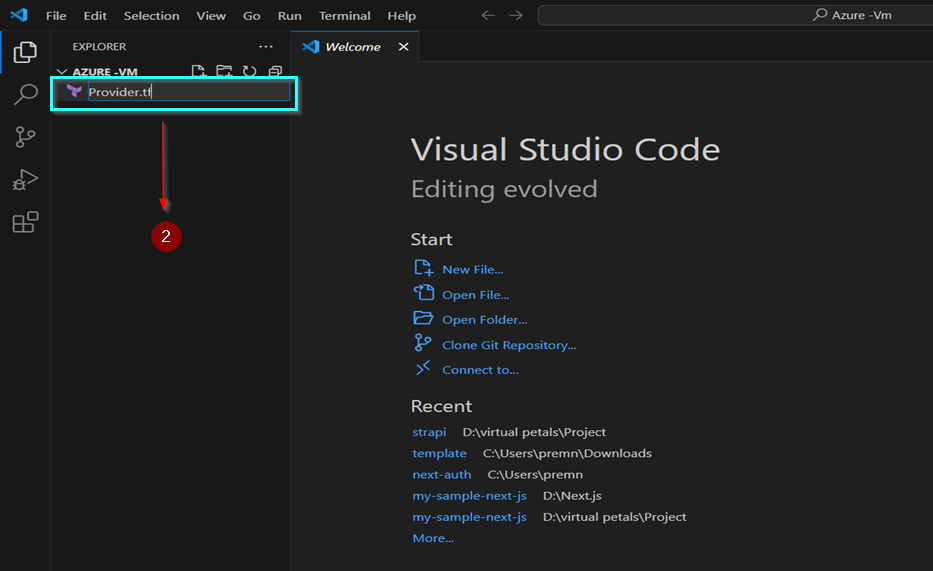
Step 2:
Create a named Provider.tf file.
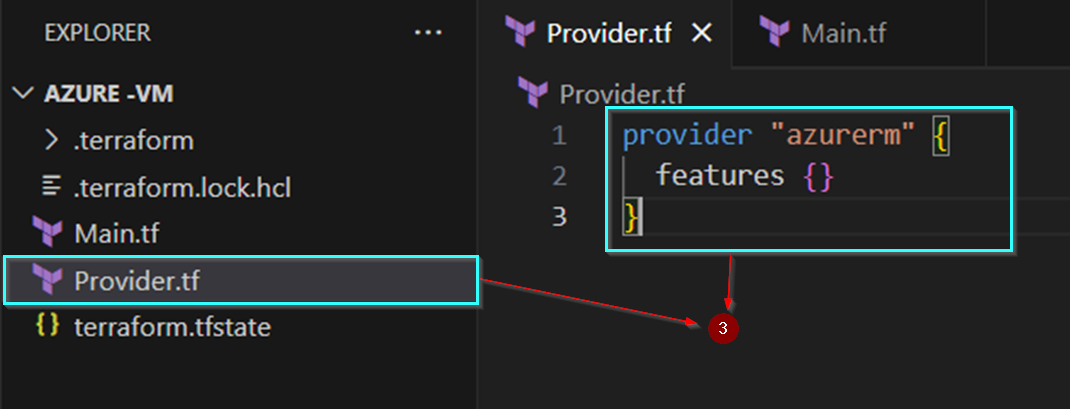
Step 3:
Insert the following code in Provide.tf file.
provider “azurerm” {
features {}
}
Step 4:
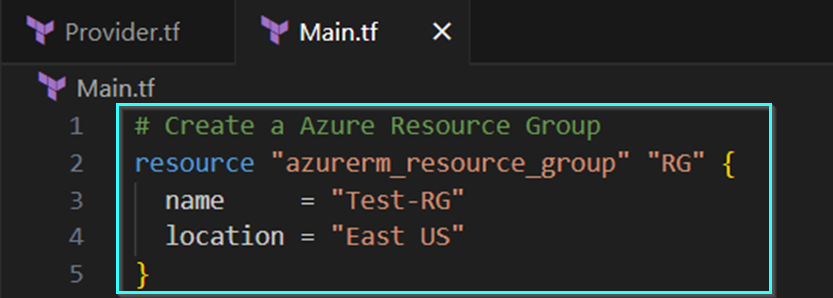
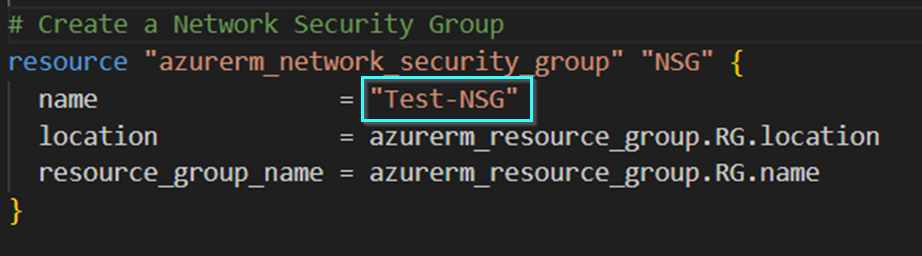
In Main.tf file use the following code to create a resource group (RG).
# Create a Azure Resource Group
resource “azurerm_resource_group” “RG” {
name = “Test-RG”
location = “East US”
}
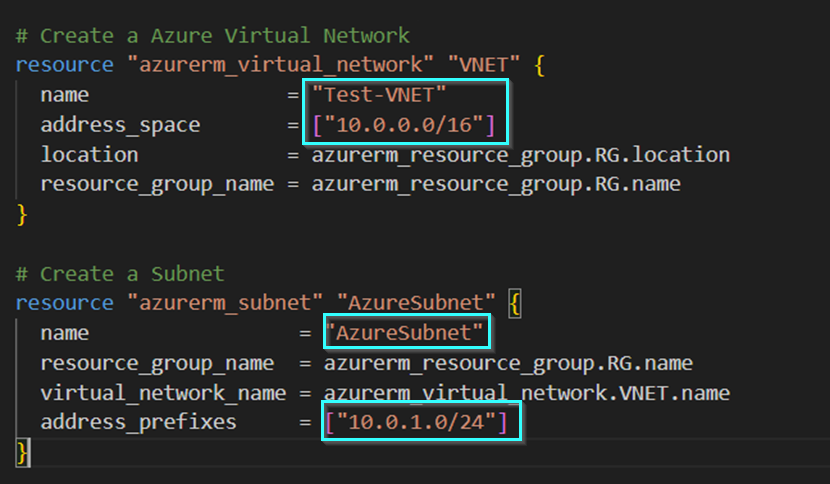
Step 5
In Main.tf file use the following code to create a Virtual Network and Subnet
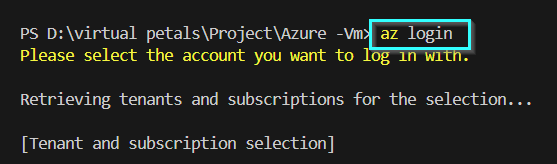
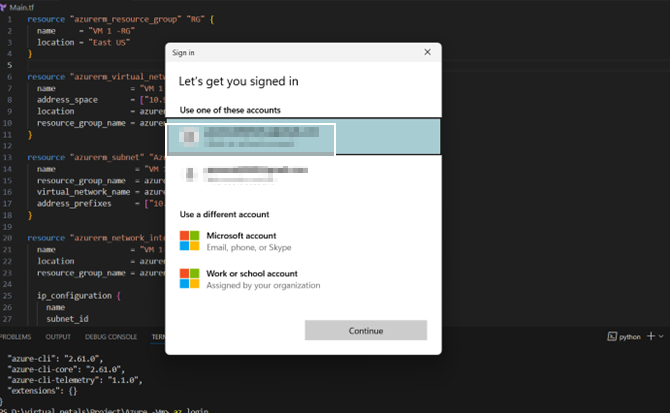
Before running this configuration file, ensure that you have the Azure CLI installed and that you have authenticated using the az login command. Additionally, replace the placeholders for subscription_id, client_id, client_secret, and tenant_id with your own values. After executing the az login command, the Microsoft Azure sign-in page will appear automatically, as shown in the snapshot below.
STEP 10
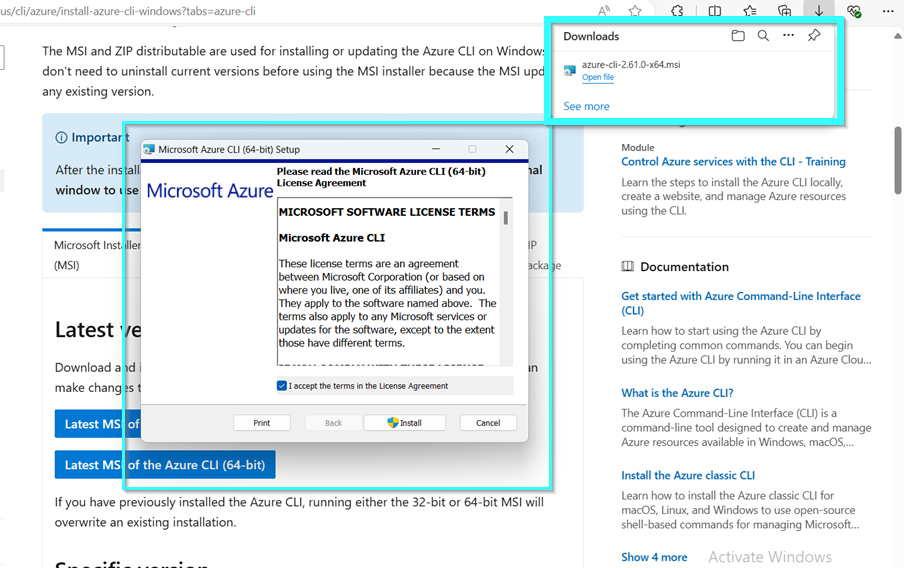
Download and install on a local machine
STEP 11
After Downloading Run This Command In Terminal
az login
Step 12
login azure Portal
STEP 13
Download the Terraform software and install it on your local machine. Then, use the VS Code terminal to run the command terraform init.
Key commands in Terraform
Terraform init – Initialize a terraform working directory. Example: terraform init
Terraform plan – Generate and show an execution plan. Example: terraform plan
terraform apply – Build or change infrastructure. Example: terraform apply
terraform show – Show the state file in a human-readable format: terraform show
STEP 1
In Terminal type terraform init command
STEP 2
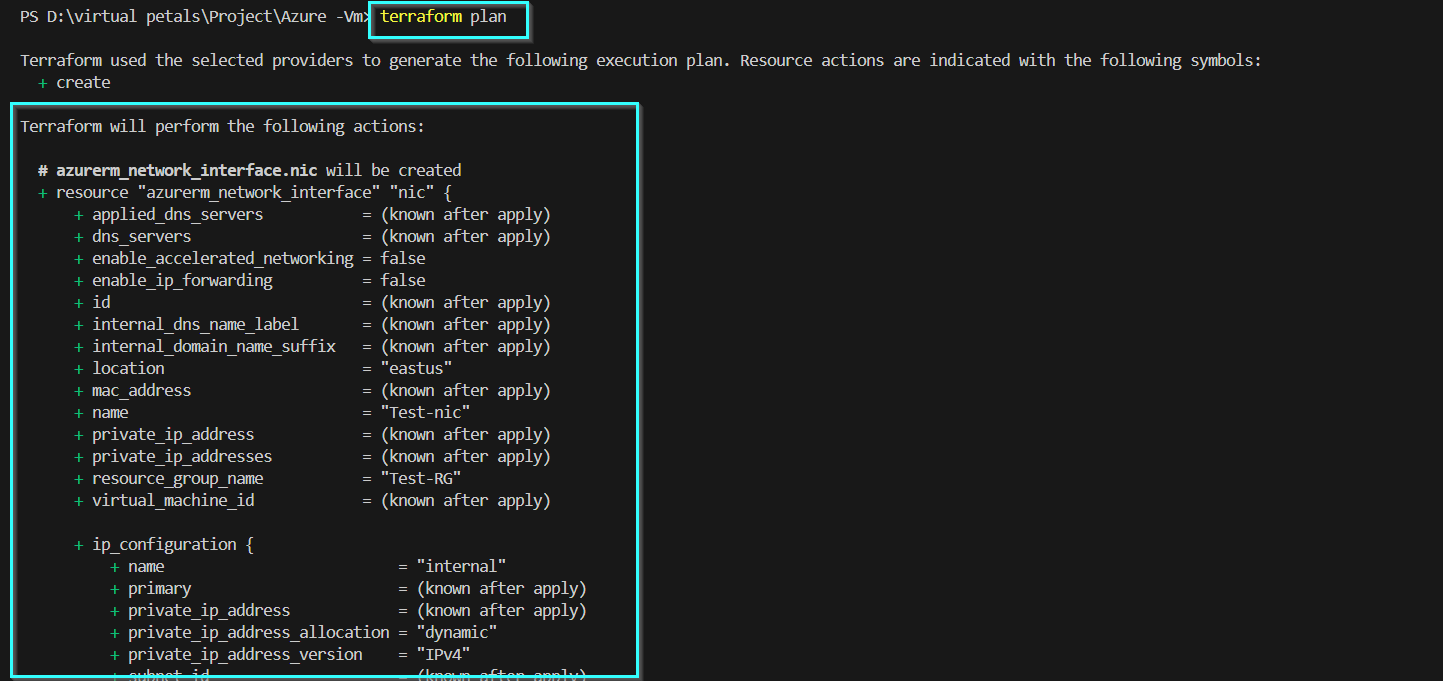
In Terminal type terraform plan command
STEP 3
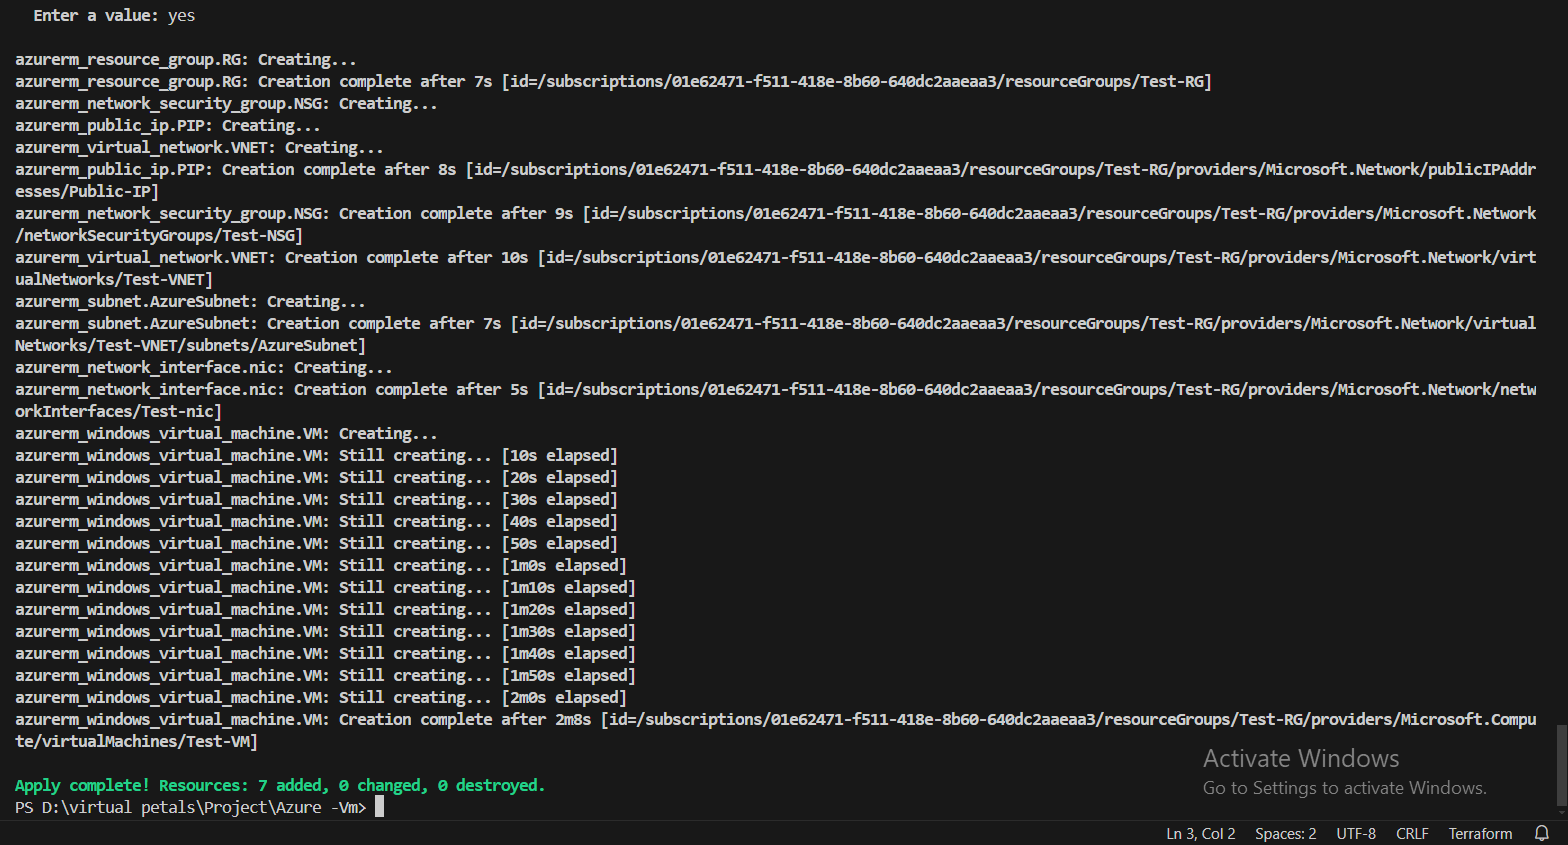
Open the terminal and type terraform apply -auto-approve command
It successfully created the Azure infrastructure
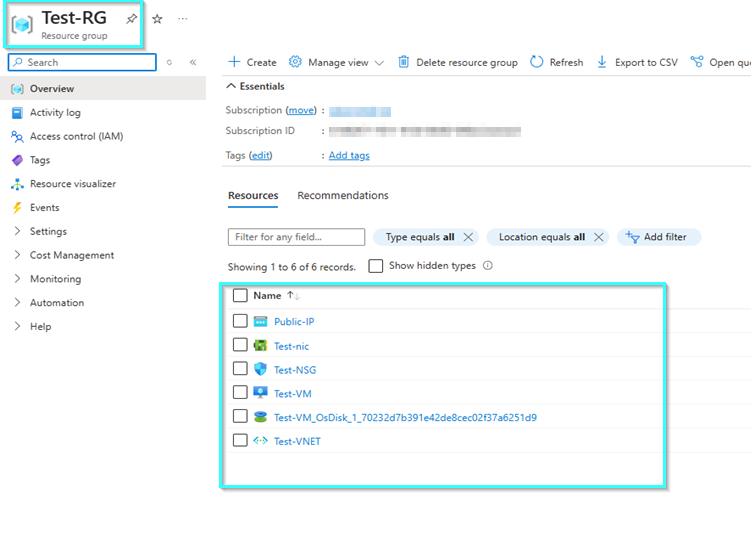
OUTPUT
Conclusion
How to deploy Azure virtual machines using Terraform code Infrastructure as Code (IaC). If you have any questions, don’t hesitate to comment below.


")